
Related Manuals for Pride Outlander Series


Summary of Contents for Pride Outlander Series
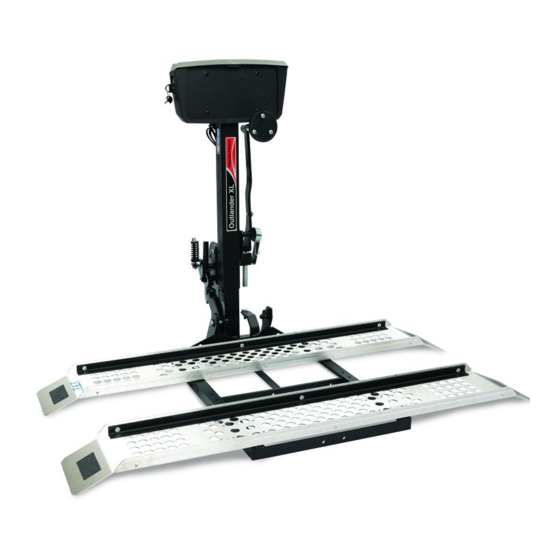
- Page 1 Outlander Series Including Models/Incluant des modèles Outlander, Outlander DE, Outlander XL Outlander www.pridemobility.com...
- Page 2 Any changes to our products may cause slight variations between the illustrations and explanations in this manual and the product you have purchased. The latest/current version of this manual is available on our website. Copyright © 2010 Pride Mobility Products Corp. INFMANU3882/Rev B/October 2010 www.pridemobility.com Outlander...
-
Page 3: Table Of Contents
C O N T E N T S INTRODUCTION ........................4 SAFETY ............................5 III. INSTALLATION ........................10 IV. OPERATION ..........................15 BATTERY CHARGING ......................19 VI. CARE AND MAINTENANCE ....................21 VII. TROUBLESHOOTING ......................23 VIII.WARRANTY ..........................24 APPENDIX I - SPECIFICATIONS ....................25 Outlander www.pridemobility.com... -
Page 4: Introduction
Pride is not liable for damage to property or personal injury arising out of the unsafe use of a lift system. Pride is also not liable for any property damage or personal injury arising out of the failure of any person... -
Page 5: Safety
I I . S A F E T Y PRODUCT SAFETY SYMBOLS The symbols below are used on the lift system to identify warnings, mandatory actions, and prohibited actions. It is very important for you to read and understand them completely. Do not sit on mobility device while activating lift or during transport. -
Page 6: Ii. Safety
I I . S A F E T Y Removal of grounding prong can create electrical hazard. If necessary, properly install an approved 3-pronged adaptor to an electrical outlet having 2-pronged plug access. Do not connect an extension cord to the charger cord. Do not allow unsupervised children to play near the lift system while the batteries are charging. - Page 7 I I . S A F E T Y Disposal and recycling - Contact your authorized Silver Star Provider for information on proper disposal of your Pride product and its packaging. Outlander www.pridemobility.com...
- Page 8 The lift system is an extremely versatile device, which users may employ to lift items other than Pride products. Pride has no control over such use, nor can Pride anticipate every possible use to which a lift system may be put. Lifting non-Pride products with the lift system is done at the operator’s own risk, and Pride accepts no liability for damage or injury resulting from such use.
- Page 9 I I . S A F E T Y HITCH CLASS INFORMATION Hitches come in a variety of sizes and are des- ignated by class. The classes range from Class I to Class IV. A heavier load requires a larger class, which has a higher tongue weight.
- Page 10 I I I . I N S T A L L A T I O N LIFT SYSTEM INSTALLATION The Outlander is designed to be easily installed into any vehicle equipped with a Class II, Class III or Class IV hitch receiver. The hitch receiver should be installed no higher than 21 in. (53.34 cm) from the bottom of the hitch tube to the ground.
-
Page 11: Iii. Installation
I I I . I N S T A L L A T I O N Follow these steps to install the lift system: 1. Remove the preassembled mounting hardware from LIFT FRAME the hitch tube. 2. Mount the hitch tube to the lift frame using the previ- ously removed mounting hardware. - Page 12 I I I . I N S T A L L A T I O N 6. Install the wheel chocks to the lift platform. Refer to “Wheel Chock Installation.” Wiring Harness Installation The wiring harness is approximately 25 ft. (7.62 meters) long and will accommodate most vehicles. NOTE: You may wish to perform a practice run before installing the wiring harness.
- Page 13 I I I . I N S T A L L A T I O N License Plate Holder The license plate holder should be rotated to the upright position during installation. See figure 8. 1. Pull the pivot weldment out to disengage keyway. You may need to loosen the pivot nut with a 3/4 in.
- Page 14 I I I . I N S T A L L A T I O N Wheel Chock Installation Your lift is supplied with four adjustable wheel chocks, WHEEL CHOCK TOP that when installed, aid in centering your mobility device during loading. Follow these steps to install the wheel chocks: 1.
-
Page 15: Operation
I V . O P E R A T I O N LIFT SYSTEM OPERATION WARNING! The lift system is intended for the transport of mobility devices only. The mobility device must be unoccupied before operating the lift. WARNING! Do not exceed the load limits of your vehicle or hitch system as specified by the vehicle manufacturer. - Page 16 Ensure that the mobility device is secured properly before transport. Pride is not liable for damage or loss resulting from improper securing of a mobility device. Figure 15. Locking the Retractable Tie-down Strap www.pridemobility.com...
- Page 17 I V . O P E R A T I O N 4. Raise the lift platform by turning and holding the key in the counterclockwise direction. See figure 11. Continue to raise the lift until the motor stops, then release the key. NOTE: As the lift platform rises, the automatic lock-down arm activates to secure the scooter to the lift platform.
- Page 18 I V . O P E R A T I O N To unload a power chair: NOTE: It is possible that the power chair shifted slightly during transport. Before trying to back the power chair off of the power dock, push forward on the power chair to ensure the power dock adaptor is all the way forward in the power dock.
-
Page 19: Battery Charging
V . B A T T E R Y C H A R G I N G BATTERY CHARGING Follow these steps to charge the onboard battery: 1. Remove the onboard battery from the battery case and place it near a standard electrical outlet. 2. -
Page 20: V. Battery Charging
V . B A T T E R Y C H A R G I N G BATTERY REPLACEMENT WARNING! Battery posts, terminals, and related accessories contain lead and lead compounds. Wear goggles and gloves and wash hands after handling. MANDATORY! Use only AGM or Gel-Cell batteries to reduce the risk of leakage or explosive conditions. - Page 21 V I . C A R E A N D M A I N T E N A N C E CARE AND MAINTENANCE Your lift system requires a minimal amount of care and maintenance. If you do not feel confident in your ability to perform the maintenance listed below, you may schedule T-BAR INNER-TELESCOPING inspection and maintenance at your authorized Silver Star...
-
Page 22: Vi. Care And Maintenance
V I . C A R E A N D M A I N T E N A N C E General Cleaning Guidelines The lift system can be hand washed along with the vehicle with soap and water. However, automatic drive- through car washes should be avoided as they may interfere with and cause damage to the lift. -
Page 23: Troubleshooting
V I I . T R O U B L E S H O O T I N G TROUBLESHOOTING Any electromechanical device occasionally requires some troubleshooting. However, most of the problems that may arise can usually be solved with a bit of thought and common sense. Many of these problems occur because the battery is not fully charged or because the battery is worn down and can no longer hold a charge. -
Page 24: Viii.warranty
V I I I . W A R R A N T Y THREE-YEAR TRANSFERABLE LIMITED WARRANTY For three (3) years from the date of purchase, Pride Mobility Products will repair or replace at our option, free of charge, any mechanical or electrical component found upon examination by an authorized representative of Pride to be defective in material and/or workmanship. -
Page 25: Appendix I - Specifications
A P P E N D I X I - S P E C I F I C A T I O N S SPECIFICATIONS Lift System Dimensions: Overall Height: 58 in. (147.32 cm) Overall Width: 49.25-56.75 in. (125.73-144.14 cm) from hitch with platform down 20 in. - Page 26 à autre. Ces changements au produit peuvent causer des variations entre les illustrations et explications contenues dans ce manuel et le produit que vous avez acheté. La dernière version de ce manuel est sur notre site Internet. Copyright © 2010 Pride Mobility Products Corp. INFMANU3882/Rev B/October 2010/French www.pridemobility.com Outlander...
-
Page 27: I. Introduction
T A B L E D E S M A T I E R E S INTRODUCTION ........................28 SECURITE ..........................29 III. INSTALLATION ........................34 IV. FONCTIONNEMENT ......................39 RECHARGE DES BATTERIES ................... 44 VI. SOINS ET ENTRETIEN ......................46 VII. -
Page 28: Introduction
Vous vous engagez à ne pas refuser ni négliger de faire installer les trousses de mise à jour au besoin, fournies par Pride afin de maintenir ou améliorer l'aspect sécuritaire de votre produit. -
Page 29: Securite
I I . S E C U R I T E PICTOGRAMMES DE SECURITE Les pictogrammes ci-dessous sont apposés sur le système de levage pour indiquer les actions obligatoires, mises en garde et actions prohibées. Il est très important de les lire et de bien les comprendre. Ne prenez pas place sur votre appareil motorisé... - Page 30 I I . S E C U R I T E Il est dangereux d’enlever la fiche de mise à la terre du cordon d’alimentation. Aubesoin, faites installer une prise murale à 3 fentes ou utilisez un adaptateur à 3 fiches approuvé.
- Page 31 I I . S E C U R I T E Mise au rebut et recyclage – Contactez votre détaillant Silver Star pour connaître la méthode de mise au rebut et/ou de recyclage de votre produit Pride et son emballage.
- Page 32 LEVAGE D’UN PRODUIT NON-PRIDE Le système de levage est très versatile, Il peut soulever des produits autres que ceux fabriqué par Pride. Le fabricant n’a pas de contrôle et ne peut pas anticiper l’utilisation qui peut être faite du système de levage.
- Page 33 I I . S E C U R I T E INFORMATION SUR LES ATTELAGES DE REMORQUE Il existe plusieurs types et formats d’attelages pour remorques classés selon la capacité de chacun. Les classes varient de I à IV. Une charge plus lourde requiert une classe d’attelage plus élevée possédant une grande capacité...
-
Page 34: Installation
I I I . I N S T A L L A T I O N INSTALLATION DU SYSTEME DE LEVAGE Le système de levage est conçu pour être facilement installé sur un véhicule équipé d’un attelage pour remorque de classe II, classe III ou classe IV. Le point d’attache ne doit pas être à plus de 53.34 cm (21 po) de haut à... - Page 35 I I I . I N S T A L L A T I O N Suivez les étapes suivantes pour installer le système de levage: STRUCTURE DE L’APPAREIL 1. Retirez les éléments de fixation préassemblés sur le tube d’attache de remorque. 2.
- Page 36 I I I . I N S T A L L A T I O N MISE EN GARDE! Ne tentez jamais de brancher le câble à une source d'alimentation secondaire. N'utilisez pas le câble d'alimentation d'une remorque pour alimenter le système.
- Page 37 I I I . I N S T A L L A T I O N Support de plaque d’immatriculation Le support de plaque d’immatriculation doit être pivoter vers le haut lors de l’installation. Voir la figure 8. 1. Tirez et pivotez l'ensemble soude pour degager le chemin de cle. il se peut que vous ayez a desserrer l'ecrou du pivot a l'aide d'une douille de 3/4 in.
- Page 38 I I I . I N S T A L L A T I O N Installation des cales de roues Des cales de roues ajustables sont fournies avec PARTIE SUPERIEURE l’appareil de levage. Celles-ci permettent de bien centrer DE LA CALE votre appareil de mobilité...
-
Page 39: Fonctionnement
I V . F O N C T I O N N E M E N T FONCTIONNEMENT DU SYSTEME DE LEVAGE MISE EN GARDE! Le système de levage est conçu pour le transport des appareils de mobilité seulement. Il ne doit pas être occupé lors du levage. MISE EN GARDE! N’excédez pas le poids maximal sur la flèche d’attelage tel que spécifié... - Page 40 I V . F O N C T I O N N E M E N T MISE EN GARDE! Ne laissez jamais votre appareil de mobilité au neutre (débrayé) lorsque celui-ci CROCHET l’appareil de levage système de levage durant le transport, car celui-ci pourrait rouler de lui-même.
- Page 41 Assurez-vous que votre appareil de mobilité est bien ancré avant chaque transport. Pride ne pourra être tenu responsable des dommages découlant d’un appareil de mobilité mal ancré. 4. Soulevez la plate-forme de levage en tournant et en appuyant sur la clé...
- Page 42 I V . F O N C T I O N N E M E N T FONCTIONNEMENT AVEC BORNE D’ALIMENTATION (FAUTEUIL MOTORISE SEULEMENT) La borne d’alimentation ne fonctionne qu’avec un fauteuil motorisé équipé d’un adaptateur. Pour embarquer le fauteuil motorisé: 1.
- Page 43 I V . F O N C T I O N N E M E N T FONCTIONNEMENT MANUEL BORNE DE MANIVELLE L’SYSTEME DE LEVAGE Votre système de levage est équipé d’une borne de manivelle pour le fonctionnement manuel en cas de BOITIER DU MOTEUR panne.
-
Page 44: Recharge Des Batteries
V . R E C H A R G E D E S B A T T E R I E S RECHARGE DES BATTERIES Voici les étapes à suivre pour la recharge de la batterie interne: 1. Retirez le boîtier de la batterie interne et placez-la près d’une prise électrique standard. - Page 45 V . R E C H A R G E D E S B A T T E R I E S REMPLACEMENT D’UNE BATTERIES OBLIGATOIRE! Les batteries, les bornes et les accessoires contiennent du plomb. Portez des lumettes et des gants pour les manipuler et lavez vos mains après les avoir manipulées.
-
Page 46: Soins Et Entretien
V I . S O I N S E T E N T R E T I E N SOINS ET ENTRETIEN Votre système de levage demande un minimum de soin. Si vous croyez ne pas posséder les connaissances et habiletés pour exécuter les consignes suivantes, vous pouvez les INTERIEUR DU TUBE TELESCOPIQUE EN T... - Page 47 V I . S O I N S E T E N T R E T I E N Consignes pour le nettoyage L’appareil de levage peut être lavé à la main comme le véhicule avec de l’eau savonneuse. Cependant, évitez les lave-autos automatisés, car ceux-ci pourraient endommager votre appareil.
-
Page 48: Problemes Et Solutions
V I I . P R O B L E M E S E T S O L U T I O N S PROBLEMES ET SOLUTIONS La plupart des équipements électromécaniques connaissent occasionellement des problèmes. Cependant, la majorité des problèmes peuvent être réglés facilement. Souvent ceux-ci sont causés par des batteries faibles, usées, mal entretenues ou trop vieilles. -
Page 49: Viii.garantie
V I I I . G A R A N T I E GARANTIE LIMITEE TRANSFERABLE DE TROIS ANS Pride réparera ou remplacera à ses frais, pour une période de 3 ans pour l’acheteur d’origine seulement, les pièces défectueuses (matériel ou fabrication) après qu’un représentant autorisé Pride ait inspecté... -
Page 50: Annexe I - Specifications
A N N E X E I - S P E C I F I C A T I O N S SPECIFICATIONS Dimensions de l'appareil de levage Hauteur hors tout: 147.37 cm (58 po) Largeur hors tout: 125.73-144.14 cm (49.25-56.75 po) du support avec la plateforme abaissée 50.80 cm (20 po) du support avec la plateforme rétractée... - Page 51 *INFMANU3882* Outlander www.pridemobility.com...
Need help?
Do you have a question about the Outlander Series and is the answer not in the manual?
Questions and answers