Panasonic KX-TGP600G Operating Instructions Manual
Hide thumbs
Also See for KX-TGP600G:
- Operating instructions manual (112 pages) ,
- Quick user manual (2 pages) ,
- Operating instructions manual (178 pages)
Table of Contents
Advertisement
KX-TGP600G/
KX-TGP600CEG/
KX-TGP600UKG
KX-TGP600
Thank you for purchasing this Panasonic product. Please read this manual carefully before
using this product and save this manual for future use.
Please use only the batteries provided and charge the batteries for about 6 hours or insert
the fully charged batteries before using the handset for the first time. For details, see
"Charging the Batteries", Page 95 in this manual.
Note
R In this manual, the suffix of each model number is omitted unless necessary.
R The illustrations such as some keys may differ from the appearance of the actual product.
R Certain products and features described in this document may not be available in your
country or area. Contact your phone system dealer/service provider.
R The contents and design of the software are subject to change without notice.
Document Version: 2018-12
KX-TPA60
Model No.
KX-TPA65
Operating Instructions
Model No.
KX-TGP600CEG
KX-TGP600UKG
SIP Cordless Phone
Model No.
SIP Cordless Handset
Model No.
SIP Wireless Desk Phone
KX-TPA65/KX-TPA68
Base Unit
KX-TGP600G
KX-TGP600
KX-TPA60
KX-TPA68
Advertisement
Table of Contents

Related Manuals for Panasonic KX-TGP600G


Summary of Contents for Panasonic KX-TGP600G
- Page 1 KX-TPA65 KX-TPA68 Thank you for purchasing this Panasonic product. Please read this manual carefully before using this product and save this manual for future use. Please use only the batteries provided and charge the batteries for about 6 hours or insert the fully charged batteries before using the handset for the first time.
- Page 2 Manuals and supporting information are provided on the Panasonic Web site at: https://panasonic.net/cns/pcc/support/sipphone/ Font Information The font information for KX-TPA68 is available on the following Panasonic web site at: https://panasonic.net/cns/pcc/support/sipphone/ For Future Reference Record the information in the space below for future reference.
-
Page 3: Table Of Contents
Table of Contents Important Information Using the Handset Phonebook ......74 Using the Base Unit Phonebook (when connected Important Information ..........4 to a base unit other than the KX-TGP600 For Users in European Countries .......5 only) ..............80 For Users in the United Kingdom ......5 Using the Remote Phonebook (when connected to For Users in Australia and the United the KX-TGP600 only) ........82... -
Page 4: Important Information
Important Information Important Information Data Security R This telephone communicates using digital signals that are difficult to intercept. However, it is possible that the signals could be intercepted by a third party. R To avoid unauthorized access to this product: –... -
Page 5: For Users In European Countries
This device is a DECT Portable station operating in the frequency band of 1880 MHz to 1900 MHz. The usage of this device is generally allowed in all EU countries. Hereby, Panasonic Corporation declares that the radio equipment described in this manual is in compliance with Directive 2014/53/EU. -
Page 6: For Users In New Zealand
Important Information For Users in New Zealand R This equipment shall not be set to make automatic calls to the Telecom ‘111’ Emergency Service. PTC General Warning R The grant of a Telepermit for any item of terminal equipment indicates only that Telecom has accepted that the item complies with minimum conditions for connection to its network. - Page 7 T-Coil equipped hearing aids and cochlear Hearing Aid T-Coil implants. TIA-1083 For Product Service R Call 1-800-211-PANA (7262) for the location of your nearest authorized service center. R Panasonic’s e-mail address for customer inquiries: consumerproducts@panasonic.com For customers in the USA and Puerto Rico ONLY.
-
Page 8: For Users In Canada
Important Information For Users in Canada Industry Canada Notices and Other Information This product meets the applicable Industry Canada technical specifications. Note R This device complies with Industry Canada licence-exempt RSS standard(s). Operation is subject to the following two conditions: (1) this device may not cause interference, and (2) this device must accept any interference, including interference that may cause undesired operation of the device. -
Page 9: For Users In Argentine
Important Information Compliance with TIA-1083 standard: Telephone handsets identified with this logo have reduced noise and Compatible with interference when used with T-Coil equipped hearing aids and cochlear Hearing Aid T-Coil implants. TIA-1083 For Users in Argentine CONDITIONS OF OPERATION Operation of this device is subject to the condition that it must not cause interference with other authorised radio systems. -
Page 10: For Users In Brazil
Important Information For Users in Brazil Handling of end-of-life batteries BRASIL Após o uso, as pilhas e/ou baterias deverão ser entregues ao estabelecimento comercial ou rede de assistência técnica autorizada. Cobrir os terminais positivo ( ) e negativo ( ) com uma fita isolante adesiva, antes de depositar numa caixa destinada para o recolhimento. -
Page 11: For Best Performance
Important Information For Best Performance Operating Range R The range of operation depends on the topography of your office, weather, or usage conditions, because signals are transmitted between the base unit and the handset/desk phone by radio waves. R Normally, you get greater range outdoors than indoors. If there are obstacles such as walls, noise may interfere with your telephone calls. -
Page 12: Battery Information (Kx-Tpa60 Only)
Important Information Battery Information (KX-TPA60 only) After batteries are fully charged (at 25 °C [77 °F]): Operation Operating Time While Talking (Backlight off , Narrowband Mode) Up to about 11 h While Talking (Backlight on , Wideband Mode) Up to about 8 h While not in use (Standby) Up to about 200 h *1 When the "Talking"... - Page 13 Important Information (For the United States and Canada only) Nickel metal hydride batteries that are recyclable power the product you have purchased. Please call 1-800-8-BATTERY for information on how to recycle these batteries. Important Notice Concerning the Correct Use and Charging of Ni-MH Batteries Batteries, due to their construction, undergo some wear and tear.
-
Page 14: Before Operating The Telephones
However, there are some differences in the functionality between the KX-TPA60/KX-TPA65/ KX-TPA68 and the KX-UDT series handsets. For details, refer to the following web site. https://panasonic.net/cns/pcc/support/sipphone/ "Download" ® "KX-TGP600 series" *1 For KX-UDT series, Software File Version 06.000 or later. - Page 15 Before Operating the Telephones <When the base unit is not a KX-TGP600> The KX-TPA60, KX-TPA65 and KX-TPA68 support the CAT-iq (Cordless Advanced Technology-internet and quality) 2.0 standard and can be connected and used with any base unit that supports this standard. This manual describes how to connect to a base unit other than the KX-TGP600, but the availability of certain features, and the specifications of certain settings and operations will depend on the base unit being used.
-
Page 16: Accessory Information
Before Operating the Telephones Accessory Information Included Accessories KX-TGP600/KX-TGP600C/KX-TGP600LA/KX-TGP600AL/KX-TGP600AG/KX-TGP600A/ KX-TGP600CE/KX-TGP600RU/KX-TGP600LC/KX-TGP600UK/KX-TGP600BR AC adaptor for Base unit: 1 Model No. Part No. KX-TGP600/KX-TGP600C/ PQLV219 KX-TGP600LA KX-TGP600AL PQLV219AL KX-TGP600AG PQLV219AG KX-TGP600BR PQLV219LB KX-TGP600A/KX-TGP600CE/ PQLV219CE KX-TGP600RU KX-TGP600LC PQLV219BX/PQLV219CE DC Output: 6.5 V KX-TGP600UK PQLV219E Model No. - Page 17 Before Operating the Telephones Ethernet Cable: 1 Screws: 2 Washers: 2 *1 The AC adaptor comes attached to the charger. *2 Rechargeable AAA Ni-MH 1.2 V, 630 mAh batteries KX-TGP600G/KX-TGP600CEG/KX-TGP600UKG AC adaptor for Base unit: 1 Model No. Part No. KX-TGP600G PQLV219...
- Page 18 Before Operating the Telephones Charger: 1 Belt Clip: 1 Batteries *1 Rechargeable AAA Ni-MH 1.2 V, 630 mAh batteries KX-TPA65 AC adaptor for Desk phone: 1 Model No. Part No. KX-TPA65/KX-TPA65C/ PQLV219 KX-TPA65LA KX-TPA65AL PQLV219AL KX-TPA65AG PQLV219AG KX-TPA65BR PQLV219LB KX-TPA65A/KX-TPA65CE/ PQLV219CE DC Output: 6.5 V KX-TPA65RU...
- Page 19 Before Operating the Telephones KX-TPA68 AC adaptor for Desk phone: 1 Model No. Part No. KX-TPA68 PQLV219 KX-TPA68AL PQLV219AL KX-TPA68CE PQLV219CE KX-TPA68UK PQLV219E DC Output: 6.5 V Handset Cord: 1 Handset: 1 Stand: 1 Note For users in the United States only To order accessories, call toll-free 1-800-332-5368.
-
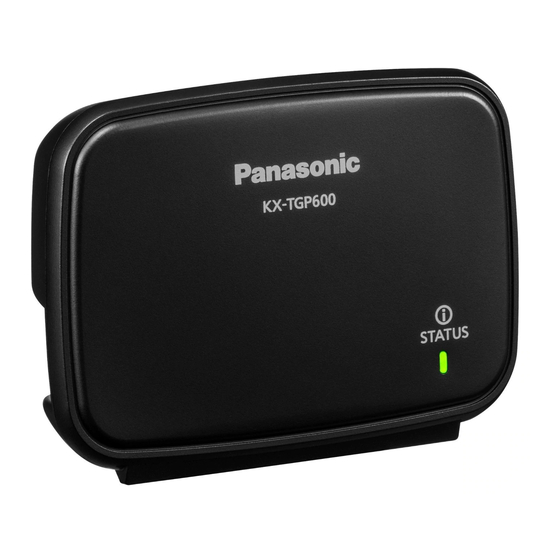
Page 20: Location Of Controls
Before Operating the Telephones Location of Controls Base Unit (KX-TGP600) Status Indicator Status Meaning Color Light pattern Green R The base unit is connected to the Internet. The startup process is complete and you may now make and receive internet calls. Slow Flashing R The base unit is being used for a call. - Page 21 Before Operating the Telephones Status Meaning Color Light pattern Amber R The base unit’s IP address may conflict with the IP addresses of other devices on your local network. Contact your administrator for further information. Slow Flashing R The base unit is obtaining an IP address or is obtaining configurations.
- Page 22 Before Operating the Telephones Handset (KX-TPA60) [Back View] (KX-TPA60 only) (KX-TPA60C only) (KX-TPA60RU only) (All other models) Ringer/Charge/Message Indicator Status Meaning Color Light pattern Charging Slow Flashing There is a new missed call or voice mail. Quick Flashing Receiving a call —...
- Page 23 For up-to-date information about headsets that have been tested with this unit, refer to the following web sites: https://panasonic.net/cns/pcc/support/sipphone/ (TALK/Speakerphone) Key Used to make or answer calls, or toggle between Receiver mode and Hands-free mode during a conversation.
- Page 24 Before Operating the Telephones Soft Keys A/B/C (located from left to right) are used to select the item displayed on the bottom line of the display. For details about the soft keys displayed here, see “Soft Keys (KX-TPA60/KX-TPA65)”, Page 40. (POWER/CANCEL) Key Used to end calls, exit the phonebook or Function mode.
- Page 25 Before Operating the Telephones Desk Phone KX-TPA65...
- Page 26 Before Operating the Telephones KX-TPA65AL, KX-TPA65AG, KX-TPA65BR, KX-TPA65LA, KX-TPA65LC, KX-TPA65UK, KX-TPA65X...
- Page 27 Before Operating the Telephones KX-TPA65C...
- Page 28 Before Operating the Telephones KX-TPA65A, KX-TPA65CE...
- Page 29 Before Operating the Telephones KX-TPA65RU Handset Hook Keeps the handset stable when the unit is mounted on a wall. For details, see “Hooking the Handset (KX-TPA65/KX-TPA68)”, Page 99. Ringer/Message Indicator If an incoming call arrives, the indicator blinks in accordance with the LED pattern setting. Status Meaning Color...
- Page 30 Used to cancel the selected item. Headset Jack The headsets can be used with this unit. (Not all operations with the headsets can be guaranteed.) For up-to-date information about headsets that have been tested with this unit, refer to the following web site: https://panasonic.net/cns/pcc/support/sipphone/...
- Page 31 Before Operating the Telephones KX-TPA68...
- Page 32 Before Operating the Telephones KX-TPA68AL/KX-TPA68UK...
- Page 33 Before Operating the Telephones KX-TPA68CE Handset Hook Keeps the handset stable when the unit is mounted on a wall. For details, see “Hooking the Handset (KX-TPA65/KX-TPA68)”. Program Keys Used to display the call information or to perform the assigned function. Display Soft Keys All soft keys are displayed from the left side in order of the priority in each status.
- Page 34 The headsets can be used with this unit. (Not all operations with the headsets can be guaranteed.) For up-to-date information about headsets that have been tested with this unit, refer to the following web site: https://panasonic.net/cns/pcc/support/sipphone/ [MESSAGE] Key Used to access your voice mailbox.
- Page 35 Before Operating the Telephones In this manual, when a procedure instructs you to "press ", you can also press the [ENTER] key to confirm the selection.
-
Page 36: The Display And Icons
Before Operating the Telephones The Display and Icons Display (KX-TPA60/KX-TPA65) [Example: In standby mode] Pictograph Signal Strength Indicator - Strong Battery Indicator - Full Signal Strength Indicator - Medium Battery Indicator - Medium Signal Strength Indicator - Weak Battery Indicator - Low Signal Strength Indicator - Very weak Battery Indicator... - Page 37 Before Operating the Telephones Handset/Desk Phone Status Information Suffix Meaning (none)/C/LA/ A/UK/AL/RU/ LC/AG/BR Ringer Off Silent Mode Auto Answer Base unit number (when registered to multiple base units) Registration number of handset/desk phone Call Forwarding Do Not Disturb *1 Not displayed when connecting to a base unit other than the KX-TGP600. Time Display Date, New Message or Missed Call Display Handset/Desk phone number and Name (when connecting to a KX-TGP600 only)
- Page 38 Before Operating the Telephones Display (KX-TPA68) [Example: In standby mode] Status, Date, Time The meanings of icon are indicated below. Signal Strength Indicator - Strong Auto Answer Signal Strength Indicator - Medium Silent Mode Signal Strength Indicator - Weak Ringer Off Signal Strength Indicator - Very weak Navigator Key Guidance Signal Strength Indicator - Out of...
- Page 39 Before Operating the Telephones Desk Phone Status Information Registration number of handset/desk phone Program Keys Page Soft Keys *1 Not displayed when connecting to a base unit other than the KX-TGP600.
- Page 40 Before Operating the Telephones Soft Keys (KX-TPA60/KX-TPA65) Icons and information shown on the display will vary depending on the context. To select an item shown on the display, press the corresponding soft key. Soft Key A (Left key) Suffix Meaning (none)/C/LA/ A/UK/AL/RU/ LC/AG/BR...
- Page 41 Before Operating the Telephones Soft Key B (Middle key) Suffix Meaning (none)/C/LA/ A/UK/AL/RU/ LC/AG/BR Confirms the entry. Opens the main menu. When in standby mode, pressing this key for MENU more than 2 seconds locks all keys. Opens the list menu (edit/delete in the phonebook, etc.). MENU Stores a new item in the phonebook.
- Page 42 Before Operating the Telephones Suffix Meaning (none)/C/LA/ A/UK/AL/RU/ LC/AG/BR Displayed when in Special character (Extended 2) entry mode. Displayed when in Greek character entry mode. Clears digits or characters. Searches for an item in the phonebook alphabetically. Used to select an item when in setting mode. Used to select AM or PM when setting the Memo Alarm feature.
- Page 43 Before Operating the Telephones [In standby mode] Switch to the next Soft Keys. More Opens the phonebook. Pressing this key for more than 2 seconds locks the phonebook. Opens the main menu. When in standby mode, pressing this key for Menu more than 2 seconds locks all keys.
- Page 44 Before Operating the Telephones Perform an unscreened (blind) transfer. Blind Activate/deactivate Noise Reduction. Used to retrieve a parked call (Call Parking). Park Establishes a multiple-party conversation (Conference). Conf Used to make or answer intercom calls. Intercom Disconnects the current call and allows you to make another call Flash without hanging up.
- Page 45 Before Operating the Telephones 3. [D]/[C]: "Key Option" a 4. [D]/[C]: "Soft Key Edit" a 5. [D]/[C]: Select a desired soft key. a 6. [D]/[C]: "Standby"/"Talking" a 7. [D]/[C]: "Function Key" a 8. [D]/[C]: Select the desired item. a Assigning Hot Key Dial keys [In standby mode] Menu MENU...
- Page 46 Before Operating the Telephones LINE Key The LINE Key can be used either to seize a line in order to make or receive a call. In standby mode, press the LINE key to display a list of available lines. The color of each line number indicates the status of the line or the status of the function assigned to the key.
- Page 47 Before Operating the Telephones Status Icon Icons Description Shows the number (1–8) of the handset/desk phone which is in use or on hold. Shows the Block Anonymous Call setting. For details about operation, see “Call Settings”, Page 118. Displayed when an Anonymous Call is specified. For details about operation, see “Call Settings”, Page 118.
- Page 48 Before Operating the Telephones Operation Outline Screen Transition Diagram Handset/Desk Phone functions are accessed through the display menu and selected with the soft keys. [Example] (KX-TPA60/KX-TPA65) <In standby mode> <Line Status> <Function Keys> LINE FUNC MENU <Handset Phonebook> <Main Menu> <Outgoing Call Log>...
- Page 49 Before Operating the Telephones Function Menus (KX-TPA60/KX-TPA65) Press or the [CENTER]/[ENTER] navigation key to display the main and sub menus. MENU Main Menu–While in Standby Mode Incoming Log (Page 51) Enters the Incoming Call Log. Ringer Volume (Page 50) Accesses the "Ringer Volume" setting. New Phonebook (Page 74) Stores a new item in the Phonebook.
-
Page 50: Adjusting The Volume
Before Operating the Telephones Function Keys (KX-TPA60/KX-TPA65) Handset/desk phone functions can be activated through the display key list. In standby mode or during a conversation, press /[FUNC]/[FUNCTION] to display the function key list. The followings are by default, and you can change the key list. The list order may differ depending on your country/area. -
Page 51: Incoming/Outgoing Call Log
Before Operating the Telephones [D]/[C]: "Ringer Volume"a 3. [D]/[C]: Select the desired setting. a *1 When using a KX-TPA65/KX-TPA68, the volume can also be adjusted by using /[VOL]. Note R You can press the [D] key instead of performing steps 1 and 2. R For details about setting the ringer pattern, see “Incoming Option”, Page 107. -
Page 52: Parallel Mode (Kx-Tpa65/Kx-Tpa68)
Before Operating the Telephones Note R For details about the other operations, see “Screen Transition Diagram”, Page 48. Making a call using the Incoming/Outgoing Call Log See “Using the Incoming/Outgoing Call Log”, Page 59. Storing an item using the Incoming/Outgoing Call Log See “Storing an Item Using the Incoming or Outgoing Call Log”, Page 75. -
Page 53: Setting The Password
Before Operating the Telephones 9. [To make one unit receive a busy signal while the other is on a call] [D]/[C]: "Busy" a [To make one unit take over a call when the other is on a call] [D]/[C]: "Take Over Call" a For details about the setting, see Parallel Setting (KX-TPA65/KX-TPA68) Page 117. -
Page 54: Selecting The Display Language
Before Operating the Telephones R If no password has been set, you cannot select "Manual&Password" or "Auto&Password" for "Key Lock Type". To set the password, see “Setting the Password”, Page 53. R When "Auto" or "Auto&Password" is selected, the inactive time until keys are automatically locked (Auto Lock Time) can be set. - Page 55 Before Operating the Telephones Model No. Character Mode Transition KX-TPA60A,KX-TPA60CE,KX-TPA60UK,KX-TPA60AL, (Latin) KX-TPA60LA,KX-TPA60LC,KX-TPA60AG,KX-TPA60BR ¯ KX-TPA65CE,KX-TPA65UK,KX-TPA65A,KX-TPA65AL, (Numeric) KX-TPA65LA,KX-TPA65LC,KX-TPA65AG,KX-TPA65BR, ¯ KX-TPA65X (Greek) ¯ (Extended 1) ¯ (Extended 2) KX-TPA60RU (Cyrillic) KX-TPA65RU ¯ (Numeric) ¯ (Latin) ¯ (Extended 1) ¯ (Extended 2) Example: To enter "Anne" in Latin Mode. 2 a [E] a [G] a 6 a 6 a [E] a 6 a 6 a [E] a 3 a 3 R To switch between uppercase and lowercase, press KX-TPA60:...
-
Page 56: Power On/Off (Kx-Tpa60 Only)
Before Operating the Telephones Power On/Off (KX-TPA60 only) To turn the power of the handset on or off, press and hold Power Save Mode Power Save Mode turns off the ringer, LCD backlight, and/or key backlight automatically after a set number of seconds have passed while receiving a call. -
Page 57: Making Calls
Making Calls Making Calls R To enter characters, see “Entering Characters”, Page 54. R You can confirm that the number was dialed correctly before calling (Predialing) by entering the number, then KX-TPA60: Press KX-TPA65/KX-TPA68: Off-hook R To clear an entire number while predialing, KX-TPA60: Press /[XFER/CLR] for more than 1 second. -
Page 58: Easy Dialing
Making Calls /[FUNC]/[FUNCTION]: End the call 2. [D]/[C]: "Flash/Recall" Predialing [In standby mode] 1. Dial the number while on-hook. 2. After dialing KX-TPA60: KX-TPA65/KX-TPA68: Off-hook Making an Intercom Call Intercom calls can be made between handsets/desk phones. [In standby mode] Menu MENU Intercom... - Page 59 Making Calls KX-TPA65/KX-TPA68: Off-hook Note R While the Hot Key’s information is displayed, you can press [D] or [C] to select another Hot Key number. R If Hot Key dialing is set to "Auto", a Hot Key number can also be dialed by pressing and holding the assigned dialing key for a specified number of seconds.
- Page 60 Making Calls Using the Phonebook Using the Handset Phonebook [In standby mode] 2. [D]/[C]: "Phonebook" a 3. Enter the name or the first character(s) of the desired name. a 4. [D]/[C]: Select the desired item. 5. Press the [CENTER]/[ENTER] navigation key. 6.
-
Page 61: Making A Multicast Voice Paging Call
Making Calls Note R For details about making a call using the Base unit Phonebook, see “Searching for an Item in the Base Unit Phonebook”, Page 81. Using the Remote Phonebook (when connected to a base unit other than the KX-TGP600 only) [In standby mode] 2. -
Page 62: Receiving Calls
Receiving Calls Receiving Calls R You can select the ringer for each type of incoming call. See “Incoming Option”, Page 107. R You can also use "Any Key Answer" , "Quick Answer" or "Auto Answer" to answer a call. See “Answer Option”, Page 108. -
Page 63: Hands-Free Mode
Receiving Calls For details about setting these features, see “Answer Option”, Page 108. *1 KX-TPA60 only. Note R Line keys with incoming calls will be flashing green rapidly. R If "Quick Answer" is set to "On" and a brief power failure occurs while the handset is receiving a call on the charger, the following may occur: –... -
Page 64: Answering An Intercom Call
Receiving Calls You can cancel hands-free mode in one of the following ways: R During a conversation in hands-free mode, press R During a conversation in hands-free mode with the handset on the charger, lift the handset off its charger. [KX-TPA65/KX-TPA68] During a conversation in hands-free mode, go off-hook. -
Page 65: During A Conversation
Receiving Calls R During a conversation in Noise Reduction mode, either the soft key will blink, or "Noise Reduction" will be displayed on the LCD. R During a conversation with a headset in default Noise Reduction mode, even if you disconnect the headset from the handset, Noise Reduction mode will continue. -
Page 66: During A Conversation
During a Conversation During a Conversation Transferring a Call (Call Transfer) You can transfer a call to another destination (extension or outside party). To transfer [During a conversation] 1. KX-TPA60: /[XFER/CLR] KX-TPA65/KX-TPA68: /[TRANSFER/CLEAR] Call 2. Dial the party you want to transfer to. a CALL 3. - Page 67 During a Conversation *1 When connected to a base unit other than the KX-TGP600, the operation is as follows. KX-TPA60: /[XFER/CLR] KX-TPA65/KX-TPA68: /[TRANSFER/CLEAR] Holding a Call You can put a call on hold by holding the call at your extension. Holding To hold the current call 1.
- Page 68 During a Conversation KX-TPA60/KX-TPA65: 1. Enter the Call Park Retrieve feature number. 2. KX-TPA60: KX-TPA65: Off-hook KX-TPA68: 1. Enter the Call Park Retrieve feature number. 2. Press the Program Key assigned as "Park Retrieve". 3. Off-hook. Note Park R Depending on the telephone system, the soft key might blink to show that the line has a PARK Park...
- Page 69 During a Conversation /[CONF] during a conversation. Call 2. Dial the party you want to add to the conversation. a CALL Conf CONF Note R The soft key can also be used to access the Conference function directly. To Conf CONF display this key, edit the displayed soft keys.
- Page 70 During a Conversation Note R When Mute is blinking, Mute is on. MUTE If the Mute soft key is not displayed on the LCD, /MUTE is displayed on the 1st line MUTE of the LCD. R During Mute, even if you switch from/to speakerphone, Mute will continue. R During Mute, even if you connect/disconnect a headset, Mute will continue.
-
Page 71: Before Leaving Your Desk
Before Leaving Your Desk Call Forwarding/Do Not Disturb You can have incoming calls automatically forwarded to another destination. You can also have incoming calls rejected (Do Not Disturb). Note R Do Not Disturb is available only when connected to a KX-TGP600. To access the FWD/DND settings [In standby mode] 1. - Page 72 Before Leaving Your Desk Note R Step 2 is not necessary if only one line is configured on the handset/desk phone. R When using a KX-TPA60, this feature cannot be used when you have a call on hold.
-
Page 73: Using The Phonebook
Using the Phonebook Using the Phonebook The KX-TGP600 has 3 types of phonebook. 1. Handset Phonebook This Phonebook is stored in the handset/desk phone. 2. Base unit Phonebook (when connected to a base unit other than the KX-TGP600 only) This Phonebook is stored in the Base unit. 3. -
Page 74: Using The Handset Phonebook
Using the Phonebook Using the Handset Phonebook You can store up to 500 phone numbers in the handset/desk phone along with names for easy access. You can also set unique ringer patterns for different categories to identify incoming calls. All Phonebook items are stored in alphabetical order. - Page 75 Using the Phonebook R The valid digits are "0" through "9", "G", "B", "J", "P". R If an item with the same name and number exists, the new information added will be merged with the existing item. R To enter characters, see “Entering Characters”, Page 54. Storing an Item Using the Dialing You can dial a number first and then add it as a phonebook entry.
-
Page 76: To A Base Unit Other Than The Kx-Tgp600
Using the Phonebook Note R Steps 8 and 9 can be omitted if you do not want to assign a category. R Steps 10 and 11 can be omitted if you do not want to assign a default number. (The first number entered for an entry will automatically be assigned as the default number.) R The valid digits are "0"... - Page 77 Using the Phonebook 2. KX-TPA60/KX-TPA65: [D]/[C]/[F]/[E]: KX-TPA68: [D]/[C]: "Setting Handset"a 3. [D]/[C]: "Display Option" a 4. [D]/[C]: "Category Name" a 5. [D]/[C]: Select the desired category number (1–9). a 6. Enter a name for the category (max. 13 characters). a 7.
- Page 78 Using the Phonebook *1 If only Handset Phonebook is permitted, this step is skipped. *2 If you push and hold [D]/[C], the next/previous items will be displayed automatically. Searching by Category If items in the phonebook have been assigned categories, you can search by category. [In standby mode] 2.
- Page 79 Using the Phonebook Example: To enter "ANNE" in Latin Mode. 2 a 6 a 6 a [E] a 6 a 6 a 3 a 3 Note R Availability depends on your phone system. Contact your administrator for further information. Locking the Handset Phonebook You can lock/unlock the phonebook while the handset/desk phone is in standby mode.
-
Page 80: Using The Base Unit Phonebook (When Connected To A Base Unit Other Than The Kx-Tgp600 Only)
Using the Phonebook Using the Base Unit Phonebook (when connected to a base unit other than the KX-TGP600 only) Storing an Item in the Base Unit Phonebook Storing a New Item Menu MENU 2. [D]/[C]/[F]/[E]: 3. [D]/[C]: "Base Phonebook" a 4. - Page 81 Using the Phonebook 4. [D]/[C]: Select the desired item. a Menu MENU 5. [D]/[C]: "Delete" a 6. [D]/[C]: "Yes" a *1 In step 5, you can select "Delete All" instead to delete all items. Searching for an Item in the Base Unit Phonebook Searching by Name You can also search for an item in the phonebook by entering a name: [In standby mode]...
-
Page 82: Using The Remote Phonebook (When Connected To The Kx-Tgp600 Only)
Using the Phonebook Using the Remote Phonebook (when connected to the KX-TGP600 only) You can refer to the Remote Phonebook in addition to the Handset Phonebook, if the Remote Phonebook is available. Note R We recommend setting this feature with your administrator. Contact your administrator for further information. -
Page 83: Customizing The Telephone
Customizing the Telephone Customizing the Telephone Changing the Handset Number and Name Display You can change the display of the handset’s number and name when the handset/desk phone is in standby mode. Menu MENU 2. KX-TPA60/KX-TPA65: [D]/[C]/[F]/[E]: KX-TPA68: [D]/[C]: "Setting Handset"a 3. - Page 84 Customizing the Telephone Deleting a Hot Key 1. In standby mode, press and hold the dialing key assigned as a Hot Key for more than 1 second. Menu MENU 3. [D]/[C]: "Delete" a 4. [D]/[C]: "Yes" a *1 While the Hot Key’s information is displayed, you can press [D] or [C] to select another Hot Key number.
- Page 85 Customizing the Telephone The alarm modes are as follows: R Off: Disables the selected Memo Alarm. R Once: The selected Memo Alarm will occur only once. R Daily: The selected Memo Alarm will occur at the same time every day. R Weekly: The selected Memo Alarm will occur at the same time on selected days of the week.
- Page 86 Customizing the Telephone Changing the Function Keys [In standby mode] Menu MENU 2. KX-TPA60/KX-TPA65: [D]/[C]/[F]/[E]: KX-TPA68: [D]/[C]: "Setting Handset"a 3. [D]/[C]: "Key Option" a 4. KX-TPA60/KX-TPA65: [D]/[C]: "Function Key" a KX-TPA68: [D]/[C]: "Program Key" a 5. [D]/[C]: Select the item to change. a 6.
- Page 87 Customizing the Telephone Main Item Sub Item Page Display Option Language Backlight LCD Brightness Page 111 Standby Display Handset Name Category Name Date Format Time Format Caller ID Disp Colour Scheme/ Base Monitor Notification Color Scheme Tone Option Key Tone Range Alarm Page 113 System Option...
- Page 88 Customizing the Telephone IMPORTANT R We recommend setting with your administrator. Contact your administrator for further information. R This feature is not available on shared lines. Menu MENU 2. KX-TPA60/KX-TPA65: [D]/[C]/[F]/[E]: KX-TPA68: [D]/[C]: "System Settings"a 3. [D]/[C]: "Call Settings" a 4.
- Page 89 Customizing the Telephone 3. [D]/[C]: "Call Settings" a 4. [D]/[C]: "Block Caller ID" a 5. [D]/[C]: Select a desired line. a 6. [D]/[C]: Select a desired phone number. a MENU 7. [D]/[C]: "Edit" a 8. Enter the phone number. a SAVE Deleting the phone numbers to reject (when connected to the KX-TGP600 only) Menu...
- Page 90 Customizing the Telephone Web User Interface Programming The product provides a Web-based interface for configuring various settings and features, including some that are not programmable directly from the handset/desk phone. The following list contains some useful features that are programmable through the Web user interface. Contact your administrator for further information.
-
Page 91: Installation And Setup
Installation and Setup Installation and Setup Note R Panasonic assumes no responsibility for injuries or property damage resulting from failures arising out of improper installation or operation inconsistent with this documentation. WARNING R To reduce the risk of fire or electric shock, do not overload AC outlets and extension cords. - Page 92 Installation and Setup Example: KX-TPA65 PUSH PUSH R Low Position ® High Position Example: KX-TPA65 PUSH PUSH Removing the Stand (KX-TPA65/KX-TPA68) Tilt the stand in the direction indicated while pushing the PUSH marks with both hands. Example: KX-TPA65 PUSH PUSH...
-
Page 93: Connections
Installation and Setup Connections KX-TPA65 (Desk phone) Attach the AC adaptor, corded handset and headset to the desk phone. PQLV219xx... - Page 94 Installation and Setup KX-TPA68 (Desk phone) Attach the AC adaptor, corded handset and headset to the desk phone. PQLV219xx KX-TGP600 (Base unit) Connect the AC adaptor and the Ethernet cable to the base unit. PQLV219xx R If PoE is available, an AC adaptor is not needed. R If you are using a PoE hub, the number of devices that you can connect simultaneously is limited by the amount of power supplied by the hub.
- Page 95 AC adaptor to a ceiling-mounted AC outlet, as the weight of the adaptor may cause it to become disconnected. R Fasten the AC adaptor cord to the cord holder. R Use only the included Panasonic AC adaptor. Battery Installation Open the battery cover, insert the batteries, and close the cover as indicated below.
- Page 96 Installation and Setup R The charge indicator will turn off when the batteries are fully charged. R If the batteries are already fully charged and the handset is placed in the charger while the power is off, the charge indicator will turn on and then turn off.
- Page 97 Installation and Setup Wall Mounting Note R Make sure that the wall and the fixing method are strong enough to support the weight of the unit. KX-TGP600 (Base unit) 1. Drive the screws into the wall either 55 mm (2 5/32 in) apart, and mount the unit on the wall. *1 55 mm (2 5/32 in) *2 Washer *3 Drive the screw to this point.
- Page 98 Installation and Setup KX-TPA68 3. Fasten the wall mounting adaptor to the base with the screw. (Recommended torque: 0.4 N·m [4.08 kgf·cm/3.54 lbf·in] to 0.6 N·m [6.12 kgf·cm/5.31 lbf·in]) 4. Connect the AC adaptor. 5. Drive the screws into the wall either 83 mm (3 1/4 in) or 100 mm (3 15/16 in) apart, and mount the unit on the wall.
-
Page 99: Updating The Software
Installation and Setup *4 Drive the screw to this point. *5 83 mm (3 1/4 in) *6 100 mm (3 15/16 in) R You can find a wall mounting template at the end of this manual. R When inserting screws, avoid pipes and electrical cables, etc., that may be present/buried. R The screw heads should not be flush to the wall. -
Page 100: Registering/Deregistering A Handset/Desk Phone To The Kx-Tgp600
Installation and Setup After the base unit requests to start downloading the handset/desk phone software, you cannot enter any keys. The update is performed automatically. Follow the instructions on the LCD and wait until the update finishes. *1 KX-UDT series are not available for KX-TGP600LA, KX-TGP600LC, KX-TGP600AG or KX-TGP600BR. - Page 101 Installation and Setup e. [D]/[C]: "Register H/S" a f. Select a base unit. a After "Registered" is displayed on the LCD, the registration is completed. R If 4 base units have been registered to a handset/desk phone, "Memory Full" is displayed on the LCD at step d.
- Page 102 Installation and Setup Registering/Deregistering the Handset/Desk Phone to a Base Unit Other than the KX-TGP600 Registering the handset/desk phone The base unit operations/settings should be performed according to the base unit’s instructions. Handset/desk phone registration using the base unit 1. Base unit: Enter handset/desk phone registration mode.
-
Page 103: Appendix
Appendix Appendix Character Mode Table KX-TPA60/KX-TPA65/KX-TPA68 (Suffix: [none/C]) ABC (Latin) +ÀÂ (Extended 1) 0–9 Keys (Numeric) Upper Lower Upper Lower Space B & ’ ( ) G , – . / 1 Space B & ’ ( ) G , – . / 1 A B C 2 a b c 2 D E F 3... - Page 104 Appendix 0–9 ΑΒΓ AÄÃ SŚŠ Keys (Latin) (Numeric) (Greek) (Extended 1) (Extended 2) D E F 3 Δ Ε Ζ 3 d e f 3 δ ε ζ 3 G H I 4 Η Θ Ι 4 g h i 4 η...
- Page 105 Appendix АБВ 0–9 AÄÃ SŚŠ Keys (Cyrillic) (Numeric) (Latin) (Extended 1) (Extended 2) А Б В Г 2 A B C 2 а б в г 2 a b c 2 Д Е Ё Ж З 3 D E F 3 d e f 3 д...
- Page 106 Appendix Character Table for Administrator Password 0–9 Keys (Latin) (Numeric) B & ’ ( ) G , – . / ~ 1 A B C 2 a b c 2 D E F 3 d e f 3 G H I 4 g h i 4 J K L 5 j k l 5...
- Page 107 Appendix Handset Setting Menu Layout Incoming Option Sub Item Description Setting Default Ringer Volume Adjusts the ringer volume Level 3 Step Up Step Down Level 1–6 Ringer Type (when Ringer Pattern Line 1–8: Ringtone 1–19, 25–32 using a KX-TGP600) Selects the ringtone for each Ringtone 1–8 R Line 1–8 Intercom Ring:...
- Page 108 Appendix Talk Option Sub Item Description Setting Default Noise Reduction/ Activate/deactivate Noise Voice Clarity Reduction. (KX-TPA60 only) Speaker Volume Adjusts the rear speaker Level 1–6 Level 3 volume. Receiver Volume Adjusts the receiver volume. Level 1–6 Level 2 Headset Volume Adjusts the headset speaker Level 1–6 Level 2 volume.
- Page 109 Appendix Key Option Sub Item Description Setting Default Function Key Edits the Function Key list. Suffix: A/CE/UK/AL/RU/ 1: Redial LA/LC/AG/BR 2: FWD/DND Redial 3: Conference 4: Auto Answer FWD/DND 5: Flash/Recall Conference 6: Incoming Log Auto Answer 7: Outgoing Log Flash/Recall 8: Phonebook Incoming Log...
- Page 110 Appendix Sub Item Description Setting Default Key Lock Type Selects the type of key lock. Manual Manual *6*7 Manual&Password Auto *6*7 Auto&Password Auto Lock Time Sets the number of seconds 0s–60s before the handset/desk phone key lock is activated when "Auto" is selected as the "Key Lock Type".
- Page 111 Appendix Display Option Sub Item Description Setting Default Language Selects the display language. Suffix: A/CE/UK/AL Auto Up to 10 languages can be Auto downloaded from the base English unit. The feature depends on Deutsch your phone system. Contact Español your administrator for further FRANÇAIS information.
- Page 112 Appendix Sub Item Description Setting Default Date Format Selects the format for the date Suffix: A/CE/ DD-MM-YYYY shown on the display in UK/AL/LA/LC/ MM-DD-YYYY standby mode. RU/AG/BR YYYY-MM-DD DD-MM-YYYY Suffix: (none/ MM-DD-YYYY Time Format Selects the format for the time Suffix: A/CE/ shown on the display in UK/AL/LA/LC/...
- Page 113 Appendix Tone Option Sub Item Description Setting Default Key Tone Turns the key tone on or off. Range Alarm Selects whether the range alarm tone rings or not. System Option The administrator password may be required for this setting. Contact your administrator for further information.
- Page 114 Appendix Sub Item Description Setting Default Reset Handset Returns the handset/desk Not selected Enter Password. (4 digits) phone settings to its default ¯ settings. Select the desired item(s). ¯ Press *2*5 Selects whether the web Embedded Web function and the logging function are available or not.
- Page 115 Appendix System Setting Menu Layout (when connected to the KX-TGP600) Status Sub Item Description Setting Default Line Status Displays the line status. — Registered /Registering (NULL) Firmware Version Selects which is shown on the –Base Station — display the model number and –Handset the firmware version.
- Page 116 Appendix Sub Item Description Setting Default IPv4 Settings Specifies the IPv4 settings. DHCP–Auto DHCP Auto Manual –DNS 1 –DNS 2 Static –IP Address –Subnet Mask –Default Gateway –DNS 1 –DNS 2 IPv6 Settings Specifies the IPv6 settings. DHCP–Auto DHCP Auto Manual –DNS 1 –DNS 2...
- Page 117 Appendix System Settings The administrator password may be required for this setting. Contact your administrator for further information. For available characters, see “Character Table for Administrator Password”, Page 106. Sub Item Description Setting Default Register H/S Registers the handset/desk Select the handset/desk —...
- Page 118 Appendix *2 After selecting the line, selects the handset(s)/desk phone(s) assigned to the line. This function is enabled by default for all handsets/desk phones. *3 After selecting the handset/desk phone, selects the line(s) assigned to the handset/desk phone. This function is enabled by default for all handsets/desk phones. *4 After selecting the handset/desk phone, selects a default line assigned to the handset/desk phone.
- Page 119 Appendix Sub Item Description Setting Default Specifies the Xsi’s Remote –Remote Office — Remote Office Office setting. –Phone Number Specifies the Xsi’s –SimultaneousRing SimultaneousRing Simultaneous Ring setting. –Phone Number *1 Displayed only when editing. *2 In a phone number that exceeds 32 digits, the exceeding digits will not be displayed. *3 If the Xsi’s service is available, you can select these items.
- Page 120 Appendix System Setting Menu Layout (when connected to a base unit other than the KX-TGP600) System Settings The administrator password may be required for this setting. Contact your administrator for further information. For available characters, see “Character Table for Administrator Password”, Page 106. Sub Item Description Setting...
- Page 121 Appendix Specifications KX-TGP600 (Suffix: all) Item Specifications Power Supply AC adaptor/PoE (IEEE 802.3af) Maximum Power Consumption 2.6 W Operating Environment 0 °C (32 °F) to 40 °C (104 °F) Ethernet Port (LAN) 1 (RJ45) Ethernet Interface 10Base-T/100Base-TX (Auto/100MB-FULL/100MB-HALF/10MB-FULL/10MB-HALF) CAT-iq Wideband Codec G.722/G.722.2 Narrowband Codec G.711a-law/G.711µ-law/G.729a...
- Page 122 Appendix 47.8 mm ´ 25.5 mm ´ Dimensions "High" position: (Width ´ Depth ´ Height) 192 mm ´ 170 mm ´ 182 mm 153.2 mm (1.88 in ´ 1.00 in ´ 6.03 in) (7.56 in ´ 6.69 in ´ 7.17 in) "Low"...
- Page 123 Appendix Troubleshooting Problem Possible Cause Solution The handset does not The battery is drained. Charge the battery fully. work. For details, see "Charging the Batteries" on Page 95. The power is off. R Turn it on. For details, see "Location of Controls"...
- Page 124 Appendix Problem Possible Cause Solution The handset stops An unknown error has occurred. R Turn the handset off, and then working during turn it back on. operation. For details, see "Location of Controls" on Page 20. R Re-insert the battery and try again.
- Page 125 Appendix Problem Possible Cause Solution While charging the The temperature of the battery Confirm that the area where the battery, the LED being charged is outside of handset is being charged is indicator blinks rapidly, normal limits. between 5 °C (41 °F) and 40 °C but the handset does not (104 °F), and wait for the battery’s beep.
- Page 126 Appendix Error Messages Error Message Possible Cause Solution Register Unit The handset/desk phone has Consult your dealer. been cancelled or the handset/ desk phone has not been registered. No Service The handset/desk phone is out Move closer to the base unit. of range.
-
Page 127: Revision History
Appendix Revision History Software File Version 01.129 or later New Contents R System Settings—Restart (Base) (Page 117) Changed Contents R Status—Line Status (Page 115) Software File Version 02.100 or later New Contents R Function Keys (KX-TPA60/KX-TPA65)—#: Group Pickup (Page 50) R Function Key—Group Pickup (Page 109) R Status—CDP (Page 115) R Network Settings—CDP (Page 116) - Page 128 One screw here One screw here WALL MOUNTING TEMPLATE 1. Drive the screws into the wall as indicated. 2. Hook the unit onto the screw heads. Note: Make sure to set the print size to correspond with the size of this page. If the dimensions of the paper output still deviate slightly from the measurements indicated here, use the measurements indicated here.
- Page 129 Notes...
- Page 130 Notes...
- Page 131 Notes...
- Page 132 1006, Oaza Kadoma, Kadoma-shi, Osaka 571-8501, Japan Web Site: https://panasonic.net/cns/pcc/support/sipphone/ Two Riverfront Plaza, Newark, New Jersey 07102-5490 Web Site: https://panasonic.net/cns/pcc/support/sipphone/ 5770 Ambler Drive, Mississauga, Ontario, L4W 2T3 Web Site: http://www.panasonic.com/ca/ © Panasonic Corporation 2015 PNQX6905PA PP0215MK10117...