
Subscribe to Our Youtube Channel
Related Manuals for timecode systems UltraSync ONE

Summary of Contents for timecode systems UltraSync ONE
- Page 1 Manual Issue 1.0 For the latest user guide, please visit: www.support.timecodesystems.com UltraSync ONE User Guide...
- Page 2 All rights reserved. No part of this publication may be reproduced without the expressed written permission of Timecode Systems Ltd. Timecode Systems Ltd shall not be liable to the purchaser of this product or third parties for damages, losses, costs, or expenses incurred by the purchaser or third...
-
Page 3: Table Of Contents
EXT LTC Input, Output to RF Slaves EXT LTC Input, Output to Wired Devices Free Running and Jamming Free Running - UltraSync ONE as a Standalone Device Jamming to an External Timecode Source Output via SYNC UltraSync ONE User Guide... - Page 4 Chapter 3 Quick Set Up Preparation - Before you Set Up your UltraSync ONE Getting Started - Master TX Mode Getting Started - RF Slave Mode Getting Started - EXT LTC Input Master to RF Slaves and Wired Devices Master to Wired Device Only, No RF Slaves...
- Page 5 Reset FAQs Can UltraSync ONE be used as a Master Unit? Can a Master Device use Drop-Frame Timecode? How Long Does it Take for UltraSync ONE to Re-Sync? Chapter 9 Safety and Disposal Battery Safety and Disposal Battery Safety Disposal and Recycling...
- Page 6 UltraSync ONE User Guide...
- Page 7 You have made a great choice. With its compact and lightweight design, long battery life (at least 25 hours) and ability to run as a timecode master or slave, UltraSync ONE is one of the most advanced timecode and synchronisation options on the market.
- Page 8 UltraSync ONE User Guide...
- Page 9 Chapter 1 UltraSync ONE Overview In this chapter, you can learn about the screen, buttons, and ports of your UltraSync ONE, and its technical specifications. UltraSync ONE for Synchronisation Switch UltraSync ONE On and Off Display and Controls Ports Charging your UltraSync ONE...
-
Page 10: Ultrasync One For Synchronisation
You can learn more about these modes in Networks and Modes on page Tip: If you use UltraSync ONE with a :pulse, you have free access to the BLINK Hub app. You can use the app to configure and monitor your UltraSync ONE. -
Page 11: Switch Ultrasync One On And Off
The UltraSync ONE screen lights up and displays the message: Push Up/Dn twice to switch on 2. Press the up or down button twice to turn on the UltraSync ONE. This extra step is designed to prevent you from accidentally turning the UltraSync ONE on. - Page 12 1. Press and hold the Select button until the following message is displayed: Push Up/Dn twice to switch off 2. Press the Up or Down button twice to turn off the UltraSync ONE. Note: If you do not press the up or down button twice within a 5 second period, the UltraSync ONE stays on and the screen reverts to showing the main display.
-
Page 13: Display And Controls
Display and Controls Your UltraSync ONE is easy to set up and use. It has a simple menu system for applying the device's settings. OLED (see page 13) Status Indicator LED (see page 14) Up and Down (see page 15) -
Page 14: Status Indicator Led
UltraSync ONE is in RF Slave mode or EXT LTC Int mode and is synchronised with the master. UltraSync ONE is the master device in an RF network. The LED shows a solid green light if the UltraSync ONE is switched off and the battery is fully charged. Blue... -
Page 15: Up And Down
To make a selection or change a setting, use the Up and Down buttons to scroll to a menu or option. Press the Select button once to confirm. To switch your UltraSync ONE on or off, press and hold the Select button (see Switch UltraSync ONE On and Off on page 11, for more details). -
Page 16: Ports
Ports Your UltraSync ONE has three ports, which you can use to connect to an external device (LTC or SYNC output) and a USB-C charger. Port Description SYNC Use to output genlock to a camera, word clock to a sound mixer/recorder, or Linear Time Code (LTC) to any compatible device. -
Page 17: Din 1.0/2.3 To Bnc Cables
The SYNC and LTC ports have DIN 1.0/2.3 connectors. To connect other devices to these ports, use the DIN 1.0/2.3 to right-angled BNC cables that are supplied with your UltraSync ONE. The cables are colour-coded for ease of use. Cable Port Blue SYNC UltraSync ONE User Guide... -
Page 18: Charging Your Ultrasync One
Very hot and very cold conditions can affect battery performance. If the battery in your UltraSync ONE is running out of power, the LED flashes red and the following message is displayed on screen: The low battery power is also indicated on the battery icon in the bottom-right of the main screen, next to the channel number. -
Page 19: Mounting Your Ultrasync One
Mounting your UltraSync ONE To mount your UltraSync ONE, fix a hook-fastening Velcro strap to the middle of the rear side of the unit. You can then attach the UltraSync ONE to other equipment. Note: Alternative mounting pouches will be available soon. -
Page 20: Technical Specification
Charging Time 3 hours LTC Input/Output DIN 1.0/2.3 connector. Input or output, depending on the mode selected. SYNC Output DIN 1.0/2.3 connector. Can be set to output either Genlock, word clock, or timecode (LTC). UltraSync ONE User Guide... - Page 21 200m (256 feet, 219 yards). This range is based on an uninterrupted line of sight. If there are obstacles between a slave and master, the range can be reduced. *Typical range. The range can vary. UltraSync ONE User Guide...
- Page 22 UltraSync ONE User Guide...
- Page 23 Chapter 2 Networks and Modes Timecode Systems devices, including your UltraSync ONE, can synchronise wirelessly over a distance of approximately 200m*. To synchronise, they use our proprietary radio protocol, and have to be set up to operate in a network.
-
Page 24: Master And Slaves
The slaves communicate with the master regularly, to make sure they remain synchronised. In the image shown, the UltraSync ONE units are set to run as slaves and the master is a Timecode Systems:pulse. In an RF network, your UltraSync ONE can run as a slave or as a master, but in a BLINK network, it can only be used as a slave. -
Page 25: How Can I Tell If A Slave Is Communicating With A Master
The number shown to the right of the antenna icon shows the signal strength (0-7 where 7 is the maximum signal strength). Note: The LED flashes green in time with the master when a connection is established and maintained. UltraSync ONE User Guide... -
Page 26: What If A Slave Cannot Find A Master
What if a Slave Cannot Find a Master? Sometimes, your UltraSync ONE may be out of range of its master. In this situation, your UltraSync ONE cannot receive timecode from the master and so uses its own internal timecode instead. This is called 'free running'. - Page 27 Car A has its UltraSync ONE set to run in Master TX mode and use RF Channel Car B has its UltraSync ONE set to run in RF Slave mode and use RF Channel 4. At the start, Car A and Car B are UltraSync ONEs are within range and so they synchronise.
-
Page 28: Multiple Masters In The Same Network
Multiple Masters in the Same Network You should set up your Timecode Systems devices so that there is one master device per network (RF channel). This ensures that all of the slave devices synchronise with the same timecode data (the timecode of the master device). -
Page 29: Rf Network
BLINK Network on page What is an RF Network? An RF network is a group of Timecode Systems devices that are all set to communicate on the same radio frequency (RF channel). The devices in an RF network can synchronise with each other over distances of 200m* (with internal antenna), and they communicate using our proprietary RF protocol. - Page 30 When a slave receives this data, it updates its own internal settings to match, so that it is synchronised with the master. To learn more about the relationships between devices in an RF network, see Master and Slaves on page UltraSync ONE User Guide...
-
Page 31: Blink Network
BLINK Network To synchronise two or more Timecode Systems products, you need to set them to operate in a network. There are two different types of network: RF network BLINK network. In this section, we are going to look at the BLINK Network. To learn about the RF... - Page 32 BLINK Hub app. You can install the BLINK hub app on a computer, tablet, or smartphone and use it for remote monitoring and control of some Timecode Systems products. To learn more about BLINK Hub, see Remote Settings using BLINK Hub on page...
-
Page 33: Master Tx
Master TX You can set your UltraSync ONE to run in Master TX mode, where it acts as a master in an What is an RF Network? (see page 29). You should use the Master TX mode if: You want to use your UltraSync ONE independently. Your UltraSync ONE will provide timecode to a connected device, but will not synchronise with other Timecode Systems products. - Page 34 The master UltraSync ONE also sends timecode data to any device that is connected to the LTC port. To set your UltraSync ONE to be a master in an RF network, see Set UltraSync ONE to Run as Master TX on page...
-
Page 35: Rf Slave
As a slave, your UltraSync ONE will receive its timecode from the master device, as long as the master is in range and is communicating on the same RF channel as your UltraSync ONE. -
Page 36: Ext Ltc Input
You can set your UltraSync ONE to receive timecode from a device that is connected to the LTC port. The timecode can then be used by your UltraSync ONE, and passed on to other devices, including any slave UltraSync ONEs in the network. -
Page 37: Ext Ltc Input, Output To Rf Slaves
To learn how to set up your UltraSync ONE to use EXT LTC Input mode in this way, Set UltraSync ONE to use LTC as an Input on page... -
Page 38: Ext Ltc Input, Output To Wired Devices
EXT LTC Input, Output to Wired Devices You can set your UltraSync ONE to use EXT LTC Input mode without using an RF network. This is useful if you cannot use radio communications, perhaps because of interference or restrictions on the use of radio in your filming environment. -
Page 39: Free Running And Jamming
UltraSync ONEs are most commonly used in a network, where they will synchronise with a master device. But you do not have to use your UltraSync ONE in a network - if you prefer, you can use it as a standalone device. -
Page 40: Jamming To An External Timecode Source
Jamming to an External Timecode Source If you want to use your UltraSync ONE in a third-party system instead of a Timecode Systems network, you will need to use jamming. This is because third-party systems do not recognise our proprietary RF protocol. Jamming uses a wired connection, and so our RF protocol is not used. - Page 41 1. Connect the UltraSync ONE to the device that will receive the timecode from your UltraSync ONE. 2. Set your UltraSync ONE to run as a Master TX. It can then output the timecode via its LTC port or via its SYNC port (SYNC output has to be set to LTC for this).
-
Page 42: Output Via Sync
Word clock Timecode (LTC) The SYNC output can be used in all of the UltraSync ONE's modes. But to use it, you need to set the Sync O/P Mode. You may also need to set the Sync O/P Level. To learn how to configure your UltraSync ONE for SYNC output, see... - Page 43 Chapter 3 Quick Set Up If you know how to access your UltraSync ONE's settings and understand the different modes, you can use the quick set up instructions to get started. Preparation - Before you Set Up your UltraSync ONE...
-
Page 44: Preparation - Before You Set Up Your Ultrasync One
Preparation - Before you Set Up your UltraSync ONE The 'quick set up' instructions are designed to help you get your UltraSync ONE up and running as soon as possible. They assume that you are familiar with the master- slave relationship, the RF network, and know how to navigate through the UltraSync ONE menu. -
Page 45: Getting Started - Master Tx Mode
:wave has to be the master. Getting Started - RF Slave Mode You can set your UltraSync ONE so that it runs as an RF Slave and synchronises with the timecode of a 'master' Timecode Systems device. The master can be any Timecode Systems product with a master mode, including another UltraSync ONE. -
Page 46: Getting Started - Ext Ltc Input
Receive timecode via the LTC port and then transmit timecode to slaves via radio. Follow the steps in Set UltraSync ONE to use LTC as an Input on page Receive timecode via the LTC port and then transmit timecode via a wired connection. -
Page 47: Master To Rf Slaves And Wired Devices
Master to RF Slaves and Wired Devices You can set your UltraSync ONE up so that it provides timecode to a device that is wired to the UltraSync ONE, and also to RF slaves. To act as the master and the timecode source, the UltraSync ONE has to be set to run in Master TX mode. - Page 48 FPS of the connected device (see Set the Frame Rate Per Second on page 73). 11. Use the Local or EXT U/B option to set your UltraSync ONE to use either local user bits or external user bits (see Set the User Bits on page 74).
- Page 49 Your UltraSync ONE will also detect any slave devices that are within range and using the same RF channel (as your UltraSync ONE). If a slave is detected, and it is searching for a new master, your UltraSync ONE will connect with it. Your UltraSync ONE will then transmit timecode, FPS, and userbits data to the slaves, so that they can synchronise with your UltraSync ONE (which is the RF network master).
-
Page 50: Master To Wired Device Only, No Rf Slaves
Master to Wired Device Only, No RF Slaves If you want your UltraSync ONE to only provide timecode to devices that are wired to the UltraSync ONE: 1. Connect your camera or sound mixer/recorder to your UltraSync ONE. If you want your UltraSync ONE to provide timecode via the LTC port, connect your device to the LTC port. - Page 51 FPS of the connected device (see Set the Frame Rate Per Second on page 73). 8. Use the Local or EXT U/B option to set your UltraSync ONE to use either local user bits or external user bits (see Set the User Bits on page 74).
-
Page 52: Run Ultrasync One As An Rf Slave
DIN 1.0/2.3 to BNC cable that is supplied with your UltraSync ONE. 2. Position your UltraSync ONE so that it is within range of the master device in your RF network. It is easier to confirm that synchronisation has taken place if you can see the clocks and LEDs of your slave and the master at the same time. - Page 53 6. Set the Timecode Mode to RF Slave. Set the RF Channel (see page 68). 8. Use the Local or EXT U/B option to set your UltraSync ONE to use either local user bits or external user bits (see Set the User Bits on page 74).
-
Page 54: How Does An Rf Slave Synchronise With A Master
How does an RF Slave Synchronise with a Master? When you set up an UltraSync ONE to run as an RF Slave, it will 'announce' itself on the network, so that it can be detected by a master (see Run UltraSync ONE as an RF Slave on page 52). - Page 55 To learn about setting the internal timecode, frames-per-second, and user bits for your UltraSync ONE, see: Set the Timecode for the Master (see page 72) Set the Frame Rate Per Second (see page 73) Set the User Bits (see page 74).
-
Page 56: Set Ultrasync One To Use Ltc As An Input
Set UltraSync ONE to use LTC as an Input The 'quick set up' instructions are designed to help you get your UltraSync ONE up and running as soon as possible. They assume that you are familiar with the master- slave relationship, the RF network, and know how to navigate through the UltraSync ONE menu. - Page 57 Choose Tx On (Master) to set your UltraSync ONE to output timecode to slaves in an RF network (via radio). 9. Use the Local or EXT U/B option to set your UltraSync ONE to use either local user bits or external user bits (see Set the User Bits on page 74).
- Page 58 If you have set your UltraSync ONE to use Tx On (Master) mode, it will detect any slave devices that are in range and using the appropriate RF channel. It will connect to the slaves and send the timecode, FPS, and user bits to them via radio.
-
Page 59: Send Timecode From A Standalone Ultrasync One
So far, you have synchronised your UltraSync ONE with an external timecode source. Next, you need to disconnect your UltraSync ONE and use it to send timecode to another device. UltraSync ONE User Guide... - Page 60 UltraSync ONE to output LTC. Ignore this step if you connected via the LTC port. 5. Configure the device that is connected to your UltraSync ONE so that it can receive timecode. See the device manufacturer's instructions for more details.
-
Page 61: Jam Ultrasync One To A Signal
Jam UltraSync ONE to a Signal You can connect your UltraSync ONE to an external device and then 'jam' to the external device's timecode. When it has jammed, you can disconnect your UltraSync ONE and then use it to transmit the timecode to other devices. - Page 62 UltraSync ONE User Guide...
- Page 63 Set the Frame Rate Per Second Set the User Bits Set the SYNC Output Set the LTC Level Change the Status Indicator LED Brightness Change the Screen Brightness Change the Screen Saver Time Flip the Display Button Lock UltraSync ONE User Guide...
-
Page 64: Set The Rf Country/Area
Your UltraSync ONE can communicate with other devices via radio (RF). Before you use your UltraSync ONE, you need to set it to use the correct radio frequencies for your region. This is because the regulations for the use of radio frequencies vary in different countries. -
Page 65: Set The Timecode Mode
Note: These modes define how your UltraSync ONE synchronises with other devices, so it is important that you understand how they work. To set your UltraSync ONE to run in a particular mode, you need to use the Timecode Mode settings. - Page 66 *When an UltraSync ONE is free running and in RF Slave mode, it uses its own clock settings but continues to search for a master in the same network. If it finds a master, the master will set the timecode.
- Page 67 9. If you are prompted to choose TX On or TX Off: Choose Tx On (Master) to set your UltraSync ONE to output timecode to slaves in an RF network (via radio). Choose Tx Off (Standalone) if you want your UltraSync ONE to output timecode via a wired connection only (no radio).
-
Page 68: Set The Rf Channel
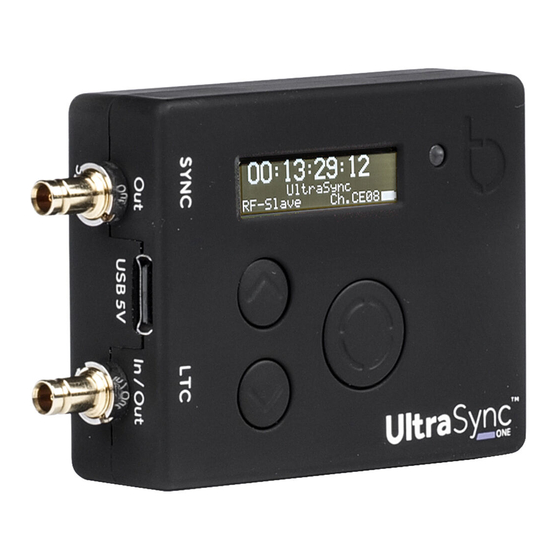
Set the RF Channel If you are going to use your UltraSync ONE in an RF network, you need to set its RF channel to match the other Timecode Systems devices in the network. (An RF network is a group of Timecode Systems products that all use the same RF channel for radio communications). - Page 69 Look at the main screen to find out which channel a UltraSync ONE is set to use. The channel is shown in the bottom-right corner, next to the battery indicator. In the image above, Ch.CE03 indicates that the UltraSync ONE is set to run in the Europe region (CE) and use RF Channel 03.
- Page 70 The :pulse and the three UltraSync ONEs are all in the RF Channel 6 BLINK network. The two networks are completely separate and the devices in one network will not communicate with devices in another network. UltraSync ONE User Guide...
- Page 71 To get them to connect to the replacement :pulse, you can either turn the UltraSync ONE slaves off and then on again to refresh their memory. Alternatively, you can try setting them to use RF Channel 5 again. For details on country/area, see...
-
Page 72: Set The Timecode For The Master
Quick Set Up: UltraSync ONE as Master TX on page If your UltraSync ONE is set to run in Master TX mode, it means it is the master in an RF network. As it is the master, you need to set its timecode. The timecode will then be transmitted to the slaves in the network, so that they can synchronise with the master. -
Page 73: Set The Frame Rate Per Second
5. Use the Up and Down buttons to scroll to the Set FPS Rate option. 6. Press the Select button. 7. Use the Up and Down buttons to set the UltraSync ONE's FPS to the appropriate value. 8. Press the Select button to confirm. -
Page 74: Set The User Bits
The timecode mode and user bits settings of your UltraSync ONE affect what metadata it uses: If your UltraSync ONE is a Master TX, it will send its user bits data to the slaves in the network. If you have not set the user bits, it will send the default user bits, which is four sets of 00. - Page 75 5. Use the Up and Down buttons to choose from: Use Locally Set U/B - your UltraSync ONE will use its own user bits settings. It will ignore the user bits settings from the master/external source. Use EXT Source U/B - your UltraSync ONE will use the user bits settings it receives from the master or external source.
-
Page 76: Set The Sync Output
Set the SYNC Output Your UltraSync ONE has a SYNC output port that can output word clock, genlock, or timecode (LTC). You should use the SYNC port if: You want to output genlock to a camera for added accuracy You want to output word clock to a sound mixer/recorder for added accuracy You are using the LTC port as an input port and need to output timecode via a wired connection. - Page 77 Level is a 170mVpp signal and the High O/P Level is a 2.7Vpp signal. 18. Press the Select button to confirm. Your UltraSync ONE will now output a genlock, word clock, or timecode signal to your device via the SYNC port.
-
Page 78: Set The Ltc Level
Set the LTC Level If you set your UltraSync ONE up to output LTC (timecode) via the LTC port, you need to set the LTC level. This is a voltage for the LTC signal, and it has to match the voltage that is supported by the external device that will receive the LTC signal. -
Page 79: Change The Status Indicator Led Brightness
Change the Status Indicator LED Brightness You can set your UltraSync ONE so that its status indicator LED is more/less bright, depending on your requirements. To change the LED brightness: 1. Make sure your UltraSync ONE is switched on (see... -
Page 80: Change The Screen Brightness
To change the brightness of the screen: 1. Make sure your UltraSync ONE is switched on (see Switch UltraSync ONE On and Off on page 11). -
Page 81: Change The Screen Saver Time
Change the Screen Saver Time By default, the UltraSync ONE's screen is lit at the set brightness level all of the time. This makes it easier to read the display, but uses up more battery power. If you want to reduce the use of battery power, or just prefer the screen to dim after a short amount of time, you should change the Display Settings. -
Page 82: Flip The Display
Flip the Display In some situations, you may need to mount the UltraSync ONE so that it hangs upside-down. To make it easier to look at the UltraSync ONE display, you can set the screen to flip by 180°. To flip the display: 1. -
Page 83: Button Lock
Button Lock In some situations, you may find that your UltraSync ONE's control buttons are pressed accidentally, which can affect the settings. To prevent these accidental button presses from affecting your UltraSync ONE, you can turn on the Button Lock. - Page 84 UltraSync ONE User Guide...
-
Page 85: Chapter 5 Status Information
Chapter 5 Status Information Your UltraSync ONE has a collection of status displays that you can use to view current information about the unit. To learn about the displays, see: Main Screen Version Number and Serial Number Power and Battery Status... -
Page 86: Main Screen
Main Screen The Main screen is displayed when you are not using the UltraSync ONE to view other status displays or to access menu options. Description The timecode that is being used by the UltraSync ONE. The mode of the UltraSync ONE unit (see Networks and Modes on page 23). -
Page 87: Version Number And Serial Number
Version Number and Serial Number If you contact Timecode Systems technical support, you may be asked to provide the serial number of your UltraSync ONE. You may also be asked what version of the firmware your UltraSync ONE is running. To find this information: 1. -
Page 88: Power And Battery Status
The battery is a five bar icon that shows an estimate of the remaining battery charge (1 bar is low charge, 5 bar is full charge). This is based on the UltraSync ONE's current settings, and can increase if unused features are turned off. -
Page 89: Synchronisation Status
Shows the name of the master device that the UltraSync ONE is synchronised with (only available if your UltraSync ONE is in RF Slave mode). If your UltraSync ONE is in a master mode, the status shows the number of slaves connected to the master. UltraSync ONE User Guide... -
Page 90: Sync Output Status
Status Description Mode The type of signal that your UltraSync ONE is currently set to output via the SYNC port (see Set the SYNC Output on page 76 Level The voltage level of the SYNC output (see Set the SYNC Output on page 76). -
Page 91: Ltc Output Status
LTC Output Status You can use the LTC O/P status screen to see what frames-per-second and level your UltraSync ONE is using for the LTC output port. 1. Display the Main Screen on page 2. Use the Up and Down buttons to scroll to the screen that shows LTC O/P at the top. - Page 92 UltraSync ONE User Guide...
-
Page 93: Chapter 6 Blink Hub
Chapter 6 BLINK Hub You can make changes to some of your UltraSync ONE's settings remotely, by using the free BLINK Hub app on a smartphone or tablet. You can also use BLINK Hub to view some status information. To learn about BLINK Hub, see:... -
Page 94: Remote Settings Using Blink Hub
In BLINK Hub, each device in the BLINK network, including your UltraSync ONE, has its own status panel, which provides information about the device. You can also use BLINK Hub to change some of the UltraSync ONE settings, including: Name User bits Brightness. - Page 95 Chapter 7 Warranty and Conformity To learn about the warranty and the conformity declarations, see: Warranty Quality Declarations EC Declaration of Conformity UltraSync ONE User Guide...
-
Page 96: Warranty
Warranty All products sold by Timecode Systems Limited are warranted to the original purchaser against defects in materials and workmanship for (one) year from the date of original purchase. However, this warranty excludes accessories, batteries and cables. Also, this warranty does not apply to any instrument determined by Timecode Systems Limited to have been subjected to customer alteration, modification, negligence or misuse. -
Page 97: Quality Declarations
RF exposure compliance. This transmitter must not be co-located or operating in conjunction with any other antenna or transmitter. Changes or modifications not expressly approved by the party responsible for compliance could void the user's authority to operate the equipment. UltraSync ONE User Guide... -
Page 98: Industry Canada Statements
Industry Canada. To reduce potential radio interference to other users, the antenna type and its gain should be so chosen that the equivalent isotropically radiated power (e.i.r.p.) is not more than that necessary for successful communication. UltraSync ONE User Guide... -
Page 99: Ec Declaration Of Conformity
AYV- USYN01 IC ID 10427A- USYN01 Object of the declaration: The object of the declaration described above is in conformity with the relevant Union harmonization legislation: EMC Directive 2014/30/EU Low Voltage Directive (LVD) 2014/35/EU R&TTE Directive 1999/5/EC UltraSync ONE User Guide... - Page 100 The following harmonized standards and technical specifications have been applied: EN 300 220-2 V2.4.1:2012 EN 301 489-3 V1.6.1:2013 EN 55024 2010 EN 55032 2012 Paul Scurrell Timecode Systems UltraSync ONE User Guide...
- Page 101 Troubleshooting and FAQs In this chapter, you can find troubleshooting information, answers to popular questions, and instructions on how to reset your UltraSync ONE. If you are experiencing problems that are not covered here, please visit https://support.timecodesystems.com for up-to-date FAQs and manuals.
-
Page 102: Troubleshooting
Troubleshooting If you are having difficulty setting up your UltraSync ONE, the following troubleshooting sections may help: UltraSync ONE Slave not Connecting to Master (see page 103) UltraSync ONE Slave is Connecting to the Wrong Master (see page 103) UltraSync ONE not Responding to Select button (see page 103) UltraSync ONE Battery not Charging (see page 104). -
Page 103: Ultrasync One Slave Not Connecting To Master
Networks and Modes on page 23). The master is out of range. The UltraSync ONE will use its own timecode settings until a master is back in range. An UltraSync ONE that is using its own timecode settings is described as 'free running'. -
Page 104: Ultrasync One Battery Not Charging
Switch UltraSync ONE On and Off on page 11). 2. Check that the USB-C port on the UltraSync ONE is clear. USB-C ports can get clogged with lint from pockets or dirt and dust from the environment. 3. Try using a different charger. -
Page 105: Restore Factory Settings
4. Press the Select button. 5. Use the Up and Down buttons to scroll to Set Factory Defaults. 6. Press the Select button. The UltraSync ONE is reset to have all the default settings in place and the main screen is displayed. -
Page 106: Reset
3. Release the Up and Down buttons. The UltraSync ONE restarts. When the UltraSync ONE restarts, it still has all of the settings that were in place before you reset it. If it is still unresponsive, try performing a factory reset. A... -
Page 107: Faqs
Can UltraSync ONE be used as a Master Unit? Yes. UltraSync ONE is a timecode over RF transceiver, and so can be set as either a master transmitting unit or a slave receiving unit in an RF network. It cannot be used as a master in a BLINK network. - Page 108 UltraSync ONE User Guide...
-
Page 109: Chapter 9 Safety And Disposal
Chapter 9 Safety and Disposal Please read the important safety and recycling information regarding your UltraSync ONE and its battery: Battery Safety and Disposal UltraSync ONE User Guide... -
Page 110: Battery Safety And Disposal
UltraSync ONE contains a battery. The battery may contain toxic heavy metals and is subject to hazardous waste regulations. To make sure you use and dispose of your UltraSync ONE safely and responsibly, please follow these safety and disposal instructions. - Page 111 The recycling of materials contributes to the conservation of natural resources. For further information on disposal and recycling, please contact Timecode Systems. UltraSync ONE User Guide...
- Page 112 UltraSync ONE User Guide...
-
Page 113: Index
Disposal Life Diversity Power Critical Down button Battery life Drift Battery Status Drop-frame timecode Blink Hub BLINK Hub BLINK network 29, EC declaration of conformity Blue cable Europe Blue LED Europe/UK Brightness EXT LTC input 36, UltraSync ONE User Guide... - Page 114 Main screen Getting Started Master Green LED Master FPS Master frame rate per second Master timecode Hot conditions - battery Master TX Modes Mounting Industry Canada statements Multi-channel digital transceiver International use Networks Jamming New Zealand UltraSync ONE User Guide...
- Page 115 Screen saver Select button Power charging Serial number Power status Short timed on Signal strength 25, Slave 24, Quality declarations Specification Quick Setup Status indicator LED Status information Switch Off Radio frequencies Switch On Range SYNC Re-sync UltraSync ONE User Guide...
- Page 116 System settings TC generator 61, 72-73, Technical specification Timecode Timecode for free running Timecode for master Timecode input Timecode mode Timecode output Timecode Systems address Troubleshooting United States of America Up button US/CA/AU/NZ User bits Version number UltraSync ONE User Guide...
- Page 117 UltraSync ONE User Guide...
- Page 118 Timecode Systems Unit 6, Elgar Business Centre, Hallow Worcester, WR2 6NJ, UK +44 (0) 1700 808 600 contact@timecodesystems.com http://www.timecodesystems.com...
Need help?
Do you have a question about the UltraSync ONE and is the answer not in the manual?
Questions and answers