Table of Contents
Advertisement
Advertisement
Table of Contents

Related Manuals for Embla S4500


Summary of Contents for Embla S4500
- Page 1 Embla S4500 ® ™ Clinical Manual...
- Page 2 Embla. All clinical conclusions and decisions that are made based on the use of this product are the responsibility of the user. Embla does not accept any liability or responsibility for damages arising out of the use of or inability to use this product.
-
Page 4: Table Of Contents
Contents About This Manual ..................1 About the Embla S4500 System..............2 Safety and Regulatory Information...................... 2 Warnings, Cautions and Contraindications ..........3 Warnings and Cautions........................... 3 Intended Use ............................. 5 Certifications.............................. 5 Classifications ............................6 System Components ..................7 Communication Unit..........................7 About the Communication Unit ......................7 Rear Panel.............................. - Page 5 Embla S4500 Clinical Manual Attaching the Electrodes........................27 Attaching the Oximeter and Oximeter Flex Sensor................30 The Oximeter Sensor..........................31 Attaching the Oximeter Flex Sensor....................31 Other Oximeter Sensors ........................33 Attaching XactTrace Respiratory Effort Sensors ................34 Fitting the XactTrace Belt........................34 Attaching the XactTrace Belts to the Patient...................36 Storing the Belt Lock ..........................37...
- Page 6 Contents Index........................ 65...
-
Page 8: About This Manual
About This Manual This clinical manual is intended for all users of the Embla S4500 system. It is assumed that users have a basic knowledge of the Windows environment, working with a mouse, using toolbars, and arranging windows. Sections typically begin with an overview and description of main features, followed by instructions in simple action steps. -
Page 9: About The Embla S4500 System
About the Embla S4500 System The Embla S4500 system is a full polysomnography (PSG) system used to perform online sleep studies in the sleep lab, hospital or clinical environment, under the supervision of a clinician or sleep technician. The Embla S4500 system integrates advanced digital technology and precision engineering into a flexible, rugged, full polysomnography network. -
Page 10: Warnings, Cautions And Contraindications
• Do not use the Embla S4500 system in an MRI environment. • Do not use the Embla S4500 device in an explosive environment, that is, in the presence of flammable liquids or gases. • The system is not defibrillator proof. - Page 11 S4500 system. • The Embla S4500 system should not be used adjacent to, or stacked with, other equipment. If adjacent or stacked use is necessary, the device should be observed to verify normal operation in the configuration in which it will be used.
-
Page 12: Intended Use
Warnings, Cautions and Contraindications Intended Use The Embla S4500 system is intended for use by a physician or trained technician for the acquisition of Electroencephalogram (EEG) and polysomnography (PSG) signals and their transmission to a PC during neurophysiologic or sleep examinations. The intended environments are hospitals, institutions, sleep centers, sleep clinics, or other test environments. -
Page 13: Classifications
According to the regulation in Europe on Waste of Electrical and Electronic Equipment (WEEE) the WEEE may not be disposed of as unsorted municipal waste. The Embla S4500 should be returned to Embla when it is ready to be disposed of. Contact Embla at support@embla.com for more information. -
Page 14: System Components
The Communication Unit supplies the power to the Bedside Unit and communicates between the Embla S4500 and an acquisition computer over a Local Area Network (LAN). It has additional inputs for external devices such as a CPAP, and functions in part as a patient isolation unit, preventing a direct electrical connection between the patient and the external devices connected to the system. -
Page 15: Rear Panel
Embla S4500 Clinical Manual Rear Panel The following figure shows the location of the rear panel components on the Embla S4500 Communication Unit: B C D Communication Unit (rear view) Table 1 lists and describes the Communication Unit rear panel components and symbols. - Page 16 Ensure the voltage selector switch is correctly set before turning the unit on. Warning: The use of auxiliary devices compatibility-tested by Embla is recommended. Contact Embla technical support (support@embla.com) for information on which external devices can be connected to the Communication Unit inputs. When installing an auxiliary device ensure the tracing from the auxiliary input represents the same value observed on the display of the auxiliary device.
-
Page 17: Communication Unit Cables
Always inspect the equipment, particularly the cables and connectors, for evidence of wear before each study. If evidence of wear is found, remove the worn equipment from use and contact Embla Technical Support for replacement or servicing. Table 2: Communication Unit Cables... -
Page 18: Status Lights
Caution: When you see this symbol on the bedside unit, consult the accompanying documentation for information about the interface. S4500 Input Panel Status Lights There are three status lights at the top of the Input Panel: PWR, OXI, and REC. -
Page 19: Impedance Test Button
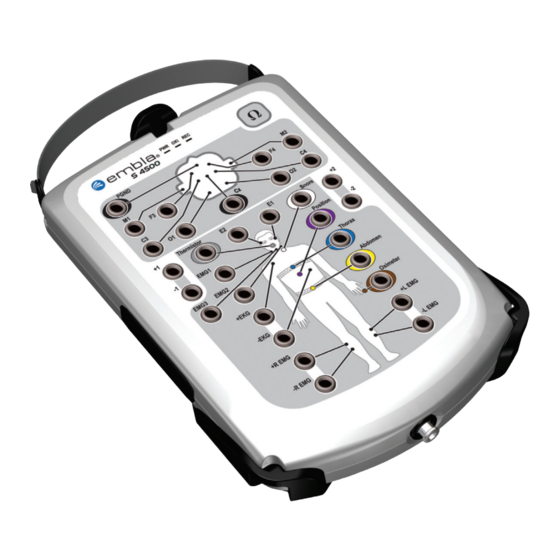
Embla PSG software. Channel Inputs The Bedside Unit reads and transmits a total of 21 channels and includes an input for a ground electrode (PGND) and a reference electrode. On the Embla S4500, the Reference input label refers is CZ. Bedside Unit... - Page 20 System Components Referential Channels The beside unit has 13 referential channels: • 8 channels (M1, M2, F3, F4, C3, C4, O1, O2) intended for EEG and labeled according to the international 10-20 System of electrode placement. • 2 channels (E1, E2) intended for EOG. •...
-
Page 21: Cable
Embla S4500 Clinical Manual Luer Lock The bedside unit has 1 Luer Lock Interface. A nasal pressure sensor connects to the Luer Lock and allows measurement of nasal flow/pressure. A flow generator with pressure tubing can also be connected to the Luer Lock to record mask pressure. -
Page 22: Shoulder Strap
Patient carrying the Bedside Unit with shoulder strap Sensors The sensors used with the Embla S4500 system can be ordered online at ShopEmbla (www.shopembla.com) or from a local Embla distributor. There are two types of sensors used with the Embla S4500: Electrodes The sensors used with the Embla Bedside Unit must have 1.5 mm touch-proof connectors. -
Page 23: Sensor Inputs
The sensor inputs incorporate sensors for recording respiratory signals and body position signals. Only sensors provided by Embla should be used. The Bedside Unit records signals from six external sensors and one built-in sensor. The external sensors that can be used are abdominal and thoracic respiratory effort, oral/nasal airflow (thermistor), snoring, oximetry, and position. - Page 24 System Components Type Name Description Sensor patient's throat, it generates a signal in response to vibration during snoring. Snoring can also be detected in the pressure signal from the nasal cannula. Used to collect data regarding patient sleep position changes. Body External Position...
-
Page 25: Assembling The System
Assembling the System Mounting the Bedside Unit Bracket The Bedside Unit sits in a bracket that should be mounted before any studies are performed. The bracket can, for example, be mounted on a wall or a bedside table next to the patient's bed. -
Page 26: Mounting The Communication Unit
Assembling the System Mounting the Communication Unit The Communication Unit should be mounted in a well-ventilated area to prevent overheating. Caution: Avoid installing the Communication Unit where there is danger of spilling or exposure to any kind of liquid. To mount the Communication Unit: 1. -
Page 27: Creating And Attaching An Id Card To The Communication Unit
Creating and Attaching an ID Card to the Communication Unit More than one Embla S4500 can be used to record on the same acquisition computer. Each device is identified in the acquisition application by its serial number and given a custom name. -
Page 28: Connecting The Units
Please contact support@embla.com for information on which devices are recommended and supported by Embla. See Technical Specifications for more detailed information on the AUX and COM inputs. 6. Connect the Bedside Unit cable to the interface labeled with this symbol:... -
Page 29: Connecting The Bedside Unit
Embla S4500 Clinical Manual 7. Connect the power cable to the input located beneath the On/Off button, and then connect it to a wall outlet. Connecting the Bedside Unit The cable from the Communication Unit is already locked into the mounting bracket and does not require setup. - Page 30 Assembling the System Disconnecting from the Bracket The bedside unit is easily disconnected from the base bracket via the quick-release mechanism. To disconnect the bedside unit from the bracket: 1. Push the quick-release clip away from the unit. 2. Hold the handle and pull the Bedside Unit out of the bracket. Releasing the quick-release clip Lifting the Bedside Unit from the bracket...
-
Page 31: Installing The System On The Network
Installing the System on the Network Installing the Embla S4500 on a network should only be done by a trained technician. For more detailed instructions, consult the following articles available on the Embla knowledge base Web site, or contact Embla Technical Support (support@embla.com): •... -
Page 32: Connection Types
Isolated Network It is recommended to set up a small isolated network containing one or more Embla systems and one or more acquisition computers. By isolating the network it will not be affected by downtime or other limitations of the pre-existing network and vice versa. - Page 33 Embla S4500 Clinical Manual Part of a Larger Network It is possible to connect the Embla systems and the acquisition computers directly to a larger Local Area Network (LAN). This is typically carried out by the IT department of the hospital or organization running the network.
-
Page 34: Performing A Study
Performing a Study Study Types The Embla system is designed to be flexible and can be used in different ways. Depending on the kind of study you desire, different sensors, and additional interfaces will be used. Table 4 describes the standard and physiological study setups for performing a sleep study with the Embla system. - Page 35 2. Measure the distance from the nasion to inion along the mid-line through the vertex. 3. Make a preliminary mark at the midpoint (Cz). In Embla S4500 recordings, a common reference (REF) electrode is placed here. The CZ input on the Embla S4500 can only be used as a REF placement.
- Page 36 Performing a Study 8. The second marks for O1 and O2 are made by continuing the horizontal mark for Oz. Do this by holding the tape at T3 and T4 through Oz, and extend the horizontal mark to intersect the previous O1 and O2 marks. 9.
-
Page 37: Attaching The Oximeter And Oximeter Flex Sensor
Embla S4500 Clinical Manual Conditions for use of electrodes The conductive part of electrodes and their connectors, including the ground electrode, should not contact other conductive parts including earth. To prevent the hazard of burns, all electrodes should be removed from the patient before using high frequency (HF) surgical equipment. -
Page 38: The Oximeter Sensor
The manufacturer of the oximeter, Nonin Medical Inc., has validated the oximeter. For more information, see Technical Specifications, or consult the Embla web site (www.embla.com). Attaching the Oximeter Flex Sensor The Oximeter Flex Sensor records oxygen saturation and pulse. The preferred application site for the oximeter flex sensor on adults is the index finger. - Page 39 Embla S4500 Clinical Manual To apply the oximeter: 1. Grasp the blue tab on the FlexiWrap™. Peel the paper backing away. 2. Firmly press the sensor against the adhesive side of the FlexiWrap. 3. Carefully position the adhesive side of the FlexiWrap on the finger as shown in the figure below.
-
Page 40: Other Oximeter Sensors
Performing a Study 6. For best results secure the sensor wire with medical tape, preferably around the base of the finger. Make sure that the tape securing the wire does not restrict the blood flow. Dispose of the FlexiWrap after each application. Other Oximeter Sensors It is possible to use other Nonin standard oximeter sensors certified to carry the CE mark with the Bedside Unit such as: pediatric sensor, disposable sensor and finger-clip sensor. -
Page 41: Attaching Xacttrace Respiratory Effort Sensors
Embla S4500 Clinical Manual to quantify the degree of hyperoxemia present. Interferences such as movement, abnormal hemoglobins, intravascular dyes, low perfusion states and skin pigmentation may influence the function of the pulse oximeter. Note that the temperature of the SpO2 probe may reach up to 42°C. - Page 42 Performing a Study To prepare the single use belt for the study: 1. Encircle the belt around the patient's chest to approximate the circumference for the thoracic belt. 2. When cutting the belt, reduce its circumference by 10-15cm (4-6") so that it will stretch around the thorax.
-
Page 43: Attaching The Xacttrace Belts To The Patient
Embla S4500 Clinical Manual Attaching the XactTrace Single-Use Belts to the Patient XactTrace belts are attached to the patient and are used to measure respiratory effort. The XactTrace sensor generates a high quality signal that is a measure of the thoracic (chest) and abdominal circumference. -
Page 44: Storing The Belt Lock
Performing a Study Thoracic and abdominal XactTrace belts attached to the patient. Storing the Belt Lock Proper storage of the XactTrace belt locks between recordings will increase their lifetime. To protect the sensor cable from damage, do not wrap it tightly around the Belt Lock as it may cause the cable to break where it connects to the Lock. - Page 45 Embla S4500 Clinical Manual Full Size Reduced Size inches inches Large 141-194 56-76 120-167 47-66 Medium 104-142 41-56 83-114 33-45 Small 78-104 31-41 57-77 22-30 Attaching the XactTrace Reusable Belts: When using the XactTrace belts, it is advised to avoid all unnecessary contact with moisture.
- Page 46 Performing a Study 4. Place the belt with the blue connector around the patient’s chest under the arm and snap the snap lock together. 5. Insert the blue and yellow sensor plugs into the appropriate color-coded inputs. Storing the Reusable Belt Proper storage of the XactTrace belts will increase the lifetime of the belts.
-
Page 47: Attaching The Nasal Pressure Sensor
Embla S4500 Clinical Manual • Do not wrap the sensor cable tightly around the belt lock as it may cause the cable to break where it connects to the lock. Attaching the Nasal Pressure Sensor The Bedside Unit has a built-in pressure sensor. The pressure is measured via a nasal cannula connected to the Luer Lock on top of the Bedside Unit. - Page 48 Performing a Study To apply the nasal cannula: 1. Place the nasal prongs in the nostrils. The prongs should bend downwards in the nostrils to effectively measure nasal breathing. 2. Loop the air cannula tube over the ears and then position it under the chin. 3.
-
Page 49: Attaching The Snoring Sensor
Embla S4500 Clinical Manual Attaching the Snoring Sensor An external piezo-electric snoring sensor can optionally be used with the system. When the snoring sensor is attached to a patient's throat, it generates a signal in response to vibration during snoring. Relying on vibrations rather than actual sounds eliminates all artifacts associated with external noises. -
Page 50: Attaching The Thermistor
Performing a Study Attaching the Thermistor Airflow may be measured with a thermistor that connects to the Bedside Unit. When the thermistor is used alongside a nasal cannula it can help distinguish between apneas and mouth breathing. The quality of the recorded signal depends on variables such as filters, placement, patient's respiration, room temperature and CPAP pressure. -
Page 51: Attaching The Body Position Sensor
2. Attach the sensor to the strap by using the hook Velcro on the sensor's back. To ensure proper placement, the Embla logo should be turned correctly. 3. Plug the 2 pin touch-proof connector in the Bedside Unit. No external interface or power supply is necessary. -
Page 52: Connecting Sensors To The Bedside Unit
Performing a Study Connecting Sensors to the Bedside Unit Once the sensors are attached to the patient, you must connect these inputs to the Bedside Unit Input Panel. The clinician can prepare the patient and the system in whatever order is most convenient. -
Page 53: Testing The Electrode Impedance
Although it is possible to test impedance using the test button on the input panel of the Bedside Unit, using your Embla PSG software to test impedance is recommended. If you require a specific impedance threshold, for example, 5kOhms (to meet AASM guidelines), you must perform impedance testing using your Embla PSG software. - Page 54 If an impedance test is started during a recording, the test is performed on the channels selected in the Embla PSG software, and is started from within the software application. Consult your PSG software user manual for details on how to start and stop the impedance test in the software.
-
Page 55: Activating The Calibration Test Signal
Embla S4500 Clinical Manual Activating the Calibration Test Signal The S4500 recorder, together with the Embla PSG software, allows you to verify the gain for the Bedside Unit. When you activate the calibration test signal from the Embla PSG software, the system sends a calibration signal for 30 seconds to all channels on the Bedside Unit. -
Page 56: System Maintenance
System Maintenance Cleaning the System Units The Embla S4500 bedside unit is covered with plastic coating and does not require cleaning after each use. When necessary, clean with a damp cloth. Isopropyl alcohol may also be used for disinfecting the exterior of the unit. The contact of liquid to the inner parts and the connectors of the units should be avoided at all times. -
Page 57: Single Use Sensors
• The operating temperature range is between +5°C (41°F) and +45°C (113°F). • Avoid using the Embla in high humidity, where there is a danger of water condensing inside the recorder. • The warranty is void if the system is opened. -
Page 58: Factory Calibration
The Embla system is calibrated in production and no further calibration is needed. Disposal The units in the Embla system are to be disposed of like other electronic equipment. The Communication Unit contains Nickel Metal Hydride (NIMH) batteries that should be... -
Page 59: Troubleshooting
Troubleshooting This section provides some steps that can be taken to quickly troubleshoot the Embla S4500 system. If the system does not operate correctly after troubleshooting, contact your local representative. • No part of the system is serviceable by third party technical personnel. - Page 60 Troubleshooting An unclear respiratory effort signal may be caused by the incorrect preparation of the XactTrace belts. If the crimping of the XactTrace belts is not properly done, the respiratory effort tracing may be incomplete or unclear. Crimping refers to the process of inserting the cut end of the belt into the catch of the Belt Lock and tightening until the white mark on the top matches the closed lock symbol on the catch.
-
Page 61: Technical Specifications
Technical Specifications Communication Unit Table 8: Communication Unit Technical Specifications Description Properties LAN (Ethernet) 10Base-T (10 Mbps) RS232 port speed (COM A & B) Up to 115.2 kbits per second Input AC voltage, non-isolated 115 V/ 230 V Input AC current, non-isolated 100/50 mA Input DC voltage to 8 AUX channels ±5V... -
Page 62: Bedside Unit
Technical Specifications Description Properties Storage and transport temperature -20°C (-4°F) to +60°C (140°F) Pressure Withstands atmospheric pressures from 0.5 to 2 Humidity 0-95% (non-condensing) COM A & B Serial Ports RS-232 signal level serial ports. In addition to the RX and TX signals, the port also includes a 5V power source, from which a total of 120mA can be drawn. - Page 63 Embla S4500 Clinical Manual Description Properties External channels Signals supported: Nonin oximeter, Thermistor, Snoring Sensor, Abdominal belt (XactTrace), Thoracic belt (XactTrace), Body Position Sensor Internal channels Pressure input Pressure range • ± 50 mbar Sampling rates (base 10) Referential channels: Fs = 50, 100, 200 and 500 Hz Bipolar channels: Fs = 2, 10, 20, 50, 100, 200 and 500 Hz.
-
Page 64: Bedside Unit Bracket
Technical Specifications Description Properties Dimension Height: 27 mm (1.06 in) Width: 130 mm (5.12 in) Length: 190 mm (7.48 in) Weight 620 g (1.37 lbs) Operating temperature +5°C to +45°C (40°F to +113°F) Storage and transport -20°C (-4°F) to +60°C (140°F) temperature Pressure Withstands atmospheric pressures from 0.5 to 2 bar... -
Page 65: Oximeter Accuracy For Type Nonin Xpod
Not specified for all sensors Plethysmograph 75Hz Pulse/HR value 18- 300bpm (3Hz) ±3% ±1bpm Signal Properties Oxygen saturation range Range 0 - 100% (3Hz) SpO2 beat-to-beat value 0-100% (3Hz) For more information on oximeters consult the Embla Web site products page (www.embla.com/products). -
Page 66: Materials List
Technical Specifications Materials List The following table details the Embla S4500 System component materials. Table 12: Embla S4500 System Materials List Component Material Communication Unit ABS/PC Bedside Unit ABS/PC System Cables Mounting Bracket Nylon Shoulder Strap Nylon Elastic Strap Nylon, Velcro®... -
Page 67: Further Readings
Further Readings Iber C, Ancoli-Israel S, Chesson A Jr, Quan S. AASM Manual for the Scoring of Sleep and Associated Events: Rules, Terminology and Technical Specification. (2007). Collop NA, Anderson WM, Boehlecke B, Claman D, Goldberg R, Gottleib DJ, Hudgel D, Sateia M, Schwab R: Portable Monitoring Task Force on the American Academy of Sleep Medicine. - Page 68 Further Readings American Academy of Sleep Medicine Task Force. "Sleep-related breathing disorders in adults: recommendations for syndrome definition and measurement techniques in clinical research". Sleep 1999;22:667-689. American Sleep Disorders Association. "Obstructive Sleep Apnea Syndrome". In The International Classification of Sleep Disorders. Diagnostic and Coding Manual, revised. Rochester, MN: America Sleep Disorders Association.
-
Page 69: List Of Tables
Table 8: Communication Unit Technical Specifications, p. 54 Table 9: Bedside Unit Technical Specifications, p. 55 Table 10: Bedside Unit Bracket Technical Specifications, p. 57 Table 11: Oximeter Accuracy for Type Nonin Xpod, p. 58 Table 12: Embla S4500 System Materials List, p. 59... -
Page 70: Glossary
Glossary AHI: Apnea-Hypopnea Index AI: Apnea Index ASDA: American Sleep Disorder Association CPAP: Continuous Positive Airway Pressure EEG: Electroencephalogram EKG/ECG: Electrocardiogram EMG: Electromyogram EOG: Electro-Oculogram ESD: Electrostatic Discharges HI: Hypopnea Index IP: Internet Protocol IT: Information Technology LAN: Local Area Network LED: Light Emitting Diode MRI: Magnetic Resonance Imaging... - Page 71 Embla S4500 Clinical Manual PGND: Patient Ground PSG: Polysomnography RDI: Respiratory Disturbance Index RF: Radio Frequency RIP: Respiratory Inductive Plethysmograph TCP: Transmission Control Protocol TP: Twisted-pair...
- Page 72 Index gain..............48 mounting bracket ........14 10-20 system ..........27 shoulder strap........15, 48 technical specifications......55 Bedside Unit bracket........14 Accuracy of oximeter ........58 mounting .............18 Activating calibration test signal....48 technical specifications......57 Amplitude ............48 Bedside Unit cable ........14 Applying nasal cannula ......40 Belt Lock............34 Assembling the system....21, 22, 24 storage............34...
- Page 73 Embla S4500 Clinical Manual Certifications ............5 Ethernet cable ..........10 Channel inputs........12, 45 Ethernet network ...........24 Classifications...........6 External sensors..........16 Cleaning sensors........... 49 Cleaning the system........49 Color code on Bedside Unit ....... 45 Factory calibration ........51 COM A & B inputs ..........8 Fasteners for Communication Unit ....
- Page 74 Index accuracy .............58 attaching.............30 Knowledge Base ..........2 Oxygen saturation ........30 LAN .............8, 24 Patient isolation..........7 Larger network..........24 Patient leaving bed........48 Lights............... 10 Performing a study........27 Bedside Unit ..........10 PGND..............12 Communication Unit........7 Physiological study setup ......27 List of materials ..........59 Plastic fasteners ..........
- Page 75 Embla S4500 Clinical Manual cleaning............49 attaching.............43 electrodes ..........15 Trigger input/output ........8 sensor inputs ..........16 Troubleshooting..........52 Serial Communication Unit cable ....10 Types of studies ..........27 Serial number ..........20 Serial ports............8 Shoulder strap ..........15 Unclear signals ..........52 Single use electrodes........
- Page 76 2800107 *2800107*...
Need help?
Do you have a question about the S4500 and is the answer not in the manual?
Questions and answers