ALPHA LITE FS Series User Manual
Spot light
Hide thumbs
Also See for FS Series:
- User manual book (28 pages) ,
- User manual (27 pages) ,
- User manual book (28 pages)
Table of Contents
Advertisement
Quick Links
Advertisement
Table of Contents

Related Manuals for ALPHA LITE FS Series


Summary of Contents for ALPHA LITE FS Series
- Page 1 SPOT LIGHT FS SERIES USER MANUAL July 2018...
-
Page 2: Safety Information
Safety Information 1. Do not open or disassemble the cover to reduce the risk of electric shock. 2. Please wear safety equipment such as safety helmet during work. WARNING 3. The work should be done under the direction of approved specialist who is trained in safety and mechanical installations. -
Page 3: Table Of Contents
Summary Safety Information Summary Fixture Information Fixture Exterior View Dimensions Power Connection Through and DMX512 Connection Smart LCD Control Setting Spot Light Encoder Menu Function Setting Order Error and Information Message Technical Specifications Photometric Diagram Mode & DMX Channel & RDM DMX Protocols Summary... -
Page 4: Fixture Information
LED and color temperature change by chromatic aberration. FS Series is a single light source with a large capacity, such as a halogen lamp, and the texture of the light source projected by the lens is very soft. -
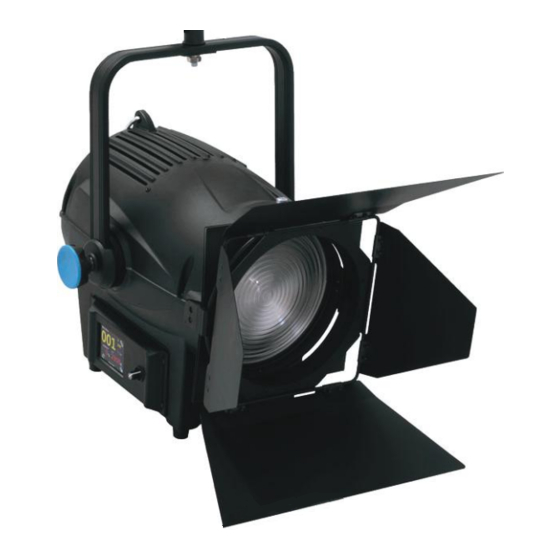
Page 5: Fixture Exterior View
Fixture Exterior View Stirrup Handle Install Area Screen Focus Knob Install Area Connector Panel Fixed Knob Install Area Fixture Exterior View... -
Page 6: Dimensions
Dimensions (FS-1.5 / FS-2.0) (inch) ~170 (14.2) (~6.7) (11.2) (14.4) (w/ Knob) (1.3) (2.7) (6.9) (6.4) (14.2) (9.5) Dimensions... - Page 7 Dimensions (FS-3.0) (inch) ~224 (13.7) (16.3) (~8.8) (17) (w/ Knob) (1.3) (2.7) (6.8) (10.6) (16.5) Dimensions...
-
Page 8: Power Connection
Power Connection Power Power AC power at 100-250V, 50-60Hz Connection Connection 1. ON/OFF SWITCH 2. POWER IN 3. DMX IN 4. DMX OUT 5. USB PORT 1. Observe the proper voltage range 2. If power is supplied outside the range, noise may be generated from the SMPS. 3. -
Page 9: Through And Dmx512 Connection
Through and DMX512 Connection DMX512 3-pin or 5-pin XLR sockets are equipped for DMX input and output, depending on user needs. Connect the controller to a lighting, or lighting fixture to other lighting fixture. Connection If user uses a standard DMX controller, the DMX output of the controller can connect directly to the DMX input of the first fixture in the DMX chain. -
Page 10: Smart Lcd Control
Smart LCD Control Current Mode DMX Address The number indicates the address of the DMX512. To change the DMX512 Address, touch and input the value. In normal operation, the number will not blink. Intensity (Lighting Brightness) Main Screen Displays the brightness value(0~100%) of the equipment. - Page 11 Smart LCD Control Wireless communication status Displays the strength of the connection signal with the wireless module. Current CRI CCT (Color Temperature) The number indicates the color temperature of the equipment. In Mode 1, possible to set the color temperature value user want. In Mode 2, displays the color temperature value by the channel setting.
- Page 12 Setting Intensity (Lighting Brightness) Brightness value is adjusted by touch on the gradient or press +,-. Channel Mode 1 : Dimming (Channel 1) 2 : Dimming (Channel 1), CCT (Channel 2) LCD Screen Setting LCD ON : The screen stays on all the time. LCD OFF 30s : After 30 seconds, the screen goes off.
-
Page 13: Spot Light Encoder Menu
Spot Light Encoder 1. The encoder is not working while LCD touch setting 2. LCD touch setting is not working while the encoder activates. 3. When press the encoder on the main screen, the menu setting appears. 4. Press the encoder to select the value and enter the menu. 5. - Page 14 Function Setting Order User Mode 1. Press the encoder, the menu setting appears. 2. Move to ‘MODER SELECT’ and press the encoder. Setting 3. It will be displayed as (2). Move to ‘USER MODE’ and press encoder. 4. On the screen (3), turning the encoder clockwise to increase the value and counterclockwise to decrease the value.
- Page 15 Function Setting Order DMX512 Mode 1. Press the encoder, the menu setting appears. 2. Move to ‘MODER SELECT’ and press the encoder. Setting 3. It will be displayed as (2), move to ‘DMX MODE’ and press encoder. 4. On the screen (3), select channel mode and press the encoder. 5.
- Page 16 Function Setting Order Kelvin Setting 1. Press the encoder, the menu setting appears. 2. Move to ‘SET KELVIN’ and press the encoder. 3. On the screen (2), turn the encoder clockwise or counterclockwise to set KELVIN value. Press the encoder and all the value are saved. Automatically go to main screen. LCD 30 Sec 1.
- Page 17 Function Setting Order FIXTURE ID 1. Press the encoder, the menu setting appears. 2. Move to ‘FIXTURE NUMBER’ and press the encoder. Setting 3. On the screen (2), select ‘FIXTURE NUMBER’ and press the encoder. 4. On the screen (3), the cursor is on the units digit. Turning encoder to set the value. Go to 10th digit pressing the encoder, go to 100th digit pressing the encoder one more time.
-
Page 18: Function Setting Order
Function Setting Order ROTATE DISPLAY 1. Press the encoder, the menu setting appears. Setting 2. Move to ‘ROTATE DISPLAY’ and press the encoder. 3. The screen is upside down. WIRE MODE SET 1. Press the encoder, the menu setting appears. 2. -
Page 19: Error And Information Message
Error and Information Message Temperature Detects the temperature of the currnet equipment, Sensor and appears the temperature on the LCD when it reaches a certain temperature. - LED - Drive - Housing Fan Sensor The fan speed level is displayed on the LCD by detecting the speed. Error and Information Message... -
Page 20: Technical Specifications
Technical Specifications FS-1.5 FS-2.0 FS-3.0 Optical System Focusable Fresnel Lens Lens Diameter 200mm / 8” 200mm / 8” 250mm / 10” Beam Angle 20°~60° (Half Peak Angle) Weight 12kg / Pole Up 14kg 12kg / Pole Up 14kg 15kg / Pole Up 17kg Handling Adjusting Sliding Stirrup, High Strength Tilt Lock Mounting... -
Page 21: Photometric Diagram
Photometric Diagrams Distance (m) Flood 55° Middle 30° SPOT 15° FS-1.5 (55°) 1500 illuminance(lux) FS-2.0 (55°) 2300 Source Four 15-55° Zoom set at 55° (cosine) ISO-Luminace Diagram Distance (m) Flood 68° Middle 50° SPOT 30° FS-3.0 (68°) 3300 1350 illuminance(lux) Photometric Diagrams... -
Page 22: Mode & Dmx Channel & Rdm
Mode & DMX Channel & RDM Mode Channel Value Function 0-255 0-100 Dimmer 0-255 0-100 Color Macro Parameter ID Discovery command SET command GET command DISC_UNIQUE_BRANCH DISC_MUTE DISC_UN_MUTE DEVICE_INFO SUPPORTED_PARAMETERS SOFTWARE_VERSION_LABEL DMX_START_ADDRESS IDENTIFY_DEVICE DEVICE_MODEL_DESCRIPTION MANUFACTURER_LABEL DEVICE_LABEL SENSOR_DEFINITION SENSOR_VALUE DMX_PERSONALITY DMX_PERSONALITY_DESCRIPTION STATUS_MESSAGES Mode &... -
Page 23: Dmx Protocols
DMX Protocols MODE #1 DMX Value Function MODE #2 DMX Value Function MODE #2 DMX Value Function CHANNEL 1 0~255 Dimmer 0~100% CHANNEL 2 76~79 3850 CHANNEL 2 168~171 5000 80~83 3900 172~175 5050 MODE #2 DMX Value Function 84~87 3950 176~179 5100... - Page 24 For more information and questions, please visit our Website(www.alpha-lite.net), or call Telephone(82-2-6317-0464). ALPHA LITE Co.,Ltd. #504, HausD Biz, 10, Seonyu-ro 3 gil, Yeongdeungpo-gu, Seoul, South Korea Email : hello@alpha-lite.net Fax : 82-2-2039-0464...
Need help?
Do you have a question about the FS Series and is the answer not in the manual?
Questions and answers