
Related Manuals for Celestron Nexstar Evolution 12090


Summary of Contents for Celestron Nexstar Evolution 12090
- Page 1 ® I N ST R U CT I O N M A N UA L Model #12090- NexStar Evo 6 Model #12091- NexStar Evo 8 Model #12092- NexStar Evo 9.25...
-
Page 3: Table Of Contents
NexStar Evolution Telescope Settings in NexStar+ Hand Control NexStar+ Hand Control for NexStar Evolution Menu Tree Advanced Menu Tree Telescope Maintenance Appendix A: Specifications Appendix B: Advanced WiFi Appendix C: L E D Status Celestron Two Year Limited Warranty ENGLISH... - Page 4 ENGLISH...
-
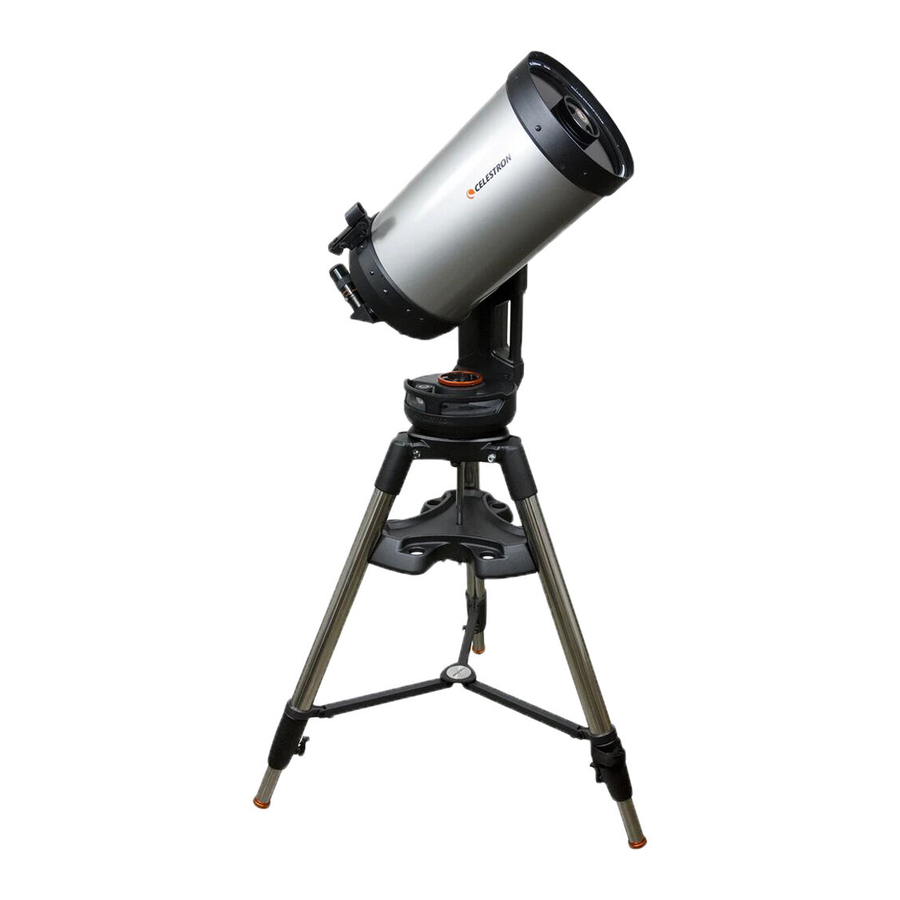
Page 5: What's In The Box
WHAT’S IN THE BOX Altitude Clutch Knob Power & Charging L E D Carry Handle WiFi L E D USB Power Output Port Power Input Port Auxiliary Ports 3 & 4 Bubble Level Tripod Support Nut and Washer Acessory Tray Leg Height Adjustment Lock Knob Telescope Optical Tube StarPointer Red Dot Finder... - Page 6 • An Apple iOS device with iOS 7 0 and later or an Android device with Android 4 0 if used without the included Nex- Star+ hand control • Free download of Celestron SkyPortal app from the App Store or Google Play if used without the included NexStar+ hand control •...
-
Page 7: Assembly And Setup
ASSEMBLY AND SETUP Remove the parts from their shipping cartons and go over all the items in the parts list Keep all of the original packaging so it can be used to transport the telescope safely Set the fork arm mount on a sturdy flat surface Remove all of the accessories from their individual boxes TRIPOD 1 Spread the tripod legs and stand the tripod upright... - Page 8 TELESCOPE OPTICAL TUBE The 6” optical tube is preinstalled with the telescope The 8” and 9 25” models require installing the optical tube onto the fork arm mount 1 Unlock the altitude clutch by loosening the orange altitude clutch lock knob 2 Rotate the altitude axis until the quick release knob faces Quick Release downward...
- Page 9 ALIGNING THE STARPOINTER RED DOT FINDERSCOPE The StarPointer is powered by a long life 3-volt lithium battery (#CR2032) located underneath the front portion of the Star Pointer The StarPointer must be properly aligned with the telescope before it can be used This is a simple process using the azimuth and altitude control knobs located on the side and bottom of the StarPointer The alignment procedure is best done at night since the LED dot will be difficult to see during the day 1 Turn on the StarPointer by rotating the variable brightness...
-
Page 10: Getting Started - Using Your Smart Device
Earth rotates This keeps objects centered in the eyepiece, and makes it easy to share views with family and friends SkyPortal’s default alignment uses Celestron’s SkyAlign™ technology which only requires centering any three bright stars in the sky, without having to know their names And since your smart device already accounts for date, time and location, there... -
Page 11: Pointing To Objects In Skyportal And Other Telescope Functions
1 Set up your telescope as you did during the day Make sure your star diagonal and 40mm eyepiece are installed Set the tripod to a comfortable height and level it Turn the telescope on 2 Connect to the “SkyQLink-xx” WiFi network Open the SkyPortal app Select the telescope icon at on your screen, then press “Connect and Align”... - Page 12 Connect is useful if you keep the telescope set up and close the app, or walk out of WiFi range, then return to the telescope later to resume the alignment Connect and Align will start a new alignment The default uses SkyAlign™ which requires centering any three bright stars in the sky Note: Any time “Connect and Align”...
-
Page 13: Skyportal Telescope Setup And Control Menu
• Tray Lighting - Adjusts the LED brightness of the accessory tray light Light can be turned off by sliding all the way to 0 • Logo Lighting - Adjusts the LED brightness of the Celestron power logo and the WiFi logo Can be dimmed down or shut... - Page 14 ANTI-BACKLASH All mechanical gears have a certain amount of backlash or play between the gears This is seen as a delay in the time it takes for the telescope to move after a direction arrow is pressed, especially when changing directions Anti-backlash compensates for backlash by inputting a value which quickly rewinds the motors just enough to eliminate the play between gears •...
-
Page 15: Getting Started - Using The Nexstar+ Control
The NexStar Evolution includes a computerized hand control to operate the telescope directly without the use of the WiFi connection to Celestron SkyPortal The hand control can be plugged into any of the 4 AUX ports on the mount 1 Liquid Crystal Display (LC D) Window: Has a four-line,... -
Page 16: Overview Of Two Popular Alignment Methods
ALIGNMENT PROCEDURES For the telescope to accurately point to objects in the sky, it must first be aligned with known positions (stars) With this information, the telescope can create a model of the sky, which it uses to locate any object with known coordinates There are many ways to align your telescope with the sky depending on what information the user is able to provide: •... -
Page 17: Using A Wedge With Eq North / Eq South Alignment
ALIGNING WITH AUTO TWO STAR After the first star is selected and centered, the second star will automatically be chosen for the best possible alignment Once selected, the telescope will automatically slew to the second alignment star to complete the alignment 1 Flip the NexStar’s power switch on The hand control will display “Verifying Packages…”... -
Page 18: Nexstar Evolution Telescope Settings In Nexstar+ Hand Control
NEXSTAR EVOLUTION TELESCOPE SETTINGS IN NEXSTAR+ HAND CONTROL Press Menu, scroll to the “Peripherals” menu and press ENTER Here, you can control L E D brightness of the logo lights and accessory tray lighting, check the battery status, or set more advanced features including external power supply and USB charge port settings ADJUST THE L.E.D. -
Page 19: Nexstar+ Hand Control For Nexstar Evolution Menu Tree
NEXSTAR+ HAND CONTROL FOR NEXSTAR EVOLUTION MENU TREE Menu Tracking Mode EQ North EQ South Alt - Az Rate Sedereal Solar Lunar View Time-Site Saved Site Hand Control Light Control Keypad Level Display Level Scrolling Menu Toggle Bold Font Set Contrast Set Language Scope Setup See Diagram - Next Page... -
Page 20: Advanced Menu Tree
ADVANCED MENU TREE Scope Setup Setup Time-Site Custom Site City Database Anti-Backlash Alt Positive Alt Negative AZM Positive AZM Negative Slew Limits Filter Limits Direction Button Alt Button AZM Button Goto Approach AH Approach AZM Approach Cordwrap Custom Rate 9 AZM Axis Enable Set Rate... -
Page 21: Telescope Maintenance
The easiest way to prevent dew is to add an optional dew shield, available from Celestron, which shrouds the corrector and keeps the air immediately surrounding the corrector slightly warmer than the ambient temperature If conditions are more severe,... - Page 22 To accomplish this, you need to adjust the secondary collimation screw(s) that move the star across the field toward the direction of the skewed light These screws are located on the secondary mirror holder Note: Make only small 1/6 to 1/8 adjustments to the collimation screws and re-center the star by moving the scope before making any improvements or before making further adjustments.
-
Page 23: Appendix A: Specifications
APPENDIX A: SPECIFICATIONS Mount Mount Type Computerized Altitude-Azimuth Worm Gears Brass worm gears with ball bearings Stainless steel 146mm diameter, 180 teeth Worm Wheels Internal Battery 9 6V, 4 5Ah lithium iron phosphate battery (LiFePO4) Up to 4 5A with optional power supply if battery charge, Max Power Consumption USB charge port, and telescope are used simultaneously 0 0001A... - Page 24 NexStar Evolution 8 Telescope Schmidt Cassegrain Optical Design Aperture 203 2mm Focal Length 2032mm Focal Ratio Focal Length of Eyepiece 1 40mm Focal Length of Eyepiece 2 13mm Magnification of Eyepiece 1 156x Magnification of Eyepiece 2 Finderscope StarPointer, uses 3V CR2032 lithium button battery Star Diagonal 1 25”...
-
Page 25: Appendix B: Advanced Wifi
NexStar Evolution 9.25 Telescope Optical Deisgn Schmidt-Cassegrain 235mm Aperture Focal Length 2350mm Focal Ratio Focal Length of Eyepiece 1 40mm Focal Length of Eyepiece 2 13mm Magnification of Eyepiece 1 Magnification of Eyepiece 2 180x StarPointer Finderscope Star Diagonal 1 25” 555x Highest Useful Magnification Lowest Useful Magnification... -
Page 26: Appendix C: L E D Status
TERMS SET FORTH HEREIN. CELESTRON EXPRESSLY DISCLAIMS ANY LOST PROFITS, GENERAL, SPECIAL, INDIRECT OR CONSEQUENTIAL DAMAGES WHICH MAY RESULT FROM BREACH OF ANY WARRANTY, OR ARISING OUT OF THE USE OR INABILITY TO USE ANY CELESTRON PRODUCT. ANY WARRANTIES WHICH ARE IMPLIED AND WHICH CANNOT BE DISCLAIMED SHALL BE LIMITED IN DURATION TO A TERM OF TWO YEARS FROM THE DATE OF ORIGINAL RETAIL PURCHASE. - Page 27 NOTE: This warranty is valid to U.S.A. and Canadian customers who have purchased this product from an authorized Celestron dealer in the U.S.A. or Canada. Warranty outside the U.S.A. and Canada is valid only to customers who purchased from a Celestron’s International Distributor or Authorized Celestron Dealer in the specific country. Please contact them for any warranty service.
- Page 29 ® MODE D'EMPLOI Modèle N°. 12090- NexStar Evo 6 Modèle N°. 12091- NexStar Evo 8 Modèle N°. 12092- NexStar Evo 9.25...
- Page 30 FRANÇAIS...
- Page 31 Arbre de menu du contrôle à main NexStar+ pour NexStar Evolution Arbre du menu avancé Maintenance du télescope Annexe A : Caractéristiques techniques Annexe B : Wi-Fi Avancé Annexe C : DEL État Garantie limitée de deux ans Celestron FRANÇAIS...
- Page 32 FRANÇAIS...
-
Page 33: Contenu De La Boîte
CONTENU DE LA BOÎTE Bouton de blocage de l'altitude DEL d'alimentation et de charge Poignée de transport DEL Wi-Fi Port USB pour alimentation externe Port d'alimentation Ports auxiliaires 3 et 4 Niveau à bulle Molette et rondelle du support du trépied Plateau à... - Page 34 CONDITIONS PRÉALABLES • Prise secteur pour charger le télescope avec l'adaptateur secteur CA inclus • Un appareil Apple iOS avec iOS 7 0 et plus récent ou un appareil Android avec Android 4 0 si utilisé conjointement avec le contrôle à main NexStar+ inclus •...
-
Page 35: Assemblage Et Installation
ASSEMBLAGE ET INSTALLATION Sortez toutes les pièces des cartons de transport et vérifier la présence de tous les éléments par rapport à la liste des pièces Conservez l'emballage original de manière à pouvoir transporter le télescope en toute sécurité Posez le bras de monture à... - Page 36 TUBE OPTIQUE Le tube optique de 6" est préinstallé sur le télescope dans le cas des modèles 8” et 9 25”, il est nécessaire d'installer le tube optique sur la monture à fourche 1 Déverrouillez le verrouillage d'altitude en desserrant la molette de verrouillage d'altitude orange 2 Faites pivoter l'axe d'altitude jusqu'à...
- Page 37 ALIGNER LE CHERCHEUR À POINT ROUGE STARPOINTER Le StarPointer est alimenté par une pile longue durée de vie de 3 volts (#CR2032) , située sur le dessous de la portion avant du StarPointer Le StarPointer doit être correctement aligné avec le télescope avant de l'utiliser Ceci est un processus très simple utilisant les molettes d'azimut et d'altitude situées sur le côté...
-
Page 38: Pour Commencer - Utilisation De Votre Appareil Intelligent
Par défaut, SkyPortal utilise la technologie d'alignement SkyAlign™ de Celestron, qui n'a besoin d'un centrage que sur trois étoiles brillantes de votre choix dans le ciel, sans nécessiter de connaître leur nom Et puisque votre appareil intelligent indique la date, l'heure et votre localisation géographique, vous n'avez pas besoin d'un GPS, ni de saisir des informations... -
Page 39: Pointer Vers Des Objets Avec Skyportal Et Autres Fonctions Du Télescope
1 Installez votre télescope comme vous l'avez fait pendant la journée Assurez-vous que votre renvoi coudé et votre oculaire de 40mm sont installés Ajustez le trépied à une hauteur confortable et nivelez-le Allumez le télescope 2 Connectez-vous au réseau Wi-Fi « SkyQLink-xx » Ouvrez l'application SkyPortal Sélectionnez l'icône de télescope sur l'écran, puis appuyez sur «... - Page 40 Connecter est utile si vous souhaitez conserver la configuration du télescope et fermer l’application, ou vous éloigner hors de portée du réseau Wi-Fi, puis y revenir plus tard pour terminer l’alignement Connecter et aligner lancera un nouvel alignement Par défaut, SkyAlign™ est utilisé, ce qui nécessite le centrage sur trois étoiles brillantes de votre choix dans le ciel Note : À...
-
Page 41: Configuration Du Télescope Avec Skyportal Et Menu De Contrôle
0 • Éclairage du logo - Pour ajuster la luminosité de la DEL du logo d’alimentation Celestron, ainsi que du symbole Wi-Fi Vous pouvez en réduire la luminosité ou l’éteindre complètement si vous-vous trouvez sous un ciel sombre COMPORTEMENT •... - Page 42 ANTI-REBOND Tous les engrenages mécaniques ont un certain de niveau de rebond et de jeu entre les engrenages Ceci est visible par un délai présent entre le moment où vous appuyez sur un bouton de direction, et le moment où le mouvement est appliqué...
-
Page 43: Pour Commencer - Utilisation Du Contrôle De Votre Nexstar
Le NexStar Evolution utiliser un contrôle à main électronique qui contrôle le télescope directement, sans nécessiter de connexion Wi-Fi à SkyPortal de Celestron Le contrôle à main peut être branché dans l’un des 4 ports AUX de la monture 1 Fenêtre de l’écran à cristaux liquides (LC D) : Écran d'affichage de deux lignes de 18 caractères avec... -
Page 44: Présentation De Deux Méthodes D'alignement Populaires
PROCÉDURES D'ALIGNEMENT Pour que le télescope s’oriente avec précision vers des objets du ciel, il doit d’abord être orienté sur des positions connues (étoiles) Avec cette information, le télescope peut créer un modèle du ciel, qu'il utilise pour localiser n'importe quel objet avec des coordonnées connues Il y a plusieurs façons d'aligner votre télescope avec le ciel selon les informations que l'utilisateur est en mesure de fournir : •... -
Page 45: Utilisation D'une Cale Avec Alignement Eq Nord / Eq Sud
ALIGNER AVEC AUTO DEUX ÉTOILES Une fois une étoile sélectionnée et centrée, la seconde étoile sera automatiquement sélectionnée pour obtenir le meilleur alignement possible Une fois sélectionné, le télescope s’orientera automatiquement vers la seconde étoile d’alignement pour terminer la procédure 1 Activez le bouton d'alimentation du NexStar Le contrôle à... -
Page 46: Réglages Du Télescope Nexstar Evolution Dans Le Contrôle À Main Nexstar
Lorsque le télescope a été aligné sur chaque étoile, l’écran affiche Alignement réussi Vous êtes maintenant prêt à trouver votre premier objet Le suivi se fera maintenant équatorialemment, se déplaçant dans une direction pour garder l’objet centré dans le champ de vision du télescope, sans pivoter Ce type de suivi est adapté à l’astrophotographie RÉGLAGES DU TÉLESCOPE NEXSTAR EVOLUTION DANS LE CONTRÔLE À... -
Page 47: Arbre De Menu Du Contrôle À Main Nexstar+ Pour Nexstar Evolution
ARBRE DE MENU DU CONTRÔLE À MAIN NEXSTAR+ POUR NEXSTAR EVOLUTION Menu Suivi Mode EQ Nord EQ Sud Alt - Az Désactivé Taux Sidéral Solaire Lunaire Afficher heure-site Site enregistré Contrôle à main Contrôle d'éclairage Éclairage du clavier Éclairage de l'affichage Menu de Défilement Activer les caractères gras Contraste... -
Page 48: Arbre Du Menu Avancé
ARBRE DU MENU AVANCÉ Configurer heure-site Site personnalisé Réglage du Télescope Base de données de villes Anti-rebond Alt positif Alt négatif AZM positif AZM négatif Limites d'orientation Limites de filtre Touches de direction Bouton Alt Bouton AZM Approche Aller à Approche AH Approche AZM Enroulement de... -
Page 49: Maintenance Du Télescope
Les réglages internes et le nettoyage ne devraient être effectués que par le service de réparation de Celestron Si votre télescope a besoin d'un nettoyage interne, veuillez appeler l'usine pour obtenir un numéro d'autorisation de retour et un devis COLLIMATION Les performances optiques de votre télescope sont directement liées à... - Page 50 Pour faire cela, vous devrez ajuster la ou les vis de collimation secondaires qui déplaceront l’étoile dans le champ de vision dans le sens du déséquilibre Ces vis se trouvent sur le support du miroir secondaire Note : Effectuez seulement de petits ajustements de 1/6 ou 1/8 sur les vis de collimation et recentrez l’étoile en déplaçant le télescope avant d’effectuer des améliorations, ou avant d’effectuer des ajustements supplémentaires.
-
Page 51: Annexe A : Caractéristiques Techniques
ANNEXE A : CARACTÉRISTIQUES TECHNIQUES Monture Type de monture Monture électronique altazimutale Engrenages d’entraînement Engrenages d'entraînement avec roulements à bille Roues d’entraînement Acier inoxydable de 146mm de diamètre, 180 dents Pile au phosphate de lithium-ion de 9,6 V, 4,5 Ah (LiFePO4) Pile intégrée Consommation maximum Jusqu’à... - Page 52 Télescope NexStar Evolution 8 Schmidt Cassegrain Conception optique Ouverture 203,2mm Distance focale 2032mm Rapport focal Longueur de focale de l’oculaire 1 40mm Longueur de focale de l’oculaire 2 13mm Puissance d’agrandissement de l’oculaire 1 156x Puissance d’agrandissement de l’oculaire 2 Chercheur StarPointer, utilisant une pile-bouton au lithium de 3 V de type CR2032...
-
Page 53: Annexe B : Wi-Fi Avancé
Télescope NexStar Evolution 9,25 Conception optique Schmidt-Cassegrain 235mm Ouverture Distance focale 2350mm Rapport focal Longueur de focale de l’oculaire 1 40mm Longueur de focale de l’oculaire 2 13mm Puissance d’agrandissement de l’oculaire 1 Puissance d’agrandissement de l’oculaire 2 180x Lunette de recherche Chercheur Diagonale en étoile 1,25”... -
Page 54: Annexe C : Del État
PARTICULIER OU INDIRECT POUVANT RÉSULTER DE LA VIOLATION DE TOUTE GARANTIE, OU EN RAISON DE L’UTILISATION DE, OU DE L’INCAPACITÉ À UTILISER, UN PRODUIT CELESTRON. TOUTE GARANTIE IMPLICITE QUI EST ET QUI NE PEUT ÊTRE DÉCLINÉE SERA LIMITÉE À UNE DURÉE DE DEUX ANS À PARTIR DE LA DATE D’ A CHAT INITIALE. - Page 55 Cette garantie est valable pour les clients américains et canadiens qui ont acheté ce produit auprès d’un revendeur agréé Celestron aux États-Unis ou au Canada La garantie en dehors des É.-U. et du Canada n’est valable que pour les clients ayant acheté le produit d’un distributeur international de Celestron ou d’un distributeur agréé dans le pays en question.
- Page 57 ® BEDIENUNGSANLEITUNG Modell #12090- NexStar Evo 6 Modell #12091- NexStar Evo 8 Modell #12092- NexStar Evo 9.25...
- Page 58 DEUTSCH...
- Page 59 Mit der Polhöhenwiege EQ Nord/EQ Süd ausrichten NexStar Evolution Teleskopeinstellungen in NexStar+ Handsteuerung NexStar+ Handsteuerung für NexStar Evolution Menübaum Erweiterter Menübaum Teleskop Wartung Anhang A: Technische Daten Anhang B: Erweitertes WLAN Anhang C: LED Status Zweijährige eingeschränkte Garantie von Celestron DEUTSCH...
- Page 60 DEUTSCH...
-
Page 61: Lieferumfang
LIEFERUMFANG Höhenkupplungsknopf Akku- und Lade-LED Tragegriff WLAN LED USB-Stromausgang Stromeingang Zusatzanschlüsse 3 und 4 Wasserwaage Mutter und Unterlegscheibe der Stativhalterung Zubehörablage Beinhöhenverstellungssperrknopf Teleskop-Optischer Tubus StarPointer Leuchtpunktsucherfernrohr Okular Okularadapter Zenitspiegel Fokussierknopf Zusatzanschlüsse 1 und 2 WLAN Schalter Reset-Schalter Azimutkupplungsknopf Tragegriff TEILELISTE Netzschalter Tubenbaugruppe 1 25”... - Page 62 • Ein Apple iOS-Gerät mit iOS 7 0 oder höher oder ein Android-Gerät mit Android 4 0, wenn es ohne die mitgelieferte NexStar+ Handsteuerung verwendet wird • Kostenloser Download der Celestron SkyPortal App aus dem App Store oder Google Play, wenn es ohne den mitgelieferten NexStar+ Handsteuerung verwendet wird •...
-
Page 63: Aufbau Und Einrichten
AUFBAU UND EINRICHTEN Nehmen Sie alle Teile aus den Versandkartons und kontrollieren Sie alle Artikel anhand der Teileliste Bewahren Sie die gesamte Originalverpackung auf, damit das Teleskop sicher transportiert werden kann Stellen Sie die Gabelhalterung auf eine stabile, flache Oberfläche Nehmen Sie alle Zubehörteile aus den einzelnen Schachteln STATIV 1 Ziehen Sie die Stativbeine auseinander und stellen Sie das Stativ auf... - Page 64 TELESKOP OPTISCHER TUBUS Der 6” optische Tubus ist in dem Teleskop vorinstalliert Bei den 8” und 9,25” Modellen muss der optische Tubus auf der Gabel- armhalterung installiert werden 1 Entriegeln Sie die Höhenkupplung, indem Sie den orangefarbenen Höhenverriegelungsknopf lockern 2 Drehen Sie die Höhenachse so lange, bis der Schnellentriegelungs- Schnellspannknopf nach unten zeigt Knopf...
- Page 65 STARPOINTER LEUCHTPUNKTSUCHER AUSRICHTEN Der StarPointer wird von einem langlebigen 3-Volt-Lithium-Akku (#CR2032) angetrieben, der sich unter dem vorderen Teil des StarPointer befindet Der StarPointer muss korrekt auf das Teleskop ausgerichtet sein, bevor er verwendet werden kann Das ist ein einfaches Verfahren, das mit Hilfe der Azimut- und Höhenknöpfe an der Seite und Unterseite des StarPointers durchgeführt wird Der Ausrichtungsvorgang wird am besten nachts durchgeführt, da der LED-Punkt während des Tages schwer zu sehen ist 1 Schalten Sie den StarPointer ein, indem Sie den variablen...
-
Page 66: Erste Schritte - Verwendung Ihres Smart-Geräts
Sie einfach mit Ihrer Familie und Freunden Beobachtungen durchführen können Die Standardausrichtung von SkyPortal verwendet die SkyAlign™ -Technologie von Celestron, bei der nur drei helle Sterne am Himmel zentriert werden müssen, ohne deren Namen zu kennen Und da Ihr Smart-Gerät bereits Datum, Uhrzeit und Ort berechnet, brauchen Sie kein GPS und brauchen keine Details Ihrer Beobachtungsstelle eingeben Alles was Sie tun müssen ist 3 helle Sterne am Himmel zu zentrieren und auszurichten... -
Page 67: Auf Objekte Im Skyportal Zeigen Und Andere Teleskopfunktionen
2 Stellen Sie eine Verbindung zum "SkyQLink-xx” WLAN-Netzwerk her Öffnen Sie die SkyPortal App Wählen Sie das Teleskopsymbol auf Ihrem Bildschirm und drücken Sie "Connect and Align (Anschliessen und Ausrichten)" 3 Verwenden Sie die Pfeile auf Ihrem Bildschirm, um das Teleskop zu einem hellen Stern am Himmel zu bewegen 4 Zentrieren Sie das Objekt in Ihrem StarPointer und tippen Sie auf ENTER (Eingabetaste) Nach dem Zentrieren des Objekts im Sucherfernrohr wird die Motordrehzahl reduziert, damit Sie zum Zentrieren im Okular schrittweise Anpassungen vornehmen können... - Page 68 Verbinden ist nützlich, wenn Sie das Teleskop aufstellen und die App schließen oder außerhalb des WLAN-Bereichs gehen und später dann zum Teleskop zurückkehren, um die Ausrichtung wieder aufzunehmen Verbinden und Ausrichten beginnt mit einer neuen Ausrichtung Die Standardeinstellung verwendet SkyAlign™, bei dem drei helle Sterne am Himmel zentriert werden müssen Hinweis: Jedes Mal, wenn "Connect and Align (Anschliessen und Ausrichten)"...
-
Page 69: Skyportal Teleskop Einrichtung Und Steuerungsmenü
• Zubehörfachbeleuchtung - Stellt die LED-Helligkeit der Beleuchtung des Zubehörfachs ein Licht kann ausgeschaltet werden, indem Sie den Regler ganz auf 0 schieben • Logo Beleuchtung - Passt die LED-Helligkeit des Celestron Power-Logos und des WiFi-Logos an Kann für dunkle Himmelsbereiche gedimmt oder ausgeschaltet werden VERHALTEN •... - Page 70 ANTI-BACKLASH Alle mechanischen Getriebe weisen einen gewissen Nachlauf oder ein Spiel zwischen den Zahnrädern auf Dies wird als Verzögerungszeit angesehen, die das Teleskop benötigt, um sich zu bewegen, nachdem ein Richtungspfeil gedrückt wurde, insbesondere wenn die Richtung geändert wird Das Anti-Backlash kompensiert das Getriebespiel durch Eingabe eines Wertes, der die Motoren schnell genug zurückspult, um das Spiel zwischen den Zahnrädern zu eliminieren •...
-
Page 71: Erste Schritte - Verwenden Der Nexstar+ Steuerung
NexStar+ Controllers verwenden Der NexStar Evolution verfügt über eine computergesteuerte Handsteuerung, um das Teleskop direkt ohne WLAN-Verbindung zum Celestron SkyPortal zu betreiben Die Handsteuerung kann an einen der 4 AUX-Ports der Halterung angeschlossen werden 1 Flüssigkristallanzeige (LCD) Fenster: Verfügt über... -
Page 72: Überblick Über Zwei Beliebte Ausrichtungsmethoden
AUSRICHTUNGSMETHODEN Damit das Teleskop genau auf Objekte im Himmel zeigt, muss es zuerst mit bekannten Positionen (Sternen) ausgerichtet werden Mit diesen Daten kann das Teleskop ein Modell des Himmels erstellen, das dann zur Lokalisierung von Objekten mit bekannten Koordinaten verwendet wird Es gibt viele Möglichkeiten, Ihr Teleskop am Himmel auszurichten; diese hängen davon ab, welche Daten der Benutzer bereitstellen kann: •... - Page 73 AUTOMATISCHE AUSRICHTUNG MIT ZWEI STERNEN Nachdem der erste Stern ausgewählt und zentriert wurde, wird der zweite Stern automatisch für die bestmögliche Ausrichtung ausgewählt Sobald das Teleskop ausgewählt ist, wird es automatisch zum zweiten Ausrichtungsstern geschwenkt, um die Ausrichtung abzuschließen 1 Schalten Sie mit dem Schalter das NexStar ein Die Handsteuerung zeigt “Verifying Packages (Pakete überprüfen)…”an Nach einigen Sekunden wird "Evolution"...
-
Page 74: Mit Der Polhöhenwiege Eq Nord/Eq Süd Ausrichten
MIT DER POLHÖHENWIEGE EQ NORD/EQ SÜD AUSRICHTEN Die EQ Nord und EQ Süd Ausrichtungen unterstützen den Benutzer beim Ausrichten des Teleskops, wenn die Polarausrichtung auf einer optionalen Polhöhenwiege erfolgt EQ AUTOALIGN 1 Wählen Sie EQ Nord (für die nördliche Hemisphäre) oder Süd (für die südliche Hemisphäre) Richten Sie sich an den Ausrichtungsoptionen aus und drücken Sie ENTER (Eingabetaste) 2 Geben Sie Uhrzeit, Datum und Standortinformationen wie bei allen anderen Ausrichtungen ein 3 Wählen Sie die EQ AutoAlign (Automa Ausrichtung) Methode und drücken Sie ENTER (Eingabetaste) -
Page 75: Nexstar Evolution Teleskopeinstellungen In Nexstar+ Handsteuerung
NEXSTAR EVOLUTION TELESKOPEINSTELLUNGEN IN NEXSTAR+ HANDSTEUERUNG Drücken Sie Menü, gehen Sie zum Menü "Peripheriegeräte" und drücken Sie ENTER (Eingabetaste) Hier können Sie LED Helligkeit der Logo-LEDs und der Beleuchtung des Zubehörfachs regeln, den Batteriestatus überprüfen oder erweiterte Funktionen wie externe Stromversorgung und Einstellungen für den USB-Ladeanschluss einstellen LED HELLIGKEIT EINSTELLEN 1 Scrollen Sie zu "Mount Lights"... -
Page 76: Nexstar+ Handsteuerung Für Nexstar Evolution Menübaum
NEXSTAR + HANDSTEUERUNG FÜR NEXSTAR EVOLUTION MENÜBAUM Menü Nachführung Modus EQ Nord EQ Süd Alt - Az Rate Siderisch Solar Lunar Uhrzeit-/ Gespeicherter Standort-Anzeige Standort Handsteuerung Tastaturstufe Beleuchtungssteuerung Anzeigeebene Scroll-Menü Auf Fettschrift umschalten Kontrast einstellen Sprache einstellen Teleskops Aufbau Siehe Abbildung - Nächste Seite Energieversorgung Siehe Abbildung - Nächste Seite Benutzerobjekte... -
Page 77: Erweiterter Menübaum
ERWEITERTER MENÜBAUM Benutzerdefinierte Einrichtzeit am Teleskops Aufbau Website Standort Städte Datenbank Getriebespiel Alt positiv Alt negativ AZM positiv AZM negativ Schwenkgrenzen Filtergrenzen Richtungstasten Alt Taste AZM-Taste Goto-Annäherung AH Ansatz AZM Ansatz Kabelaufwicklung Benutzerdefinierte AZM-Achse Aktivieren Parameter 9 Parametereinstellung Alt-Achse Aktivieren Parametereinstellung Energieversorgung Goto-Daten kalibrieren... -
Page 78: Teleskop Wartung
Taupunkt, kann sich innerhalb von Minuten Tau auf dem Korrektor bilden Der einfachste Weg, um Tau zu vermeiden, ist eine optionale, von Celestron erhältliche Taukappe, die den Korrektor bedeckt und die Luft, die den Korrektor unmittelbar umgibt, etwas wärmer hält als die Umgebungstemperatur Wenn die Bedingungen erschwerter sind, kann eine Tauheizung verwendet werden, die im allgemeinen von anderen Herstellern erhältlich ist, um den... - Page 79 KOLLIMATION Die optische Leistung Ihres Teleskops hängt direkt mit seiner Kollimation zusammen Kollimation ist die Ausrichtung des optischen Systems Ihr Schmidt-Cassegrain-Teleskop wurde nach dem vollständigen Zusammenbau im Werk kollimiert Möglicherweise muss nach dem Transport das Teleskop kollimiert werden Das einzige optische Element, das angepasst werden muss oder angepasst werden kann, ist die Neigung des Sekundärspiegels Um die Kollimation Ihres Teleskops zu überprüfen, benötigen Sie eine Lichtquelle Ein heller Stern in der Nähe des Zenits ist ideal, da es dort nur eine minimale atmosphärische Verzerrung gibt Vergewissern Sie sich, dass die Nachführung aktiviert...
- Page 80 2 Legen Sie Ihren Finger an die Kante der vorderen Zelle des Teleskops (achten Sie darauf, die Korrektorplatte nicht zu berühren) und zeigen Sie auf die Kollimationsschrauben Wenn Sie jetzt in das Okular schauen, sollten Sie den Schatten Ihres Fingers sehen Gehen Sie mit Ihrem Finger um die Tubuskante herum, bis der Schatten am nächsten Punkt der engsten Stelle der Ringe zu sehen ist (d h in der gleichen Richtung, in die der mittlere Schatten verzerrt ist) 3 Suchen Sie nach der Kollimationsschraube, die der Position Ihres Fingers am nächsten ist Dies ist die Kollimationsschraube,...
-
Page 81: Anhang A: Technische Daten
ANHANG A: TECHNISCHE DATEN Montierung Montierungstyp: Computerisierter Höhen-Azimut Schneckengetriebe Schneckengetriebe aus Messing mit Kugellagern Schneckenräder Edelstahl 146mm Durchmesser, 180 Zähne 9,6 V, 4,5 Ah Lithium-Eisen-Phosphat-Akku (LiFePO4) Interne Batterie Max. Stromverbrauch: Bis zu 4,5 A mit optionalem Netzteil, wenn Akkuladen, USB-Ladeanschluss und Teleskop gleichzeitig verwendet werden Min. - Page 82 NexStar Evolution 8 Teleskop Schmidt Cassegrain Optisches Design Blendenöffnung 203,2mm Brennweite 2032mm Öffnungsverhältnis Brennweite des Okulars 1 40mm Brennweite des Okulars 2 13mm Vergrößerung des Okulars 1 51 x 156 x Vergrößerung des Okulars 2 Sucherfernrohr StarPointer, verwendet 3 V CR2032 Lithium-Knopfbatterie Zenitspiegel 1,25”...
-
Page 83: Anhang B: Erweitertes Wlan
NexStar Evolution 9,25 Teleskop Optisches Design Schmidt-Cassegrain 235mm Blendenöffnung Brennweite 2350mm Öffnungsverhältnis Brennweite des Okulars 1 40mm Brennweite des Okulars 2 13mm Vergrößerung des Okulars 1 59 x Vergrößerung des Okulars 2 180 x StarPointer Sucherfernrohr Zenitspiegel 1,25” 555 x Höchste nützliche Vergrößerung Niedrigste sinnvolle Vergrößerung 34 x... -
Page 84: Anhang C: Led Status
Celestron unternimmt angemessene Anstrengungen, um das von dieser Garantie abgedeckte Produkt innerhalb von 30 Tagen nach Erhalt zu reparieren oder zu ersetzen Falls für Reparatur oder Austausch mehr als 30 Tage erforderlich sind, muss Celestron den Kunden entsprechend informieren Celestron behält sich das Recht vor, ein Produkt, das aus der Produktlinie genommen wurde, durch ein neues oder in Wert und Funktion vergleichbares Produkt zu ersetzen Diese Garantie ist nichtig und ohne Wirkung für den Fall, dass ein von der Garantie abgedecktes Produkt im Design oder in der... - Page 85 HINWEIS: Diese Garantie ist für Kunden in den USA und Kanada gültig, die ihr Produkt von einem autorisierten Celestron-Händler in den USA oder Kanada gekauft haben. Diese Garantie ist für Kunden außerhalb der USA und Kanada gültig, die ihr Produkt von einem autorisierten Celestron-Händler in dem jeweiligen Land gekauft haben. Wenden Sie sich für alle Fragen zur Garantie an diese Händler.
- Page 87 ® MANUAL DE INSTRUCCIONES Modelo #12090- NexStar Evo 6 Modelo #12091- NexStar Evo 8 Modelo #12092- NexStar Evo 9.25...
- Page 88 ESPAÑOL...
- Page 89 Configuración de NexStar Evolution telescopio en el control manual NexStar+ Control manual NexStar+ para el árbol de menú NexStar Evolution Árbol de menú avanzado Mantenimiento del telescopio Apéndice A: Especificaciones Apéndice B: WiFi avanzada Apéndice C: Estado LED Garantía limitada por dos años de Celestron ESPAÑOL...
- Page 90 ESPAÑOL...
-
Page 91: Contenido De La Caja
CONTENIDO DE LA CAJA Mando de bloqueo de altitud LED de encendido y carga Asa de transporte LED WiFi Puerto de salida de alimentación Puerto de entrada de alimentación Puertos auxiliares 3 y 4 Nivel con burbuja Rosca y arandela de soporte de trípode Bandeja de accesorios Mando de bloqueo de ajuste de... - Page 92 • Un dispositivo Apple iOS con iOS 7 0 o posterior o un dispositivo Android con Android 4 0 si se usa sin el mando manual NexStar+ incluido • Descarga gratuita de la app SkyPortal de Celestron de la App Store o Google Play si se usa sin el mando manual NexStar+ incluido •...
-
Page 93: Montaje E Instalación
MONTAJE E INSTALACIÓN Saque las piezas de sus cajas de transporte y revise todos los elementos de la lista de piezas Conserve el embalaje original para poder usarlo para transportar el telescopio con seguridad Ponga el soporte del brazo en horquilla sobre una superficie plana y resistente Saque todos los accesorios de sus cajas respectivas TRÍPODE 1 Separe las patas del trípode y póngalo derecho... - Page 94 TUBO ÓPTICO DEL TELESCOPIO El tubo óptico de 6» está preinstalado con el telescopio Los modelos de 8” y 9,25” precisan instalar el tubo óptico en el soporte del brazo en horquilla 1 Desbloquee el cierre de altitud aflojando el mando de bloqueo del cierre de altitud naranja 2 Gire el eje de altitud hasta que el mando de liberación rápida quede orientado hacia abajo...
- Page 95 ALINEAR EL LOCALIZADOR DE PUNTO ROJO STARPOINTER El StarPointer se alimenta con una baterñia de larga duración de 3 voltios de litio (#CR2032) situada bajo la parte anterior del StarPointer El StarPointer debe estar alineado correctamente con el telescopio antes de poder usarlo Es un proceso sencillo usando los mandos de azimut y altitud situados en el lateral y la parte inferior del StarPointer El procedimiento de alineación es preferible realizarlo de noche, ya que el punto LED será...
-
Page 96: Comenzando - Uso De Su Dispositivo Inteligente
La alineación por defecto de SkyPortal usa la tecnología SkyAlign™ de Celestron, que solamente precisa centrar tres es- trellas brillantes cualquiera del firmamento, sin necesidad de conocer sus nombres Como su dispositivo inteligente ya se encarga de la fecha, hora y ubicación, no es necesario el GPS ni introducir información sobre el lugar de observación Todo... -
Page 97: Apuntar A Objetos En Skyportal Y Otras Funciones Del Telescopio
2 Conecte a la red WiFi “SkyQLink-xx” Abra la app SkyPortal Seleccione el icono del telescopio en su pantalla y pulse "Conectar y alinear" 3 Use las flechas de la pantalla para mover el telescopio a cualquier estrella brillante del firmamento 4 Centre el objeto en su StarPointer y toque Enter Ahora que el objeto está... - Page 98 Conectar es útil si mantiene instalado el telescopio y cierra la app, o sale del alcance WiFi, y vuelve más tarde al telescopio para continuar la alineación Conectar y alinear iniciará una nueva alineación Por defecto se usa SkyAlign™, que precisa centrar tres estrellas brillantes del firmamento Nota: Siempre que se toque «Conectar y alinear», la alineación anterior se borrará...
- Page 99 La luz puede apagarse deslizando por completo hasta 0 • Iluminación de logotipo - Ajusta el brillo del LED del logotipo de encendido Celestron y del logotipo WiFi Puede reducirse o apagarse para ubicaciones con firmamento oscuro COMPORTAMIENTO •...
- Page 100 COMPENSACIÓN DE RETROCESO Todos los engranajes mecánicos tienen cierta cantidad de retroceso o juego entre los engranajes Esto se contempla como un retraso en el tiempo que tarda el telescopio en moverse tras pulsar una flecha de dirección, especialmente al cambiar de dirección La función anti retroceso compensa el retroceso introduciendo un valor que retrocede rápidamente los motores lo justo para eliminar el juego entre engranajes •...
-
Page 101: Comenzando - Uso Del Control Nexstar
El NexStar Evolution incluye un mando manual informatizado para usar directamente el telescopio sin usar la conexión WiFi al SkyPortal de Celestron El mando manual puede conectarse a cualquiera de los 4 puertos AUX del soporte 1 Ventana de pantalla de cristal líquido (LCD): Dispone de una pantalla de cuatro líneas y 18 caracteres con... -
Page 102: Resumen De Dos Métodos De Alineación Populares
PROCEDIMIENTO DE ALINEACIÓN Para que el telescopio apunte con precisión a objetos celestes, debe estar alineado primero con posiciones conocidas (estrellas) Con esta información, el telescopio puede crear un modelo del firmamento, que usa para ubicar cualquier objeto con coordenadas conocidas Existen muchas formas de alinear su telescopio con el firmamento según la información que pueda proporcionar el usuario: •... -
Page 103: Uso De Una Cuña Con Alineación Eq Norte / Eq Sur
ALINEACIÓN CON DOS ESTRELLAS AUTOMÁTICA Tras seleccionar y centrar la primera estrella, la segunda estrella se elegirá automáticamente para obtener la mejor alineación posible Una vez seleccionada, el telescopio se desplazará automáticamente a la segunda estrella de alineación y completará la alineación 1 Encienda el interruptor de encendido del NexStar El mando manual mostrará... - Page 104 CONFIGURACIÓN DEL TELESCOPIO NEXSTAR EVOLUTION EN EL CONTROL MANUAL NEXSTAR+ Pulse Menú, vaya al menú «Periféricos» y pulse ENTER Aquí puede controlar el brillo LED de las luces del logotipo y la iluminación de la bandeja de accesorios, comprobar el estado de la batería, o establecer funciones más avanzadas, incluyendo alimentación externa y configuración del puerto de carga USB AJUSTE DE LED BRILLO 1 Vaya a «Luces del soporte»...
-
Page 105: Control Manual Nexstar+ Para El Árbol De Menú Nexstar Evolution
CONTROL MANUAL NEXSTAR+ PARA EL ÁRBOL DE MENÚ NEXSTAR EVOLUTION Menú Seguimiento Modo EQ Norte EQ Sur Alt - Az Apagado Velocidad Sideral Solar Lunar Tiempo / Sitio de la Sitio guardado pantalla Mando manual Control de luz Nivel de teclado Nivel de indicación Menú... -
Page 106: Árbol De Menú Avanzado
ÁRBOL DE MENÚ AVANZADO Configuración del Configurar Localización personalizada telescopio hora-lugar Base de datos de ciudad Compensación de Alt positiva retroceso Alt negativa AZM positivo AZM negativo Límites de desplazamiento Límites de filtro Botones de Botón Alt dirección Botón AZM Ir a aproximación Aproximación AH Aproximación AZM... -
Page 107: Mantenimiento Del Telescopio
La forma más sencilla de evitar la condensación es añadir un protector contra rocío opcional, disponible de Celestron, que envuelve el correctos y mantiene el aire alrededor del corrector ligeramente más caliente que la temperatura ambiente Si las condiciones son más extremas, puede añadirse un calefactor de condensación, disponible comercialmente de otros... - Page 108 Para lograrlo, debe ajustar los tornillos de colimado secundarios que mueven la estrella por el campo en dirección a la luz desplazada Estos tornillos se encuentran en el soporte del espejo secundario Nota: Realice solamente pequeños ajustes de 1/6 a 1/8 en los tornillos de colimado y vuelva a centrar la estrella moviendo el telescopio antes de realizar mejoras o antes de realizar más ajustes.
-
Page 109: Apéndice A: Especificaciones
APÉNDICE A: ESPECIFICACIONES Soporte Tipo de soporte Altitud-Azimut informatizado Tornillos sin fin Tornillos sin fin de latón con rodamientos Ruedas de tornillo sin fin Acero inoxidable de 146 mm de diámetro, 180 dientes Batería de fosfato de hierro litio (LiFePO4) de 9,6V 4,5Ah Batería interna Consumo eléctrico máximo Hasta 4,5A con alimentacion opcional si se usa carga de... - Page 110 Telescopio NexStar Evolution 8 Schmidt Cassegrain Diseño óptico Apertura 203,2mm Longitud focal 2032mm Apertura focal Longitud focal del ocular 1 40mm Longitud focal del ocular 2 13mm Aumento del ocular 1 156x Aumento del ocular 2 Localizador StarPointer, usa batería de botón de litio de 3V CR2032 Diagonal estelar 1,25”...
-
Page 111: Apéndice B: Wifi Avanzada
Telescopio NexStar Evolution 9,25 Diseño óptico Schmidt-Cassegrain 235mm Apertura Longitud focal 2350mm Apertura focal Longitud focal del ocular 1 40mm Longitud focal del ocular 2 13mm Aumento del ocular 1 180x Aumento del ocular 2 Localizador StarPointer 1,25” Diagonal estelar Aumento máximo útil 555x Aumento mínimo útil... -
Page 112: Apéndice C: Estado Led
Celestron, demuestra tener defectos de materiales o mano de obra Como condición de la obligación de Celestron de reparar o sustituir dicho producto, el producto debe ser devuelto a Celestron junto con una prueba de compra adecuada para Celestron B Debe obtener un número de autorización de devolución adecuado de Celestron antes de la devolución Envíe su solicitud... - Page 113 NOTA: Esta garantía tiene validez para clientes de EE.UU. y Canadá que hayan adquirido este producto en un vendedor autorizado de Celestron en EE.UU. y Canadá. La garantía fuera de EE.UU. y Canadá solamente es válida para clientes que hayan adquirido de un distribuidor internacional de Celestron o un vendedor autorizado de Celestron en el país en cuestión.
- Page 115 ® MANUALE DI ISTRUZIONI Modello #12090- NexStar Evo 6 Modello #12091- NexStar Evo 8 Modello #12092- NexStar Evo 9.25...
- Page 116 ITALIANO...
- Page 117 Impostazioni telescopio NexStar Evolution nel controllo manuale NexStar+ Controllo manuale NexStar+ per menu ad albero NexStar Evolution Menu ad albero avanzato Manutenzione del telescopio Appendice A: Specifiche Appendice B: WiFi avanzato Appendice C: Stato LED Garanzia limitata di due anni Celestron ITALIANO...
- Page 118 ITALIANO...
-
Page 119: Contenuto Della Confezione
CONTENUTO DELLA CONFEZIONE Manopola frizione altitudine LED alimentazione e ricarica Maniglia di trasporto LED WiFi Porta uscita alimentazione USB Porta ingresso alimentazione Porte ausiliarie 3 e 4 Livella a bolla Dadi e rondelle per fissaggio treppiede Vassoio porta-accessori Manopola blocco regolazione altezza gamba Tubo ottico del telescopio Cercatore StarPointer a puntino... - Page 120 • Un dispositivo Apple iOS con iOS 7 0 e versioni successive o un dispositivo Android con Android 4 0 se utilizzato senza il controllo manuale NexStar+ incluso • Download gratuito dell'app Celestron SkyPortal da App Store o Google Play se utilizzato senza il controllo manuale NexStar+ incluso •...
-
Page 121: Montaggio E Configurazione
MONTAGGIO E CONFIGURAZIONE Rimuovere le parti dai loro cartoni di spedizione e verificare tutti gli articoli nell'elenco delle parti Conservare tutto l'imballaggio originale in modo che possa essere utilizzato per trasportare il telescopio in sicurezza Impostare la montatura con braccio a forcella su una superficie piana e robusta Rimuovi tutti gli accessori dalle loro singole scatole TREPPIEDI 1 Stendere le gambe del treppiede e posizionarlo in posizione... - Page 122 TUBO OTTICO DEL TELESCOPIO Il tubo ottico da 6'' è preinstallato con il telescopio I modelli da 8” e 9 25” richiedono l'installazione del tubo ottico sulla montatura del braccio a forcella 1 Sbloccare la frizione di altitudine allentando la manopola di blocco dell'altitudine arancione 2 Ruotare l'asse dell'altitudine fino a quando la manopola di rilascio rapido non sia rivolta verso il basso...
- Page 123 ALLINEAMENTO DEL CERCATORE STARPOINTER A PUNTINO ROSSO Lo StarPointer è alimentato da una batteria di lunga durata al litio da 3V (#CR2032) che si trova al di sotto della parte inferiore dello Star Pointer Lo StarPointer deve essere correttamente allineato con il telescopio prima che possa essere utilizzato Questo processo è...
-
Page 124: Guida Introduttiva - Uso Del Proprio Dispositivo Smart
L'allineamento predefinito di SkyPortal utilizza la tecnologia SkyAlign™ di Celestron che richiede solo il centraggio di tre stelle luminose nel cielo, senza dover conoscere i loro nomi E dal momento che il proprio dispositivo smart tiene già conto di data, ora e posizione, non c'è... -
Page 125: Puntamento Di Oggetti In Skyportal E Altre Funzioni Del Telescopio
2 Collegarsi alla rete WiFi “SkyQLink-xx” Aprire l'app SkyPortal Selezionare l'icona del telescopio sullo schermo, quindi premere “Connect and Align” (Connetti e allinea) 3 Usare le frecce sullo schermo per spostare il telescopio su una stella luminosa nel cielo 4 Centrare l'oggetto nel proprio StarPointer e toccare Invio Ora che l'oggetto è centrato nel cercatore, la velocità del motore rallenta in modo da poter effettuare regolazioni graduali per centrarlo nell'oculare 5 Centrare la stella nel proprio oculare e toccare Allinea Ciò... - Page 126 Connetti è utile se si mantiene il telescopio impostato e l'app chiusa, oppure si esce dalla portata del WiFi, quindi si ritorna al telescopio in un secondo momento per riprendere l'allineamento Connetti e allinea avvierà un nuovo allineamento L'impostazione predefinita utilizza SkyAlign™ che richiede il centraggio di tre stelle luminose nel cielo Nota: Ogni volta che "Connetti e allinea"...
-
Page 127: Configurazione Del Telescopio Skyportal E Menu Di Controllo
LED della luce del vassoio degli accessori La luce può essere spenta scorrendo il cursore fino a 0 • Logo Lighting (Illuminazione logo) - Regola la luminosità del LED del logo Celestron e del logo WiFi Può essere abbassata o spenta per le posizioni scure del cielo COMPORTAMENTO •... - Page 128 ANTI-CONTRACCOLPO Tutti gli ingranaggi meccanici hanno una certa quantità di contraccolpi o movimenti tra gli ingranaggi stessi Ciò è visto come un ritardo nel tempo necessario per il telescopio a spostarsi dopo la pressione di una freccia di direzione, soprattutto quando le direzione cambiano L'anti-contraccolpo compensa il contraccolpo inserendo un valore che fa tornare indietro rapidamente i motori quel tanto che basta per eliminare il gioco tra gli ingranaggi •...
-
Page 129: Guida Introduttiva - Uso Del Controllo Nexstar
NexStar Evolution include un controllo manuale computerizzato per operare il telescopio direttamente senza l'uso della connessione WiFi al Celestron SkyPortal Il controllo manuale può essere inserito in una delle 4 porte AUX sulla montatura 1 Finestra del display a cristalli liquidi (LCD): Presenta... -
Page 130: Panoramica Di Due Famosi Metodi Di Allineamento
PROCEDURE DI ALLINEAMENTO Affinché il telescopio punti con precisione gli oggetti nel cielo, deve prima essere allineato con le posizioni note (stelle) Con questa informazione, il telescopio può creare un modello del cielo, che utilizzerà per individuare qualsiasi oggetto con coordinate note Esistono molti modi per allineare il proprio telescopio con il cielo, a seconda delle informazioni che l’utente è... -
Page 131: Uso Di Un Prisma Con Allineamento Eq Nord / Eq Sud
ALLINEAMENTO CON DUE STELLE AUTOMATICO Dopo che la prima stella è stata selezionata e centrata, la seconda stella verrà automaticamente scelta per il miglior allineamento possibile Una volta selezionato, il telescopio si posizionerà automaticamente sulla seconda stella di allineamento per completare l'allineamento 1 Accendere l'interruttore di alimentazione di NexStar Il controllo manuale visualizzerà... -
Page 132: Impostazioni Telescopio Nexstar Evolution Nel Controllo Manuale Nexstar
8 Ripetere lo stesso processo del centraggio della stella nel proprio StarPointer, premere INVIO, quindi centrare nel proprio oculare e premere ALLINEA Quando il telescopio è stato allineato a entrambe le stelle, il display leggerà "Allineamento con successo" Il telescopio è pronto per cercare il primo corpo celeste Il tracciamento ora avverrà... -
Page 133: Controllo Manuale Nexstar+ Per Menu Ad Albero Nexstar Evolution
CONTROLLO MANUALE NEXSTAR+ PER MENU AD ALBERO NEXSTAR EVOLUTION Menu Tracciatura Modalità Nord EQ Sud EQ Alt - Az Velocità Siderale Solare Lunare Visualizza Posizione salvata ora-posizione Controllo manuale Controllo luce Livello tastierino Livello schermo Menu Scorrimento Commuta a font grassetto Imposta Contrasto Imposta Lingua Configurazione... -
Page 134: Menu Ad Albero Avanzato
MENU AD ALBERO AVANZATO Configurazione Configurazione Posizione personalizzata telescopio ora-posizione Database città Anti-contraccolpo Alt Positivo Alt Negativo AZM Positivo AZM Negativo Limiti di rotazione Limiti filtro Tasti direzionali Pulsante Alt Pulsante AZM Approccio VaiA Approccio AH Approccio AZM Avvolgicavo Velocità Asse AZM Abilita personalizzata 9... -
Page 135: Manutenzione Del Telescopio
Ciò eviterà l'ingresso di contaminanti nel tubo ottico Le regolazioni e la pulizia interne devono essere effettuate dalla divisione di assistenza Celestron Se il telescopio necessità di pulizia interna, contattare la fabbrica per un numero di autorizzazione al reso e un preventivo COLLIMAZIONE Le prestazioni ottiche del proprio telescopio sono collegate direttamente alla sua collimazione La collimazione è... - Page 136 A tal fine, è necessario regolare la vite di collimazione secondaria che sposta la stella nel campo verso la direzione della luce ruotata Queste viti sono poste sul supporto dello specchio secondario Nota: Effettuare solo piccole regolazioni da 1/6 a 1/8 alle viti del collimatore e ricentrare la stella spostando il telescopio prima di effettuare qualsiasi miglioramento o prima di effettuare ulteriori regolazioni.
-
Page 137: Appendice A: Specifiche
APPENDICE A: SPECIFICHE Montatura Tipo di montatura Azimut altitudine computerizzato Ingranaggi senza fine Ingranaggi senza fine in ottone con cuscinetti a sfera Ruote senza fine Acciaio inox 146 diam , 180 denti Batteria al fosfato di ferro da 9,6 V, 4,5 Ah (LiFePO4) Batteria interna Consumo di potenza max. - Page 138 Telescopio NexStar Evolution 8 Schmidt Cassegrain Design ottico Apertura 203,2mm Lunghezza focale 2032mm Rapporto focale Lunghezza focale dell'oculare 1 40mm Lunghezza focale dell'oculare 2 13mm Ingrandimento dell'oculare 1 156x Ingrandimento dell'oculare 2 Cercatore StarPointer, usa batteria a bottone al litio CR2032 a 3V Diagonale stellare 1 25”...
-
Page 139: Appendice B: Wifi Avanzato
Telescopio NexStar Evolution 9,25 Design ottico Schmidt-Cassegrain 235mm Apertura Lunghezza focale 2350mm Rapporto focale Lunghezza focale dell'oculare 1 40mm Lunghezza focale dell'oculare 2 13mm Ingrandimento dell'oculare 1 Ingrandimento dell'oculare 2 180x Cercatore Cercatore Diagonale stellare 1 25” Massimo ingrandimento utile 555x Minimo ingrandimento utile 14,4... -
Page 140: Appendice C: Stato Led
Le parti del prodotto per cui si effettua la sostituzione diventano proprietà di Celestron Il cliente è responsabile di tutti i costi di trasporto e assicurazione, da e verso la fabbrica di Celestron, che devono essere pagati in anticipo Celestron farà... - Page 141 La presente garanzia è valida per i clienti di Stati Uniti e Canada che hanno acquistato il proprio prodotto da un rivenditore Celestron autorizzato negli Stati Uniti o in Canada. La garanzia al di fuori degli Stati Uniti e del Canada è valida solo per i clienti che hanno acquistato da un distributore internazionale di Celestron o da un rivenditore autorizzato Celestron nel paese specifico.
Need help?
Do you have a question about the Nexstar Evolution 12090 and is the answer not in the manual?
Questions and answers