
Subscribe to Our Youtube Channel
Related Manuals for Hoshizaki HDD-1-24


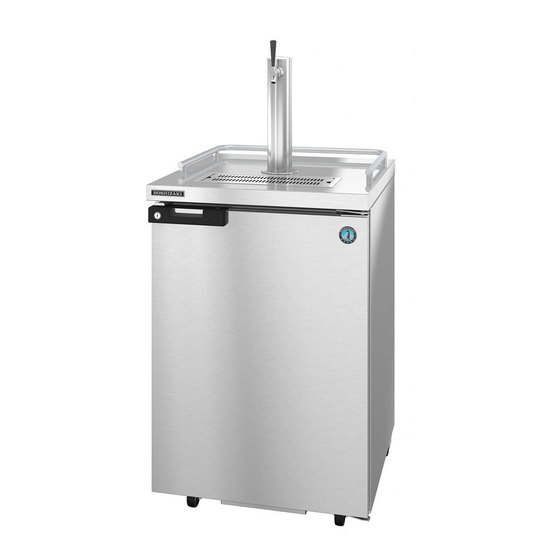
Summary of Contents for Hoshizaki HDD-1-24
- Page 1 Instruction Manual Direct Draw Equipment Models HDD-1-24 (-S) HDD-2-59 (-S) HDD-3-69 (-S) HDD-3-80 (-S) HDD-4-95 (-S) Issued: 08-04-2018 hoshizakiamerica.com Revised:...
- Page 2 WARNING Only qualified service technicians should install and service the appliance. To obtain the name and phone number of your local Hoshizaki Certified Service Representative, visit www.hoshizaki.com. No installation or service should be undertaken until the technician has thoroughly read this Instruction Manual.
-
Page 3: Table Of Contents
IMPORTANT This manual should be read carefully before the appliance is serviced. Read the warnings and guidelines contained in this manual carefully as they provide essential information for the continued safe use, service, and maintenance of the appliance. Retain this manual for any further reference that may be necessary. CONTENTS IMPORTANT SAFETY INFORMATION .................. -
Page 4: Important Safety Information
IMPORTANT SAFETY INFORMATION Throughout this manual, notices appear to bring your attention to situations which could result in death, serious injury, damage to the appliance, or damage to property. WARNING Indicates a hazardous situation which could result in death or serious injury. - Page 5 WARNING, continued • The appliance is designed only for storage and display of non-potentially- hazardous beverage kegs only. Employ sanitary methods. Use for any other purposes (for example, storage of chemicals or medical supplies such as vaccine and serum) could cause deterioration of stored items. •...
- Page 6 NOTICE • Protect the floor when moving the appliance to prevent damage to the floor. • Keep ventilation openings, in the appliance enclosure or in the built-in structure, clear of obstruction. Blockage of airflow could negatively affect performance and damage the appliance. •...
-
Page 7: Installation
INSTALLATION 1.1 General information 1.2 Transport, handling, unpacking, location. 1.3 Intended use and restrictions. 1.4 Manufacturer’s identification label description. 1.5 Installation and assembly. 1.6 Connections (electric, gas, water) 1.1 General information You can find the following symbols, or stickers to identify some type of warnings or useful information about your equipment. -
Page 8: Intended Use And Restrictions
1.3 Intended use and restrictions HOSHIZAKI equipment is not designed for personal, family, or household purposes, and its sale for such purposes is not intended. In the event the equipment is so used, this warranty shall be null and void, and the equipment is so used, this warranty shall be null and void, and the equipment shall be deemed to have been sold “as is-where is”... -
Page 9: Installation And Assembly
1.5 Installation and assembly This appliance is intended for indoor use only. Be sure the location chosen has a floor strong enough to support the total weight of the unit and contents. For the most efficient operation, be sure to provide good air circulation inside and outside of the unit. INSIDE CABINET The first cleaning must be made when you unpack the unit and before switching it on. -
Page 10: Operation
OPERATION 2.1 General information. 2.2 Control panel description. 2.3 Machine settings and programs. 2.4 Analog Thermostat. 2.5 Tower Installation 2.1 General Information Good air flow inside the cabinet is critical. Do not block the air outlet or the evaporator fan grill. A minimum of 2 inches of space along the front, back, and sides is required for proper air flow. -
Page 11: Machine Settings And Programs
Verify you don't have any alarms on the controller. If after you turn ON the equipment the controller shows an alarm icon or an error code, please contact your local Hoshizaki certified service representative. They will help you fix the problem. -
Page 12: Analog Thermostat
Wait 3-min. for the compressor to energize. 2.4 Analog Thermostat Model: HDD-1-24 Before connect the unit to the power supply, verify the analog thermostat is NOT in the OFF position (“OFF” over the yellow mark). If the dial is in the OFF position the compressor will not run but the evaporator fan will still power while the analog thermostat is in the OFF position. -
Page 13: Tower Installation
Defrost Off-Cycle Defrost: the HDD-1-24 refrigerator defrost naturally between run cycles. 2.5 Tower Installation This procedure describes how to install the towers and the air hose needed to provide cold air directly into the towers. Tools needed: Philips Screwdriver. Step 1 Locate the gaskets and bolts included in with your Tower accessories kit. - Page 14 Step 4 Introduce the “WHITE HOSE CORRUGATED” into the tower’s HOLE. Hose Hook Be sure that the hose hook is correctly attached into the tower hole.
-
Page 15: Maintenance
MAINTENANCE 3.1 General safety rules. 3.2 Machine cleaning and maintenance routine. 3.3 Machine disposal. 3.1 General safety rules Neglecting the condenser coil cleaning procedures WILL VOID YOUR WARRANTY associated with the compressor or cost to replace the compressor! To prevent corrosion and damage to stainless steel surfaces, use only products formulated for use on stainless steel appliances. -
Page 16: Machine Disposal
To put back the condensing unit in its place, slide in the unit carefully. BE SURE DRAIN PIPE IS LOCATED OVER THE PAN. Replace front bottom panel, plug the appliance into the electrical outlet, then move the power switch to the "ON" position. 3.3 Machine disposal The appliance contains refrigerant and must be disposed of in accordance with applicable national, state, and local codes and regulations. -
Page 17: Troubleshooting Chart
Check the temperature setpoint on the controller. The default setpoint is 32°F. On HDD-1-24 Check the dial position. The default position is 5 c. Check if the compressor is running. d. Ensure Equipment is placed in a ventilated place and is a minimum of 2 inches from any other appliance and away from any heat source.
Need help?
Do you have a question about the HDD-1-24 and is the answer not in the manual?
Questions and answers