Table of Contents
Advertisement
Quick Links
Advertisement
Table of Contents

Summary of Contents for Sennheiser Tourguide Charger L 2021-40
- Page 1 Tourguide Charger L 2021-40 Instruction manual...
-
Page 3: Table Of Contents
Sennheiser a world-leading company in this field. Please take a few moments to read these instructions carefully, as we want you to enjoy your new Sennheiser products quickly and to the fullest. Contents... -
Page 4: Important Safety Instructions
11. Only use attachments/accessories specified by Sennheiser. 12. Use only with the cart, stand, tripod, bracket, or table specified by the manufacturer, or sold with the device. - Page 5 Replacement parts When replacement parts are required, be sure the service technician has used replacement parts specified by Sennheiser or those having the same characteristics as the original part. Unauthorized substitutions may result in fire, electric shock, or other hazards.
-
Page 6: Delivery Includes
Delivery includes Delivery includes 1 L 2021-40 charger 1 instruction manual 1 CD-ROM with: – the instruction manual of the L 2021-40 charger – the “Conference Control” software – the instruction manual of the “Conference Control” software You additionally require: 1 mains cable 1 network cable The L 2021-40 charger... -
Page 7: Product Overview
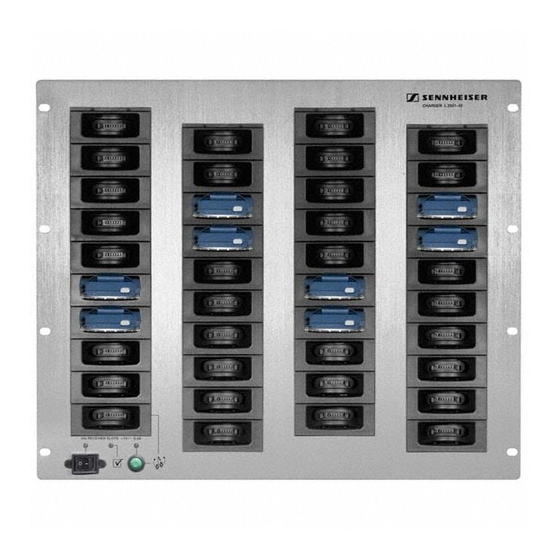
Product overview ³ 39 “slave” charging compartments (light blue in the diagram) · “Master” charging compartment (with channel copy function) » Green LED COPY AVAILABLE ¿ COPY button ´ Yellow LED SELECT ² Red LED POWER · ¶ Mains switch º... -
Page 8: Indications And Displays On The Charger
Product overview · Indications and displays on the charger Operation indication LED POWER ² Meaning ¶ lights up red The mains switch the mains supply is switched on. ¶ is off The mains switch the mains supply is switched off. Status indication LED SELECT ´... -
Page 9: Putting The Charger Into Operation
Putting the charger into operation NOTICE! Danger due to heat accumulation! The charger and the receiver rechargeable batteries can get very hot during charging. If the heat cannot dissipate, the devices can be damaged. Make sure that the air vents of the charger are not covered or blocked. -
Page 10: Installing The Charger
Putting the charger into operation Installing the charger The housing of the charger is designed so that it fits into a 19” rack. The charger can also be installed in a cabinet or similar. CAUTION! Risks when rack mounting the charger! When installing the device in a closed or multi-rack assembly, please consider that, during operation, the ambient temper- ature, the mechanical loading and the electrical potentials... - Page 11 You can install the charger fixedly, e.g. in a cabinet or similar. For the dimensions required for fixed installation, please refer to the below instal- lation drawing. 482.6 465.1 10.3 Putting the charger into operation 69.7 156.7...
-
Page 12: Connecting The Charger To A Pc
Putting the charger into operation Connecting the charger to a PC You can connect one or several chargers to a PC. The supplied “Conference Control” software allows you to centrally and easily configure and monitor several chargers and receivers. For this, the charger requires a network connection with a PC. The charger can be connected directly to an individual PC or integrated into an existing network. -
Page 13: Using The Charger
Using the charger Switching the charger on/off NOTICE! High switch-on voltage can blow the fuse! If you switch on more than three chargers at the same time, you can blow the fuse due to the high switch-on voltage! Only switch on a maximum of three chargers at the same time, e.g. - Page 14 The built-in rechargeable battery is defective. orange Interrupt the charging process and contact your Sennheiser service partner. Charging a completely discharged rechargeable battery takes approx. ¹ ¹ 3.5 hours at room temperature. However, the charging process may take longer if: •...
-
Page 15: Specifications
Configuring chargers via a PC The “Conference Control” software offers additional possibilities to configure the receivers and to display the configurations in detail. The “Conference Control” software and the corresponding instruction manual are included on the supplied CD. Using several Tourguide systems simultaneously If you are using several Tourguide 2020 D systems to give more than one guided tour or one conference at the same time, the systems can interfere with one another. -
Page 16: Accessories For The Tourguide System
Accessories for the Tourguide system Accessories for the Tourguide system Product name Product description HDE 2020 D Stethoset receiver HDE 2020 D-US Stethoset receiver (US) Earbuds (black) for HDE 2020 D and – HDE 2020 D-US stethoset receivers Earbuds (transparent) for HDE 2020 D and –... -
Page 17: Manufacturer Declarations
Manufacturer Declarations Warranty Sennheiser GmbH & Co. KG gives a warranty of 24 months on this product. For the current warranty conditions, please visit our web site at www.sennheiser.com or contact your Sennheiser partner. CE Declaration of Conformity 0682 This device is in compliance with the essential requirements and other relevant provisions of Directives 2004/108/CE and 2006/95/CE. - Page 18 Sennheiser electronic GmbH & Co. KG Printed in Germany Am Labor 1, 30900 Wedemark, Germany Publ. 06/2008 www.sennheiser.com 524164/A01...


Need help?
Do you have a question about the Tourguide Charger L 2021-40 and is the answer not in the manual?
Questions and answers