Table of Contents
Advertisement
Advertisement
Table of Contents

Related Manuals for GlobalMed TotalExam 3


Summary of Contents for GlobalMed TotalExam 3
- Page 1 TotalExam 3 Camera ® User Manual MAN-600005, Rev. F 8/9/18...
- Page 2 No license to any intellectual property rights is granted by this document, whether express or implied, by estoppel or otherwise. One or more GlobalMed products are covered under U.S. Patent(s) with other patents pending. Any testimonials contained within any GlobalMed website or document are individual cases and do not guarantee that you will get the same results.
- Page 3 Products that become defective during the first year after the order is shipped will be repaired or replaced by GlobalMed free of charge. This limited warranty is contingent upon proper use of the product and does not cover products that have been damaged (scratches, bent metal, broken components) misused, modified, or subject to unusual physical or electrical stress.
- Page 4 Founded in 2002 by a Marine Corps Reserve Veteran still serving as CEO, GlobalMed is proud to be a Veteran Owned Small Business (VOSB). Contact info: Help Desk: 1.800.886.3692 option 2, or email help@globalmed.com...
- Page 5 Revision History Revision Changes Date Initial release. 03-08-2017 Updated to include TotalExam 3.1 camera body information 12-08-2017 Updated "TotalExam 3.1 with alignment dots" on page 15 01-22-2018 Added "TotalExam 3.1 with locking collar" on page 18 04-09-2018 Updated: • "TotalExam 3 Controls" on page 8 •...
-
Page 6: Table Of Contents
TotalExam 3.1 with alignment dots ........15... -
Page 7: About Totalexam 3
Following the instructions provided in this manual will enable the operator to safely utilize the camera. The TotalExam 3 is not intended to be serviced or maintained while in use. Any repair or replacement of components will be performed by GlobalMed personnel and are not to be replaced by service personnel. -
Page 8: Precautions
• Do not use if cable is damaged Certifications The TotalExam 3.0 Camera complies with U.S. FCC and EMI requirements according to FCC Part 15, ICES-001, and ICES-003 ® 8/9/18 TotalExam 3 User Manual, MAN-600005 Rev. -
Page 9: Chapter 1 About Totalexam
(IEC 60417-5333) Direct Current (IEC 60417 - 5031) ON / OFF (IEC 60417 - 5010) Reciprocal interface: The TotalExam 3.0 complies with U.S. FCC and EMI requirements according to FCC Part 15, ICES-001, and ICES-003. ® 8/9/18 TotalExam 3 User Manual, MAN-600005 Rev. F... -
Page 10: Warnings
Doing so could result in electrical shock or other hazardous results. The TotalExam 3.0 has been tested and found to comply with the limits for a Class B digital device, pursuant to part 15 of the FCC Rules. These limits are designed to provide reasonable protection against harmful interference when the equipment is operated in a commercial environment. - Page 11 About TotalExam 3 ® Table 3 TotalExam 3 Camera (Continued) Component 3.0 Specifications 3.1 Specifications Output USB 3.0 USB 3.0 Integrated Freeze Push-button (selects the clearest Push-button (selects the clearest Frame frame of the last 16 frames) frame of the last 16 frames)
-
Page 12: Features
About TotalExam 3 Features • HD video stream over USB 3.0 output • Up to 60 fps on USB 3.0, up to 15 fps on USB 2.0 • 720p image resolution and clarity • Powered by USB 3.0 ports (No external power supply needed) •... -
Page 13: Overview
USB 3.0 high-speed connector. 2. There are no drivers or software to install or download. 3. The TotalExam 3 does not require the use of a power supply external from the device that contains the USB 3.0 connection. -
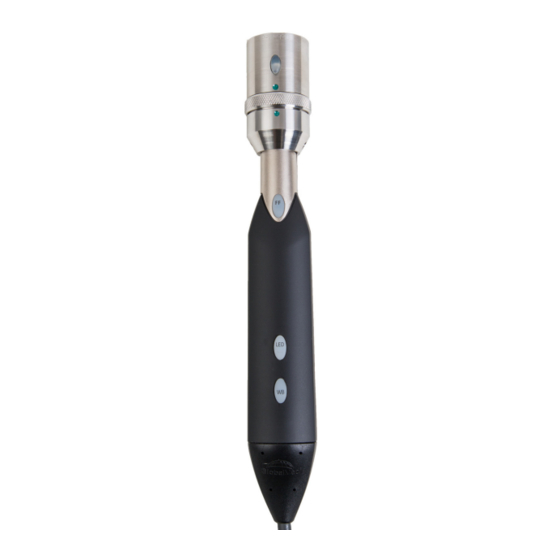
Page 14: Totalexam 3 Controls
Using the TotalExam 3 TotalExam 3 Controls Figure 1TotalExam 3.0 control locations ® 8/9/18 TotalExam 3 User Manual, MAN-600005 Rev. F | 8 | Confidential... -
Page 15: Autofocus (Af)
Note: Both versions of the TotalExam 3.1 have the same control locations. Figure 2 Total Exam 3.1 control locations 2.3.1 Autofocus (AF) On both versions of the TotalExam 3.1 an AF button is located on the autofocus head. Press this button to turn the autofocus capabilities ON/ OFF. ® 8/9/18 TotalExam 3 User Manual, MAN-600005 Rev. -
Page 16: Freeze-Frame Control (Ff Button)
Using the TotalExam 3 2.3.2 Freeze-Frame Control (FF Button) Use the FF button to freeze live video and conduct closer examination of an image. Freeze-Frame image optimization is aided by counting back eight frames and forward eight frames for analysis that automatically selects the clearest image among the sixteen buffered-frames. -
Page 17: Led Light Control (Led Button)
There are multiple levels of LED light intensity that can be accessed and controlled via the LED button. 1. Press the LED button to turn on the TotalExam 3 LED ring. The light intensity level is at the lowest setting. -
Page 18: Totalexam 3.0
Using the TotalExam 3 2.4.1 TotalExam 3.0 1. To put a head on, gently place the head on the camera wand, lining up the ports on each end of the camera wand and head. The align- ment markers are unaligned (see Figure ®... - Page 19 2. To lock the head on the wand, turn the middle ring clockwise until all three alignment markers are aligned. Figure 4 Lock the middle ring 3. To take the head off the TotalExam 3.0 camera wand: a. Rotate the middle ring counterclockwise until the alignment markers are unaligned (see...
- Page 20 Using the TotalExam 3 b. Gently pull the head away from the camera wand. Figure 6 Gently remove the head ® 8/9/18 TotalExam 3 User Manual, MAN-600005 Rev. F | 14 | Confidential...
-
Page 21: Totalexam 3.1 With Alignment Dots
Using the TotalExam 3 2.4.2 TotalExam 3.1 with alignment dots 1. To put a head on, line up the pin in the head with the hole in the camera wand. Gently begin placing the head on the wand (see Figure Figure 7 Line up the pin 2. - Page 22 Figure 9 Rotate the locking ring clockwise Figure 10 for an example with the otoscope head. Figure 10 The otoscope head has two green alignment dots 4. To take the head off the TotalExam 3.1 camera wand: ® 8/9/18 TotalExam 3 User Manual, MAN-600005 Rev.
- Page 23 Using the TotalExam 3 a. Rotate the locking ring counterclockwise until the head is loosened from the wand (see Figure 11). Figure 11 Rotate the locking ring counterclockwise b. Gently pull the head away from the camera wand. Figure 12 Gently remove the head ®...
-
Page 24: Totalexam 3.1 With Locking Collar
TotalExam 3.1 with locking collar Use the following instructions for both the autofocus and otoscope heads on the TotalExam 3.1 with locking collar. 1. Line up the pin in the head with the hole in the camera wand (see Figure 13). -
Page 25: Otoscope Head
Using the TotalExam 3 3. Twist the locking ring to align the line on the ring with the locked symbol (see Figure 15). Figure 15 Twist the locking ring Note: Do not use force to lock the head into place. -
Page 26: Totalexam 3 Accessories
12-14mm from the ear drum and uses a fixed focus design. (see Figure 16). Figure 16 Otoscope head on TotalExam 3.1 with locking collar TotalExam 3 Accessories 2.5.1 Variable Polarizing Hood The Variable Polarizing Hood (VPH), purchased separately, is an... - Page 27 Using the TotalExam 3 Figure 17 Standard VPH (left) and VPH with locking collar (right) To attach the standard VPH: 1. Place end with the polarizing ring straight onto the autofocus head (see Figure 18). Figure 18 Place the Variable Polarizing Hood on the autofocus head 2.
- Page 28 Using the TotalExam 3 The VPH with locking collar has symbols along the blue collar to show the direction to loosen or tighten (see Figure 19). Figure 19VPH symbols To attach the VPH with locking collar: 1. Place the end with the polarizing ring straight onto the autofocus...
- Page 29 Using the TotalExam 3 2. Hold the top of the hood firmly and twist the blue locking collar counterclockwise until it’s fully tightened (see Figure 21). Note: If the VPH loosens during use, twist the locking collar counterclockwise again to tighten.
-
Page 30: Derm Hood And Touch Collar
Using the TotalExam 3 3. To remove the VPH with locking collar, hold the top of the hood and twist the blue locking collar clockwise (see Figure 22). Figure 22 Twist the collar to the left to remove 4. A touch collar can be placed on the distal end to act as a barrier between the camera and patient. -
Page 31: Tongue Depressor Adapter
(see Figure 24). To use the tongue depressor adapter, the head of the TotalExam 3 must be in the upright position, not pivoted. The adapter holds a standard tongue depressor blade for examinations of the throat, mouth, or for stabilization during up-close examinations. -
Page 32: Specula
Using the TotalExam 3 2.5.4 Specula The TotalExam 3 Otoscope Head is compatible with the single use, disposable Welch Allyn Specula (Adult). After each use, the specula should be disposed of as medical/biohazard waste. Figure 25 Welch Allyn specula ®... - Page 33 Using the TotalExam 3 2.5.5 Total Exam 3 Stand A camera stand can be purchased separately to hold the Total Exam 3 (see Figure 26). Figure 26 Total Exam 3 Stand 1. Turn the knob at the top of the stand to loosen the joint, and then rotate the camera holder to the desired angle.
-
Page 34: Cleaning Procedures
Using the TotalExam 3 Cleaning Procedures The TotalExam 3 Camera is an FDA registered Class I non-sterile medical device. The camera is used in conjunction with three accessories: the tongue depressor adapter, derm hood and the disposable touch collar. The Welch-Allyn specula is used in conjunction with the otoscope head.
Need help?
Do you have a question about the TotalExam 3 and is the answer not in the manual?
Questions and answers