Table of Contents
Advertisement
Advertisement
Table of Contents

Subscribe to Our Youtube Channel
Related Manuals for Life Fitness ACTIVATE


Summary of Contents for Life Fitness ACTIVATE
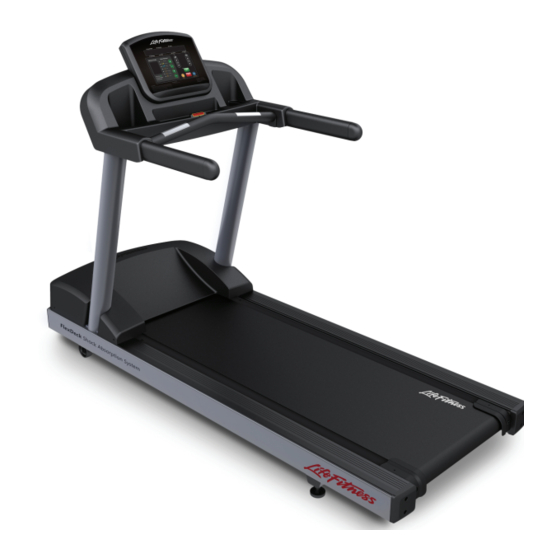
- Page 1 ACTIVATE TREADMILL OST Assembly Instructions 1010885-0001 REV AA...
- Page 3 User and Service Documents Link Operation Manuals and other Product Information available at https://www.lftechsupport.com/web/document-library/documents https://www.lftechsupport.com/web/document-library/documents https://www.lftechsupport.com/web/document-library/documents https://www.lftechsupport.com/web/document-library/documents https://www.lftechsupport.com/web/document-library/documents https://www.lftechsupport.com/web/document-library/documents Trobareu el manual de funcionament i altra informació de producte a https://www.lftechsupport.com/web/document-library/documents Mae Llawlyfrau Gweithredu a Gwybodaeth Arall am Beiriannau ar gael yn https://www.lftechsupport.com/web/document-library/documents Die Betriebsanleitung und andere Produktinformationen erhalten Sie unter https://www.lftechsupport.com/web/document-library/documents...
- Page 4 Latin America and Caribbean* Spain Hong Kong Life Fitness, Inc. Life Fitness IBERIA Life Fitness Asia Pacific LTD Columbia Centre III C/Frederic Mompou 5,1º1ª 32/F, Global Trade Square 9525 West Bryn Mawr Avenue 08960 Sant Just Desvern Barcelona 21 Wong Chuk Hang Road Rosemont, IL 60018 U.S.A.
-
Page 5: Table Of Contents
2XL Corporation. PureGreen 24 is a trademark of Pure Green. © Copyright 2018, Life Fitness, a division of Brunswick Corporation. All Rights Reserved. Columbia Center III - 9525 West Bryn Mawr Ave., Rosemont, IL 60018 • 847-288-3300 www.lifefitness.com... -
Page 6: Getting Started Safety Instructions
CAUTION: Risk of injury to persons – to avoid injury, use extreme caution when stepping onto or off of a moving belt. Read assembly instruction manual before using. WARNING: Health-related injuries may result from incorrect or excessive use of exercise equipment. Life Fitness STRONGLY recommends seeing a physician for a complete medical exam before undertaking an exercise program, particularly if the user has a family history of high blood pressure or heart disease, is over the age of 45, smokes, has high cholesterol, is obese, or has not exercised regularly in the past year. - Page 7 • If warnings are missing or damaged, please contact Customer Support Services immediately for replacement warning labels. Warning labels are shipped with every product and should be installed before product is used. Life Fitness is not responsible for missing or damaged warning labels.
-
Page 8: Consignes De Sécurité
Consignes de Sécurité Lire toutes les instructions avant usage. Avertissement : Une utilisation incorrecte ou excessive de l'appareil peut entraîner des blessures. Life Fitness Recommande VIVEMENT aux utilisateurs de passer un examen médical complet avant d'entamer un programme d'entraînement, et tout particulièrement dans les cas suivants : antécédents familiaux d'hypertension (pression sanguine trop élevée) ou de pathologies cardiaques, utilisateurs de 45 ans ou plus, tabagisme, hypercholestérolémie... - Page 9 • Si certaines étiquettes d'avertissement sont manquantes ou endommagées, contactez immédiatement le Service à la clientèle. Nous vous en fournirons de nouvelles. Les étiquettes d'avertissement sont expédiées avec les appareils et doivent être installées avant utilisation de ces derniers. Life Fitness n'est pas responsable des étiquettes manquantes ou endommagées.
-
Page 10: Set-Up
Set-Up Read the entire manual before setting up the treadmill. Place the treadmill where it will be used before beginning the setup procedure. Electrical Power Requirements The treadmill requires a dedicated* line with isolated neutral according to the electrical configurations listed in the chart below. -
Page 11: How To Position And Stabilize The Treadmill
How to Position and Stabilize the Treadmill Follow all safety instructions. Move the treadmill to the location in which it will be used. NOTE: See How to Adjust and Tension the Striding Belt to center the striding belt. Safety Clearances The following information is supplied as regional reference data regarding safety clearances around the exterior of the treadmill. -
Page 12: Power Switch
Power Switch Located on the front panel at the base of the treadmill, the ON/OFF switch has two positions: "l" (one) for ON and "0" (zero) for OFF. Immobilization Method The purpose of immobilizing the treadmill is to prevent unauthorized use. The system causes immobilization of the treadmill when a pre-defined hard key sequence has been activated. -
Page 13: Specifications
Stop Systems Red magnetic lanyard emergency stop system Heart Rate Monitoring Systems Patented Lifepulse™ digital contact heart rate CATV (1) F-type connector Activate Console Physical Dimensions Shipped Dimensions Length 14 in. / 35.56 cm 17 in. / 43.18 cm Width 12 in. -
Page 14: Service And Technical Data Preventive Maintenance Tips
2. Service and Technical Data Preventive Maintenance Tips NOTE: Safety of the equipment can be maintained only if the equipment is examined regularly for damage or wear. Keep the equipment out of use until defective parts are repaired or replaced. Pay special attention to parts that are subject to wear, as outlined below. -
Page 15: Preventive Maintenance Schedule
Preventive Maintenance Schedule Item Weekly Monthly Biannually Console Overlays Clean Inspect Bottle Holders / Accessory Clean Inspect Trays Console Mounting Bolts Inspect Hardware Inspect Frame Clean Inspect Plastic Covers Clean Inspect Lifepulse Sensors Clean / Inspect Striding Belt Centered Inspect Emergency Stop Magnet Clean / Inspect Motor Cover... -
Page 16: Assembly
3. Assembly Hardware and Required Tools Component List Item Number Description Qty. Left Upright Right Upright 3/8 x 5” Hex Head Bolt 3/8” Flat Washer 3/8” Nut Ergo™ Front Crossbar M8 x 25MM Hex Head Bolt M8 Washer M8 Lock Nut Tie Wrap Plastic Grommet Upper Dashboard Tray... - Page 17 Hardware Page 17 of 33...
-
Page 18: Assembly Procedure
Assembly Procedure IMPORTANT: Make sure all hardware is tight. Page 18 of 33... - Page 19 Page 19 of 33...
- Page 20 Page 20 of 33...
- Page 21 Page 21 of 33...
- Page 22 Page 22 of 33...
- Page 23 Page 23 of 33...
- Page 24 Page 24 of 33...
- Page 25 Page 25 of 33...
- Page 26 Page 26 of 33...
- Page 27 Page 27 of 33...
- Page 28 Page 28 of 33...
- Page 29 Page 29 of 33...
- Page 30 Page 30 of 33...
- Page 31 Page 31 of 33...
- Page 32 Page 32 of 33...
-
Page 33: Install Power Cord
Insert the power cord into the receptacle (C) in the front of the treadmill. The power cord can be routed left or right depending on installation / site needs. CAUTION: Make sure that there is 6.5 ft. (2 m) of clearance behind the treadmill. Contact Life Fitness Customer Support Services for an optional longer power cord if necessary.
Need help?
Do you have a question about the ACTIVATE and is the answer not in the manual?
Questions and answers