Table of Contents
Advertisement
Advertisement
Table of Contents

Related Manuals for Sangean DPR-42BT


Summary of Contents for Sangean DPR-42BT
- Page 1 DPR-42BT Version 1...
- Page 2 ® The Bluetooth word mark and logos are registered trademarks owned by Bluetooth SIG, Inc. and any use of such marks by SANGEAN ELECTRONICS INC. is under license.
-
Page 3: Important Safety Instructions
Important safety instructions Read and understand all safety and operating instructions before the radio is operated. Retain instruction: The safety and operating instructions should be retained for further reference. Heed warnings: All warnings on the appliance and operating instructions should be followed. Follow all operations and use instructions. - Page 4 Important safety instructions If the radio is left unattended and used for a long period of time, remove the batteries. The batteries may leak and damage furniture or your radio. Do not attempt to service the receiver yourself. Removing the cover may expose you to dangerous voltage, and will void the warranty.
- Page 5 Important information on charging and using rechargeable batteries Read and understand all safety and operating instructions before the radio is operated. Recharge the batteries in any case at least every 2 months. Make sure the Battery Select switch inside the battery compartment is set to the “NiMH” position. Put the batteries in the compartment while paying attention to the correct polarity of the batteries (+ and -).
- Page 6 Important information on charging and using rechargeable batteries Battery level indication is an approximate indication only and can vary with battery type that is used. Batteries can become hot during charging. In cold conditions the capacity of batteries will be much lower than when used at normal room temperature.
-
Page 7: Top View
Controls Top view Page button Preset 3 / Rewind button Preset 1 Preset 4 / Play / Pause button Preset 2 Preset 5 / Fast-forward button... -
Page 8: Front View
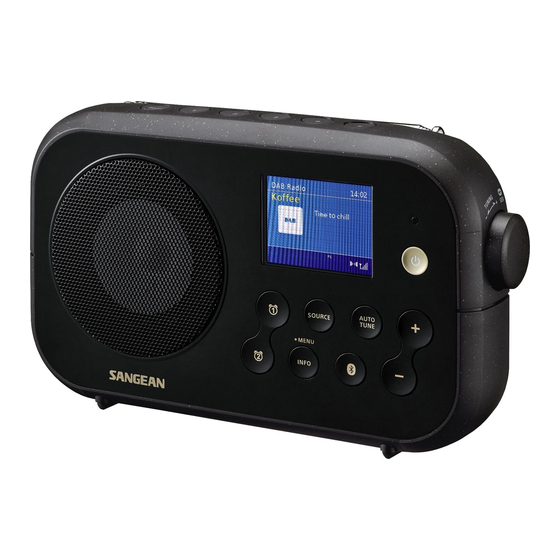
Controls Front view Right view 9 10 18 17 Speaker Volume Down button LCD display Bluetooth pairing button Charge / Battery Low indicator Source button Power button Info / Menu button Tuning control knob / Select / Seek button Alarm 2 button Auto Tune button Alarm 1 button Volume Up button... -
Page 9: Back View
Controls Back view Left view Battery compartment Telescopic aerial NiMH / Alkaline batteries switch Headphone socket USB socket for software upgrade DC IN socket... -
Page 10: Battery Operation
Battery operation Open the battery cover on the rear of the unit by pushing the latch downward. NOTE Before you insert the batteries, check the NiMH / Alkaline switch position. If you use non-rechargeable batteries, make sure the NiMH / Alkaline switch which located inside the battery compartment is switched to Alkaline position. - Page 11 Battery operation The low battery indicator showing red, reduced power, distortion and a ‘stuttering’ sound are all signs that the batteries may need replacing. If the radio is not to be used for any extended period of time it is recommended that the batteries are removed from the radio.
-
Page 12: Using The Ac Power Adaptor
Battery operation Charging the batteries NOTE ● Duration for charging your batteries fully can vary according to the mAh capacity of the batteries. Higher mAh batteries require a longer charging time. ● When the batteries are exhausted, the battery light will show red for a short while.The radio will then switch itself off. -
Page 13: Operating Your Radio - Dab
Operating your radio – DAB Carefully extend the telescopic aerial. Press and hold the Power button to switch on your radio. If this is the first time the radio is used, a quick scan of the Band III DAB channels will be carried out. -
Page 14: Secondary Services - Dab
Secondary services – DAB Some radio stations may have one or more additional broadcasts associated with them. If these are available, they will appear immediately after the main station as you rotate the Tuning control knob. To tune to the selected service, Press the Select button. Finding new stations –... -
Page 15: Dynamic Range Control Settings - Dab
Dynamic Range Control settings – DAB Dynamic Range Control (also known as DRC) can make quieter sounds easier to hear when your radio is used in a noisy environment by reducing the dynamic range of the audio signal. When in DAB mode press and hold the Info / Menu button to enter the DAB menu. Rotate the Tuning control knob to select “DRC”. -
Page 16: Prune Stations - Dab
Prune stations – DAB If you move to a different part of the country, some of the stations which were listed may no longer be available. Also, from time to time, some DAB services may stop broadcasting, or may change location or frequency. -
Page 17: Manual Tuning - Fm
Operating your radio – FM After a few seconds the display will update. The display will show the frequency of the signal found. If the signal is strong enough and there is RDS data present then the radio will display the station name. -
Page 18: Scan Sensitivity Setting - Fm
Scan sensitivity setting – FM Your radio will normally scan for FM broadcasts which are strong enough to give good reception. However, you may wish the Auto-scan function to also be able to find weaker signals, possibly from more distant radio transmitters. Your radio includes “Strong stations only” and “All Stations” options for the Auto-scan function. - Page 19 Display options – DAB / FM / Bluetooth Your radio has a range of display options when in DAB, FM and Bluetooth modes: Press the Info button to cycle through the various options. DAB display options Your radio can display the following in DAB mode: Station name, scrolling text, program type, multiplex name, channel &...
-
Page 20: Presetting Stations In Dab And Fm Modes
Presetting stations in DAB and FM modes There are 20 presets (4 pages x 5 presets) each for DAB and FM radio. They are used the same way for each operating mode. Press and hold the Power button to switch on your radio. Tune to the required radio station as previously described. -
Page 21: Listening To Music Via Bluetooth Streaming
Listening to music via Bluetooth streaming You need to pair your Bluetooth device with your DPR-42BT before you can auto-link to play / stream Bluetooth music through your DPR-42BT. Pairing creates a ‘bond’ so the two devices can recognize each other. - Page 22 Bluetooth audio streaming or even temporarily disconnect from your device. Such behavior is a function of the connected device and does not indicate a fault with your DPR-42BT. Playing audio files in Bluetooth mode When you have successfully connected your radio with the chosen Bluetooth source device you can start to play your music using the controls on your connected Bluetooth device.
-
Page 23: Automatically Updating The Clock
Listening to music via Bluetooth streaming Reconnecting a previously – paired Bluetooth source device The DPR-42BT can memorize up to 8 sets of paired Bluetooth source devices, when the memory exceed this amount, the earliest paring device will be over written from the device. -
Page 24: Setting The Clock Format
Setting the clock format With your radio switched on, press and hold Info / Menu button to access the menu for the current mode. Rotate the Tuning control knob to select “System Settings”. Press the Select button to enter the system settings menu. -
Page 25: Setting The Clock Manually
Setting the clock manually With your radio switched on, press and hold Info / Menu button to access the menu for the current mode. Rotate the Tuning control knob to select “System Settings”. Press the Select button to enter the system settings menu. -
Page 26: Clock Style
Clock style Your radio has a range of clock styles for the display when the radio is in Standby. There are four options available. With your radio switched on, press and hold Info / Menu button to access the menu for the current mode. Rotate the Tuning control knob to select “System Settings”. - Page 27 Setting the alarm clock Press the Alarm (1 or 2) button to enter the alarm setting menu. Rotate the Tuning control knob to choose “Alarm” and press the Select button to select “On” or “Off”. If “Off” is selected any current setting for that alarm will be cancelled. Rotate the Tuning control knob to choose “Wake Up time”.
-
Page 28: When The Alarm Sounds
Setting the alarm clock If setting the alarm to a radio option, rotate the Tuning control knob to choose the “Preset” option. Press the Select button. Then rotate the Tuning control knob to choose from either the radio station “Last Listened” to, or from the presets. Press the Select button to confirm the selection. NOTE You can only set the alarm to use a preset which has already been stored. -
Page 29: Cancelling Alarms
Cancelling alarms Whilst an alarm is sounding, press and hold the Power button to cancel the alarm and return to standby mode. Snooze timer When the radio alarm sounds, pressing any button other than the Volume buttons will silence the alarm for 5 minutes. -
Page 30: Sleep Timer
Sleep timer Your radio can be set to turn off after a preset time has elapsed. The sleep timer setting can be adjusted between 15 and 90 minutes in increments. With your radio switched on, press and hold Info / Menu button to access the menu for the current mode. Rotate the Tuning control knob to select “System Settings”. -
Page 31: Set Up My Eq Profile
Set up My EQ profile You may set the treble and bass levels as required using the “My EQ Setup” menu. With your radio switched on, press and hold Info / Menu button to access the menu for the current mode. Rotate the Tuning control knob to select “System Settings”. -
Page 32: Night Mode
Display colour options You radio’s display can be configured to several different colour options. With your radio switched on, press and hold Info / Menu button to access the menu for the current mode. Rotate the Tuning control knob to select “System Settings”. Press the Select button to enter the system settings menu. -
Page 33: Brightness Control
Brightness control The brightness of the display can be adjusted for when the radio is in standby and for when it is in use. If you use the unit in the bedroom, you may prefer a lower standby brightness level than a higher brightness setting. -
Page 34: Factory Reset
Factory reset If you wish to completely reset your radio to its initial state this may be performed by following this procedure. By performing a factory reset, all user entered settings will be erased. With your radio switched on, press and hold Info / Menu button to access the menu for the current mode. Rotate the Tuning control knob to select “System Settings”. -
Page 35: Usb Socket For Software Upgrade
USB upgrade port. You should not attempt to update your radio unless it is recommended to you by Sangean Customer Services. Updating the software may remove all radio station presets and settings from your radio. -
Page 36: Software Version Display
Software version display The software version display is provided for reference and customer support purposes and cannot be changed. With your radio switched on, press and hold Info / Menu button to access the menu for the current mode. Rotate the Tuning control knob to select “System Settings”. Press the Select button to enter the system settings menu. -
Page 37: Specifications
Specifications Power Requirements AC 100-240 V ~ 50/60 Hz (adaptor) Mains (Use only the supplied adaptor) Batteries 4 x LR6 (AA Size) not included Up to 25 hours using alkaline cells depending upon volume, Battery Life display brightness and operating mode. Frequency Coverage 87.5-108 MHz 174.928-239.200 MHz... - Page 38 The company reserves the right to amend the specifications without notice. If at any time in the future you should need to dispose of this product please note that: Waste electrical products should not be disposed of with household waste. Please recycle where facilities exist.