Table of Contents
Advertisement
Available languages
Available languages
Quick Links
Download this manual
See also:
Manual
Utility Radio
TO PREVENT FIRE OR ELECTRIC SHOCK HAZARD, DO
NOT EXPOSE THIS PRODUCT TO RAIN OR MOISTURE.
THE LIGHTNING
FLASH AND ARROW-
HEAD WITHIN THE
TRIANGLE IS A WARN-
ING SIGN ALERTING
YOU OF "DANGEROUS
VOLTAGE" INSIDE THE
RADIO.
WARNING:
CAUTION
RISK OF ELECTRIC
SHOCK DO NOT OPEN
CAUTION: TO REDUCE THE
RISK OF ELECTRIC
SHOCK, DO NOT REMOVE
THE BACK, NO USER SER-
VICEABLE PARTS INSIDE.
REFER SERVICING TO
QUALIFIED SERVICE PER-
SONNEL.
U1
Operating instruction
Mode d' emploi
Instruccions de manejo
Gebruiksaanwijzing
Bedienungsanleitung
!
THE EXCLAMATION
POINT WITHIN THE
TRIANGLE IS A WARN-
ING SIGN ALERTING
YOU OF IMPORTANT
INSTRUCTIONS
ACCOMPANYING THIS
RADIO.
GB
F
E
NL
D
Advertisement
Table of Contents

Related Manuals for Sangean U1


Summary of Contents for Sangean U1
- Page 1 Utility Radio WARNING: TO PREVENT FIRE OR ELECTRIC SHOCK HAZARD, DO NOT EXPOSE THIS PRODUCT TO RAIN OR MOISTURE. CAUTION RISK OF ELECTRIC SHOCK DO NOT OPEN CAUTION: TO REDUCE THE THE LIGHTNING RISK OF ELECTRIC FLASH AND ARROW- SHOCK, DO NOT REMOVE HEAD WITHIN THE THE BACK, NO USER SER- TRIANGLE IS A WARN-...
-
Page 2: Important Safety Instructions
IMPORTANT SAFETY INSTRUCTIONS 1. Read these instructions. 2. Keep these instructions. 3. Heed all warnings. 4. Follow all instructions. 5. Do not use this apparatus near water. 6. Clean only with dry cloth. 7. Do not block any ventilation openings. Install in accordance with the manufacturer’... - Page 3 10. Protect the power cord from being walked on or pinched particularly at plugs, convenience receptacles, and the point where they exit from the apparatus. 11. Only use attachments/accessories specified by the manufacturer. 12. Use only with the cart, stand, tripod, bracket, or table specified by the manufacturer, or sold with the apparatus.
-
Page 4: Main Features
The U-1 is designed and manufactured to meet the satisfaction of usage around the house, yard, garage, campsite and worksite. The full range 6 1/2 inches speakers produces high quality rich sound. The high impact cushion around the radio is made to endure a six-feet drop and also water resistant housing provides protection when used poolside, by the lake and outdoors. - Page 5 (9) 9-14V DC jack for vehicle and boat power. (10) Earphones socket. (11) AUX IN socket. (12) Microphone IN socket. (13) 6 1/2 inches 15 Watts full range speaker. (14) AC wire compartment. (15) High sensitivity, excellent sound performance.
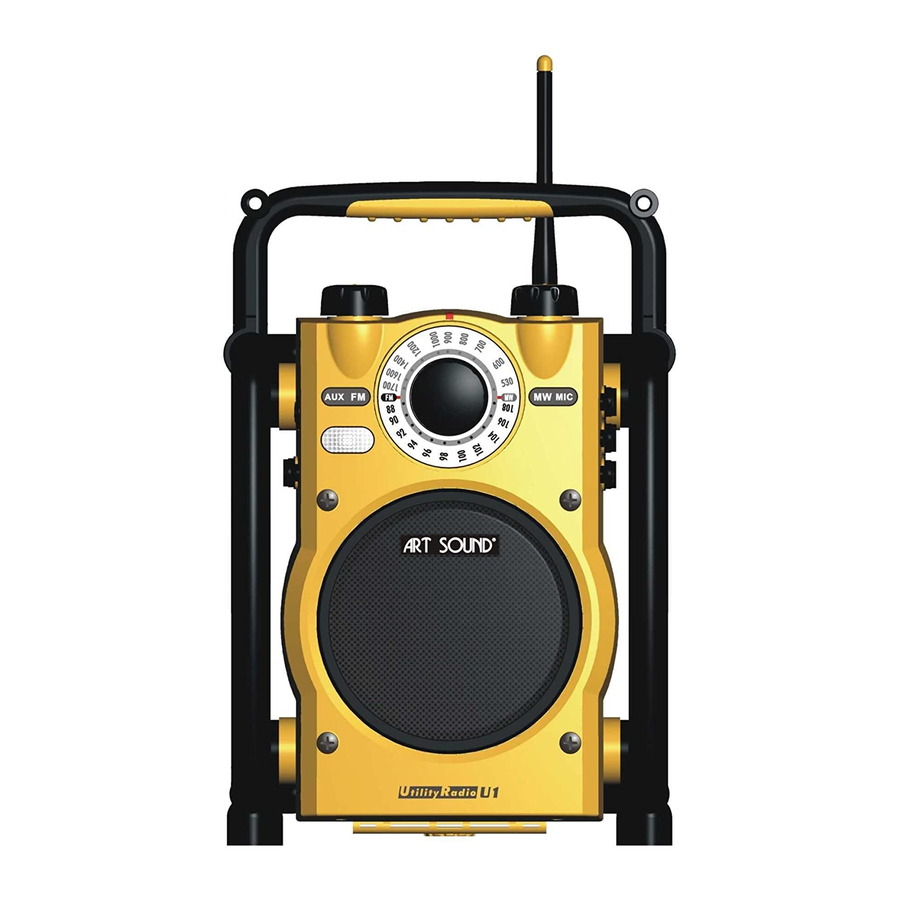
- Page 7 Controls Power and AM/FM/AUX IN band selector Tuning LED indicator Volume Control AUX/FM band indicator DC IN (9-14V) socket for vehicle and boat power LED light AUX IN socket Open to AC cord compartment AM band /Microphone indicator Soft and bendable spring antenna Tuning Control Battery Compartment LED illuminator switch...
-
Page 8: Power The Radio
Power the radio 1. Battery operation Installing the batteries, first turn battery cover fixture anti-clockwise to loosen and put down the battery cover. Insert 6 x D size ( UM-1 ) battery into the compartment. Ensure the battery is inserted in accordance with the diagram shown. -
Page 9: Operating Your Radio - Fm
Operating your radio FM 1. Turn on the radio by switching the Power knob to FM position. The FM band indicator will be lit on. 2. Rotate the Tuning Control to select the desired station. On FM, the tuning scale is marked in MHz ( Megahertz ). The Tuning LED will be lit on, if the radio station has been correctly tuned. -
Page 10: Headphones Socket
Headphones socket You can use a stereo or mono headphones set with a 3.5 mm plug for listening radio program via headphones. When you insert the headphones plug, the speaker is disconnected. This is a mono type radio, sound from the headphones set will be all in mono even if you apply a stereo headphones set. -
Page 11: Specifications
Specifications Frequency Coverage: FM 87.50 - 108 MHz AM 520 - 1710 kHz AC Power: AC 120 V/60Hz/25W (USA) or AC 230 V/50 Hz/25W (Europe) Batteries: 6 x UM-1 (D size) DC IN: 12V/1A center pin positive (operational voltage 9-14V), 5.5mm in diameter. - Page 12 MIC IN socket: 6.5 mm diameter, suits for Vocal Dynamic Microphone. Speaker unit: 6.5 inches 8 ohm 15 W , full range Internal Antenna system: AM built-in ferrite aerial FM built in removable bended spring antenna LED illuminator: 3 x white LED, current consumption 50 mA Battery life: Approx.
-
Page 14: Consignes De Sécurité Importantes
CONSIGNES DE SÉ CURITÉ IMPORTANTES 1. Lisez attentivement ces instructions. 2. Conservez ces instructions à portée de la main. 3. Prêtez attention à tous les avertissements. 4. Suivez toutes les instructions. 5. N’ utilisez pas cet appareil à proximité d’ eau ou dans un environnement humide. - Page 15 10. Veillez à ce que le cordon d’ alimentation ne puisse être écrasé ou coincé, en particulier au niveau des prises, des objets contournés et à son point de raccordement à l’ appareil. 11. Utilisez uniquement les cordons et accessoires recommandés par le fabricant.
-
Page 16: Principales Caractéristiques
La radio U-1 a été conçue et fabriquée de sorte à répondre à toutes les attentes lors d’ une utilisation autour de la maison, dans le jardin, le garage, un terrain de camping ou sur un lieu de travail. Les haut-parleurs de 6,5" reproduisent la gamme complète des fréquences dans un son riche et de haute qualité. - Page 17 (7) Cadran gradué avec rétro-éclairage. (8) Compensation dynamique des graves pour des basses d’ une grande richesse. (9) Prise 9-14V CC pour alimentation dans un véhicule ou sur un bateau. (10) Prise écouteurs. (11) Prise d’ entrée AUX. (12) Prise d’ entrée pour micro. (13) Haut-parleur 15 watts de 6,5"...
- Page 18 Commandes Marche/arrêt et sélecteur Bande AM / Bande FM / Entrée AUX Indicateur lumineux de syntonisation Bouton de syntonisation Commande du Volume Compartiment à piles Indicateur bande FM/AUX Interrupteur d’ éclairage LED Prise 9-14V CC pour alimentation dans un véhicule ou sur un bateau Eclairage LED Prise pour micro...
- Page 19 Alimentation de la radio 1. Fonctionnement sur piles Pour l’ installation des piles, commencez par tourner la fixation du couvercle du compartiment à piles dans le sens inverse de celui des aiguilles d’ une montre, pour desserrer et enlever le couvercle. Insérez six piles D (UM-1) dans le compartiment.
-
Page 20: Utilisation De Votre Radio Fm
Utilisation de votre radio FM 1. Allumez la radio en mettant le bouton d’ Alimentation en position FM. L’ indicateur de bande FM s’ allume. 2. Faites pivoter le bouton de syntonisation pour sélectionner la station souhaitée. Sur FM, l’ échelle de syntonisation est marquée en MHz (Mégahertz). - Page 21 Utilisation de votre radio AM (MW) 1. Allumez votre radio en mettant le bouton d’ Alimentation en position AM. L’ indicateur de bande AM s’ allume. 2. Faites pivoter le bouton de syntonisation pour sélectionner la station souhaitée. Sur AM, l’ échelle de syntonisation est marquée en kHz (Kilohertz). La LED de syntonisation s’...
-
Page 22: Eclairage Led
Prise d’ entrée pour micro Placez le sélecteur de puissance/de bande sur la position AM, FM ou AUX. Raccordez un microphone et réglez le volume ; l’ indicateur de micro s’ allume et la radio peut être utilisée comme système de reproduction microphone. - Page 23 Entrée CC: 12V/1A broche centrale positive (tension de fonctionnement 9-14V), 5,5 mm de diamètre. Puissance de Sortie: 4 W 10% T.H.D. @ 100 Hz @ CC pile 9 V 7 W 10% T.H.D. @ 100 Hz @ AC 230 V ou 110V. Prise écouteurs: 3,5 mm de diamètre, prise stéréo sortie mono Puissance de sortie: 5 mW + 5 mW Prise d’...
- Page 24 Eclairage LED: 3 voyants LED blancs, consommation électrique 50 mA Autonomie: Environ 30 heures avec des piles Alcalines pour une puissance de sortie de 50 mW Dimensions: 260 x 370 x 350 mm Poids: environ 4,2 kg...
- Page 26 INSTRUCCIONES IMPORTANTES DE SEGURIDAD 1. Lea estas instrucciones. 2. Conserve estas instrucciones. 3. Preste atención a todas las advertencias. 4. Siga todas las instrucciones. 5. No utilice este aparato cerca del agua. 6. Lí mpielo sólo con trapos secos. 7. No bloquee los orificios de ventilación. Instálelo según las instrucciones del fabricante.
- Page 27 10. Proteja el cable de corriente para que no pueda ser pisado o aplastado, especialmente en enchufes, receptáculos y su punto de salida del aparato. 11. Utilice únicamente accesorios o anexos especificados por el fabricante. 12. Utilice el aparato únicamente con el carro, el apoyo, el trí pode, el soporte o la mesa que especifique el fabricante o que se venda con él.
-
Page 28: Características Principales
El equipo U-1 ha sido diseñado y fabricado para funcionar de forma satisfactoria en casa, en el patio, aparcamiento, en el campo y en el lugar de trabajo. Altavoz de 6 ½ pulgadas de rango completo que crea un sonido de gran calidad. El sistema de amortiguación contra impactos alrededor de la radio la protege contra caí... - Page 29 (8) Compensación dinámica de sonidos graves para mejorar la reproducción de las frecuencias bajas. (9) Clavija 9 – 14 VCC para alimentación desde vehí culos y embarcaciones. (10) Conector de auriculares. (11) Conector de entrada auxiliar AUX IN. (12) Conector de entrada de micrófono MIC IN. (13) Altavoz de 6 ½...
- Page 30 Controles Selector de banda AM/FM/AUX IN y alimentación Indicador LED de sintoní a Control de sintoní a Control de volumen Compartimiento de pilas Indicador de banda AUX/FM Interruptor piloto LED Conector de entrada DC IN (9-14V) para vehí culo y embarcación Piloto LED Conector de micrófono Conector AUX IN (entrada auxiliar)
-
Page 31: Encendido De La Radio
Encendido de la radio 1. Funcionamiento con pilas Para instalar las pilas, lo primero gire la tapa del compartimiento en sentido antihorario y quí tela. Coloque 6 pilas de tamaño D ( UM-1 ) en el compartimiento. Asegúrese que las pilas se coloquen de acuerdo con el diagrama mostrado a continuación. - Page 32 Funcionamiento de la radio en FM 1. Encienda la radio poniendo en botón de encendido en la posición FM. Se iluminará el indicador de banda FM. 2. Gire el control de sintoní a hasta la emisora que desee. En FM el cuadrante de sintoní a va marcado en MHz (Megahercios).
- Page 33 Conector de auriculares Puede utilizar auriculares estereofónicos o monofónicos con clavija de 3,5 mm para oir la radio a través de los auriculares. Al conectar los auriculares, se desconecta el altavoz automáticamente. Esta radio es monofónica, así , el sonido de los auriculares será monofónico incluso si utiliza auriculares estereofónicos.
-
Page 34: Especificaciones
Especificaciones Cobertura de frecuencias: FM 87.50 - 108 MHz AM 520 - 1710 kHz Alimentación C.A.: 120 VCA/60Hz/25W (EEUU) o 230 VCA/50 Hz/25W (Europa) Pilas: 6 x UM-1 (tamaño D) Entrada de C.C. (DC IN): 12V/1A con la patilla central en positivo (tensión de funcionamiento 9 –... - Page 35 Clavija de entrada de micrófono (MIC IN): 6,5 mm de diámetro, adecuado para micrófono dinámico de voz. Altavoz: 6,5 pulgadas, 8 Ohmios, 15 W, rango completo Sistema de antena interna: antena de ferrita incorporada para AM antena de resorte de doblado suave para FM Iluminador LED: 3 pilotos LED blancos, consumo de corriente: 50 mA Vida de la pila:...
-
Page 37: Belangrijke Veiligheidsvoorschriften
BELANGRIJKE VEILIGHEIDSVOORSCHRIFTEN 1. Lees deze handleiding. 2. Bewaar deze handleiding. 3. Neem alle waarschuwingen in acht. 4. Volg alle voorschriften op. 5. Houd dit apparaat uit de buurt van water. 6. Uitsluitend reinigen met een droge doek. 7. Blokkeer nooit de ventilatieopeningen. Installeer het apparaat volgens de voorschiften van de fabrikant. - Page 38 10. Ga nooit op het netsnoer staan en zorg dat het netsnoer niet bekneld kan raken, wees met name voorzichtig met de stekkeraansluiting, met verlengsnoeren en op de plaats waar het netsnoer uit het apparaat komt. 11. Gebruik alleen door de fabrikant goedgekeurde accessoires. 12.
- Page 39 De U-1 is ontworpen en ontwikkeld voor optimaal gebruik in en rond uw huis, tuin en garage en tijdens het kamperen of op uw werk. De luidspreker voor het gehele frequentiebereik met een diameter van 6,5 inch produceert een vol geluid van hoge kwaliteit. De schokbestendige buffer rondom de radio is bestand tegen een val van een hoogte van 1,8 meter en de waterdichte behuizing biedt bescherming bij gebruik bij het zwembad, aan het water en in...
- Page 40 (8) Dynamische bascompensatie voor volle basweergave. (9) Gelijkstroomaansluiting (9-14V) voor gebruik in de auto of op de boot. (10) Hoofdtelefoonaansluiting. (11) AUX-ingang. (12) Microfooningang. (13) Luidspreker voor het gehele frequentiebereik (6,5 inch/15 Watt). (14) Vak voor netsnoer. (15) Uitstekende ontvangst en geluid van hoge kwaliteit.
- Page 41 Bedieningselementen Keuzeknop voor aan/uit en AM/FM/AUX IN Afstem-controlelampje Afstemknop Volumeknop Batterijvakje Aanduiding AUX/FM LED-lichtschakelaar Gelijkstroomaansluiting (9-14V) voor gebruik in de auto of op de boot LED-verlichting Microfooningang AUX-ingang Hoofdtelefoonaansluiting Opening netsnoervak Luidspreker Aanduiding AM/microfoon Draagbeugel Zachte, buigzame veerantenne Afstemschaal...
- Page 42 Voeding van de radio 1. Gebruik op batterijen Draai bij het plaatsen van de batterijen eerst de vergrendeling van het deksel van het batterijvakje tegen de klok in om het deksel van het batterijvakje te ontgrendelen en te openen. Plaats 6 batterijen van D-formaat (UM-1) in het vakje.
- Page 43 Bediening van de radio voor FM-ontvangst 1. Schakel uw radio in door de aan/uit-knop naar de stand “FM” te draaien. De aanduiding FM licht op. 2. Draai aan de afstemknop om de gewenste zender te zoeken. Bij FM-ontvangst is de afstemschaal verdeeld in MHz (megahertz). De afstem-LED zal oplichten bij ontvangst van een zender.
- Page 44 Hoofdtelefoonaansluiting U kunt naar radioprogramma’ s luisteren via een hoofdtelefoon (stereo of mono) met een 3,5 mm-stekker. Wanneer u een hoofdtelefoon aansluit, wordt de luidspreker uitgeschakeld. Dit is een monoradio en het geluid uit de hoofdtelefoon zal ook mono zijn, ook als u een stereohoofdtelefoon gebruikt.
-
Page 45: Technische Gegevens
Technische gegevens Frequentiebereik: FM 87,50 - 108 MHz AM 520 - 1710 kHz Netspanning: wisselstroom120 V /60Hz/25W (VS) of wisselstroom 230 V /50 Hz/25W (Europa) Batterijen: 6 x UM-1 (D-formaat) Gelijkstroom: 12V/1A positieve centrale pool (operationeel voltage 9-14V), diameter 5,5mm. Uitgangsvermogen: 4 W, 10% THD bij 100 Hz bij 9 V gelijkstroom 7 W, 10% THD bij 100 Hz bij 230 V of 110 V wisselstroom... - Page 46 MIC-ingang: diameter 6,5 mm, geschikt voor vocale, dynamische microfoons. Luidspreker: 6,5 inch, 8 ohm, 15 W, voor het gehele frequentiebereik Intern antennesysteem: AM geï ntegreerde ferrietantenne FM geï ntegreerde, afneembare, buigzame veerantenne LED-verlichting: 3 witte LEDs, stroomverbruik 50 mA Levensduur batterijen: ong.
-
Page 48: Wichtige Sicherheitshinweise
WICHTIGE SICHERHEITSHINWEISE 1. Lesen Sie diese Anleitung durch. 2. Bewahren Sie diese Anleitung gut auf. 3. Beachten Sie alle Warnhinweise. 4. Befolgen Sie alle Anweisungen. 5. Verwenden Sie dieses Gerät nicht in der Nähe von Wasser. 6. Reinigen Sie es nur mit einem trockenen Tuch. 7. - Page 49 10. Sorgen Sie dafür, dass niemand auf das Netzkabel tritt und dass es nicht gequetscht wird, insbesondere an Steckern, Steckdosen und an der Stelle, an dem es aus dem Gerät kommt. 11. Verwenden Sie nur die vom Hersteller angegebenen Zusatzgeräte/Zubehörteile. 12.
- Page 50 Das U-1 wurde für die Verwendung im Haus, im Garten, in der Garage, auf dem Campingplatz und am Arbeitsplatz entwickelt und produziert. Der 16,5-cm-Vollbereichslautsprecher erzeugt einen vollen Klang hoher Qualität. Die stoßfesten Puffer um das Radio sichern es gegen Stürze aus bis zu 1,5 m Höhe, und das wasserfeste Gehäuse bietet Schutz bei Verwendung an Swimmingpools, am See oder im Freien.
- Page 51 (8) Dynamische Bassverstärkung für vollen Bass. (9) 9-14 V-GS-Buchse für Betrieb mit Auto- und Bootsbatterien. (10) Kopfhörerbuchse. (11) AUX-IN-Buchse. (12) Mikrofoneingangsbuchse. (13) 16,5 cm großer 15-Watt-Vollbereichslautsprecher. (14) Fach für Netzkabel. (15) Hochempfindliches Gerät mit exzellentem Klang.
- Page 52 Bedienelemente Netzschalter und AM/FM/AUX-IN-Bandwahlschalter LED-Anzeige für Sendereinstellung Sendereinstellungsknopf Lautstärkeregler Batteriefach AUX/FM-Bandanzeige LED-Schalter Gleichstromeingangsbuchse (9-14 V) für Auto- und Bootsbatterien LED-Beleuchtung Mikrofonbuchse AUX-IN-Buchse Kopfhörerbuchse Fach für Netzkabel Lautsprecher AM-Band-/Mikrofonanzeige Tragegriff Weiche, biegbare Federantenne Kreisskale...
- Page 53 Stromversorgung des Radios 1. Batteriebetrieb Einlegen der Batterien – Drehen Sie die Befestigungsvorrichtung des Batteriefachs gegen den Uhrzeigersinn und nehmen Sie dann die Abdeckung des Batteriefachs ab. Legen Sie 6 D-Batterien (UM-1) in das Batteriefach. Achten Sie darauf, die Batterien gemäß der Angaben in der Zeichnung einzulegen.
- Page 54 Bedienung Ihres Radios - FM 1. Schalten Sie Ihr Radio ein, indem Sie den Netzschalter auf die Position FM stellen. Die FM-Bandanzeige leuchtet auf. 2. Drehen Sie den Sendereinstellungsknopf, um den gewünschten Sender einzustellen. Bei FM ist die Einstellungsskala in MHz (Megahertz) eingeteilt. Die Einstellungs-LED leuchtet auf, wenn der Radiosender richtig eingestellt wurde.
- Page 55 Bedienung Ihres Radios – AM (MW) 1. Schalten Sie Ihr Radio ein, indem Sie den Netzschalter auf die Position AM stellen. Die AM-Bandanzeige leuchtet auf. 2. Drehen Sie den Sendereinstellungsknopf, um den gewünschten Sender einzustellen. Bei AM ist die Einstellungsskala in kHz (Kilohertz) eingeteilt. Die Einstellungs-LED leuchtet auf, wenn der Radiosender richtig eingestellt wurde.
-
Page 56: Technische Daten
Mikrofoneingangsbuchse Schalten Sie den Netz-/Bandwahlschalter auf die Position AM, FM oder AUX. Schließen Sie ein Mikrofon an und stellen Sie die Lautstärke ein. Die Mikrofon-LED leuchtet auf, und das Radio funktioniert als Mikrofonanlage. Alle anderen Audioprogramme werden abgeschaltet, sobald das Mikrofon in die Buchse gesteckt wird. - Page 57 Eingangsgleichstrom: 12 V/1 A positiver Mittenkontakt (Betriebsspannung 9-14 V), Durchmesser 5,5 mm. Ausgangsleistung: 4 W, 10 % Gesamtklirrfaktor bei 100 Hz mit 9-V-Gleichstrombatterie 7 W, 10 % Gesamtklirrfaktor bei 100 Hz mit 230-V- oder 110-V-Wechselstrom Kopfhörerbuchse: Durchmesser 3,5 mm, Stereobuchse, einkanalige Ausgabe Ausgangsleistung: 5 mW + 5 mW AUX-IN-Buchse: Durchmesser 3,5 mm, Stereobuchse, einkanalig Eingangsempfindlichkeit: 250 mVolt effektiv an 5 W bei 100 Hz...
- Page 58 Batterielebensdauer: ca. 30 Stunden bei Alkalibatterien mit einer Leistungsabgabe von 50 mW Abmessungen: 260 x 370 x 350 mm Gewicht: ca. 4,2 kg...
- Page 59 381K901...