
Subscribe to Our Youtube Channel
Related Manuals for Numatic TRO 650/200T


Summary of Contents for Numatic TRO 650/200T
- Page 1 TRO 650 / 200T R I D E - O N S C R U B B E R D RY E R Owner Instructions Warning! Read instructions before using the machine www.numatic.co.uk...
-
Page 2: Table Of Contents
R I D E O N S C R U B B E R D RY E R TRO 650 / 200T Index Machine Overview ........ Pages 2-3 PLEASE Control Panel Overview ........ Page 4 READ Machine Set up Guide ........ Pages 5-10 Fitting the Floor tool ........ -
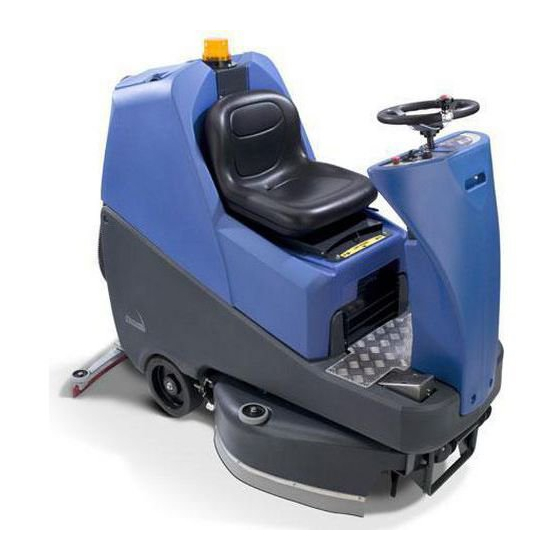
Page 3: Machine Overview
Machine Overview... -
Page 4: Control Panel Overview
R I D E O N S C R U B B E R D RY E R TRO 650 / 200T Control Panel Overview... -
Page 5: Machine Set Up Guide
Machine Set-up Guide PLEASE READ BEFORE COMMENCING ANY OPERATION AFTER THE REMOVAL OF ALL THE PACKAGING, CAREFULLY OPEN AND CHECK THE CONTENTS. CONTENTS 1 x Owner Manual 2 x Battery Charging Lead 2 x Keys 3 x 40 Amp Fuse (1 spare) 2 x Side pod skirts 1 x Brake disengage key 1 x Maxi Fuse-puller... -
Page 6: Fitting The Floor Tool
Lower the floor-tool arm by moving the release lever to the upper position (Fig.9). Push floor-tool onto the holder and secure with the easy-fit securing pin (Fig.10). Push waste collection pipe onto the floor-tool; ensure a tight fit (Fig.11). Note: Raise floor-tool again before driving to the cleaning area. www.numatic.co.uk... -
Page 7: Fitting The Hose
Machine Set-up Guide Fitting the Hose Guide The vacuum hose has a U-bend clip which creates a U-bend in the hose preventing water spillage when the vacuum is switched off. If you need to remove the U-bend clip for any reason always ensure it is refitted correctly before you resume operation. Refit vacuum hose to the Floor-tool when finished. -
Page 8: Fitting The Brush
Fill-level indicator The water level in the clean-water tank can be measured using the scale on the rear of the machine (Fig.20). Always ensure that the waste-water tank is empty before lifting. www.numatic.co.uk... -
Page 9: Maximum Speed Control
Machine Set-up Guide IMPORTANT Do not operate machine unless the Operator Manual has been read and fully understood. Maximum Speed Control Use the maximum speed control knob and set desired traction speed as required, depending on floor type and level of soiling. -
Page 10: Raise / Lower Brush Deck
While depressing left-hand foot pedal (see Fig.24), press down the release lever (see Fig.25) and gently release the foot pedal to lower the brush deck (see Fig.26). Lowering the Floor-tool Note: DO NOT push the vacuum hose onto the Floor-tool with the Floor-tool in the raised position. www.numatic.co.uk... -
Page 11: Setting The Cleaning Controls
Machine Operation Setting the Cleaning Controls Insert the key into the ignition and quarter-turn it clockwise to position (1) ‘ON’. The battery charge-level indicator will illuminate. Waste-water Tank Fill Level Warning Light When the waste-water tank becomes full, a red warning light will illuminate on the operator control panel (as illustrated) and the vacuum motor will stop automatically. -
Page 12: Hi / Lo Vacuum Setting
This means the Vacuum motor is running at 100%. With the machine running press the Hi - Lo button once the Vacuum motor will reduce its speed to 75% of capacity and the Hi - Lo light will NOT illuminate Blue. www.numatic.co.uk... -
Page 13: Machine Cleaning
Machine Cleaning ALWAYS ENSURE THAT THE MACHINE IS SWITCHED OFF PRIOR TO ANY MAINTENANCE. After use, empty waste-water tank using emptying hose and flush-out with clean-water. Next remove floor-tool vacuum hose and flush out with clean-water. Next empty clean-water tank, using emptying hose and again flush out with clean-water. -
Page 14: Changing Floor Tool Blades
1. Floor-tool main body 2. Rear blade 3. Blade carrier 4. Front blade (slotted) 5. Retaining pins x 4 Note: Floor Tool adjusters are factory set for optimal performance. The blades are designed to be reversible, thus extending their useful working life. www.numatic.co.uk... -
Page 15: Machine Charging
Machine Charging Always ensure that the machine is switched off prior to charging. The battery meter displays the charge level of the batteries; when fully charged, all meter lights are illuminated (see Fig.33). As the machine is used and the batteries are discharged, the meter lights will go out from right to left. -
Page 16: Battery Care
Maxi fuse-puller provided, prior to this period. Batteries should be recharged every three months. Charge fully the day before you start using the machine again. Periodicly inspect the battery connectioins for tightness and corrosion www.numatic.co.uk... -
Page 17: Free-Wheel Function
Free-wheel Function & Towing ALWAYS ENSURE THAT THE MACHINE IS ON LEVEL GROUND BEFORE DISENGAGING BRAKE ARM. NEVER DISENGAGE THE BRAKE WHEN THE MACHINE IS ON A SLOPE / GRADIENT. NEVER TOW THE MACHINE WITH THE BRAKE ENGAGED AND POWER PLUG CONNECTED! remove battery fuses The TTV 678 is equipped with a free-wheel Your start-up kit includes a brake drive disengage function that will enable the operator to move /... -
Page 18: Off-Aisle Cleaning Kit
Return the hose to the floor-tool once finished using the off-aisle facility (fig.42). Off-Aisle Accessory Kit (Optional) (606182) In the event of a breakdown contact your Numatic dealer or the Numatic Technical helpline +44 (0)1460 269268 (See back page for company addresses or dealers stamp) - Page 20 Contact Service Agent...
-
Page 21: Trouble Shooting
565 Kg 370 Kg 242.8 Kg 31.8 Kg L - 330mm W - 170mm *RTU = Ready To Use In the event of a breakdown contact your Numatic dealer or the Numatic Technical helpline +44 (0)1460 269268 T 01460 68600... -
Page 22: Rating Label / Personal Protective Equipment / Recycling
Safety Critical Component: In the event of a breakdown contact Charging Leads: H05VV-F x 1.0 mm x 3 Core your Numatic dealer or the Battery Charger: 220V / 240V (50-60Hz) Numatic Technical DC Output: 24VDC, 20A help line +44 (0)1460 269268... -
Page 23: Safety Precautions
Operators shall be adequately instructed as to the correct use of the machine. If this product does not have a factory installed Numatic battery charger, then it is the responsibility of the owner and user of the product to ensure that the charging system and battery combination are compatible, fit for purpose and safe to use. -
Page 24: Battery Care 16
Undo battery terminals and remove. Remove batteries. The batteries are to be disposed of safely, as according to local government guidelines. 10. Only use genuine Numatic replacement batteries. 11. Do not allow the batteries to become fully discharged; it may not be possible to re-charge them. -
Page 25: Recommended Spare Parts
Spare Parts Part No. BRUSHES Part No. GENERAL PARTS 606174 330mm Octo Polyscrub Brush 206953 Detent Pin 606172 330mm Octo Nyloscrub Brush 208167 Spare Set of Keys (2 Keys) 606253 330mm Octo High Density Nyloscrub Brush 208165 Bulb 606176 330mm Octo Longlife (Green) Brush 280001 Seat Cover 606407... -
Page 26: Battery Wiring
4 x 98A\H Stud Terminal Gel Type 12V Battery As Per Numatic Item: 230138 x1 Black Wires x1 Red Wires For optimum performance Numatic International Ltd recommend the use of the following batteries in the Twintec machines. Numatic Machine Numatic Recommended Battery Number... -
Page 27: Eu Declaration Document
EU Declaration of Conformity T 01460 68600... -
Page 28: Warranty
Warranty www.numatic.co.uk... - Page 29 Notes T 01460 68600...
- Page 30 Notes www.numatic.co.uk...
- Page 31 Notes T 01460 68600...
-
Page 32: Company Address
Tel: 0861 686 284 www.numatic.co.za Numatic International Schweiz AG. Sihlbruggstrasse 142, 6340 Baar. SCHWEIZ Tel: 0041 (0) 41 76 80 76 - 0 www.numatic.ch Numatic International ULDA. Centro de Negócios da Maia, Rua Albino José Domingues, 581, 4470 – 034 Maia PORTUGAL Tel: +351 220 047 700 www.numatic.pt...
Need help?
Do you have a question about the TRO 650/200T and is the answer not in the manual?
Questions and answers