Table of Contents
Advertisement
Available languages
Available languages
Quick Links
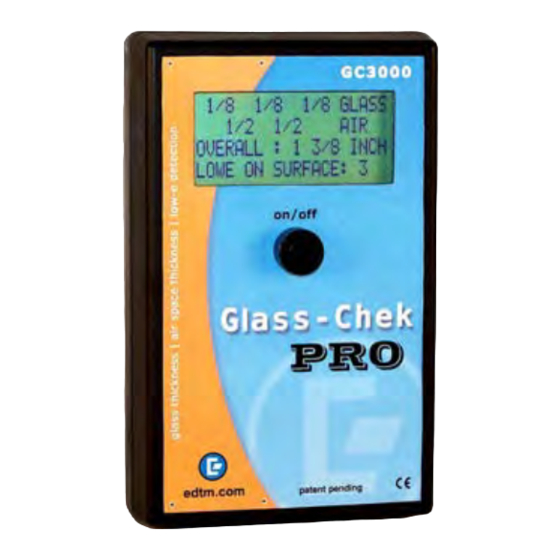
GLASS-CHEK PRO
Glass Thickness Meter and Low-E Coating Detector
MODEL# GC3000
GENERAL DESCRIPTION
The Glass-Chek PRO enables you to mea-
sure glass and air space thickness of triple
pane windows from a single side (also
compatible with double and single pane).
Furthermore, the GC3000 allows you to
determine the presence, location and type
of invisible Low-E coatings.
This manual will outline how to use the
meter, including choosing language and
measurement settings, explanations of
"results" screens, proper use, and main-
tenance of the meter. Additionally, it will
outline appropriate applications, technical
details and warranty information.
USING SETUP MODE
There are various selectable options avail-
able in the GC3000 meter. To access these
options, you must use Setup Mode.
Push and HOLD DOWN the button to turn
on the meter. Continue to hold the button
down as the following two messages are
displayed:
Release the button after the following
message is displayed:
NAVIGATING THROUGH SETUP MODE
After releasing the button (as outlined in
the previous step), the following message
will briefly appear:
This message explains how to navigate
through the menu system in setup mode.
When you enter setup mode, a menu will
appear, and a small arrow will be next to
one of the options. In the illustration below,
the arrow is next to the "MODE" option.
To scroll through the menu, gently touch
the back of the meter (see Figure 1).
Figure 1
To select an option, push the meter's but-
ton. To exit the menu, touch the back of the
meter until the arrow points to "EXIT" and
push the button. The following screen will
appear.
As shown in Figure 1, gently touch the back
of the Glass-Chek PRO to scroll through
the menu options. Touching the back of
the meter will advance the arrow to the
next line. Do not hit or tap the meter with
excessive force. Push the meter's button
to make a selection.
CHOOSE YOUR LANGUAGE IN SETUP
MODE
In the Setup Mode menu, select the "LAN-
GUAGE" option.
Touch the back of the meter to scroll
through the available languages. Push the
button to select your desired language
when it appears on the display. Save your
changes.
WARNING:
Once the meter's language is
changed, the menu will immediately change
to the language selected. If you choose
the wrong language and can't get back to
your desired language, stop navigating the
menu and allow the meter to automatically
power down after about a minute of inactiv-
ity. When the meter powers back up, it will
display the previously selected language.
The following languages are available in
the GC3000: English, German, French,
Spanish (Latin America), Dutch and Italian.
CHOOSE FROM NORMAL, HIGH RESO-
LUTION AND LOW-E LAMINATE MODES:
Mode 1: Normal resolution — slightly less
accurate than High Resolution, but it en-
ables the meter to take quicker measure-
ments.
Mode 2: High Resolution — more accurate
than normal resolution, but measurements
take longer. Accuracy differences are out-
lined in the Technical Details section.
Mode 3: PVB WITH LOW-E — used to
identify the location of a Low-E coating
against the PVB inner layer of laminated
glass (see page 4).
To choose your mode: In the Setup Mode
menu, select the "MODE" option. (Normal
resolution is the factory default setting.)
Touch the back of the meter to scroll be-
tween the "NORMAL," "HIGH RES" and
"PVB WITH LOW-E" options. Press the
button to select your desired mode. Save
your changes when you exit the menu.
CHOOSING YOUR DISPLAY UNITS:
The GC3000 can display thickness mea-
surements in various units. You also have
the option of rounding measurements to the
nearest "Glass Thickness Standard" (Re-
fer to GC3000 Standards chart on page 4).
To choose the display units appropriate for
your application, follow these steps:
In the Setup Mode menu, select the "DIS-
PLAY UNITS" option. The following sub-
menu will be displayed:
Display Units Sub-Menu:
First, select the "DIMENSIONS" option.
This option will determine whether your
meter will display measurements in milli-
meters or inches. Touch the back of the
meter to find your desired setting. Push
the button to select it.
Next, determine whether you want the
meter to: 1.) round measurements to the
nearest Standard, 2.) display the actual
dimensions, or 3.) display both standard
and actual. For more information about
rounding to Standards, see the "GC3000
Standards Table" in this manual. To turn
Standard rounding on or off, select the
"STANDARD" option. If your dimensions
are set to inches, you will have the op-
tions: FRACTION, DECIMAL or OFF. If
your dimensions are set to millimeters, you
will have the options: ON or OFF. Touch
the back of the meter to find your desired
745 Capital Commons Drive
Toledo, Ohio 43615 USA
PHONE: (419) 861-1030
FAX: (419) 861-1031
www.EDTM.com
Email: sales@edtm.com
© Copyright 2012 Electronic Design to Market, Inc. All rights reserved.
1
setting and push the button to select it.
PLEASE NOTE, if the STANDARD option
is selected in inches, the glass thickness
designations will always be shown in frac-
tions. If decimal inches are chosen, only
the air space thickness and overall IG unit
thickness will be shown in decimal inches.
Next, choose your ACTUAL setting. If this
setting is activated, your meter will display
actual dimensions without rounding. If your
dimensions are set to inches, you will have
the options: FRACTION, DECIMAL or OFF.
If your dimensions are set to millimeters,
you will have the options: ON or OFF. Touch
the back of the meter to find your desired
setting and push the button to select it.
NOTE: STANDARD and ACTUAL cannot
both be set to OFF. If they are both activat-
ed, the measurements will alternate on the
screen after a measurement has been
taken. For an illustration of this feature,
see the "Measurement Examples" section.
When you exit the Display Units menu, the
meter will show an example of what a
reading will look like according to your
selections. This will help you determine
whether you chose the correct options.
Push the button to exit the example display.
PROPER OPERATION OF THE GLASS-
CHEK PRO
Place the meter on the window to be test-
ed. Press and release the button to turn
the meter on and take a measurement. As
the initial message is displayed, the meter
is already taking a reading. Do not hold the
button down, as this will cause you to en-
ter setup mode.
In all other instances, the meter will indi-
cate it is taking a reading with the "TAKING
READING" message. The "TAKING READ-
ING" screen also indicates the amount of
voltage remaining in your battery. Continu-
ing to hold the button down at this time will
turn the meter off.
TURNING THE METER OFF
Hold the button down for several seconds
to turn off the meter. A message will display
on the screen notifying you that the meter
is about to power down. Continue hold-
ing the button down until the screen goes
blank. If the meter is left unused for a
period of time, the unit will automatically
shut off. To conserve battery life, it is rec-
ommended to turn the meter off manually
when you are finished using it.
KEEP THE COMPETITIVE
EDGE WITH PRODUCTS
FROM EDTM, INC.
glass & air space laser meters,
tempered glass detectors, SHGC,
solar, visible, & uv meters Low-E
type detectors, 4 point sheet re-
sistance meters, tin side detec-
tors, self-clean coating detectors,
sales kits, temperature guns &
sales kit accessories
Advertisement
Table of Contents

Subscribe to Our Youtube Channel
Related Manuals for EDTM GC3000


Summary of Contents for EDTM GC3000
- Page 1 Glass-Chek PRO to scroll through compatible with double and single pane). the menu options. Touching the back of fer to GC3000 Standards chart on page 4). Push the button to exit the example display. Furthermore, the GC3000 allows you to...
- Page 2 Low-E coat- IMPORTANT SAFETY CONSIDERATION ing on pane 1 or pane 2. Since the GC3000 only The GLASS-CHEK family of glass thickness and air space detects coatings on the first 2 panes, you may be meters use a Class 2M laser to take its measurements.
-
Page 3: Explanation Of Error Messages
Low-E results or issue an error message. The window area under test must be testing. The Low-E detection circuitry is CLEAN as well as the lenses on the back of the meter. Clean the lenses on the back of the GC3000 affected by conductive materials that are with compressed air. - Page 4 GC3000 product by the purchaser or others. No other obligations or liabilities are expressed or implied. All damage or liability claims will be limited to an amount equal to the sale price of the GC3000, as established by the manufacturer.
- Page 5 CHOISIR LES UNITÉS D’AFFICHAGE : ce que vous verrez à l’écran en fonction de doucement l’arrière du Glass-Chek PRO pour vitrage). En outre, le GC3000 vous permet de Le GC3000 peut afficher les mesures vos choix. Ceci vous aidera à déterminer dérouler les options du menu.
-
Page 6: Informations De Sécurité Importantes
Le pouce de l’utilisateur — Troisième Exemple d’Affichage de Mesure — se trouve sur le GC3000 sans toucher le vi- trage mesuré. En outre, assurez-vous qu’au- Revêtement à Affichage des Mesures Résultantes: Étant donné... -
Page 7: Guide De Dépannage
GC3000. dans les applications suivantes: Pile et remplacement de la pile: le mesureur GC3000 est alimenté par une pile alcaline de 9 volts. Lorsque Fenêtres Double Vitrage la pile est pratiquement vide, un message d’erreur apparaît, recommandant de la remplacer rapidement. - Page 8 0,531 GARANTIE DU GC3000 Le fabricant garantit que tous les modèles du GC3000 sont dépourvus de défaut de matériaux et de fabrication dans le cadre d’une utilisation et d’un entretien normaux, conformes aux spécifications du manuel de l’opérateur. Le fabricant réparera ou remplacera l’unité...
-
Page 9: Allgemeine Beschreibung
Seite aus zu messen (auch geeignet für Änderungen. Abschnitt „Messbeispiele“. Einzel- und doppelverglaste Scheiben). Darü- ber hinaus können Sie mit dem GC3000 be- SO WÄHLEN DAS IHR ANZEIGEFORMAT: Wenn Sie das Menü „Display Units“ verlas- stimmen, ob unsichtbare Low-E-Beschich- Berühren Sie leicht die Rückseite des Glass- Mit dem GC3000 können die Messwerte der... - Page 10 Hard-Coat-Low-E-Beschichtung handelt. die Positionierung der Hand im linken Bild. Der Daumen des Benutzers befindet sich auf dem GC3000 ohne das zu überprüfende — Messanzeige: Beispiel 3 — Glas zu berühren. Stellen Sie außerdem Entsprechende Messanzeige: Aufgrund der Beschich-...
- Page 11 Linsen auf der Geräterückseite müssen SAUBER sein. Reinigen Sie die Linsen auf der Materialien beeinflusst, die das Messgerät Rückseite des GC3000 mit Druckluft. Falls unbedingt erforderlich, verwenden Sie ein fusselfreies Tuch, um erkennt. Leitende Materialien können bei- Schmutzflecken, Fingerabdrücke usw.
- Page 12 Verbundglases. GARANTIE Der Hersteller gewährleistet, dass alle Modelle des GC3000 unter normalen Nutzungsbedingungen und bei der War- tung gemäß Bedienungsanleitung frei von Material-und Herstellungsfehlern sind. Der Hersteller muss das Gerät in- nerhalb von zwölf (12) Monaten ab dem ursprünglichen Lieferdatum reparieren oder ersetzen, nachdem das Gerät an den Hersteller zurückgegeben, vom Benutzer im Voraus bezahlt und vom den Hersteller als defekt erklärt wurde.
-
Page 13: Descripción General
“Espesura de Vidrio Estándar” (refiera a la de capas Low-E invisibles. leccionó. Esto le ayudará a determinarse si table de los estándares del GC3000 en la usted eligió las opciones correctas. Empuje página 16). Para elegir las unidades de ex- Este guía explicará... - Page 14 Low-E en el vidrio 1 o en • No toque el vidrio con su mano mientras el vidrio 2. Puesto que el GC3000 detecta solamente que toma las pruebas. El cuadro en la capas en los primeros 2 hojas de vidrio, podría ser re-...
- Page 15 1, la superficie 2, o la Reemplazo de la pila: El metro GC3000 es alimentado por medio de una pila alcalino de 9 voltios. Cuando la superficie 3 o 4. Moviéndose al otro lado de la pila alcanza llegar a un nivel de poder baja, un mensaje de error aparecerá...
- Page 16 PVB CON EL MODO DE LOW-E (VIDRIO LAMINADO CON LOW-E) Ventana Entera Además de identificar la ubicación de capas Low-E, el GC3000 determina el tipo de Low-E Al trabajar con el vidrio laminado que tiene una capa de Low-E Vidrio en el vidrio.
Need help?
Do you have a question about the GC3000 and is the answer not in the manual?
Questions and answers