Table of Contents
Advertisement
Quick Links
Advertisement
Table of Contents

Subscribe to Our Youtube Channel
Related Manuals for dji ZENMUSE X7


Summary of Contents for dji ZENMUSE X7
- Page 1 ZENMUSE X7 User Manual V1.2 2018.04...
-
Page 2: Read Before The First Flight
3. Zenmuse X7 User Manual We recommend reading the Zenmuse X7 Quick Start Guide, especially its Disclaimer and Safety sections, to get familiar with all parts of the Zenmuse X7. And then refer to this Zenmuse User Manual for detailed information. -
Page 3: Table Of Contents
Product Profile Introduction In the Box Overview Zenmuse X7 DJI DL/DL-S Lens (Optional) Getting Started Read the information below before setting up your Zenmuse X7 Installing a Camera Lens Mechanical Range Compatible Lenses Lens Specifications Mounting Filters/Protector Camera Controls DJI GO 4 App... -
Page 4: Product Profile
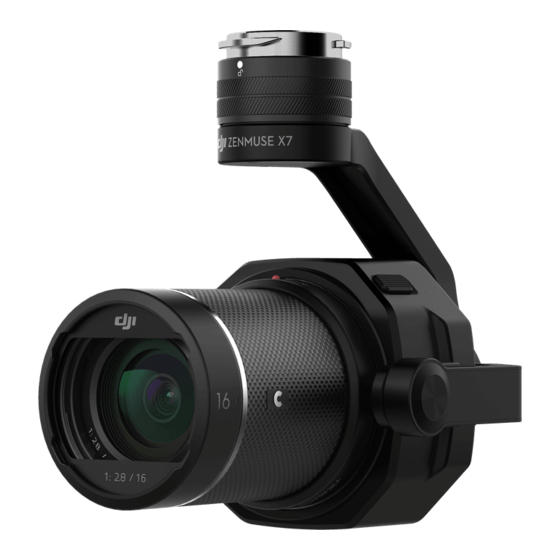
Product Profile Introduction The Zenmuse X7 is the world’s first Super 35 mm camera made for aerial cinematography and is capable of recording videos at 6K 30fps (full FOV), 3.9K 59.97fps (narrow FOV) in CinemaDNG and at 5.2K 30fps (full FOV) in Apple ProRes formats. It can also shoot 24 MP stills. A variety of shooting modes including Single Shot, Burst Shooting (3/5/7/10 shots), and Interval Shooting, provide even more creative options. -
Page 5: In The Box
Check that all of the following items are in your package. If any item is missing, please contact DJI or your local dealer. Zenmuse X7* × 1 Carrying Box × 1 * Lenses are not included with the Zenmuse X7. Please visit the official DJI Online Store to pur- chase a compatible lens. Overview Zenmuse X7 DJI Gimbal Connector 2.0... -
Page 6: Dji Dl/Dl-S Lens (Optional)
Getting Started Read the information below before setting up your Zenmuse X7 Supported Devices The Zenmuse X7 can be attached to the following device, and will be compatible with other DJI devices in the future: DJI Inspire 2 series Supported Lenses for the Zenmuse X7 The Zenmuse X7 currently supports the following lenses, and will support additional lenses in the future. -
Page 7: Installing A Camera Lens
35 g. You may also choose not to attach any balancing ring or filter (lens protector) to the lens when using the Zenmuse X7, but always attach the lens hood under this situation. The gimbal is capable of working normally when the total weight of the attached is between 10 to 35 g. - Page 8 Attaching a Lens Please follow the steps below to mount a lens to the camera body. The following instructions use the DJI DL 24mm F/2.8 LS ASPH lens as an example. 1. Remove the camera body cap. 2. Remove the lens cap and rear cap.
-
Page 9: Mechanical Range
ZENMUSE X7 User Manual Mounting the Zenmuse X7 to an Aircraft The following steps show how to mount the Zenmuse X7 to a DJI Inspire 2 drone: 1. Remove the gimbal cap from the Zenmuse X7. 2. Press the gimbal and camera detach button on the Inspire 2. Rotate the gimbal cap on the Inspire 2 to remove it. -
Page 10: Compatible Lenses
DJI DL/DL-S Lenses are compatible with the DJI DL-Mount of the Zenmuse X7 (a diameter of 58 mm). When used with the Zenmuse X7, the crop factor is 1.5 for still shooting, and 1.6 for video recording. The DL-S 16 mm F2.8 ND ASPH lens has a built-in ND 4 filter and it can record video of Super 35 mm size. -
Page 11: Lens Specifications
ZENMUSE X7 User Manual Lens Specifications DL 24mm DL 35mm DL 50mm DL-S 16mm Lens F2.8 LS ASPH F2.8 LS ASPH F2.8 LS ASPH F2.8 ND ASPH Focal Length 24 mm 35 mm 50 mm 16 mm 35 mm equivalent (stills) -
Page 12: Camera Controls
ZENMUSE X7 User Manual Enabling the Built-in ND Filter of the 16 mm Lens Launch the DJI GO 4 app and go to the camera page, then tap > > ND Filter to enable the built-in ND 4 filter. Camera Controls Press the Shutter Button to capture photos or the Record Button to record videos. -
Page 13: Dji Go 4 App
1. Power on the remote controller and the aircraft. 2. Connect the remote controller and your mobile device via a USB cable. 3. Launch the DJI GO 4 app after successful connection, and the live HD video stream will begin. Camera Interface The touch interface can be used for capturing photos, recording videos and playback. -
Page 14: Video/Photo Settings Page
5. SD: Videos in H.264 and H.265 formats will be stored on the MicroSD card. An MicroSD card is a necessary storage device for the Zenmuse X7. Choose H.264 or H.265 before recording, and then the frame ratio and the resolution in the pull-down menu. -
Page 15: Ei Mode
ZENMUSE X7 User Manual Photo Setting Video Photo Photo Mode Single Image Size 4 : 3 16 : 9 3 : 2 Image Format JPEG Raw + JPEG Color Normal Style Normal White Balance Custom Format SSD Format SD 1. Photo Mode: Choose Single Shot, Multiple, AEB, Timed Shot or RAW Burst (CINESSD is needed for RAW Burst). -
Page 16: Advanced Settings
ZENMUSE X7 User Manual READY TO GO (GPS) 4.07V P-GPS 4.07V 09:29 CAPACITY SHUTTER SD TIME AF/MF 1/200 0.3 Auto 4KP30 20:12 4KP30 384G Color Waveform to zoom in on the waveform in the middle of the screen to check the color balance. Tap to switch between RGB and black-and-white waveforms. -
Page 17: Video/Photo Styles
If you see dark or colored spots or lines in your images, then you may need to clean the sensor unit. The Zenmuse X7 features an ultrasonic dust-removing function. You can use the DJI GO 4 app to help remove dust from the sensor unit. DO NOT touch the sensor with your finger ©... -
Page 18: Update Firmware
> > Lens Dedusting. 3. A window will appear in the DJI GO 4 app. Tap Start to start. Follow the instructions to detach the lens. After the system detects that the lens has been successfully removed, tap Start to continue. -
Page 19: Specifications
The battery level should be above 30% for the firmware update process. When using the DJI GO 4 app to update, you may disconnect the aircraft and the mobile device once the update is more than 30% completed. No Internet connection is required. -
Page 20: 2018 Dji All Rights Reserved
SSD Card, Reset Camera Settings. Manual lens calibration is required when used for the first time. Incorrect calibration will result in an inability to focus to infinity. Calibrate the camera in the camera settings page in the DJI GO 4 app. ©... - Page 21 ZENMUSE X7 User Manual Video CINESSD: CinemaDNG, Apple ProRes 422 HQ, Apple ProRes 4444 XQ Video Codec MicroSD: H.264, H.265 Storage Frame Ratio Format Resolution Bit Depth Effective sensor size for imaging* 6016×3200 CinemaDNG 17:9 4096×2160 23.5×12.5 mm ProRes 422HQ 4096×2160...
- Page 22 ZENMUSE X7 User Manual Storage Frame Ratio Format Resolution Bit Depth Effective sensor size for imaging* H.264 17:9 4096×2160 23.5×12.5 mm H.265 3840×2160 H.264 2720×1530 1920×1080 23.976/24/ 16:9 22.5×12.7 mm 29.97/30fps 3840×2160 H.265 2720×1530 1920×1080 MicroSD H.264 2.44:1 3840×1572 23.5×9.6 mm H.265...
- Page 23 DJI Support http://www.dji.com/cn/support This content is subject to change. Download the latest version from http://www.dji.com/zenmuse-x7 ZENMUSE is a trademark of DJI OSMO Copyright © 2018 DJI All Rights Reserved.
Need help?
Do you have a question about the ZENMUSE X7 and is the answer not in the manual?
Questions and answers