Table of Contents
Advertisement
Advertisement
Table of Contents

Subscribe to Our Youtube Channel
Summary of Contents for X1 Bike X1 Explorer 2018
-
Page 1: User Manual
Journey Onward User Manual 2018... - Page 2 Using this product may be a dangerous activity and could result in serious injury, even if you are using safety equipment. X1 Bike, its companies, partners, associates and factories do not accept any liability whatsoever, in regards to the use of this product by any person/s. This product is intended for adult use only (age 18+).
-
Page 3: Table Of Contents
Table of Contents Product Diagram ----------------------------------------------------P1 Precautions Before Use -------------------------------------------P2 III. Basic Parameters & Performance ------------------------------P3 IV. LCD Multi Display Panel ------------------------------------------P4 Electrical Wiring Diagram ---------------------------------------- P5 - P6 VI. Battery and Charger Care ----------------------------------------P7 ... -
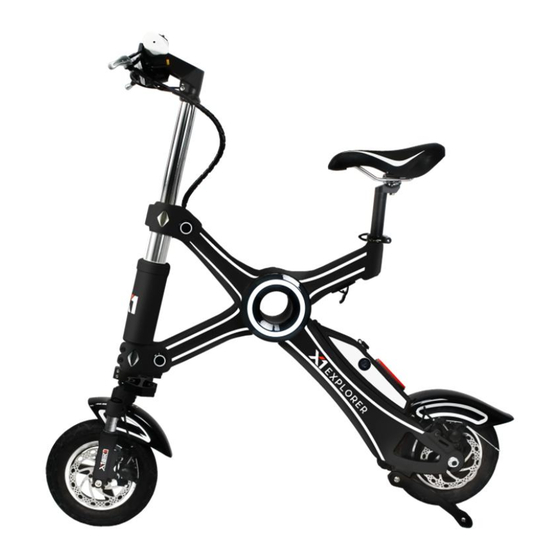
Page 4: Product Diagram
I. Product Diagram 1. 10-inch Pneumatic Tire (air 40psi) 2. Suspension Fork 3. Shock Absorber 4. Slip Joint for Folding Function 5. Horn and Front LED Light Switch 6. Brake Levers (Disconnects Power to Motor When Pulled) 7. LCD Multi Display Panel 8. -
Page 5: Precautions Before Use
II. Precautions Before Use 1. Before using, learn about the X1 Explorer features, functions, and basic operations in this handbook. 2. Make sure that the brakes are working correctly and the tires are fully aired (40 psi). 3. For riding comfort and safety, adjust the seat height to ensure that your feet can touch the ground. 4. -
Page 6: Basic Parameters & Performance
III. Basic Parameters & Performance Finished eBike Battery Wheel base 776mm Voltage 25 mile = 8.4AH L x W x H (unfolded) 1035*1050*550mm Capacity 37 mile =11.6AH L x W x H (folded) 1055*603*300mm Battery core Panasonic 18650-2900PF Maximum speed 25km/h Cycle life More than 1,000 times Maximum riding mileage 40/60km Discharging rate... -
Page 7: Lcd Multi Display Panel
IV. LCD Multi Display Panel LCD Display Panel Speedometer Odometer/Tripometer Display Horn Remaining Battery Meter LED Head Light LCD Display Panel LED Head Light Speedometer Remaining Battery Meter Temperature Display Odometer/Tripometer Display ... -
Page 8: Electrical Wiring Diagram
V. Electrical Wiring Diagram System structure general set... - Page 9 Wiring diagram controller (general set)
-
Page 10: Battery And Charger Care
VI. Battery and Charger Care IMPORTANT Battery description The battery is located in the frame of the eBike Fully-charged underneath the charging port area. Do not attempt to 41.5v voltage disassemble the battery compartment, or try to connect positive to negative. Please charge the eBike every 15-30 Undervoltage days (even if not being used) in order to keep the battery protection... -
Page 11: Use & Installation: Alarm, Gps, Handlebar & Folding
VII. Use & Installation: Alarm, GPS, Handlebar & Folding Function of Immobilizing Anti-Theft Alarm Key Start INDICATOR LIGHT ACTIVATE ALARM DISARM ALARM & TURN-OFF AUTO-START EMERGENCY PANIC BUTTON AUTO-START (PRESS TWICE) The mechanical lock is used if your Keyfob becomes lost or broken. Please keep your spare physical key and extra keyfob in a safe place. Included in the package is a GPS tracking device. - Page 12 Installation of Handlebar Install the Please visit our website www.x1bike.com/gallery for a handlebar this way video tutorial on how to install the handlebar. Remove this cover 1. Loosen screw A and remove the black cover. 2. Place the handlebar onto the Explorer and insert screw A back into the same hole, and tighten using the included allen wrench.
- Page 13 Folding System 1. Loosen the seat clasp and twist the seat 90 degrees in either direction To unfold, simply squeeze the fold- trigger and push the 2. Using the palm bike apart with the of your hand, seat and the slightly press down handlebar.
-
Page 14: Troubleshooting
VIII. Troubleshooting If one of the following occurs, use this checklist to address the issue. MOTOR DOES NOT ROTATE BATTERY CANNOT BE CHARGED 1. Motor joint became loose. 1. Charger connector is loose. 2. Battery may be too low. 2. Charger is damaged. 3. -
Page 15: Warranty & Guarantee
IX. Warranty and Guarantee 1.We implement a standard guarantee / warranty system for our products. We provide free maintenance, replacement/installation of parts, and replacement services for those products which comply with warranty conditions (USA, Canada and Mexico only). Excluding insurance, post/delivery and transport charges, we provide free warranty service for 1 year. -
Page 16: In The Box
X. In The Box • Your X1 Explorer • 1 Charger Unit (110/240v Power Adapter) • GPS tracking device (requires SIM card and contract) • 2 Keys and 2 Remote Keyfobs • 1 spare inner tube • Instruction Manual • Allen Wrench Set •... - Page 17 XI. Product Patent, PICC and Test / Safety Certificate...
-
Page 18: Quality Control
XII. Quality Control This X1 Explorer was hand made and hand tested prior to packing, and has passed quality inspection. It was approved to leave the factory. Proof of purchase is required to activate your warranty. The VIN number is allocated to you and your X1 Explorer at the time of registration (warranty is transferrable).To register your warranty, please visit https://x1bike.com/register-your-warranty/ SEAL OF Q.C. - Page 19 Journey Onward X1 Bike and X1 Explorer are Registered Trademarks of X1 Technology LLC. All rights reserved. Ⓡ Ⓡ X1bike.com X1explorer.com...
Need help?
Do you have a question about the X1 Explorer 2018 and is the answer not in the manual?
Questions and answers