
Related Manuals for Telkonet SS5200


Summary of Contents for Telkonet SS5200
- Page 1 SS5200 Thermostat Installation & Maintenance Guidebook Document - 6.30.115 Telkonet SmartEnergy 10200 Innovation Drive Milwaukee, WI 53226 Tel: (240) 912 -1800 Fax: (414) 258 - 8307 www.telkonet.com...
-
Page 2: In This Training Guide
In This Training Guide What is a SmartSystem? How Does it Work? Answering Common Guest Questions Installing a New Sensor Installing a New Thermostat Linking the Sensor to the Thermostat Troubleshooting Product Returns... -
Page 3: What Is A "Smartsystem"
What is a “SmartSystem”? Guest exits room and leaves thermostat set, for example, to 72 Thermostat turns down while the room is empty to save energy, temperature drifts off of the set point. Guest returns to room, air conditioner turns on to return the room temperature to guest’s setting. -
Page 4: How Does It Work
How Does it Work? Two units working together: People sensor on the ceiling Thermostat on the wall... -
Page 5: What Happens While A Guest Is In The Room
What Happens While a Guest is in the Room? Guest has full control of the thermostat while in the room. SmartSystems save energy in empty rooms. -
Page 6: How Does The Sensor Know When The Room Is Empty
How Does the Sensor Know When the Room is Empty? Sensor detects motion and body heat. The sensor transmits the room status wirelessly. - Page 7 If You Walk Into a Room That Feels Too Warm or Too Cool… Room temperature will automatically return to the thermostat’s last setting within about 15 minutes.
-
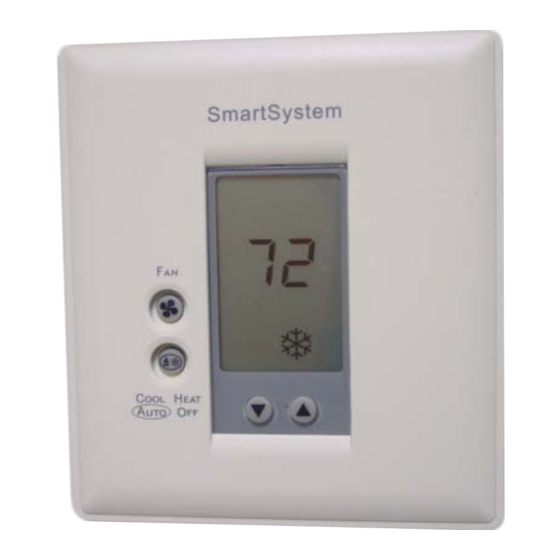
Page 8: Buttons On The Thermostat
Buttons on the Thermostat Turn continuous fan on/off. (This does not make it warmer or cooler, it just moves the air around.) Turn Heat or Cool on, or turn the system completely off. These are the “Warmer/Cooler” Buttons. Press these to raise or lower the temperature. -
Page 9: Pictures On The Thermostat
Pictures on the Thermostat Temperature setting. Batteries on sensor are low or missing, or sensor is gone. Sometimes this also means the sensor is broken. Continuous fan is on (blank when fan is off). Flame = Heat mode on Snowflake = Cool mode on Blank = System is off Flashing flame or snowflake... -
Page 10: Note To Housekeeping And Front Desk
Note to Housekeeping and Front Desk • If products in the room are missing or have been vandalized… • If the thermostat screen is displaying a flashing wrench… • If the thermostat cover is not locked down… Note the room number and description of the problem and report it to maintenance right away. - Page 11 Answering Common Guest Questions...
-
Page 12: When Housekeeping Finds A Problem In A Room
When Housekeeping Finds a Problem in a Room • If products in the room are found to be vandalized or they are not functioning properly, note the room number and report it to maintenance right away. -
Page 13: Too Hot Or Too Cold
Too Hot or Too Cold If a guest returns to their room and complains it is too hot or too cold, “Please give it about fifteen minutes to return to your temperature setting.”... -
Page 14: Temperature Won't Go Lower/Higher
Temperature Won’t Go Lower/Higher If the guest complains that the thermostat won’t let them set it as high or as low as they want. Explain to them that the thermostat has heat/cool limits, this prevents energy waste. NOTE: Setting the temperature to extreme temperatures will not make the room get... -
Page 15: Thermostat Is Clicking
Thermostat is Clicking “Thermostat is making loud “clicking” noises. Have maintenance staff replace the thermostat right away. -
Page 16: Thermostat Won't Respond
Thermostat Won’t Respond If the guest complains that they are setting the temperature on the thermostat but the system won’t turn on… A snowflake The system has or flame probably been symbol should turned off; ask the always be guest to press the displayed. - Page 17 What Happens While a Guest is in the Room? • When a guest is in the room, they control the room temperature, just like a regular thermostat. • A SmartSystem saves energy in an empty room.
-
Page 18: Installing A New Sensor
Installing a New Sensor... - Page 19 Sensor Installation Steps - Overview Remove failed or vandalized sensor. Insert Batteries Connect new sensor to the base. Link the new sensor to the thermostat.
-
Page 20: Important Note About Installing A New Sensor
Important Note About Installing a New Sensor • Units are linked using a wireless signal. • Never move a sensor to another room. – It will not work in the new room until you establish a new communication link between the new sensor and the thermostat. -
Page 21: Remove The Failed Or Vandalized Sensor
Remove the Failed or Vandalized Sensor • Remove the main body of the Sensor from the ceiling mounted base by turning it counter- clockwise. -
Page 22: Insert Batteries
Insert Batteries • Make sure batteries align according to the images in the casing. The “curved” metal pieces of the battery clips should be touching the “flat” end of the batteries as shown below. -
Page 23: Connect New Sensor To The Base
Connect New Sensor to the Base • Re-attach the main body of the Sensor to the ceiling mounted base by aligning the slots with the tabs. Hold base plate in place and turn clockwise until it snaps into place. If it doesn’t line up, spin the sensor ¼... - Page 24 After the Sensor is Installed • After you install the sensor you must link the sensor to the thermostat. Proceed to LINK THE SENSOR TO THE THERMOSTAT section.
- Page 25 Installing a Thermostat...
- Page 26 Thermostat Installation Steps - Overview Unlock thermostat Remove failed or vandalized thermostat Attach new thermostat to base plate Link sensor to thermostat. Lock buttons Lock down thermostat cover...
-
Page 27: Important Note About Installing A New Thermostat
Important Note About Installing a New Thermostat • Units are linked using a wireless signal. • Never move a sensor to another room. – It will not work in the new room until you establish a new communication link between the new sensor and the thermostat. -
Page 28: Unlock The Thermostat
Unlock the Thermostat • Unlock the thermostat cover by removing the screw with the appropriate tool. Screw is located at the bottom of the cover. -
Page 29: Remove Failed Or Vandalized Thermostat
Remove Failed or Vandalized Thermostat • Remove the front of the thermostat from the base plate by inserting a small screwdriver in the seam as shown. The front should lift off. Leave the base plate mounted to the wall. -
Page 30: Attach New Thermostat To Base Plate
Attach New Thermostat to Base Plate • Press the new thermostat body onto the base plate, attaching the top first. Wait a few seconds, the temperature should appear. - Page 31 After the Thermostat is Installed • After you install the thermostat you must link the sensor to it. Proceed to LINK THE SENSOR TO THE THERMOSTAT section.
-
Page 32: Link The Sensor To The Thermostat
Link the Sensor to the Thermostat Tool needed…a straightened paper clip! - Page 33 Unlock the Thermostat • If not already done, unlock the thermostat cover by removing the screw with the appropriate tool. Screw is located at the bottom of the cover.
-
Page 34: The Hidden Buttons
The Hidden Buttons • The buttons hidden under the thermostat cover are locked to prevent guest tampering or confusion. • Next you will unlock these buttons – The hidden buttons are used to set up a link between the thermostat and the sensor. -
Page 35: Pressing The Buttons
Pressing the Buttons • Press the buttons quickly, do not stop. – If you are not quick enough, the screen will go back to the normal temperature setting display and you will have to start over. - Page 36 Unlock the Buttons (NOTE: New Thermostat Will Already Have Unlocked Buttons) Press and hold the “FAN” button until it turns on, then off, then on again. Press and hold. Quickly press the HEAT/COOL/AUTO/OFF button once. HEAT COOL AUTO Press once. All of the symbols should briefly appear.
-
Page 37: Erase Old Sensors From Thermostat's Memory
Erase Old Sensors From Thermostat’s Memory Press the “%” three times in a row, the screen should show “00”. Press three times. Press the UP arrow until you reach “03”. Press to go to “03”. Press “%” once. Press once. Old sensor is now erased from memory. -
Page 38: Put The Thermostat Into "Learn" Mode
Put the Thermostat into “Learn” Mode Press the “%” three times in a row, the screen should show “00”. Press three times. Press the UP arrow until you reach “02”. Press to go to “02”. Press “%” once. Press once. The screen should now show “-0”. -
Page 39: Establish Radio Link
Establish Radio Link • Insert a straightened paper clip into the small hole on the face of the ceiling- mounted sensor. • Push lightly – you will feel a small switch inside the sensor when you press it. -
Page 40: Check The Signal Strength
Check the Signal Strength • Look at the thermostat. It should now display a symbol and a signal strength number. The number displayed indicates the strength of the signal. Signal should be “2” or higher. • It should look something like this: Strength of signal;... -
Page 41: Double Check Radio Link
Double Check Radio Link To be sure the thermostat has learned this sensor, check the number of sensors in the thermostat’s memory: Press the “%” three times in a row, the screen should show “00”. Press three times. Press the UP arrow until you reach “04”. -
Page 42: Lock The Buttons
Lock the Buttons Press and hold the “FAN” button until it turns on, then off, then on again. Press and hold. Quickly press the HEAT/COOL/AUTO/OFF button once. HEAT COOL AUTO Press once. The screen should go blank for a few Blank Screen seconds. -
Page 43: Lock The Thermostat Cover
Lock the Thermostat Cover • Lock the thermostat cover by replacing the screw with the appropriate tool. -
Page 44: Troubleshooting
Troubleshooting IMPORTANT! If there is a problem with a sensor or thermostat, it must be fixed immediately. If it is not fixed right away your property may be wasting valuable energy. -
Page 45: Equipment Maintenance
Equipment Maintenance • All air conditioning/heating equipment must be maintained according to the manufacturer’s recommendations • If an air conditioning/heating unit stops working, it must be repaired or replaced immediately... -
Page 46: What Does The Flashing Wrench Mean
What Does the Flashing Wrench Mean? • What does it mean when this symbol is flashing on the screen? -
Page 47: Low Batteries
Low Batteries? • Most of the time, a flashing wrench means the batteries are low or missing. • Check the batteries – Has someone removed the batteries? – Are the batteries in backwards? – Is there one or more dead batteries? –... -
Page 48: Flashing Wrench Problem Solved
Flashing Wrench Problem Solved • Twenty-four hours later, double- check that the service wrench did not reappear – If it does, double-check the batteries – If the screen still shows the service wrench, the sensor may be defective... - Page 49 If the Screen Went Completely Blank, Displays an “Inkblot” on the Front or Thermostat Has Been Crushed or Stolen • Return the thermostat, obtain a new one and install it according to thermostat installation instructions Inkblot (crushed) • Re-link the sensor to this new thermostat (see the LINK THE SENSOR TO THE...
- Page 50 If a Button is “Stuck” • Press the button in the middle, it should pop out • If the button does not “unstick”, then send the defective unit back to Smart Systems for replacement...
- Page 51 What if All of the Symbols are Starting to Appear on the Screen? • If all of the symbols on the thermostat’s screen are starting to show through (“ghosting”)… • Return the thermostat to Smart Systems and install a new thermostat.
-
Page 52: What If The Thermostat Is Clicking Loudly
What if the Thermostat is Clicking Loudly? • If the thermostat begins to make constant clicking noises, it is defective. • Return the defective thermostat to Smart Systems, install a new thermostat. “Click” “Click” “Click”... -
Page 53: Need Help
Need Help? Call Customer Care: (800) 380-9640... -
Page 54: Product Return Procedures
Describe the problem to our support technicians and obtain a RMA number. Place the product in a box with proper packaging and send it to Telkonet SmartEnergy. Write the RMA number on the mailing label and box. You may be contacted back in regards to your RMA, or the product will be returned as soon as possible. - Page 55 Thank you for your cooperation. Telkonet SmartEnergy 10200 Innovation Drive Milwaukee, WI 53226 Tel: (240) 912 -1800 Fax: (414) 258 - 8307 www.telkonet.com...
Need help?
Do you have a question about the SS5200 and is the answer not in the manual?
Questions and answers