Pride 610 Series Owner's Manual
Quantum 610 series owner's manual
Hide thumbs
Also See for 610 Series:
- Owner's manual (32 pages) ,
- Owner's manual (31 pages) ,
- Owner's manual (47 pages)

Related Manuals for Pride 610 Series


Summary of Contents for Pride 610 Series
- Page 1 QUANTUM 610 S E R I E S INNOVATIVE REHAB SOLUTIONS Including Models: Quantum 610 2S, Quantum 610 2SP, Quantum 610 2MP 1-800-800-8586 (US) 1-888-570-1113 (Canada)
- Page 2 S A F E T Y WARNING! A Quantum Rehab Specialist or a qualified technician must perform the initial setup of this power chair and must perform all of the procedures in this manual. The symbols below are used throughout this owner's manual and on the power chair to identify warnings and important information.
- Page 3 SAFETY ... 6 III. YOUR POWER CHAIR ... 18 IV. ASSEMBLY... 23 COMFORT ADJUSTMENTS... 26 VI. BATTERIES AND CHARGING ... 31 VII. CARE AND MAINTENANCE ... 35 VIII. WARRANTY... 41 Quantum 610 Series C O N T E N T S www.quantumrehab.com...
- Page 4 Before using your power chair, make sure your delivery is complete as some components may be individually packaged. If you do not receive a complete delivery, please contact your Quantum Rehab Specialist immediately. Where damage has occurred during transport, either to the packaging or content, please contact the delivery company responsible.
- Page 5 These message boards invite you to communicate with other Pride customers as well as Pride represen- tatives who are available to assist you with any questions or concerns you may have. Quantum 610 Series www.quantumrehab.com...
- Page 6 Avoid exposure to rain, snow, ice, salt, or standing water whenever possible. Maintain and store in a clean and dry condition. I I . S A F E T Y www.quantumrehab.com Quantum 610 Series...
- Page 7 Do not connect an extension cord to the AC/DC converter or the battery charger. Removal of grounding prong can create electrical hazard. If necessary, properly install an approved 3-pronged adapter to an electrical outlet having 2-pronged plug access. Wear safety goggles. Corrosive chemicals contained in battery. Quantum 610 Series www.quantumrehab.com...
- Page 8 Connect Red wire to Red Positive (+) Terminal Post Connect Black wire to Black Negative (–) Terminal Post Do not use batteries with different amp-hour (Ah) capacities. Do not mix old and new batteries. Always replace both batteries at the same time. www.quantumrehab.com Quantum 610 Series...
- Page 9 S A F E T Y Battery charger for indoor use only. Disposal and recycling - Contact your Quantum Rehab Specialist for information on proper disposal and recycling of your Pride product and its packaging. Disposal and recycling - Contact your Quantum Rehab Specialist for information on proper disposal and recycling of your Pride product and its packaging.
-
Page 10: General Guidelines
Pride has designed and engineered your power chair to provide maximum mobility and utility. A wide range of accessories is available from your Quantum Rehab Specialist to further customize your power chair to better suit your needs and/or preferences. However, under no circumstances should you modify, add, remove, or disable any feature, part, or function of your power chair. - Page 11 Failure to heed could result in the power chair tipping over. Quantum 610 Series I I . S A F E T Y...
- Page 12 (i.e., lessen the sharpness of the turn) to prevent your power chair from tipping. WARNING! When cornering sharply, reduce your speed and maintain a stable center of gravity. This greatly reduces the possibility of a tip or fall. I I . S A F E T Y 5 (8.7%) www.quantumrehab.com Quantum 610 Series...
- Page 13 WARNING! Do not attempt to have your power chair proceed backward down any step, curb, or other obstacle. This may cause the power chair to tip. Figure 2. Correct Curb Approach Quantum 610 Series I I . S A F E T Y Figure 3.
- Page 14 Positioning Belts Your Quantum Rehab Specialist, therapist(s), and other healthcare professionals are responsible for determining your requirement for a positioning belt in order to operate your power chair safely. WARNING! If you require a positioning belt to safely operate your power chair, make sure it is fastened securely in order to reduce the possibility of a fall from the power chair.
- Page 15 This may cause your power chair to tip. WARNING! Keep your hands away from the tires when driving. Be aware that loose fitting clothing can become caught in drive tires. Quantum 610 Series I I . S A F E T Y...
- Page 16 WARNING! Do not operate your power chair while you are under the influence of alcohol, as this may impair your ability to operate your power chair in a safe manner. I I . S A F E T Y Figure 4. Ideal Transfer Position www.quantumrehab.com Quantum 610 Series...
- Page 17 Call Pride at 800-424-8205 to report the incident. Quantum 610 Series I I . S A F E T Y...
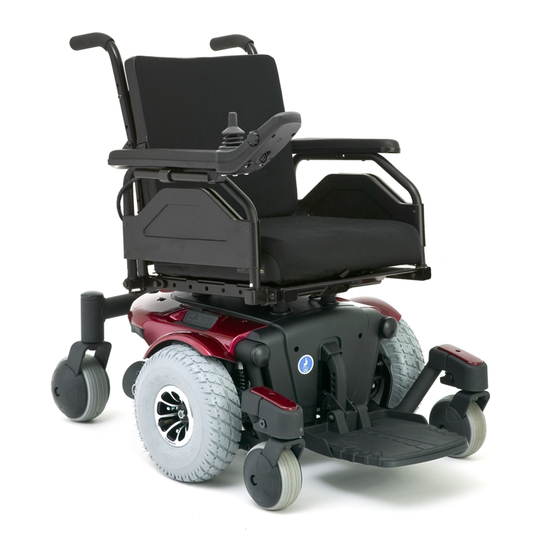
- Page 18 THE QUANTUM 610 The Quantum 610 Series has two main assemblies: the seat assembly and the power base assembly. See figure 5. Typi- cally, the seat assembly includes the armrests, seatback, and seat base. The power base assembly includes two motor/ brake assemblies, two drive wheels, four caster wheels, two batteries, and wiring harnesses.
- Page 19 (+ or – ) 3%. ³ AGM or Gel-Cell type required. See VI. “Batteries and Charging.” NOTE: All specifications subject to change without notice. Quantum 610 Series P O W E R QUANTUM 610 SPECIFICATIONS www.quantumrehab.com C H A I R...
- Page 20 TRAPEZE BARS FRONT COVER MOTOR/BRAKE ASSEMBLY Figure 6. The Quantum 610 Series Power Base Electrical Components The electrical components are located inside the power base. The ammeter and the charger power cord receptacle for the optional onboard charger are located on the right side of the power base. The main circuit breaker is located on the front of the battery tray.
- Page 21 CONTROLLER CONNECTOR MOTOR CONNECTORS ONBOARD BATTERY CHARGER CHARGER POWER CORD RECEPTACLE AMMETER Figure 7. Quantum 610 Series Electrical Components (Shown With Optional Onboard Battery Charger) Quantum 610 Series P O W E R CHARGER CIRCUIT FUSE BATTERY CONNECTOR MOTOR CONNECTORS...
- Page 22 WARNING! Do not use the freewheel lever handles as tie-down points to secure this product. Figure 8. Drive Mode (Drive Engaged) P O W E R Figure 9. Freewheel Mode (Drive Disengaged) www.quantumrehab.com C H A I R Quantum 610 Series...
- Page 23 Replacement nylon insert lock nuts are available at local hardware stores or through your Quantum Rehab Specialist. ARMREST ANGLE ADJUSTMENT CONTROLLER POSITION Figure 10. Quantum 610 Series Assembly View (Universal Mounting System Shown) Quantum 610 Series I V . A S S E M B L Y FOOT PLATFORM HEIGHT/DEPTH ADJUSTMENT www.quantumrehab.com...
- Page 24 See figure 13. I V . A S S E M B L Y REAR TRAPEZE Figure 11. Universal Mounting System Figure 12. Controller Routed on a Synergy Seat www.quantumrehab.com REAR EXTRUSION SEAT LATCH SAFETY Quantum 610 Series...
- Page 25 7. Install the controller. NOTE: Refer to V. “Comfort Adjustments” for more in- formation on controller installation and adjustment. Quantum 610 Series I V . A S S E M B L Y Figure 13. Controller Routed on a Contour Seat Figure 14.
- Page 26 WARNING! If your power chair was configured by your Quantum Rehab Specialist, please consult your healthcare professional before changing the seat position or making any other adjustment. Some adjustments may degrade your power chair’s performance and safety by changing its center of gravity.
- Page 27 You can change each armrest’s width independently of the other. NOTE: Changing the armrest width may increase the overall width of your power chair. Quantum 610 Series A D J U S T M E N T S Figure 17. Seat Position Adjustment...
- Page 28 13. Secure the controller cable to the armrest with wire ties. See figure 13. A D J U S T M E N T S Figure 19. Underside of Armrest Figure 20. Mounting Block Controller Installation www.quantumrehab.com SETSCREW MOUNTING MOUNTING SCREWS BLOCK Quantum 610 Series...
- Page 29 3. Rotate the lever until it is in the fully closed position. NOTE: If the lever will not rotate to the fully closed position, then turn the nut counterclockwise one-quar- ter or one-half turn. Quantum 610 Series A D J U S T M E N T S FOOT PLATFORM...
- Page 30 1–2 inches (2.54-5.08 cm). Always check to be sure this system is operating properly before using your power chair. A D J U S T M E N T S Figure 24. Power Seat Toggle Switch www.quantumrehab.com Quantum 610 Series...
- Page 31 BATTERIES AND CHARGING The Quantum 610 uses two long-lasting, 12-volt, deep-cycle batteries. These batteries are sealed and maintenance free. Since they are sealed, there is no need to check the electrolyte (fluid) level. Deep-cycle batteries are designed to handle a longer and deeper discharge.
- Page 32 90% of their potential. 4. After four or five charging cycles, the batteries will top off at 100% charge and last for an extended period. A N D C H A R G I N G www.quantumrehab.com Quantum 610 Series...
- Page 33 (e.g., an automotive battery charger). NOTE: Your power chair’s charger will not operate after the batteries have been discharged to nearly zero voltage. If this happens, call your Quantum Rehab Specialist for assistance. How often must I charge the batteries? Many factors come into play when deciding how often to charge the batteries.
- Page 34 If you wish to use a freight company to ship your power chair to your final destination, repack your power chair in the original shipping container and ship the batteries in separate boxes. A N D C H A R G I N G www.quantumrehab.com Quantum 610 Series...
-
Page 35: Care And Maintenance
3. Check the joystick operation and the brakes before using your power chair again. 4. If any inconsistencies are found, take your power chair to your Quantum Rehab Specialist. Power chairs that are frequently exposed to sources of water, such as incontinence, should be inspected often for corrosion and electronic components may need to be replaced frequently. - Page 36 ! Ensure that all parts of the controller system are securely fastened to your power chair. Do not overtighten any screws. ! Check for proper tire inflation. There should be 35 psi (2.4 bar) in each tire. If a tire does not hold air, see a Quantum Rehab Specialist for replacement of the tube.
- Page 37 Replacement tires, tubes, and wheel assemblies are readily avail- able through your Quantum Rehab Specialist. WARNING! The wheels on your power chair should only be serviced or replaced by a Quantum Rehab Specialist or a qualified technician.
- Page 38 WARNING! The batteries in your power chair should only be serviced or replaced by a Quantum Rehab Specialist or a qualified technician. WARNING! Do not replace batteries when seat is occupied. WARNING! Power chair batteries are heavy. See specifications table. If you are unable to lift that much weight, be sure to get help.
- Page 39 V I I . C A R E A N D M A I N T E N A N C E REAR SHROUD FASTENERS REAR SHROUD BATTERY WIRING DIAGRAM LABEL FRONT BATTERY REAR BATTERY Figure 27. Battery Installation Quantum 610 Series www.quantumrehab.com...
- Page 40 When to See Your Quantum Rehab Specialist for Service The following symptoms could indicate a serious problem with your power chair. If necessary, contact your Quantum Rehab Specialist. When calling, have the model number, serial number, nature of the problem, and the error code if available.
- Page 41 ! Bearings and bushings The battery is covered by a separate six-month warranty, provided by the battery manufacturer. The batteries are not warranted by Pride. Quantum 610 Series W A R R A N T Y ! Fixed-position seat post...
- Page 42 SERVICE CHECKS AND WARRANTY SERVICE Warranty service must be performed by a Quantum Rehab Specialist. Do not return faulty parts to Pride without prior written authorization. All transportation costs and shipping damage incurred while submitting parts for repair or replacement are the responsibility of the purchaser.
- Page 43 Quality Control - Quantum 610 Series Inclusion of all Parts Joystick Serial Number Controller Serial Number Left Motor Serial Number Right Motor Serial Number Fit and Finish Performance Pride keeps a more detailed report on file at the factory. Date Inspected...