
Subscribe to Our Youtube Channel
Related Manuals for PSI PlantPen PRI 200


Summary of Contents for PSI PlantPen PRI 200
- Page 1 PlantPen PRI 200 & NDVI 300 Instruction Manual Please read this manual before operating this product PSI, spol. s r. o., Drásov 470, 664 24 Drásov, Czech Republic FAX: +420 511 440 901, TEL: +420 511 440 011, www.psi.cz...
- Page 2 CONTENTS Contents ................................2 Instruction Manual ............................3 Technical specifications............................. 3 General Description ............................6 Components of the Plant pen series ........................7 Description of the Plant pen device- ........................8 Operation instructions ............................ 10 Control Menu Tree............................11 Connection of the device via USB pairing ......................16 Bluetooth Pairing............................
-
Page 3: Instruction Manual
INSTRUCTION MANUAL TECHNICAL SPECIFICAT IONS Measured Parameters: PRI (Photochemical Reflectance Index) PRI = (R ) / (R NDVI (Normalized Difference Vegetative Index) NDVI = (NIR – VIS ) / (NIR + VIS Measuring Light: PRI: Internal dual wavelength light source R = 531 nm (bandwidth 520 nm - 540 nm), R = 570 nm (bandwidth 570 nm - 590 nm) - Page 4 Keypad Escape Time: Turns off after 3 minutes of no use Power Supply: 4 AAA alkaline batteries (single use or rechargeable) Battery Life: 48 hours typical with full operation Low Battery Detection: Low battery indication displayed Size: 120 mm x 57 mm x 30 mm 4.7"...
- Page 5 The Bluetoothmodule BlueNiceCom III is endowed with a declaration of conformity with the following norms: EN 300 328 V1.6.1 (2004-11) EN 301 489-1, -3 V1.5.1 (2003-12) EN 50371 December 2002 EN60650 FCC Part 15.247 FCC Grantee Code: R7T Bluotooth Qualified Product Notice: GRA_013_04 Bluetooth Listing Identifier: B01572 PlantPen models (PRI 200-B, PRI 200-U, NDVI 300-B, NDVI 300-U) incorporate one of the two offered...
-
Page 6: General Description
GENERAL DESCRIPTION The PlantPen model PRI 200 measures Photochemical Reflectance Index (PRI) in two narrow wavelength bands centered close to 531 nm and 570 nm. The photochemical reflectance index (PRI = (R531– R570)/(R531+R570)) correlates with the epoxidation state of xanthophyll cycle pigments and photosystem efficiency in many studies under diverse conditions, such as different . -
Page 7: Components Of The Plant Pen Series
If any item is missing, please, contact the manufacturer: support@psi.cz. Please check the carton for any visible external damage. If you find any damage, notify the carrier and PSI immediately. The carton and all packing materials should be retained for inspection by the carrier or insurer. -
Page 8: Description Of The Plant Pen Device
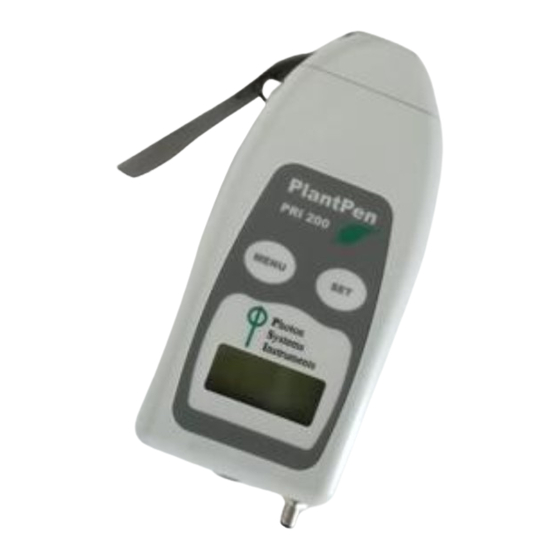
DESCRIPTION OF THE PLANT PEN DEVICE- PlantPen models (PRI 200-B, PRI 200-U, NDVI 300-B, NDVI 300-U) incorporate one of the two offered communication modules: Bluetooth or USB cable. Depending on the version purchased design of the device might slightly differ.PRI 200-U version of device is shown in figure 2. Leaf clip Optical window Menu key... - Page 9 LEAF CLIP AND THE PROTECTIVE RUBBER PAD The optical part of the PlantPen is covered with a self-adhesive rubber pad that protects the optics from dirt or moisture. The damaged or dirty pad can be easily removed by tearing it off from the surface. To affix a new one, just remove the sheeting and stick the pad on cleaned and dried surface.
-
Page 10: Operation Instructions
OPERATION INSTRUCTIONS The next chapter explains the operation software and the structure of the Main Menu and three Sub-Menus with all their options. The explanations of the operation software are same for both versions of the PlantPen devices (NDVI and PRI). ... -
Page 11: Control Menu Tree
CONTROL MENU TREE... -
Page 16: Connection Of The Device Via Usb Pairing
DATA TRANSFER AND VISUALISATION Please follow the next steps for data transfer from the PlantPen device and data visualisation with the FluorPen 1.0 software. CONNECTION OF THE DEVICE VIA USB PAIRING Please follow next steps if you have PRI 200-U /NDVI 300-U type of device. Before you set up the USB connection between the PlantPen and PC, make sure you have these components: ... -
Page 17: Bluetooth Pairing
CONNECTION OF THE DEVICE VIA BLUETOOTH Please follow next steps if you have PRI 200-B /NDVI 300-B type of device. Before you set up the USB connection between the PlantPen and PC, make sure you have these components: Bluetooth enabled PlantPen with built-in Bluetooth capabilities. ... - Page 18 Fig.5 Selection of my Bluetooth places function. You may also start your Bluetooth application via the Control Panel: Select: Start>Settings>Control Panel>Bluetooth Devices. Opening the Add Bluetooth Device Wizard Select: “Add” to start the wizard (fig.6) NOTE: Before starting to use the wizard, be sure that the PlantPen is in discoverable mode (see Step 1). Fig.6 Add function of Bluetooth device.
- Page 19 Fig.7 Searching of Bluetooth device. Selecting the PlantPen Select: Bluetooth PlantPen icon (PlantPen FluoroMeter PSI) (fig. 7) Select: Next. Note: Please note that your display may show more Bluetooth Device icons. Fig.8 Selection and adding of Bluetooth device.
- Page 20 IMPORTANT NOTE: Your Bluetooth Pairing Passkey is 0000. Fig.9 Adding of the own passkey. Completing the PlantPen Pairing Select: Finish. (fig.10) Fig.10...
-
Page 21: Bluetooth Connection
BLUETOOTH CONNECTION Installing the PlantPen Software Install the PlantPen software to your PC. Use the CD that came enclosed with your PlantPen.* * See Chapter 8 of this Operation Manual for complete information on PlantPen software. Enabling Bluetooth in the PlantPen ... - Page 22 Registering the PlantPen Software Select: Help>Register. Enter your serial (registration) number.* Select: OK. * You will find your serial (registration) number in the file SN.txt on the enclosed CD. Important Note: How to Reconnect Bluetooth Disconnection can occur, either when the Bluetooth feature has been turned off in one or both of the devices, or when the units move outside their operating range.
-
Page 23: Plantpen Software
PLANTPEN SOFTWARE This Chapter applies to users of the PlantPen FP 100-MAX and to users of the PlantPen FP 100-B, FP 100-S, and FP 100-U. START UP 1. STARTING UP Please follow next steps to start the FluorPen software for visualisation and data transfer of data from PlantPen devices. -
Page 24: Menu And Icon Explanation
MENU AND ICON EXPLANATION Menu: File Load Loads previously saved data files. Save Saves data to hard disc. Export Exports data in .txt format. Close Closes the current experiment. Close All Closes all running experiments. Exit Exits the program. Menu: Device Download Downloads data from the PlantPen to your PC. - Page 25 Menu: Settings After Download - Memory Erase If the box is checked, the PlantPen memory is erased after each data download. Data - Inverted If the box is checked, the polarity of data is inverted, e.g., multiplied by -1.* Data – Add to Opened If the box is checked, the downloaded data are added to that of the current opened experiment.
-
Page 26: Example Of Data Transfer And Visualization
EXAMPLE OF DATA TRANSFER AND VISUALIZATI ON Please follow the next instruction s for correct data transfer and visualisation. Step 1: Do a measurement with your PlantPen Note: Please note that examples below are shown for NDVI measurement. Step 2: Click the “Download”... -
Page 27: Pri - Photochemical Reflectance Index
PRI - PHOTOCHEMICAL REFLECTANCE INDEX The Photochemical Reflectance Index or PRI is a reflectance measurement. The PRI is sensitive to changes in carotenoid pigments (e.g. xanthophyll pigments) in live foliage. Carotenoid pigments are indicative of photosynthetic light use efficiency, or the rate of carbon dioxide uptake by foliage per unit energy absorbed. As such, it is used in studies of vegetation productivity and stress. -
Page 28: Software Update
SOFTWARE UPDATE Very important! The PlantPen memory is erased during the software update! Before starting any software update, export all your data from the PlantPen memory into your computer! Step 1: Starting Update Select: Setup>Update Firmware Step 2: Selecting .bxn File Find: Binary file (with the extension .bxn) Select: Open... - Page 29 Step 3: Finishing Upload Select: “OK” to start uploading of the update. The bottom bar indicates the upload progress. Press: “OK” to finish upload.
-
Page 30: Gps Module
GPS MODULE Please follow next steps if your device is purchased together with the GPS module. IMPORTANT INFORMATION: For proper GPS reading, the TIME in your PlantPen and in your computer must be synchronized! Preset time and time zone must correspond to GPS time (time zone) in your location. GPS MODULE DESCRIPTI ON 1. -
Page 31: First Time Installation Of The Gps Module
3. Power Key Turn On: Press the key once and hold it for 3 sec. Turn Off: Press the key twice (hold the second press for 3 sec). 4. Battery Status Indication Red LED On/Off (flashing 1 sec/2 sec): Battery low (turns off after 5 minutes). Red LED On: Battery charging. -
Page 32: Gps / Plantpen Operation
Select: Settings>GPS visible Step 2: Accepting GPS Setting Close and restart the PlantPen program to accept GPS setting. GPS / PLANTPEN OPERATION Step 1: Time Synchronization Synchronize the PlantPen time with the time of your PC. Time must be set correctly witch respect to your time zone. - Page 33 Step 2: Downloading PlantPen Data Start: PlantPen program. Connect: PlantPen device. Download: Measured data from the PlantPen to your PC. Be aware that no GPS coordinates are visible at this moment. Step 3: Connecting GPS Module Connect the GPS Module to your PC. Communication is set properly if the hardware is recognized by your...
- Page 34 Step 4: Downloading GPS Data Select: Device>Attach GPS file to download data from the GPS module. Step 5: Completing the Download Successfully downloaded coordinates paired with PlantPen data.
-
Page 35: Warranty Terms And Conditions
The customer is responsible for shipping and insurance charges (for the full product value) to PSI. The manufacturer is responsible for shipping and insurance on return of the instrument to the customer. -
Page 36: Troubleshooting And Customer Support
TROUBLESHOOTING AND CUSTOMER SUPPORT In case of troubles and for customer support, please, write to support@psi.cz or contact your local distributor. Manual Version: 2013/06 © PSI (Photon Systems Instruments), spol. s r.o.
Need help?
Do you have a question about the PlantPen PRI 200 and is the answer not in the manual?
Questions and answers