Table of Contents
Advertisement
Quick Links
Advertisement
Table of Contents

Subscribe to Our Youtube Channel
Related Manuals for Transystem 860 PRO PersonalMate

Summary of Contents for Transystem 860 PRO PersonalMate
- Page 1 860 PRO PersonalMate GPS User’s Manual V0.2...
- Page 2 Table of Contents Chapter 1 Before you begin..................4 1.1 Note and Warning ..................4 1.2 Introduction....................5 1.3 Features......................5 1.4 Applications ....................6 1.5 Appearance .....................6 1.6 Power Switch and Push Button ..............7 1.7 LED Display ....................8 Chapter 2 Getting Started ...................9 2.1 Checking the package content ..............9 2.2 Getting Started .....................10 Step 1 Charging Your Battery ..............10 Step 2 Turning on the power switch (NAV/ LOG)........
- Page 3 4.1 Execute and install software utility Photo Tagger........21 4.2 Google Earth....................21 4.3 Software Utility --- GPS Photo Tagger............21 Appendix........................22 Appendix A. Specifications................22 Appendix B. locr GPS Photo................25 Appendix C. Certification .................26 Appendix D. Warranty Information ..............28...
-
Page 4: Chapter 1 Before You Begin
Chapter 1 Before you begin 1.1 Note and Warning - 860 PRO uses + Lithium-Ion battery. If 860 PRO is used in temperature lower than -10℃ or higher than 60℃, its battery charging capability will decrease. Please leave the 860 PRO far from heat or high temperature environment. -
Page 5: Introduction
- Do not attempt to open the 860 PRO yourself. Unauthorized hacking may damage the unit, and void your warranty. 1.2 Introduction This 860 PRO logger features an all-in-one, cost-effective portable GPS logging solution. With its on-board memory, it allows you to log your routes by ways of time/ distance/ speed. -
Page 6: Applications
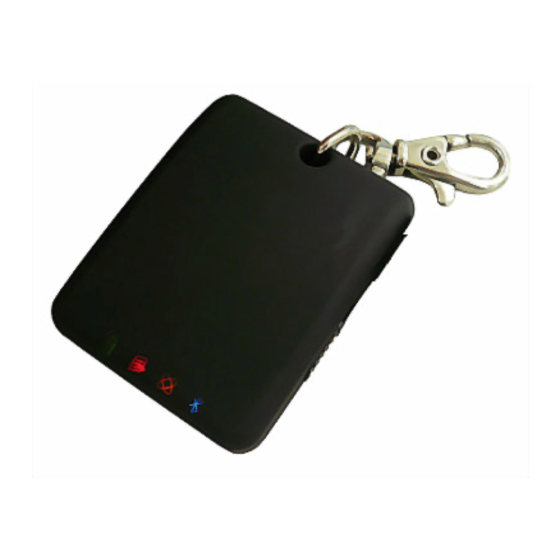
1.4 Applications - Record your travels - Manage business trip expense - Concerned about one’s driving behavior - Record Point of Interest by a push button - Geo-photo 1.5 Appearance 1. DC jack (mini USB type) 2. Mode switch (Power off/ Navigation/ Navigation& log) 3. -
Page 7: Power Switch And Push Button
1.6 Power Switch and Push Button Power Switch Right (Off) Power off Middle (NAV) Enable Navigation mode Left (LOG) Enable Navigation + log mode Push button Push Push to log points of interest, LED blinks 3 times. Difference between NAV and LOG: Working as a Bluetooth GPS receiver. -
Page 8: Led Display
1.7 LED Display The 860PRO PersonalMate GPS has four LED lights, one is Bluetooth Status LED, the 2 one is GPS Status LED, the 3 one is Log / Memory Status LED, the 4 one is Battery Status LED. The status table of LED shows as follows: Category SYMBOL COLOR STATUS... -
Page 9: Chapter 2 Getting Started
Chapter 2 Getting Started 2.1 Checking the package content Congratulations on your purchase of the 860 PRO. Before you start using 860 PRO, please make sure if your package includes the following items. If any item is damaged or missing, please contact your dealer at once. - 860PRO PersonalMate GPS x 1 - USB to mini-USB cable x 1 - DC cigarette lighter adapter x 1... -
Page 10: Getting Started
2.2 Getting Started Please follow the procedure step by step. Step 1 Charging Your Battery To charge your 860 PRO, you have to plug your USB cable into the power source. Charging time is about 3~4 hours and you can charge from PC/ Notebook’s USB HOST or from cigarette-lighter in car. -
Page 11: Step 2 Turning On The Power Switch (Nav/ Log)
Step 2 Turning on the power switch (NAV/ LOG) Power off Navigation Data record Difference between NAV and LOG: Working as a Bluetooth GPS receiver. Both of navigation and logging functions are enabled. Step 3 Connecting your handheld device with 860 PRO Please refer to the user manual of PDA to enable the Bluetooth connectivity. - Page 12 --> Start -> Bluetooth Manager 1. Open “Bluetooth Manager” on your pocket pc, and establish a new connection. --> Explore A Bluetooth device Tap 860PRO ->Next...
- Page 13 2. Explore a Bluetooth device, and find the “860PRO” Passkey 0000 (if your PDA asks for the passkey) 3. (Optional) --> Select SPP slave->Next Finish...
-
Page 14: Step 4 Loading Your Gps Mapping Or Routing Software
4. Connect to Serial Port Profile (SPP) Slave --> Tap and Hold 860PRO SPP Done slave, Connect 5. Finish Bluetooth Manager Setup Step 4 Loading your GPS mapping or routing software You should have mapping software on your PDA/ Smartphone/ laptop or you need to install it before using the 860 PRO for navigation. -
Page 15: Helpful Tips
2.3 Helpful Tips - It’s better to turn off the 860 PRO when you don’t use it, or the serial Flash's life can’t last long. - Some vehicles having heavy metallic sun protecting coating on windshields may affect GPS signal receptions - Driving in and around high buildings may affect GPS signal receptions. -
Page 16: Chapter 3 How To Configure Your Gps Record
Chapter 3 How to configure your GPS Record ? The GpsView program only supports the Microsoft Windows based platform. 3.1 Driver Installation Before the USB connector plugs in your PC/ Laptop, please have your USB Driver Installation ready. (Install InstallDriver.exe driver for USB port from CD-ROM.) 3.2 GpsView software Open the GpsView software, please select correct COM port and Baud... -
Page 17: Executing Gpsview Program
3.2.2 Executing GpsView Program Click “Command” tap. Update Rate 1 ~ 5Hz is user configurable. And still more options for choice of NMEA output, DGPS…etc. all available through pull-down menus. 3.2.3 Download AGPS 1. Start→Control Panel→System→Hardware→Device Management→Connector(COM and LPT)Check Com port position。... - Page 18 2. Open GpsView.exe→Check Baud Rate and Com port→ click On...
- Page 19 3. Choice Setup 4. Choice Update。...
- Page 20 5. When Updating now…100%, click Enter complete。 NOTE: When you use AGPS function, we suggest use GpsView to download the AGPS data via USB cable. AGPS has 6 day time limited.
-
Page 21: Chapter 4 Using Photo Tagger Software
Chapter 4 Using Photo Tagger software 4.1 Execute and install software utility Photo Tagger Complete GPS Photo Tagger and USB drivers installation (Refer to CD) 4.2 Google Earth If you computer is not yet installed with Google Earth. Google Earth has free download version, go download it in the internet first. -
Page 22: Appendix
Appendix Appendix A. Specifications General Frequency L1,1575.42MHZ C/A Code 1.023MHZ Datum WGS84 Performance Characteristics Position Accuracy Without aid: 3.0m 2D-RMS <3m CEP(50%) without SA(horizontal) DGPS (WAAS,EGNOS,MSAS):2.5m Velocity Accuracy Without aid: 0.1m/s DGPS (WAAS,EGNOS,MSAS):0.05m/s Acceleration Without aid:<4g DGPS (WAAS,EGNOS,MSAS):<4g Timing Accuracy 50 ns RMS Reacquisition Time <1s... - Page 23 Update Dynamic Altitude Maximum 18,000m Velocity Maximum 515m/s Acceleration Maximum 4g Power Vin : 5.0V±5% Input Voltage Available Baud Rates 115200 bps Protocols NMEA 0183 v3.01 Environment Operating -10 ~ 60C Temperature Storage Temperature -20 ~ 60C Charging 0 ~ 45C Bluetooth Standard Fully compliant with Bluetooth V1.2...
- Page 24 Standard Fully compliant with USB2.0 Full – speed 12Mbps Dimension 46.5 x 72.2 x 20 mm Data Log 32M bit serial Flash 125,000 way points or more Log GPS data by time interval/ distance/ speed limit. Log GPS data by button push. User can configure settings by using utility.
-
Page 25: Appendix B. Locr Gps Photo
Appendix B. locr GPS Photo With 860 PRO and locr GPS Photo software, users are allowed to import geotagging adds information to photos. The position (latitude/ longitude) then be written into the EXIF header for the further application. Also, locr GPS Photo can integrated travel log and digital photos by date/ time to show photos on the map directly. -
Page 26: Appendix C. Certification
Appendix C. Certification FCC Notices This device complies with part 15 of the FCC rules. Operation is subject to the following two conditions: 1. This device may not cause harmful interface, and 2. This device must accept any interference received, including interference that may cause undesired operation. - Page 27 CE Notices Is herewith confirmed to comply with the requirements set out in the Council Directive on the Approximation of the Laws of the Member States relating to Electromagnetic Compatibility (89/336/EEC), Low-voltage Directive (73/23/EEC) and the Amendment Directive (93/68/EEC), the procedures given in European Council Directive 99/5/EC and 89/3360EEC.
-
Page 28: Appendix D. Warranty Information
Appendix D. Warranty Information Thank you for your purchase of GPS product from the company. The company warrants this product to be free from defects in materials and workmanship for one year from the date of purchase. The warranty for accessories is six months. The stamp of distributor or a copy of the original sales receipt is required as the proof of purchase for warranty repairs.
Need help?
Do you have a question about the 860 PRO PersonalMate and is the answer not in the manual?
Questions and answers