Table of Contents
Advertisement
The Original European Brand
Synonymous with Safety, Quality & Style
© 2012 Cosco Management, Inc. All Rights Reserved.
4358-5671
Prezi
Infant Car Seat
For children 4-30 lbs (1.8 -13.6 kg)
and 29 in. (74 cm) tall or less
KEEP INSTRUCTIONS FOR FUTURE USE.
Read all instructions before using this child restraint.
Failure to follow the warnings on the labels
and in the instruction manual can result in
serious injury or death to your child.
TM
Advertisement
Table of Contents

Subscribe to Our Youtube Channel
Related Manuals for Maxi-Cosi Prezi


Summary of Contents for Maxi-Cosi Prezi
- Page 1 Prezi Infant Car Seat For children 4-30 lbs (1.8 -13.6 kg) and 29 in. (74 cm) tall or less KEEP INSTRUCTIONS FOR FUTURE USE. Read all instructions before using this child restraint. The Original European Brand Synonymous with Safety, Quality & Style...
- Page 2 D. General Vehicle Installation........Pages 28-34 A. Before You Begin............Pages 3-8 D-1 Understanding Your Vehicle A-1 Thank You... D-2 Vehicle Seating Position A-2 Registration and Safety Notices D-3 Choosing LATCH or Vehicle Belts A-3 Understanding Your Child Restraint D-4 Knowing Your Vehicle Belts D-5 Installing on Aircraft B.
-
Page 3: Registration And Safety Notices
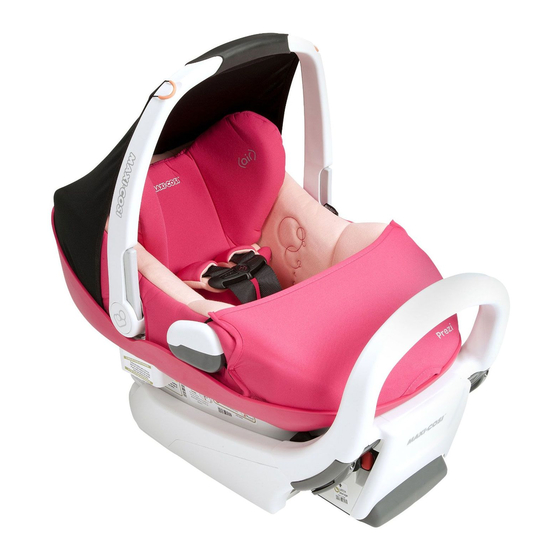
Please complete the postage-paid referred to throughout this manual as a our Consumer Relations Department at: registration card that came with your ® child restraint. The Maxi-Cosi brand is child restraint, and send it to us. Manufacture Maxi-Cosi part of the DJG family and is committed... - Page 4 Back View A-3 Understanding Your Child Restraint Carry Handle Harness System Detail Headrest Front View Harness Covers Infant Insert Buckle Cover Harness Release Button Harness Tightening Strap Canopy Level to Ground Buckle Tongue Carry Handle Attachments Lines Adjustment Levers Buckle (when used without Canopy Lower Harness...
- Page 5 LATCH Bottom of Child Restraint Top of Base Base Release Lever Upper Harness Slots LATCH Storage Detail Headrest/Harness Adjustment Levers Harness Straps Lower Harness Slots Buckle’s Metal Retainer Splitter Plate Base Belt Guide Instruction Manual LATCH Adjuster Storage Harness Tightening Strap Base Belt Path LATCH Storage Openings...
-
Page 6: Vehicle Seating Position
Do not use a child restraint Do not use cut, frayed or that has been in a crash. You damaged harnesses. must get a new child restraint. Failure to follow these warnings can result in the serious injury or Do not lubricate buckles death of your child. -
Page 7: Carrier Use
C-1 Remove and Install the C-2 Reclining the Base C-3 Carrier Use To Attach Child Restraint to Base Child Restraint to Base To Adjust To Adjust the Align the slots on the Carrying Handle Base side of child restraint To Remove Squeeze both Child Restraint with the locking bars... -
Page 8: Safety Tip
WARNING: 4-30 lbs. C-4 Child Restraint Use Attach (1.8-13.6 kg) Harness This child restraint is to be used rear- and 29 Read ALL instructions before using child restraint Tightening facing with children weighing 4-30 lbs inches (74 as a carrier. Strap End (1.8-13.6 kg) AND 29 inches (74 cm) NEVER use carrier unless child is properly secured. -
Page 9: Preparing Child Restraint To Fit Your Child
C-5 Preparing Child Restraint to Fit Your Child Choose new Check Buckle location and Position Make these adjustments with your Release Chest push the metal child in the child restraint before Clip Determine which retainer through you install in the vehicle. of the available pad and child Press on chest... - Page 10 To Change Buckle Pull on the buckle Rear-Facing Harness/ Placement for to check to make Position Headrest Small Infants sure buckle’s metal Location Harness slots must retainer is secured. With harness system loose, from the Choose the be even with or back, squeeze headrest adjustment levers slot closest to Replace the pad.
-
Page 11: Securing Child In Child Restraint
C-6 Securing Child in Child Restraint Check Harness Tightness Close Chest NOTE: Use the infant insert for children Try to pinch the Clip Failure to fasten and who weigh between 4-11 lbs. (1.8-4.9 harness at the tighten the harness system kg). -
Page 12: Removing Child From Child Restraint
C-8 Removing Pad for Cleaning C-7 Removing Child from Child Restraint Unbuckle Remove Loosen Harness NOTE: The harness straps do not need to Harness Harness be completely removed from the shell to Push down on Straps from remove the pad for cleaning. Press red button the harness Splitter... - Page 13 Remove Cleaning Pad and Canopy Remove Remove Canopy and Headrest Pad Harness Covers Hand wash pad and canopy with warm sudsy water, rinse clean and Lift up bottom With headrest in There are 4 air dry. Spot clean the harness of harness highest position, tabs behind the...
- Page 14 C-9 Reinstalling Seat Pad Replace Replace Attach Harness Harness Covers Headrest Pad NOTE: If you have Straps to completely removed Splitter Plate With headrest in Thread the the harness, start on highest position, metal spring into the left side, making From the back of from the top of pocket, between...
-
Page 15: Understanding Your Vehicle
D-1 Understanding Your Vehicle C-10 Canopy and Weather Boot Use Your vehicle’s features may be To Store Canopy Safety Tip: To Attach considerably different than those Canopy Remove elastic pictured here. Consult your vehicle To avoid your child being straps from canopy owner’s manual to help identify From the back seriously burned, take the... - Page 16 D-2 Vehicle Seating Position D-3 Choosing LATCH or Vehicle Belts Some seating positions in your vehicle may not be safe for this child restraint. Some vehicles Vehicle do not have a seating position that can be used safely with this child restraint. If you are not The LATCH LATCH Belts...
-
Page 17: Knowing Your Vehicle Belts
• ELR D-4 Knowing Your Vehicle Belts • Vehicle belts in (Emergency Review your vehicle’s owner manual for center of the door Locking ELR lap-only vehicle belts vehicle seat belt use with child restraints. or side panel Retractor) MUST NOT be used with this This is your best source for information vehicle belts You must move... - Page 18 Vehicle Latch Plates a locking clip to install the child restraint. D-5 Installing on Aircraft D-6 Storing LATCH System You may not need to use the base or • Check the Latch Plates on Your a locking clip with a switchable or ALR Lap and Shoulder Belt retractor.
-
Page 19: Installing Base
Check Recline E-1 Rear-Facing Installation with Base E-2 Preparing to Install Angle Base with LATCH Check the angle indicator on the Remove base. The ball Never place a child LATCH from should be fully rear-facing in a Storage in the color zone seating position with that matches the an active frontal... - Page 20 To Attach Child Fasten one Check LATCH Restraint to LATCH belt Belt Tightness Base connector to Do not use level to ground lines Grasp the base the anchor in Align the slots on on child restraint when using the at the belt path the vehicle the side of child base.
-
Page 21: Installing Base With Vehicle Belts
Recheck Check Store LATCH E-4 Installing Base with Recline Angle Recline Angle Belts Vehicle Belts Check the Make sure the You MUST angle indicator ball is fully in store the LATCH on the base. the color zone system when The ball should that matches the using the vehicle Do not use the LATCH system... - Page 22 Thread Vehicle Thread Shoulder To Attach Child Belt Belt in Shoulder Restraint to Belt Guide Base Failure to securely attach child Thread the Align the slots on restraint to base can result in vehicle lap or NOTE: Thread the side of child serious injury or death.
- Page 23 E-5 Rear-Facing Installation without Base You may need E-6 Installing Child to place a large Restraint with Vehicle rolled towel(s) Belts or foam pool 4360-2115 Never place a child rear-facing in noodle(s) under Place Child a seating position with an active the front of Restraint in frontal airbag.
-
Page 24: Using The Locking Clip
Place Child E-7 Using the Locking Clip Tighten Check Vehicle Restraint in Vehicle Belt Belt Tightness You will rarely need to use a locking Vehicle Rear- Grasp the child clip except for in some older vehicles. Lay your forearm Facing restraint at the across child Built in child restraint locking systems... - Page 25 You may need Attach Locking Check Tighten Vehicle to place a large Clip Vehicle Belt Belt rolled towel(s) Tightness Thread both or foam pool Lay your forearm 4360-2115 portions of the Grasp noodle(s) under across child vehicle belt onto the front of the the child restraint at the the locking clip, as...
-
Page 26: Replacement Parts Order Form
Replacement Parts Order Form Ship To (Please Print): _______________ Recheck Recline Angle Complete the form on the next 2 pages. Name: ___________________________ Your model number with color code and Make sure level manufacturer date code MUST be included Address: _________________________ line on side of on the form to ensure proper replacement child restraint... - Page 27 NOTE: If requested color is not available, similar color will be substituted. Prices are subject to Fill Out For Credit Card change. Visa Mastercard Part .....Cost Total Cost Card Exp. Buckle Strap/Buckle ..$6.99 X _____ = $ __ Date:____________________ Harness Strap .....
-
Page 28: Warranty
Warranty Limitations: and you may have other rights, which vary Warranty from state to state. Neither DJG nor the This warranty does not include damages Dorel Juvenile Group, Inc. (DJG) warrants dealer selling this product authorized any which arise from misuse or abuse of this this product to the original retail purchaser person to create for it any other warranty, product.
Need help?
Do you have a question about the Prezi and is the answer not in the manual?
Questions and answers