
Related Manuals for Digi-Sense 20250-29


Summary of Contents for Digi-Sense 20250-29
- Page 1 User Manual Data Logging Sound Level Meter with NIST-Traceable Calibration Model 20250-29 THE STANDARD IN PRECISION MEASUREMENT...
- Page 2 Introduction The Digi-Sense Data Logging Sound Level Meter (Model 20250-29) measures sound decibel levels for noise certification and reduction applications. The meter conforms to IEC61672-1 Class 2 standard. Advanced fea- tures include data Hold, Max/Min readings, low/medium/ high ranges, over and under range, and A and C weighting.
-
Page 3: Key Features
Key Features • Wide measurement ranges of 30 to 130 dB • Precision accuracy of ±1.4 dB • Meets IEC61672-1 Class 2 standard • User selectable low/medium/high, and auto range measurement levels • A and C frequency weighting • Fast and slow time weighting •... -
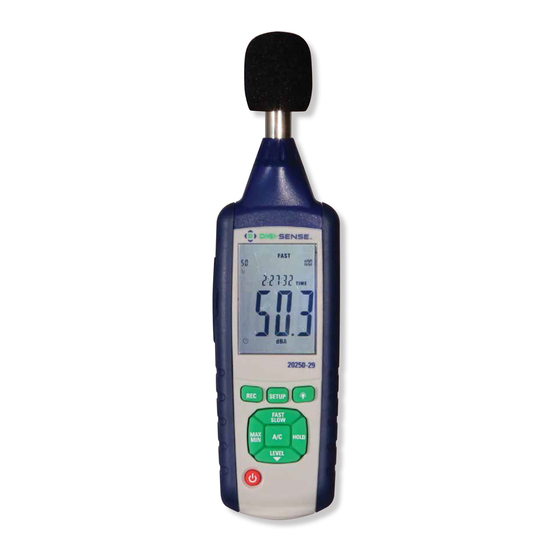
Page 4: Meter Description
Meter Description 1. Windscreen 2. LCD 3. REC button 4. SETUP button 5. FAST/SLOW button 6. MAX/MIN button 7. LEVEL button 8. Backlight button 9. A/C frequency weighting 10. HOLD button 11. Power on/off button 12. External DC 5V power supply terminal 13. -
Page 5: Display Layout
Display Layout 1. Under-range icon 10. Auto power-off icon 2. Over-range icon 11. Low-battery indication 3. Maximum hold icon 12. Recording icon 13. Memory full icon 4. Minimum hold icon 14. A-Weighting icon 5. Fast response icon (response to human sense) 6. -
Page 6: Setup And Operation
Setup and Operation 1. Remove the battery cover on the back and put in three AAA batteries. Replace the battery cover. 2. See Data Zero Function below to set before powering unit on. 3. Press the Power on/off button to turn the meter on. 4. - Page 7 Enabling the Data Logging Function 1. Press REC button after powering unit on. 2. The display will show REC and the unit will begin logging data. 3. Press the REC button again to exit recording. (Note: In order to avoid data errors, do not power the unit off while in REC mode.
- Page 8 Time and Date Setup (Continued) 7. While viewing the display (see Fig. 4), press the LEVEL button to choose the desired day of the month. Then press the HOLD button to save this day. Fig. 4 8. Press the SETUP button a fifth time (see Fig.
- Page 9 Viewing the Min and Max Readings 1. Press the MAX/MIN button once and MAX icon will appear on the display. In this mode, the maximum sound level will be captured and held until a higher sound level is captured. 2. Press the MAX/MIN button again and the MIN icon will appear on the display.
- Page 10 Connecting the USB Cable 1. Turn on the meter and connect the USB cable to the USB port located on the side of the meter. 2. Connect the other end of the USB cable to the computer. 3. Choose the software COM3 (COM). 4.
- Page 11 2. Make sure the auto power-off icon does not appear in the instrument display by pressing the SETUP button. When this symbol is not displayed, the meter is trans- mitting data to the computer. 3. Select the Real Time (R) from the top menu bar; select Setup (U) from the dropdown menu.
- Page 12 Remote Data Logging/ Downloading Data (continued) 5. Connect the meter to the computer via the USB cable. See Connecting the USB Cable section on page 10. Select the Sound Meter icon from your desktop. (Note: Software must already have been successfully installed.) 6.
- Page 13 Using the AC/DC Signal Output Earphone Output voltage: 10 mV/dB OUTPUT Output impedance: 1 kΩ Output voltage: 1 Vrms corresponding to each OUTPUT range step Output impedance: 100 Ω GROUND Using the Calibration Potentiometer The CAL function is for external standard level calibration adjust- ments.
-
Page 14: Specifications
Specifications Low: 30 to 80 dB Medium: 50 to 100 dB Range High: 80 to 130 dB Auto: 30 to 130 dB Resolution 0.1 dB Accuracy ±1.4 dB Weighting A and C Time weighting Fast = 125 m/sec, Slow = 1 sec Max/Min, Hold, Low/medium/high ranges, Over-range, Under-range, Functions... - Page 15 Ensure cover is securely refastened when finished. Remove batteries if unit is not being used for extended time periods. It is recommended that Digi-Sense products are calibrated annually to ensure proper function and accurate measure- ments; however, your quality system or regulatory body may require more frequent calibrations.
- Page 16 For Product and Ordering Information, Contact: Toll-Free: 1-800-358-5525 Phone: 1-847-327-2000 Fax: 1-847-327-2700 Davis.com/Digi-Sense Manual Part No. 00100-60 1065DGMAN_20250-29 Rev.1...
Need help?
Do you have a question about the 20250-29 and is the answer not in the manual?
Questions and answers