
Subscribe to Our Youtube Channel
Related Manuals for Sports Attack Attack


Summary of Contents for Sports Attack Attack
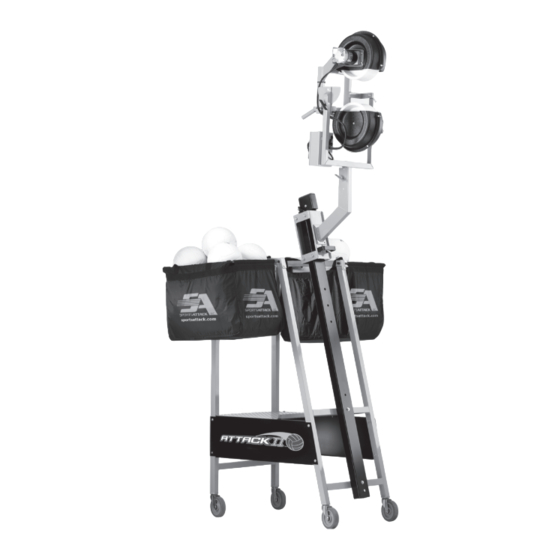
- Page 1 VOLLEYBALL MACHINE ATTACK™ AND ATTACKII™ VOLLEYBALL MACHINE PATENTS APPLIED FOR INSTRUCTION MANUAL Includes: OPERATION · SETUP · USE & CARE · SERVICE S P ORT S AT TAC K , LLC. 8 00-717 -4 251 sport sattack .c om •...
- Page 2 WARRANTY STATEMENT To register the Warranty, What is most important to Sports Attack is that your machine meets your expectations of please go to our website: quality and performance. We stand behind the material and workmanship of our machines www.sportsattack.com/war-...
-
Page 3: Table Of Contents
This manual contains the information needed to properly setup the Attack and Attack II, and to use, care for and maintain the Attack and Attack II in a manner which will ensure their optimum performance. -
Page 4: Safety Instructions
4. Use the Attack or Attack II only for their intended purpose. HAZARD 5. Do not operate the Attack or Attack II with a damaged cord or plug, if the machine Keep hands away from throwing malfunctions or has been damaged. - Page 5 COMPONENT DIAGRAM & PACKING LIST ATTACK & ATTACKII CAUTION PERSONAL INJURY HAZARD Failure to use the special tool provided to install the casters could result in personal injury. Yoke & Head Assembly EQUIPMENT DAMAGE Failure to use the special tool provided to install the casters could result in equipment damage.
-
Page 6: Assembly Instructions
(Figure 3). Casters, 4” Non-locking Assembly is now complete and your Attack or Attack II Volleyball Machine is ready for use. BS3A Casters, 4” Locking See instructions in the manual and on the decals on the machine for operating procedures and options. - Page 7 Position hole Position hole Position hole BS3A Rear cross bars Note: Attack has 2 rear cross bars Two regular casters Two locking casters. Tighten and AttackII has 1 cross bar using the wrench provided. AT TAC K ™ AN D AT TAC K II™ VO LLEYBA LL MACHI NE S P ORT S AT TAC K , L LC .
- Page 8 COMPONENT PARTS ATTACK 1- Wheel Guard Outside 2- Wheel Guard Inside #280-4002 #280-4001 10- Motor 90V - #530-1015 180V - #530-1016 3- Throwing Head Frame #533-4010 4- Throwing Wheel #531-0007 5- Controller #530-0008 22- Rolling Tray Assembly 21- Cord Roller...
- Page 9 ATTACK PARTS LIST To order additional parts, please contact: ATTACK™ Sports Attack Customer Service Dept. PART NO. DESCRIPTION QTY PER 800-71 7-4251 A-104 Rear Frame Assembly 775-345-2883 A-105 Front Frame Assembly 533-4014 Platform 533-4000 Righthand Panel 533-4001 Lefthand Panel 533-4013...
- Page 10 COMPONENT PARTS ATTACKII 1- Wheel Guard Outside 2- Wheel Guard Inside #280-4002 #280-4001 10- Motor 90V - #530-1015 180V - #530-1016 3- Throwing Head Frame #533-4010 4- Throwing Wheel #531-0007 5- Controller #530-0012 22- Rolling Tray Assembly 21- Cord Roller #533-4005 (not shown) #271-0032...
- Page 11 ATTACK II PARTS LIST To order additional parts, please contact: ATTACKII™ Sports Attack Customer Service Dept. PART NO. DESCRIPTION QTY PER 800-71 7-4251 A2-103 Rear Frame Assembly 775-345-2883 A2-105 Front Frame Assembly A2-9 Platform 533-4000 Righthand Panel 533-4001 Lefthand Panel...
-
Page 12: Replacing Throwing Head
REPLACING THROWING HEAD ATTACK and ATTACK II STEPS IN REPLACING THE THROWING HEAD 1. Lower throwing head to the lowest position on the mast & tray assembly. This is the “setting and transport” position. 2. Loosen side-to-side swivel handle on arm assembly. - Page 13 STEP 6 To order additional parts, like a ballbag, please contact: Sports Attack Customer Service Dept. 800-71 7-4251 775-345-2883 Step 5 Both arms are securely in place. Step 6 Tie ball bag straps.
-
Page 14: Operation
VOLLEYBALL OPERATION The Attack or Attack II is a total practice machine. No special training other than the complete, careful reading of this manual is required to operate the machine. Many coaches have broadened and refined their own coaching skills by its use. -
Page 15: Shutting Down
TURNING ATTACK “OFF” 1. Set each speed control dial to “0. ” 2. Turn the on/off switch “OFF.” 3. Unplug Attack or Attack II from the power source. TRANSPORTING 1. Turn the machine “OFF” and unplug. 2. Lower throwing head to the lowest position on the sliding tray. The locating pin will snap into place. -
Page 16: Care, Cleaning & Maintenance
EXAMINE THE MACHINE M.E.K container. Examine Attack or Attack II for condition and completeness before every use: FIRE HAZARD 1. Throwing wheels must be tight on the motor shafts. Check that the keyway retaining bolts are tight. -
Page 17: Component Replacement
COMPONENT REPLACEMENT THROWING WHEEL REPLACEMENT 1. Turn the throwing wheels “OFF” and unplug the power cord. Remove four bolts holding the wheel guard to the motor-side wheel guard. 2. Hold the wheel so that it cannot move. Turn the keyway retaining bolt counter-clockwise using a box end wrench (See Figure 9). -
Page 18: Controller
COMPONENT REPLACEMENT (cont’d) WIRING CONTROLLER REPLACEMENT POWER CORD 1. Turn the on/off switch “OFF” and unplug the power cord. White or Blue Wire (1) 2. Remove the four screws holding controller faceplate. Note the position of the main To middle male terminal power and motor wires on the controller, then disconnect the wires. - Page 19 INCREASING TENSION INSTRUCTIONS STEPS IN INCREASING TENSION ON THROWING HEAD (LO- CATED AT A) 1. Stretch cord approzimately 12” (this distance can be adjusted as required) 2. Using vise grips as shown, clamp tightly to hold shock absorber cord. 3. Loosen knot and slide it down to top of vise grips. 4.
- Page 20 JUNIOR HACK ATTACK SOFTBALL (shown with optional solo feeder) Please visit our web site sportsattack.com for information about Sports Attack sports training products, or call 800-717-4251 for complete information and specifications. AT TAC K ™ AN D AT TAC K II™ VO LLEYBA LL MACHI NE S P ORT S AT TAC K , L LC .
- Page 21 SKILL ATTACK STRIKE ATTACK Please visit our web site sportsattack.com for information about Sports Attack sports training products, or call 800-717-4251 for complete information and specifications. AT TAC K ™ AN D AT TAC K II™ VO LLEYBA LL MACHI NE S P ORT S AT TAC K , L LC .
Need help?
Do you have a question about the Attack and is the answer not in the manual?
Questions and answers