Hobie Mirage Compass Manual
Hide thumbs
Also See for Mirage Compass:
- Instruction manual (9 pages) ,
- Instructions manual (28 pages)
Table of Contents
Advertisement
Advertisement
Table of Contents

Subscribe to Our Youtube Channel
Related Manuals for Hobie Mirage Compass


Summary of Contents for Hobie Mirage Compass
- Page 1 Hobie Mirage Compass ® ® Kayak Manual...
- Page 3 In 1950, Hobie’s dream was born in his parents’ garage when he decided to apply his love of woodworking to the sport of surfing. Dad backed out the Buick... Hobie carved out his very first surfboard... Hobie’s business of fun had begun.
-
Page 4: Table Of Contents
Ready Option ......................... .15 Storage and Transport ..........................18 Maintenance and Care ..........................21 Safety ................................23 Warranty ................................ .25 Look for this icon. Online video is available at www.hobie.com/support Please read through the instruction manual before using this product... -
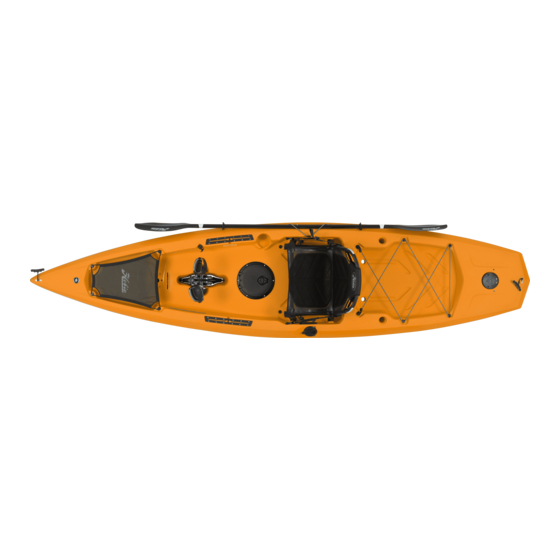
Page 5: Anatomy
Anatomy Hull Seat MirageDrive Paddle Cassette Plug Lowrance Ready Kit Items not shown to scale hobie.com... -
Page 6: Seating
Seating Seating Assembly Line up threaded inserts on seat back frame with holes molded in seat bottom frame. Once aligned, insert screws and tighten. Do not over tighten as seat will not be able to pivot. - Page 7 Seating Seating Anatomy Seat back Seat frame Mesh tension straps Support strap adjustment Lumbar adjustment strap hobie.com...
-
Page 8: Seat Installation
Seating Seat Installation Place the seat onto the seat mounts. To secure the seat to the boat, attach the two hooks under the seat to the seat retention loops. Pad Eye Clip the two back straps to pad eyes on the boat. Make sure clips are attached to the boat not the retention loop on the chair itself. - Page 9 Seating Using the seat outside the boat Unhook the seat retention hooks from the boat and remove the seat. Clip the two back straps to the seat retention loop. hobie.com...
-
Page 10: Miragedrive
MirageDrive Instruction Installation Lower drive Level straight down making sure the spine is level. Press down and lock drive into Click and Go’s. The drive locks CLICK automatically when installed. Removal Pull back each Click and Go lever Lift drive straight up... - Page 11 Make sure both cranks are in the same position number. With both feet on the pedals and together (fins straight down), your knees should be comfortably bent and not crunched or over extended. hobie.com...
- Page 12 MirageDrive Instruction Adjusting Pedaling Resistance Locate the thumb knobs on the MirageDrive. Turn the thumb knobs Turn the thumb knobs counter- clockwise, loosen clockwise, to tighten the fin to the fin from the boom, the boom, increasing resistance reducing resistance on on the fins when pedaling.
-
Page 13: On The Water
On the Water MirageDrive Operation Shallow Water and Beaching Press either pedal forward in shallow water to raise fins. Pressing one pedal fully forward will orient the fins with the kayak underside to allow beaching. hobie.com... - Page 14 On the Water The ‘Rudder’ T-Handle is located on the right/ starboard side near the front of the kayak. Rudder DOWN Rudder UP Pull ‘Rudder’ T-Handle line Uncleat ‘Rudder’ T-Handle through cleat to retract rudder. to deploy rudder. Steering The steering handle is located in the middle on the left/port side of the kayak.
-
Page 15: Lowrance Ready Option
Lowrance Ready Option Transducer Install The transducer is an optional accessory and is not included with boat. Metal clips 1/8” or 3mm gap hobie.com... -
Page 16: Lowrance Ready Option
Lowrance Ready Option Thru-Hull Plugs Single and 3-way Locate the thru-hull plug and unscrew the nut on the inside of the boat. Remove the solid rubber plug. Choose the correct plug for your wire size and insert the wire by opening the plug along the slit. - Page 17 ” Left or right Run cable into the plug just in front of the transducer scupper. Lead the cable through the inside of the hull and exit the cable through the 3-way Thru-Hull Plug. Hand tighten screws to avoid stripping threads. hobie.com...
-
Page 18: Storage And Transport
Storage and Transportation Storage Do’s Storing your boat upside down on crossbars or hanging from wide strapping are two ways to keep the boat stored. Storage Don’ts Storing your boat cockpit side up on crossbars can dent the bottom. Storing your boat on its side over a long period of time can flatten/dent... - Page 19 The cart should be used for transportation purposes only and not as a storage platform. Do not leave your boat on the cart for more than one hour (less time in warmer temperatures or direct sunlight). 1hr. Store out of the Weather hobie.com...
- Page 20 Storage and Transportation Roof Topping The best way to transport your boat is to purchase a trailer or roof rack from your dealer. Using proper cradles that support the hull, the boat can be transported right side up. Straps can then be laid across the boat and tied to the rack bars.
-
Page 21: Maintenance And Care
Use lubricant on the chain components frequently. Checking Cable Tension Cables should be tight enough so they can only be slightly squeezed in under firm finger pressure. Visit hobie.com/support for information on the MirageDrive. hobie.com... -
Page 22: Rudder Tuning
Maintenance and Care Rudder Tuning If the steering feels loose: Pull the rudder into the up position. This makes sure the rudder runs central. Loosen the screw clamping the rudder line. Pull the slack out of the rudder line making sure the steering handle is straight. -
Page 23: Safety
• Never go in flood and/ • Dress appropriately for or fast moving water weather conditions; cold water conditions. Hobie kayaks and/or weather can result in are not designed for fast hypothermia; apply sunscreen moving water. and other sun protective •... -
Page 24: Shakedown Cruise
To do this, reach across the bottom of the kayak and grab the scupper hole or the Hobie MirageDrive and pull the boat upright. Position yourself so your head is near the cockpit area of the kayak and you are facing the kayak. -
Page 25: Warranty
If you have a question or issue with your Hobie product, please see your Authorized Hobie Kayak Dealer. They will assess the problem, assist with a repair and file a warranty claim with Hobie Cat Company if needed. All warranty claims must go through your Authorized Hobie Kayak Dealer. - Page 26 Accessories Heavy Duty Plug-In Cart Kayak Cover Inflatable PFD H-Crate Hobie Vantage Seat bag Hobie H-bar Hobie Multi-Lube Livewell For more accessories see: www.hobie.com/catalogs-brochures...
- Page 27 Enjoy the Ride!
- Page 28 Hobie Cat Company Holding Company Oceanside, California, USA 1-800-HOBIE-49 Hobie Cat Australasia Subsidiary Huskisson, New South Wales, Australia 1-800-4-HOBIE Hobie Cat Europe Subsidiary Toulon, France +33 (0) 494 08 78 78 Hobie Kayak Europe Independent Distributor Stellendam, The Netherlands +31 (0) 187 499 440...
Need help?
Do you have a question about the Mirage Compass and is the answer not in the manual?
Questions and answers