
Related Manuals for KDDI A1407PT


Summary of Contents for KDDI A1407PT
- Page 1 Basic Contents/ Getting Ready Manual Making and Answering Calls Character Entry Address Book Pair Function/ One Touch Keys Mail Camera EZweb Bone Conduction Setting Other Features Troubleshooting Index...
- Page 2 Manual carefully prior to using your cellphone. When you finish reading this guide, please keep it in a safe place so that you can refer to it whenever you need. If you lose your copy of A1407PT Basic Manual , please contact your nearest au shop or au customer center.
-
Page 3: Cellphone Etiquette
Cellphone Etiquette Please carry your Manners around with you Cellphones release weak electronic signals when it is power on, even if no calls are being made. Please remember to care about the others around you, and enjoy a safe use of your handset. It is forbidden to use your cellphone in certain places. -
Page 4: Smart Mode
Smart Mode How to Use Smart Mode A1407PT is pre-set at Smart Mode when purchased. Smart Mode is a mode where only frequently-used functions such as call, mail, and camera are shown on the menu screen. There are other designs that help an easy use of the cellphone such as large-print display. -
Page 5: One Touch Keys
( 、 、 ) A1407PT has One Touch keys . Pushing One Touch Keys will connect you to pre-registered numbers. It is Forbidden to Use Your Cellphone in Certain Places Push and hold down One Touch Keys for more than 1 second will connect you to pre-registered numbers. -
Page 6: Cellphone Basics
Cellphone Basics What you can do with your A1407PT One Touch Keys E-Mail EZ web You can make calls to You can send E-Mails You can download numbers you register as to other cellphones and ‘Chaku-Uta ’ and wall ®... -
Page 7: Manner Mode/Easy Voice Memo
Manner Mode/Easy Voice Memo Manner Mode Manner mode sets your cellphone so that it will not release sound such as ringtones in order to prevent disturbing others. On standby screen Press down for more than 1second. To release Press down again for more than 1second. Easy Voice Memo When you cannot take your calls, it will play an auto reply and prompts the caller to leave messages. -
Page 8: Do Not Use Your Cellphone While Driving
Do not use your cellphone while driving It is against the law to hold a mobile phone in your hand while driving to make and receive calls or to read emails, and you can be punished for breaking this law. Keeping your eyes fixed on the screen will be an object of penalty. -
Page 9: Beware Of Spam And One-Ring Calls
Beware of Spam and One-ring Calls If you Receive a SPAM Use mail filters so that your cellphone will not receive mails from particular addresses, or Spoof e-mail. Mail filter filtering spam has the following function. ・Unauthorised advertisement filter ・Filters mails from particular addresses. ・Narisumashi-function to filter Spoof e-mail. -
Page 10: Disaster Message Board Service
Disaster Message Board Service In case of a large-scale disaster, you can register information on your safety using EZweb. Information you register can be viewed on EZweb or Internet from anywhere in the country. Registering Information on Safety In case of a large-scale Disaster Message Board, you can register information on your safety, news on damages received and your comments. - Page 11 Registration 携帯電話番 Access English Top screen of the Disaster Message Board Security information registration screen <ソフトバンク> Security information checking screen Note ●Registered information can be stored for up to 72 hours. ●Maximum of 10 messages can be registered per number. If you register more than 10 messages, the old ones will be overwritten by the new messages.
-
Page 12: Table Of Contents
● One Touch Keys ………………………………………………… Cellphone Basics ● What you can do with your A1407PT ………………………………… 4 Manner Mode/Easy Voice Memo ………………………………………… 5 Check Your Power Supply, Electronic Signal and Electronic Charger! ……… 5 Do not use your cellphone while driving ……………………………… 6 Beware of Spam and One-ring Calls ……………………………………... - Page 13 ……………………………………………………… ● Address Book Registering Entries in the Address Book …………………………… 36 Making a Call to an Entry in the Address Book …………………… 40 ……………………………… ● Pair Function/One Touch Keys Registering Pair Partner ………………………………………………… 42 Calling Pair Partner ……………………………………………………… 43 Sending E-Mail to a Pair Partner ………………………………………...
-
Page 14: Getting Ready
Getting Ready Checking Contents of Package ●A1407PT handset ●Battery pack ●Desktop holder ●Basic Manual (this booklet) ●Manual ●Warranty(Japanese) ●Notice for using your cellphone(Japanese) Note ●AC power adapter is not included in the package. Please purchase AC power adapter 01 available separately. -
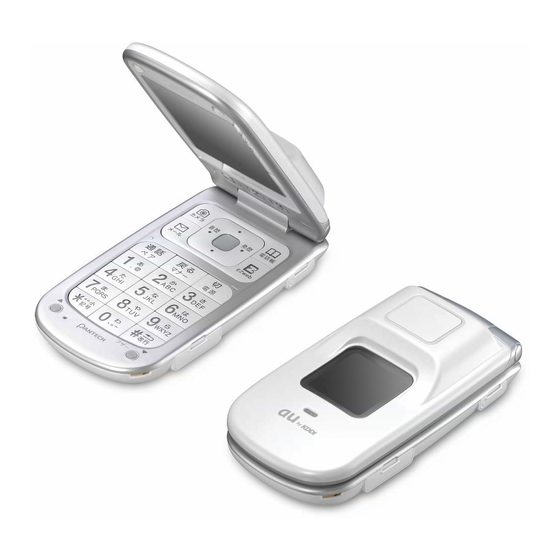
Page 15: Names Of Parts
Names of Parts Infrared port Earpiece Memo/Light Key (Side Key) Main display One Touch Keys 1∼3 Charging jack Cursor Key Camera Key Address Book Key Back/Manner Mode Key Center Key Mail Key EZ Key Call/Pair Key Power/End Key Numeric Key Microphone Built-in antenna Easy light for taking... -
Page 16: Charging Your Cellphone
Insert folded-up A1407PT with the batter pack attached into Desktop holder. Make sure that the incoming call and charger indicator on A1407PT is lit. This light will go off when the cellphone is fully charged. When the cellphone is fully charged, take A1407PT out of Desktop holder and disconnect power plug from the socket. - Page 17 Take power socket of the AC Adaptor 01 and connect it to 100V AC outlet. Make sure that the incoming call and charger indicator on A1407PT is lit. This light will go off when the cellphone is fully charged. When the cellphone is fully charged, pull the plug out of the socket and disconnect AC Adaptor 01 connecter from A1407PT port.
-
Page 18: Power On/Off
Power On/Off Power On Your Cellphone Press down for a long time (more than 1 second). Electronic signal condition Strong Medium Weak Very weak No signal Note ●You cannot make or receive calls when [ ] is displayed ●You may not be able to make or receive calls when [ is displayed. -
Page 19: Functions Of The Keys
Functions of the keys : Smart menu display Setting key function lock/ disabling key lock function (more than about 1second) : Selecting items and adjusting various volume levels : Displaying calendar : List of received calls : List of made calls :... -
Page 20: Reading The Display
Reading the Display Icon Displays on the Main Screen Icon Meaning ① Signal strength ② Remaining battery power (Reference only) ③ Call coming in/Placing call or talking/EZweb starting up / / ④ Unanswered call ⑤ Unread E-Mail ⑥ Easy Voice Memo ⑦... -
Page 21: Basic Operations
Icon Display on the Sub Screen The sub screen shows items such as information on incoming calls and clock Icon Meaning ① Signal strength ② Remaining battery power (Reference only) ③ Manner mode on Incoming ring tone off ④ ⑤ Vibrator on ⑥... -
Page 22: How To Use Soft Keys
How to Use Soft Keys Soft Keys are the keys shown under the Soft Key display screen. To execute Soft Keys, you have to press the key in the location corresponding to the location on the display. For example, in order to activate [Address Book], press Address Book Camera Key... -
Page 23: About Various Security Code To Use With Your Cellphone
About Various Security Code to use with Your Cellphone You will be using various Security Code to use services with your A1407PT. Security Code you will be using in this booklet are explained below. Security Code you set up are required for various operations and contracts, so please make sure you remember them. -
Page 24: Switching The Display Language To English
Switching the Display Language to English The display language can be switched so that menus and other indications appear in English. Before setting the display language : Set the cellphone to the normal mode The display language is selected from the normal mode. Therefore, the first thing to do is to turn the smart mode off and set the normal mode as follows. - Page 25 Select [ 画面表示 ] (Display) with and press ( 選択 ). Select [Set Language] with and press 選択 ). Select [English] with and press ( 確定 ). The menus and soft key indications will appear in English. Returning to the Smart Mode With the standby screen on the display, press (Menu).
-
Page 26: Initializing Ezweb/E-Mail
Initializing EZweb/E-Mail In order to use E-Mail and EZweb, you have to make an application to register with EZweb services. If you haven’t made this application when you purchased your cellphone, please contact your nearest au shop or au customer center for information. You need to initialize your setting before using the service. -
Page 27: Check Your Own Telephone Number And E-Mail Address
Check Your Own Telephone Number and E-Mail Address Press (Menu) on the standby screen. Select [My number] and press (Select). Your cellphone number and E-Mail address will be displayed. -
Page 28: Changing Your E-Mail Address
Changing Your E-Mail Address 「△△△」in your E-Mail address(△△△@ezweb.ne.jp) can be changed. Press (Menu)on the standby screen. Select [Mail] and press (Select). Select [E-Mail] and press (Select). Select [Addr Change] and press (Select). Choose Connect on the connection confirmation screen and press Select [Eメールアドレスの... - Page 29 Enter Security Code, and press (OK), then select [送信](Send) and press (Select). PIN code here is the 4 digit number of your choice you entered in your application form. Select[承諾する](Accept) press. Choose a column, press (Edit) and input E-Mail address, then press (OK).
-
Page 30: Making And Answering Calls
Making and Answering Calls Making a Call Press on the standby screen and enter the number of the person you want to call. Please enter area code as well if you are calling a landline number. Press If you press (Call), you can select whether to send the caller s number [186] or withhold... -
Page 31: Making An International Call
・Check the Country code at au Customer Service Center. ・For charges, refer to Global Passport Owner’s Guide or contact au Customer Service Center. 001 KOKUSAI MOBILE TALK Application required. For inquiries, please contact the KDDI Customer Service Center. 0077-7160 (toll-free; open 9:00 to 20:00 on evenday including weekends... -
Page 32: Answering A Call
Answering a Call The cellphone receives an incoming call. If the caller is registered in your address book by name and telephone number, his/her name appears on the display. If there is no caller ID from the caller, the following information is displayed. 「Number withheld」... -
Page 33: Returning Calls(Incoming History/Outgoing History)
Returning Calls(Incoming History/Outgoing History) Press (menu)when the standby screen is displayed. Select [Call] and press (Select). Select [Outgo History] or [Incom History]and press(Select) Select the phone number you want to call on and press (Select). Note ●The outgoing and incoming histories each hold 20 numbers. After that, older numbers get automatically overwritten by the newer numbers. -
Page 34: Character Entry
Character Entry How to Change Writing Method When registering contacts on your phone book or writing E-Mail, you can use ∼ 、 to write letters and numbers. In this booklet, screens you see when you are writing letters and numbers are called [Letter input screen]. Press on the letter input screen. -
Page 35: Character-Key Assignment
Character-Key Assignment Multiple characters are assigned to a single key. Repeatedly pressing the same key displays the assigned characters in turn. ● 1-byte alphabet Number of times to press the key Capital/Small case letter switching Pictogram/Symbol screen switching Line break entry Displays candidate characters in reverse order (Back Space function) during character entry ※To switch between capital and small case letters, enter the letter and then press... -
Page 36: How To Input Letters
How to Input Letters Basic Letter Input Method You can input letters that are displayed on the key. For example, with Example : On the 2-byte/ 1-byte alphabet input mode, Press 1 time→ 2 times→ 3 times→ 4 times→ 5 times→ 6 times→ 7 times… a→... - Page 37 Entering E-Mail Addresses Example : To input 「alan-f00@ezweb.ne.jp」 Display address input screen by following the processes explained in “How to compose an E-Mail message and send it”(Page 47). Select [Direct input] and press (Select). Press (once), (3 times), (once), (2 times), (4 times), (3 times), (once).
-
Page 38: Address Book
Address Book You can store up to 700 phone numbers and E-Mail addresses of people you contact often. Registering Entries in the Address Book Press (menu) when the standby screen is displayed. Select [Call] and press (Select). Select [AddressBook] and press (Select). - Page 39 Select [Input] and press (Select). Enter name and press (OK). Example: Alan Ford Select [Edit] and press (Select). Phonetic alphabets are automatically entered. Make correction to phonetic alphabet and press (OK). Select [Direct input] and press (Select).
- Page 40 Enter the phone number and press (Save). Example : 090xxxxxxxx When you are registering a landline number, remember to include the area code. Select [Do not input] and press (Select). Select [Direct input] and press (Select). Enter E-Mail address and press (OK).
- Page 41 Select [No Image] and press (Select). Press (Save). Note ●To see how to enter letters, please refer to How to Input Letters ( on page 34). ●For each entry in the phone book, up to 3 phone numbers and 3 E-Mail addresses can be stored.
-
Page 42: Making A Call To An Entry In The Address Book
Making a Call to an Entry in the Address Book Press (menu) when the standby screen is displayed. Select [Call] and press (Select). Select [AddressBook] and press (Select). Select the person you would like to call, and press... - Page 43 Select the calling method and press (Select). About calling method: You can choose whether or not to disclose your phone number to the receiver. 184+Call:This will withhold the caller s number. 186+Call:This will notify the caller s number. When you finish your call, press...
-
Page 44: Pair Function/One Touch Keys
Pair Function/One Touch Keys You can register up to 3 persons out of the phone book as a Pair Partner, and can call them or send E-Mail to them quickly. One Touch Keys let you make calls to a Pair Partner very easily. Registering Pair Partner How to register a Pair Partner Press... -
Page 45: Calling Pair Partner
Calling Pair Partner Example:To make a call to the Pair Partner 1 Press when the standby screen is displayed. Select the Pair Partner using , select [Call] using , then press (Select). Sending E-Mail to a Pair Partner Example:How to send an E-Mail to the Pair Partner 1 Press when the standby screen is... -
Page 46: Registering A Pair Partner To A One Touch Keys
Registering a Pair Partner to a One Touch Keys Other than the method explained in “How to register a Pair Partner” (Page 42), it is also possible to register a Pair Partner using One Touch Keys. Press One Touch Keys ∼... -
Page 47: Calling From One Touch Keys
Calling from One Touch Keys Press down the One Touch Keys for the Pair Partner you would like to make a call to for a long time (about 1 second). For example, if you would like to make a call to the Pair Partner 1, press down the One Touch Keys for more than 1 second. -
Page 48: Mail
Mail About E-Mail You need to register with EZweb in order to use E-Mail services. If you have not made an application at the time of purchase of this cellphone, please contact your nearest au shop or au Customer center for more information. -
Page 49: Composing And Sending E-Mail
Composing and Sending E-Mail When the standby screen is displayed, press (Menu). Select [Mail] and press (Select). Select [E-Mail] and press (Select). Select [Create New] and press (Select). Select [Address Book] and press (Select). You can copy the address to send the message to from the list of received/ dialled calls, or can be typed directly. - Page 50 Select the person you would like to send a message to and press (Select). You will be asked to choose an E-Mail address if you have registered more than one addresses with this person. Select [Input] and press (Select), then enter Subject name and press (OK).
-
Page 51: Viewing E-Mail In The Inbox
Viewing E-Mail in the Inbox When the standby screen is displayed, press (Menu). Select [Mail] and press (Select). Select [E-Mail] and press (Select). Select [Inbox] and press (Select). This will show all the mails in the Inbox folder. They include [Unread] messages and [Read] messages. - Page 52 How to Display a Received Message. Date and time when the There is an message was received attachment file Sender of the message Subject of the message Body of the message Name of the attachment Note ●To register the details of the send on your Address Book, please follow the below procedure.
-
Page 53: Prevent Spam
Prevent SPAM It is recommended that you set up mail filters to prevent reception of SPAM. If you select [supportive settings], you can set up mail filters easily by answering questions displayed on the screen. ■ How to set up a mail filter メールフィルター... -
Page 54: C-Mail
C-Mail C-Mail can be exchanged between [C-Mail]-enabled au handsets, and it can contain the maximum of 50 2-byte characters (100 1-byte characters). About C-Mail Security Block Function C-Mail Security Block Function lets you block messages which contain URL addresses (http://□□□, https://□□□) and phone numbers. C-Mail Security Block Function is activated when you purchase your cellphone. -
Page 55: Composing And Sending C-Mail
Composing and Sending C-Mail When the standby screen is displayed, press (Menu). Select [Mail] and press (Select). Select [C-Mail] and press (Select). Select [Create New] and press (Select). Select [Address Book] and press (Select). You can copy the address to send the message to from the list of received/ dialled calls, or can be typed directly. - Page 56 Select the person you want to send a message to and press (Select). If there are more than one cellphone numbers registered, choose a cellphone number and press (Select). Press (OK) and then press (Select). Enter the message then press (OK).
-
Page 57: Camera
Camera A1407PT has a built-in 1.3 Mega pixel camera and you can take photographs and movies. The photographs and movies can then be used as standby screen, or be attached to E-Mail messages. What You Can do with The Camera. -
Page 58: How To Take A Good Photograph
How to Take a Good Photograph To take good pictures and movies… How to Hold Your Camera Make sure that your fingers are not covering the lens and light, and hold the camera firmly with both hands. Lock your arms so that the camera doesn’t move. -
Page 59: Taking Pictures
Taking Pictures Press (menu) when the standby screen is displayed. Select [Camera] and press (Select). Select [Photo] and press (Select). Press (Shot). You will hear a shutter, and a photograph is taken. Press (Save). This will save the photo you took onto a data folder. -
Page 60: Attaching Photos Or Movies To E-Mail
Note ●A shutter sound will be heard even if the cellphone is set at manner mode. ●The photograph you take will be saved onto My photo folder inside the data folder, and will be given a name based on the date and time when it was taken, like this. -
Page 61: Ezweb
EZweb In order to use E-Mail and EZweb, you have to make an application to register with EZweb services. If you haven’t made this application when you purchased your cellphone, please contact your nearest au shop or au customer center for information. -
Page 62: Accessing The Au One Top Menu
Accessing the au one top Menu You can access EZweb from the top screen, and enjoy various useful and enjoyable sites. キーワード検索機能( Key word search function) Gives you function to search using key words カテゴリ検索( Category search function) Searches sites by category トップニュース( Top news) Offers the latest news updated automatically... -
Page 63: Accessing Information Sites
Accessing Information Sites Press (menu) when the standby screen is displayed. Select [EZweb] and press (Select). This will display EZ web menu. Select [Top menu] and press (Select). It may take a while before the screen is loaded. Select the site you would like to access and press (Select). -
Page 64: Resistering To Bookmark
Resistering to Bookmark Show favourite sites you would like to register and press (Browser). Press [お気に入り登録 (Resistering to Bookmark)]. Press (Reg.). -
Page 65: Viewing The Bookmark
Viewing the Bookmark Press when the standby screen is displayed. Press [Bookmark]. Select the site you would like to view using , and press (Select). Checking Information on Paying Services Press when the standby screen is displayed. Press [Pay Service]. -
Page 66: Downroading Chaku-Uta
Downroading Chaku-Uta ® Display au one top screen following instruction on process 1∼3 of “How to access an information site” on page 61. Select [カテゴリで探す (Serch by category)] and press (OK). ® Select [Chaku-Uta ] and press (OK). Select the item you would like to see and press (OK). - Page 67 Note ●To use the downloaded Chaku-Uta as your ringtone; ® 1. Press when the standby screen is displayed, then select [Setting], press , then select [Melody]. Then press , and choose standard ringtone, then press 2. Select [Data folder], then press , select [Sound], then press to choose the Chaku-Uta you would like to use, then press...
-
Page 68: Bone Conduction Setting
● Quality and volume of the noise will vary depending on the condition of use and users. ● Do not apply A1407PT directly to your hearing aid devices. This may cause a howling. Note This phone has Bone Conduction Speakers activated at the time of purchase. -
Page 69: How To Receive A Call
How to receive a call ① When the handset receives a call, keep the handset shut and press down for a long time. ② Place the Bone Conduction Speaker near or on your ears to speak. How to end a call ①... -
Page 70: Other Features
Other Features Safety Buzzer A1407PT is equipped with the Safety Buzzer function. The Safety Buzzer will go off at a very large volume. If you press down for more than 3 seconds while your P1407PT handset is open, this will release the Safety Buzzer. In order to stop the buzzer, open the handset and enter the Lock No. -
Page 71: Remote Auto Lock
Trigger Condition of the Remote Auto Lock You may set the auto lock function by making repeated calls to your A1407PT from a pre-set telephone number, within the pre-set slot of time. Auto lock function can be set when the phone is operating on normal mode. -
Page 72: Infrared Communications
Infrared communications When using Infrared communication, both the sending and receiving handsets need to be set up for Infrared communication. While data is being exchanged, infrared ports on the two phone have to be facing each other in a straight line, and the distance between the ports need to be less than 20cm. -
Page 73: Troubleshooting
Troubleshooting Reference Condition Check Cure page Is the battery pack Please insert the battery pack correctly inserted? correctly. For more information, ー please refer to“How to check the battery pack” in the attached“Manual”. Power does not go on Is the battery pack Please charge your battery pack Page 14 charged? -
Page 74: Index
Index About C-Mail ………………………… 52 Easy Voice Memo …………………… 5 Address Book ………………………… 36 E-Mail ………………………………… 46 Making a Call …………………… 40 Viewing …………………………… 50 Registering Entries ……………… 36 Sending …………………………… 47 SPAM ……………………………… 7 Mail filter ………………………… 7 E-Mail Address ……………………… 25 Battery level ……………………………... - Page 75 One-ring Calls ………………………… 7 One Touch Keys …………………… 3, 13 Calling from One Touch Keys … 45 Registering a Pair Partner to a One Touch Keys ………………… 44 Pair Function ………………………… 42 Cancel……………………………… 42 How to make a call……………… 43 Register ……………………………...
- Page 76 From an au phone Dial without an area code (toll free) Cellphone and PHS operators collect and Sales : KDDI CORPORATION / OKINAWA CELLULAR TELEPHONE COMPANY recycle unused telephones, Manufactured by Pantech&Curitel Communications,Inc. batteries and battery chargers at stores bearing the...
Need help?
Do you have a question about the A1407PT and is the answer not in the manual?
Questions and answers