Advertisement
Available languages
Available languages
Advertisement
Chapters

Related Manuals for Electrolux EKI64500OX


Summary of Contents for Electrolux EKI64500OX
- Page 1 EKI64500OX Cooker User Manual เตา คู ม ื อ การใช ง าน...
-
Page 2: Table Of Contents
15. ENERGY EFFICIENCY.................. 32 WE’RE THINKING OF YOU Thank you for purchasing an Electrolux appliance. You’ve chosen a product that brings with it decades of professional experience and innovation. Ingenious and stylish, it has been designed with you in mind. So whenever you use it, you can be safe in the knowledge that you’ll get great results every time. -
Page 3: Safety Information
ENGLISH SAFETY INFORMATION Before the installation and use of the appliance, carefully read the supplied instructions. The manufacturer is not responsible for any injuries or damages that are the result of incorrect installation or usage. Always keep the instructions in a safe and accessible location for future reference. - Page 4 This appliance is not intended to be used on a ships, • boats or vessels. Do not install the appliance behind a decorative door • in order to avoid overheating. Do not install the appliance on a platform. •...
-
Page 5: Safety Instructions
ENGLISH Before maintenance cut the power supply. • Ensure that the appliance is switched off before • replacing the lamp to avoid the possibility of electric shock. If the mains power supply cable is damaged, it must • be replaced by the manufacturer, its Authorised Service Centre or similarly qualified persons to avoid an electrical hazard. - Page 6 • Do not let mains cables touch or • Users with a pacemaker must keep a come near the appliance door, distance of minimum 30 cm from the especially when the door is hot. induction cooking zones when the •...
-
Page 7: Care And Cleaning
ENGLISH • Do not activate the cooking zones not use any abrasive products, with empty cookware or without abrasive cleaning pads, solvents or cookware. metal objects. • Do not put aluminium foil on the • If you use an oven spray, obey the appliance or directly on the bottom of safety instructions on the packaging. -
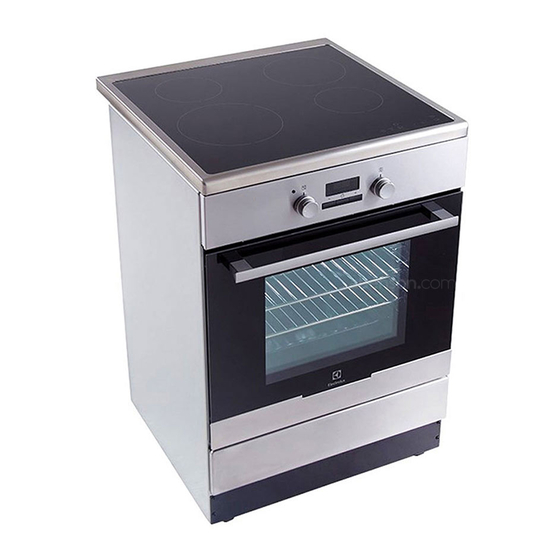
Page 8: Product Description
3. PRODUCT DESCRIPTION 3.1 General overview Temperature indicator / symbol Knob for the temperature Electronic programmer Knob for the oven functions Heating element Lamp Shelf positions 3.2 Cooking surface layout Induction cooking zone 1400 W with the Power function 2500 W... -
Page 9: Before First Use
ENGLISH 4. BEFORE FIRST USE Press again and again until the WARNING! indicator for the Time of Day function Refer to Safety chapters. flashes. To set a new time, refer to "Setting the 4.1 Initial Cleaning time". Remove all accessories from the 4.4 Preheating appliance. - Page 10 Use the sensor fields to operate the appliance. The displays, indicators and sounds tell which functions operate. Sensor Function Comment field ON / OFF To activate and deactivate the hob. STOP+GO To activate and deactivate the function. To select the cooking zone.
-
Page 11: Hob - Hints And Tips
ENGLISH When the function operates, you cannot change the heat setting. Heat setting The hob deacti‐ vates after To activate the function: touch comes on. 1 - 2 6 hours 3 - 4 5 hours To deactivate the function: touch The previous heat setting comes on. - Page 12 6.1 Cookware Cooking zone Minimum For induction cooking zones cookware di‐ a strong electro-magnetic ameter (mm) field creates the heat in the Right rear cookware very quickly. Right front Use the induction cooking zones with correct Left front cookware.
-
Page 13: Hob - Care And Cleaning
ENGLISH Heat setting Use to: Time Hints (min) Keep cooked food warm. as nec‐ Put a lid on the cookware. essary 1 - 2 Hollandaise sauce, melt: but‐ 5 - 25 Mix from time to time. ter, chocolate, gelatine. 1 - 2 Solidify: fluffy omelettes, 10 - 40 Cook with a lid on. -
Page 14: Oven - Daily Use
• Remove shiny metallic with vinegar and clean the glass discoloration: use a solution of water surface with a moist cloth. 8. OVEN - DAILY USE 2. Turn the knob for the temperature to WARNING! select a temperature. Refer to Safety chapters. -
Page 15: Oven - Clock Functions
ENGLISH Sym‐ Oven functions Application Fast Grilling To grill flat food in large quantities and to toast bread. Turbo Grilling To roast larger meat joints or poultry with bones on one shelf position. Also to make gratins and to brown. Pizza Setting To bake food on one shelf position for a more in‐... - Page 16 Clock function Application TIME DELAY To combine DURATION and END function. MINUTE MIND‐ To set countdown time. This function has no effect on the operation of the appliance. You can set the MINUTE MINDER at any time, also when the appliance is off.
-
Page 17: Oven - Using The Accessories
ENGLISH 10. OVEN - USING THE ACCESSORIES WARNING! Refer to Safety chapters. 10.1 Inserting the accessories Wire shelf: The wire shelf has a special shape in the rear which help with the heat circulation. Put the shelf on the correct shelf position. - Page 18 11.4 Cooking meat and fish 11.5 Cooking times • Use a deep pan for very fatty food to Cooking times depend on the type of prevent the oven from stains that can food, its consistency, and volume. be permanent.
-
Page 19: Accessories
ENGLISH Food Quantity Tempera‐ Time (min) Shelf Accessories ture (°C) posi‐ tion Cheese cake 2600 170 - 190 60 - 70 baking tray Swiss apple 1900 200 - 220 30 - 40 baking tray flan Christmas 2400 170 - 180 baking tray 55 - 65 cake... -
Page 20: Same Shelf
11.7 Fan cooking Food Quantity Tempera‐ Time (min) Shelf Accessories ture (°C) position Pastry baking tray stripes Pastry 250 + 250 1 + 3 baking tray stripes 1000 baking tray Flat cake 1000 + 1 + 3 baking tray... -
Page 21: Same Shelf
ENGLISH Food Quantity Tempera‐ Time (min) Shelf Accessories ture (°C) position Christmas 2400 150 - 160 baking tray 35 - 40 cake Quiche Lor‐ 1000 190 - 210 30 - 40 1 round tray (diameter: 26 raine Peasant 750 + 750 160 - 170 40 - 50 baking tray... -
Page 22: Position
11.8 True fan cooking Food Quantity Tempera‐ Time (min) Shelf Accessories ture (°C) position Pastry baking tray stripes Pastry 250 + 250 1 + 3 baking tray stripes 1000 baking tray Flat cake 1000 + 1 + 3 baking tray... -
Page 23: Same Shelf
ENGLISH Food Quantity Tempera‐ Time (min) Shelf Accessories ture (°C) position Quiche Lor‐ 1000 210 - 230 35 - 45 1 round tray (diameter: 26 raine Peasant 750 + 750 180 - 190 50 - 60 baking tray bread Romanian 600 + 600 150 - 170 40 - 50... -
Page 24: Position
Food Quantity Tempera‐ Time (min) Shelf Accessories ture (°C) position 1000 15 + 15 wire shelf Beef steaks baking tray Half chicken 1200 30 + 30 wire shelf baking tray Pork roast cut‐ 25 + 25 wire shelf baking tray 1) Preheat the oven for 4 minutes. -
Page 25: Oven - Care And Cleaning
ENGLISH 11.12 Light cooking Food Quantity Tempera‐ Time (min) Shelf Accessories ture (°C) position Pastry 150 - 160 20 - 25 baking tray stripes 160 - 170 35 - 40 baking tray Flat cake 1000 200 - 210 30 - 40 baking tray Pizza 160 - 170... - Page 26 CAUTION! Do not use the appliance without the glass panels. 1. Open the door fully and hold the two door hinges. 4. Put the door on a soft cloth on a stable surface. 2. Lift and turn the levers on the two hinges.
-
Page 27: Troubleshooting
ENGLISH 7. First lift carefully and then remove Make sure that you install the middle the glass panels one by one. Start panel of glass in the seats correctly. from the top panel. 8. Clean the glass panels with water and soap. - Page 28 13.1 What to do if... Problem Possible cause Remedy You cannot activate the The appliance is not con‐ Check if the appliance is appliance. nected to an electrical sup‐ correctly connected to the ply or it is connected incor‐...
- Page 29 ENGLISH Problem Possible cause Remedy Automatic Switch Off oper‐ Deactivate the hob and ac‐ comes on. ates. tivate it again. There is no cookware on Put cookware on the zone. comes on. the zone. The cookware is incorrect. Use the correct cookware. comes on.
-
Page 30: Installation
Problem Possible cause Remedy It takes too long to cook The temperature is too low Adjust the temperature if the dishes or they cook too or too high. necessary. Follow the ad‐ quickly. vice in the user manual. The display shows an error There is an electrical fault. -
Page 31: Technical Data
ENGLISH Minimum distances You must install the anti-tilt protection. If you do not install it, the appliance can tilt. Dimension Your appliance has the symbol shown on the picture (if applicable) to remind you about the installation of the anti-tilt protection. -
Page 32: Energy Efficiency
15. ENERGY EFFICIENCY 15.1 Product information for hob according to EU 66/2014 Model identifi‐ EKI64500OX cation Type of hob Hob inside Freestanding Cooker Number of cooking zones Heating tech‐... -
Page 33: English
15.3 Product Fiche and information for ovens according to EU 65-66/2014 Supplier's name Electrolux Model identification EKI64500OX Energy Efficiency Index 97.4 Energy efficiency class Energy consumption with a standard load, con‐ 0.84 kWh/cycle ventional mode Energy consumption with a standard load, fan- 0.76 kWh/cycle... - Page 34 15.4 Oven - Energy saving to minimum 3 - 10 minutes before the end of the cooking time, depending on The appliance contains the duration of the cooking. The residual features which help you heat inside the oven will continue to save energy during everyday cook.
- Page 35 ขอบพระคุ ณ ที ่ ซ ื ้ อ เครื ่ อ งใช ไ ฟฟ า จาก Electrolux คุ ณ ได เ ลื อ กผลิ ต ภั ณ ฑ ท ี ่ ผ ลิ ต ขึ ้ น โดยผู ผ ลิ...
-
Page 36: ข อ มู ล ด า นความปลอดภั ย
ข อ มู ล ด า นความปลอดภั ย ก อ นติ ด ตั ้ ง และใช ง านเครื ่ อ ง กรุ ณ าอ า นคำแนะนำที ่ จ ั ด มาให โ ดย ละเอี ย ดก อ นในเบื ้ อ งต น ผู ผ ลิ ต จะไม ร ั บ ผิ ด ชอบใด ๆ ต อ การบาด... - Page 37 คำเตื อ น: การปรุ ง อาหารบนเตาไฟฟ า ที ่ ม ี ไ ขมั น หรื อ น้ ำ มั น โดย • ไม ม ี ค นดู แ ลอาจเป น อั น ตรายและทำให เ กิ ด เพลิ ง ไหม ไ ด อย...
-
Page 38: คำแนะนำด า นความปลอดภั ย
2. คำแนะนำด า นความปลอดภั ย 2.1 การติ ด ตั ้ ง • ต อ ปลั ๊ ก ไฟเข า กั บ เต า รั บ ไฟฟ า เมื ่ อ ทำการ ติ ด ตั ้ ง เสร็ จ สิ ้ น แล ว เท า นั ้ น จะต อ งมี ช อ ง... - Page 39 • น้ ำ มั น ที ่ ใ ช แ ล ว อาจมี เ ศษอาหารตกค า ง • ก อ นการดู แ ลรั ก ษา ให ป ด เครื ่ อ งก อ น และทำให เ กิ ด เพลิ ง ไหม ท ี ่ อ ุ ณ หภู ม ิ ต ่ ำ กว า ปลดสายไฟจากเต...
-
Page 40: รายละเอี ย ดผลิ ต ภั ณ ฑ
3. รายละเอี ย ดผลิ ต ภั ณ ฑ 3.1 ภาพรวมเบื ้ อ งต น ไฟ/สั ญ ลั ก ษณ แ จ ง อุ ณ หภู ม ิ แป น ปรั บ อุ ณ หภู ม ิ โปรแกรมอิ เ ล็ ก ทรอนิ ก ส... -
Page 41: ก อ นการใช ง านครั ้ ง แรก
4. ก อ นการใช ง านครั ้ ง แรก 4.3 การปรั บ เวลา คำเตื อ น ดู ร ายละเอี ย ดจากหั ว ข อ ความ คุ ณ ไม ส ามารถปรั บ เวลาระหว า ง ปลอดภั ย วั น ได ห ากฟ ง ก ช ั ่ น ระยะเวลา 4.1 การทำความสะอาดเบื... - Page 42 พื ้ น ที ่ ‐ ฟ ง ก ช ั ่ น ความเห็ น เซ็ น เซอร เพื ่ อ เลื อ กพื ้ น ที ่ ป รุ ง สุ ก ค า ความร อ นจะปรากฏขึ ้ น...
-
Page 43: เตา - คำแนะนำและเคล็ ด ลั บ
5.6 ค า ความร อ น การป ด ฟ ง ก ช ั ่ น การทำงาน: กดเลื อ ก . ค า ความร อ นก อ นหน า จะติ ด สว า ง เลื อ กโซนประกอบอาหาร 5.9 ฟ ง ก ช ั ่ น การจั ด การพลั ง งาน กดเลื... - Page 44 ประสิ ท ธิ ภ าพในการทำงานของพื ้ น ที ่ ป รุ ง สุ ก จะ • เสี ย งแตก: ภาชนะทำจากวั ส ดุ ต า ง ๆ กั น สั ม พั น ธ ก ั บ เส น ผ า นศู น ย ก ลางของภาชนะ...
-
Page 45: เตาไฟฟ า - การดู แ ลและทำความสะอาด
ค า ความร อ น ใช เ พื ่ อ : เวลา คำแนะนำ (นาที ) 7 - 8 ทอดวั ต ถุ ด ิ บ จำนวนมาก แฮช‐ 5 - 15 พลิ ก กลั บ ด า นเมื ่ อ ผ า นไปครึ ่ ง ‐ บราวน... -
Page 46: เตาอบ - ฟ ง ก ช ั ่ น นาฬิ ก า
8.4 ฟ ง ก ช ั ่ น เตาอบ สั ญ ลั ก ‐ ฟ ง ก ช ั ่ น เตาอบ การใช ษณ ป ด ทำงาน เครื ่ อ งป ด ทำงาน ไฟเตาอบ เป ด ไฟได โ ดยไม ใ ช ฟ ง ก ช ั ่ น ปรุ ง อาหาร... - Page 47 9.2 ปุ ม สั ่ ง การ ปุ ม สั ่ ง การ ฟ ง ก ช ั ่ น รายละเอี ย ด MINUS (ลบ) ตั ้ ง เวลา CLOCK (นาฬิ ก า) ตั ้ ง ค า นาฬิ ก า PLUS (บวก) ตั...
-
Page 48: เตาอบ - การใช อ ุ ป กรณ เ สริ ม
3. เมื ่ อ เวลาที ่ ต ั ้ ง ไว ส ิ ้ น สุ ด ลง เสี ย งสั ญ ญาณจะ 2. กดค า งที ่ ดั ง ขึ ้ น กดปุ ม ใด ๆ เพื ่ อ หยุ ด เสี ย งเตื อ น... - Page 49 11.3 การอบเค ก ครั ้ ง ที ่ น ้ ำ แห ง เพื ่ อ ป อ งกั น การเกิ ด ไอน้ ำ เนื ่ อ งจากควั น • อย า เป ด ประตู เ ตาอบก อ นพ น กำหนดเวลา 3/4 ของโปรแกรมที...
- Page 50 อาหาร ปริ ม าณ อุ ณ หภู ม ิ (°C) เวลา (นาที ) ตำแหน ‐ อุ ป กรณ เ สริ ม (ก.) งชั ้ น วาง 1200 170 - 180 25 - 35 ถาดอบ ยี ส ต เ ค ก ยั ด ไส...
- Page 51 11.7 อบแบบมี พ ั ด ลม อาหาร ปริ ม าณ (ก.) อุ ณ หภู ม ิ เวลา (นาที ) ตำแหน ‐ อุ ป กรณ เ สริ ม (°C) งชั ้ น วาง ถาดอบ ขนมอบทรงยาว 250 + 250 1 + 3 ถาดอบ...
- Page 52 อาหาร ปริ ม าณ (ก.) อุ ณ หภู ม ิ เวลา (นาที ) ตำแหน ‐ อุ ป กรณ เ สริ ม (°C) งชั ้ น วาง สวิ ส แอปเป ล แฟ‐ 1900 180 - 200 30 - 40 ถาดอบ...
- Page 53 11.8 อบลมร อ น อาหาร ปริ ม าณ (ก.) อุ ณ หภู ม ิ เวลา (นาที ) ตำแหน ‐ อุ ป กรณ เ สริ ม (°C) งชั ้ น วาง ถาดอบ ขนมอบทรงยาว 250 + 250 1 + 3 ถาดอบ ขนมอบทรงยาว 1000 ถาดอบ...
- Page 54 อาหาร ปริ ม าณ (ก.) อุ ณ หภู ม ิ เวลา (นาที ) ตำแหน ‐ อุ ป กรณ เ สริ ม (°C) งชั ้ น วาง 2400 150 - 170 ถาดอบ คริ ส ต ม าสเค ก 50 - 60...
- Page 55 อาหาร ปริ ม าณ (ก.) อุ ณ หภู ม ิ เวลา (นาที ) ตำแหน ‐ อุ ป กรณ เ สริ ม (°C) งชั ้ น วาง 1000 15 + 15 ตะแกรงชั ้ น ‐ สเต็ ก เนื ้ อ วาง ถาดอบ...
-
Page 56: เตาอบ - การดู แ ลและทำความสะอาด
11.12 อบปริ ม าณน อ ย อาหาร ปริ ม าณ (ก.) อุ ณ หภู ม ิ เวลา (นาที ) ตำแหน ‐ อุ ป กรณ เ สริ ม (°C) งชั ้ น วาง ขนมอบรู ป ทรง‐ 150 - 160 20 - 25 ถาดอบ... - Page 57 ข อ ควรระวั ง อย า ใช เ ครื ่ อ งโดยไม ม ี แ ผง กระจก 1. เป ด ประตู ใ ห ส ุ ด และจั บ ที ่ บ านพั บ ทั ้ ง สอง ด า น 4.
-
Page 58: การแก ไ ขป ญ หา
8. ทำความสะอาดแผงกระจกด ว ยน้ ำ และสบู เช็ ด แห ง แผงกระจกด ว ยความระมั ด ระวั ง หลั ง จากทำความสะอาดเสร็ จ สิ ้ น ให ต ิ ด ตั ้ ง แผง 12.4 การเปลี ่ ย นหลอดไฟ กระจกและประตู เ ตาอบ ทำตามขั ้ น ตอนข า งต น... - Page 59 ป ญ หา สาเหตุ ท ี ่ เ ป น ไปได วิ ธ ี แ ก ไ ข คุ ณ ไม ส ามารถเป ด ใช ง าน‐ ฟ ว ส ข าด ตรวจสอบให แ น ใ จว า ฟ ว ส เ ป น ‐ เตาไฟฟ...
- Page 60 ป ญ หา สาเหตุ ท ี ่ เ ป น ไปได วิ ธ ี แ ก ไ ข มี ข อ ผิ ด พลาดที ่ เ ตาไฟฟ า ปลดเตาไฟฟ า จากแหล ง จ า ย‐ และตั ว เลขติ ด สว า ง...
-
Page 61: การติ ด ตั ้ ง
13.2 ข อ มู ล การให บ ริ ก าร ข อ มู ล ที ่ จ ำเป น สำหรั บ ศู น ย บ ริ ก ารมี แ จ ง ไว ท ี ่ แผ น พิ ก ั ด แผ น พิ ก ั ด อยู ท ี ่ โ ครงด า นหน า ของ หากไม... - Page 62 คุ ณ จะต อ งติ ด ตั ้ ง ชิ ้ น ส ว นป อ งกั น การพลิ ก คว่ ำ ข อ ควรระวั ง หากไม ต ิ ด ตั ้ ง เครื ่ อ งอาจพลิ ก คว่ ำ ได...
-
Page 63: การประหยั ด พลั ง งาน
15. การประหยั ด พลั ง งาน 15.1 ข อ มู ล เตาตามมาตรฐาน EU 66/2014 รหั ส รุ น EKI64500OX ประเภทเตา เตาด า นในเตาแยกเดี ่ ย วแบบเคลื ่ อ นย า ยได จำนวนพื ้ น ที ่ ‐ ปรุ ง อาหาร... - Page 64 จำนวนช อ งเป ด แหล ง ความร อ น ไฟฟ า ปริ ม าตร 54 l ประเภทเตาอบ เตาอบด า นในเตาแยกเดี ่ ย วแบบ‐ เคลื ่ อ นย า ยได มวล 46.0 กก. EN 60350-1 - Household electric cooking หากทำได อย า อุ น ร อ นเตาอบก อ นใส อ าหารไว...
- Page 66 www.electrolux.com...
- Page 68 www.electrolux.com/shop...