
Related Manuals for trig TY96/96A


Summary of Contents for trig TY96/96A
-
Page 1: Operating Manual
TY96/96A and TY97/97A VHF Radio Operating Manual 01239-00-AC 21 June 2017 Trig Avionics Limited Heriot Watt Research Park Riccarton, Edinburgh EH14 4AP Scotland, UK © Copyright 2016 EN/DE/FR... - Page 2 This page intentionally left blank...
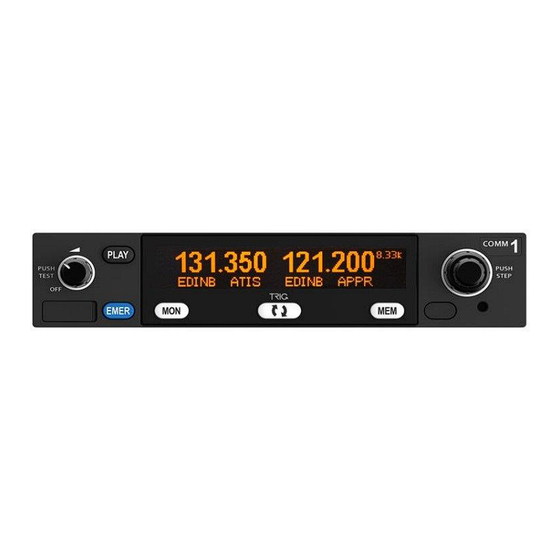
- Page 3 Front Panel This operating manual covers both the TY96/TY97 (8.33 kHz and 25 kHz channel spacing) and the TY96A/TY97A (25 kHz only channel spacing). Any references to the TY96/97 will also apply to the TY96A/TY97A unless stated otherwise. Display The display shows the primary and standby frequencies and a series of icons to indicate the operating mode of the radio.
- Page 4 Tuning Knobs The right hand concentric knobs are used to tune the radio. The large knob adjusts the MHz portion of the standby frequency, and the smaller knob adjusts the kHz portion of the standby frequency. Pressing the end of the small knob changes the channel spacing that the small knob operates through.
- Page 5 PLAY Button The VHF radio includes a digital audio recorder. Pressing the PLAY button will automatically replay the previous transmission received from ATC. During playback the icon will be displayed on the screen. If a new transmission is received during playback, the playback is cancelled and the live transmission will be heard instead.
- Page 6 Airfield or facility identifiers are in alphabetical order. Scroll through the identifiers until you find the one that you want. Move the cursor using the large knob to highlight the station type, for example GND, TWR or APPR. Pressing the MEM button at any time puts the currently selected result into the standby frequency and returns to the normal operating screen.
- Page 7 GPS Database If it has been configured in your aircraft, there is a third database in the radio. This is loaded by your GPS receiver and will contain airfields appropriate to your current route of flight. It is accessed exactly the same way as the built in database, except that you first select the remote data source using the large knob (to highlight the database field) and the small knob (to select the GPS data source).
- Page 8 If you get this far and realise that you did not want to change the database at all, select CANCEL and then press MEM; you will be returned to the normal memory mode. Saving and Loading the Frequency Database The frequency database entries you have made can be saved to a USB memory stick, or you can load a database from a USB stick.
- Page 9 your VHF radio may not be working properly. Note the message on the screen and pass that information to your avionics maintenance organisation. Press the flip-flop button to clear the message. The following warnings may be seen: Radio Hot The radio is overheating. Stuck Mic A PTT switch has been closed for more than 35 seconds and the transmitter has stopped to avoid blocking the channel.
- Page 10 Bedienelemente Diese Bedienungsanleitung ist für beide TY96/TY97 (8,33kHz und 25kHz Kanalabstand) und TY96A/TY97A (nur 25kHz Kanalabstand) gemeint. Alle Verweisen auf die TY96/97 gelten auch für die TY96A/97A, außer wenn anders angegeben ist. Anzeige Die Anzeige zeigt die Primär- und die Standby-Frequenz sowie eine Reihe von Symbolen an, die den Betriebsmodus des Funkgerätes angeben.
- Page 11 Knopf für Ein/Aus, Lautstärke und Squelch (Rauschsperre) Der Knopf auf der linken Seite schaltet das VHF-Funkgerät sowie die Rauschunterdrückung ein und aus und regelt die Lautstärke des Audiosignals. Durch Drehen des Knopfes nach rechts wird das Funkgerät eingeschaltet und dann die Lautstärke erhöht. Die Drehung nach links senkt die Lautstärke und schaltet das Funkgerät schließlich mit einem Klick aus.
- Page 12 einfacher identifizieren zu können. Gleichzeitig wird die Standby-Frequenz geringfügig stiller als der Primärkanal. Wenn das Funkgerät für Stereo-Musik verkabelt wurde und Sie ein Stereoheadset benutzen, wird sich auch der Sekundärkanal auf der rechten Seite des Primärkanals befinden. Das ist bei einem Flugzeug, das nur mit einem einzigen Funkgerät ausgerüstet ist, nützlich, da man ATIS abhören und gleichzeitig die Frequenz der Flugsicherung überwachen kann.
- Page 13 Für einen Zugriff auf diese Datenbänke, drücken Sie den Knopf MEM. Die rechte Hälfte des Bildschirms wird durch das Datenbankfenster ersetzt und die erste Datenbank am Bildschirm ist die, die vom Piloten erstellt wurde. Der große Drehknopf kontrolliert den hervorgehobenen Cursor, während der kleine Ihnen ermöglicht, durch die Buchstaben und Zahlen durchzuscrollen.
- Page 14 GPS-Datenbank Diese Datenbank ist von Ihrem GPS-Empfänger geladen und enthält Information über Flugplätze, die sich entlang der Flugstrecke befinden. Der Zugriff ist genauso wie bei der integrierten Datenbank, aber in diesem Fall drehen Sie den großen Knopf, um die Datenquelle auszuwählen (das Datenbankfeld wird sich hervorheben lassen) und den kleinen Knopf drehen Sie, um die GPS-Datenquelle auszuwählen.
- Page 15 Eintrag den Sie verändern wollen angezeigt, halten Sie MEM für 5 Sekunden gedrückt. Die selben Optionen wie zuvor werden angezeigt: EDIT, DELETE, ADD NEW oder CANCEL. Wenn Sie EDIT auswählen und MEM drücken, kann der Cursor Buchstaben, Zahlen und Anlagen im aktuellen Eintrag verändern. Drücken Sie MEM nochmals, um den Eintrag abzuspeichern.
- Page 16 Konfigurationsmodus Der Zugriff auf zusätzliche Einrichtungsfunktionen ist durch 5 Sekunden langes Gedrückthalten der MON-Taste möglich. Die Menüpunkte können mit Hilfe des größeren Innenknopfes für die Frequenzwahl ausgewählt und die Parameterwerte mit Hilfe des kleineren Außenknopfes für die Frequenzwahl geändert werden. Intercom Volume Hier wird die Lautstärke des Intercoms eingestellt Intercom Squelch...
- Page 17 Low Voltage Die Bordstromversorgung beträgt weniger als 10 Volt (TY96) oder 16 Volt (TY97). Ant Fault Etwas ist mit den Flugzeugantennen los. Das Funkgerät wird immerhin versuchen, Übertragungen zu senden, aber Sie werden vielleicht nicht gehört. Transmit Fail Es gibt ein Problem beim Senden und das Funkgerät sendet nicht mehr.
- Page 18 Panneau de contrôle Ce mode d'emploi couvre à la fois l'écart entre les canaux TY96 / TY97 (8.33 kHz et 25 kHz) et le TY96A / TY97A (espace libre de 25 kHz uniquement). Toute référence au TY96 / 97 s'appliquera également au TY96A / TY97A sauf indication contraire.
- Page 19 Une pression sur le bouton active ou désactive le squelch et règle sa valeur automatiquement. Cela permet d’écouter les stations de faible amplitude ou d’effectuer un simple test audio. Boutons rotatifs de réglage Les boutons rotatifs concentriques situés sur la droite sont utilisés pour régler la radio.
- Page 20 Bouton PLAY La radio VHS inclut un enregistreur audio digital. Appuyer sur le bouton PLAY va automatiquement repasser la transmission précédente reçue de l’ATC. Durant le playback l’icône sera affiché sur l’écran. Si une nouvelle transmission est reçue durant le playback, la réécoute est arrêtée et la transmission en temps réel sera entendue à...
- Page 21 Aérodromes ou identifiants stations sont dans l'ordre alphabétique. Faîtes défiler les identifiants jusqu'à ce que vous trouviez celui que vous voulez. Déplacez le curseur, en utilisant le gros bouton rotatif, pour sélectionner le champ « type de station », par exemple GND, TWR ou APPR. Appuyer sur la touche MEM à...
- Page 22 Base de données GPS Si elle a été configurée dans votre avion, une troisième base de données est disponible dans la radio. Celle-ci est chargée par votre récepteur GPS et contiendra les aérodromes appropriés à votre itinéraire de vol actuel. Elle est accessible de la même manière que les bases de données déjà...
- Page 23 mémoire normale. Puis, une fois l'entrée que vous souhaitez modifier affiché, appuyez et maintenez le bouton MEM pendant 5 secondes. Les choix décrits plus haut seront offerts; EDIT, DELETE, ADD NEW ou CANCEL. Si vous arrivez à cette étape et réalisez que vous ne voulez pas changer la base de données du tout, sélectionnez CANCEL, puis appuyez MEM;...
- Page 24 Intercom Squelch Règle la sensibilité du squelch de l'intercom Music Volume Règle le volume de l’entrée musique audio Music Muting Coupe la musique quand une transmission VHF est reçue Enable 8.33 kHz Règle le pas de fréquence sur 8,33/25 kHz ou 25/50 kHz (TY96 and TY97 Cette option n’est pas disponible pour TY96A et TY97A seulement)
- Page 29 Trig Avionics Limited Tel: +44 (0)131 449 8810 support@trig-avionics.com Heriot Watt Research Park Fax: +44 (0)131 449 8811 www.trig-avionics.com Riccarton, Edinburgh EH14 4AP, UK...
Need help?
Do you have a question about the TY96/96A and is the answer not in the manual?
Questions and answers