
Related Manuals for Standard Horizon HX870E


Summary of Contents for Standard Horizon HX870E
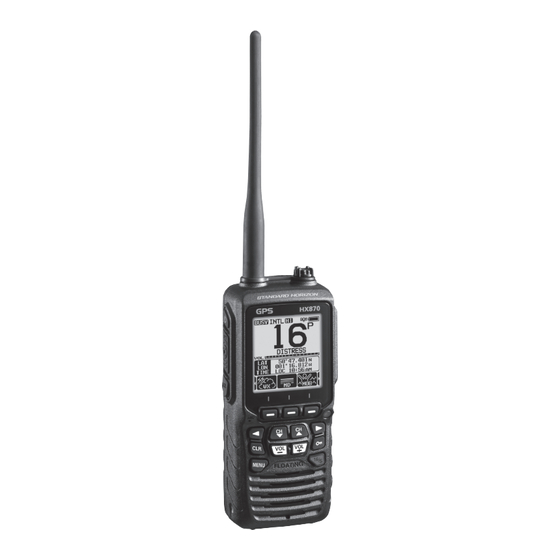
- Page 1 HX870E 6 Watt VHF/FM Floating Class D DSC Marine Transceiver with GPS Owner’s Manual...
-
Page 2: Table Of Contents
9.3 DSC DISTRESS CALL...............37 11.1.2 Setting Up the Polling Time Interval .......88 9.3.1 Transmitting a DSC Distress Call ........37 11.1.3 Enabling/Disabling Transmission during GM Operation .89 9.3.2 Receiving a DSC Distress Call ........39 11.2 STARTING GM OPERATION ............89 Page 2 HX870E... - Page 3 15.9 PINNING ..................113 15.10 SBAS (Satellite Based Augmentation System) ......114 15.11 OUTPUT SENTENCES ............114 15.12 LOGGER INTERVAL ...............115 15.13 LOG ERASE ................115 15.14 SUMMARY OF THE GPS SETUP ...........116 16 ATIS SETUP ..................117 16.1 ATIS CODE PROGRAMMING ..........117 HX870E Page 3...
-
Page 4: Quick Reference Guide
The HX870E is equipped with the E2O (Easy-To-Operate) menu system. Basic operation may be accomplished by following the procedure below: : Press and hold to turn on/off the transceiver. PTT (Push-To-Talk): Activates the transmitter when pressed. -
Page 5: Introduction
We appreciate your purchase of the HX870E, and encourage you to read this manual thoroughly, so as to learn and fully understand the capabilities of the HX870E. -
Page 6: General Information
The HX870E is capable of DSC (Digital Selective Calling) ITU-R M.493 Class D operation. Class D operation allows continuous receiving of Digital Selective Calling functions on channel 70 even if the radio is receiving a call. The HX870E operates on all currently-allocated marine channels which are switchable for use with International, USA, or Canadian regulations. -
Page 7: Optional Accessories
E-DC-6 ............DC Cable; plug and wire only : “C” suffix is for use with 230 VAC (Type-C plug), and “U” suffix is for use with 230 VAC (Type-BF plug). HX870E Page 7... -
Page 8: About This Radio
The total transmission should not exceed 1 minute. 9. End the message by saying “OVER”. Release the PTT button and listen. 10. If there is no answer, repeat the above procedure. If there is still no response, try another channel. Page 8 HX870E... -
Page 9: Calling Another Vessel (Channel 16 Or 9)
NOTE The HX870E has the DSC Distress calling, that can transmit a distress call digitally to all ships with compatible DSC radios. Refer to section “9 DIGITAL SELECTIVE CALLING (DSC)”. CALLING ANOTHER VESSEL (CHANNEL 16 OR 9) Channel 16 may be used for initial contact (hailing) with another vessel. -
Page 10: Making Telephone Calls
However, in certain situations it may be necessary to temporarily use a higher power. See Page 24 for means to temporarily override the low-power limit on these two channels. Page 10 HX870E... -
Page 11: Getting Started
If the short is of sufficient duration, it is possible to melt battery components. Do not place a loose battery pack on or near metal surfaces or HX870E Page 11... - Page 12 Battery packs should be charged only in non-hazardous environments. Use only STANDARD HORIZON-approved batteries. Use only a STANDARD HORIZON-approved charger. The use of any other charger may cause permanent damage to the battery. Follow charging instructions provided with the chargers.
-
Page 13: Rechargable Battery Installation/Removal
33 ° 37.120 118 ° 09.582 TIME LOC 09.56 : Full battery power : Enough battery power : Low battery power : Poor battery power : Charge (or replace) the battery HX870E Page 13... -
Page 14: Using The Sbh-12 Charger Cradle
NOTE The SBH-12 is only designed for the charging of the HX870E’s battery, and is not suitable for other purposes. The SBH-12 may contribute noise to TV and radio reception in the immediate vicinity, so we do not recommend its use adjacent to such devices. -
Page 15: Installation Of The Sbt-13 Battery Case
5.1.5 Installation of the SBT-13 Battery Case The SBT-13 is a battery case that holds five “AAA” size Alkaline batteries and is used with the HX870E transceiver. The Alkaline batteries can be used for reception and transmission in an emergency, and battery life will be shortened dramatically. -
Page 16: Belt Clip Installation / Removal
ATTACHING AN ANTENNA Insert the CAT460 antenna into the ANT jack at the top panel, hold the bottom end of the antenna, then screw it onto the mating connector on the transceiver until it is snug. Do not over-tighten. Page 16 HX870E... -
Page 17: Checking Gps Signal (Gps Status Display)
TIME LOC 09:56 NOTE • When the HX870E is first turned on, it may take several minutes to compute a fix of your position. This is normal, as the HX870E is down- loading “almanac” information from the GPS satellites. • When using the HX870E inside of a cabin where GPS reception is limited, choose a place where GPS satellite reception is good enough referring to the GPS status display. -
Page 18: Changing The Gps Time
CHANGING THE GPS TIME From the factory the HX870E shows GPS satellite time or UTC (Universal Time Coordinated) time. A time offset is needed to show the local time in your area. The time offset must be changed in order for the radio to display the current time in your area. -
Page 19: Changing The Time Location
5. Press the CH▼/CH▲ key to select “12hour” TIME AREA TIME FORMAT TIME FORMAT 24hour or “24hour”. BACK SELECT 12hour 6. Press the [ENTER] soft key to store the selected setting. BACK ENTER 7. Press the CLR key to return to radio opera- tion. HX870E Page 19... -
Page 20: Controls And Indicators
ANT jack ( Top side ) The supplied CAT460 flexible antenna is attached here. (Power) switch (Left side) Press and hold to toggle the radio on or off. PTT (Push-To-Talk) button (Left side) When pushed activates the transmitter. Page 20 HX870E... - Page 21 “LOCK” will appear on the entire screen, to indicate that the functions are locked. Hold down this key until “UNLOCK” appears to unlock the radio. ◄/► key Press to toggle the on-screen menus to right/left. VOL+ key Press to increase the speaker audio volume level. HX870E Page 21...
- Page 22 When the Water Hazard feature is activated, this indicator illuminates if the transceiver is submerged. Speaker The internal speaker is located here. Battery pack lock (Bottom side) Turn the Battery Pack Lock to the “UNLOCK” position for battery removal. Page 22 HX870E...
-
Page 23: Basic Operation
7 BASIC OPERATION NOTE Before operating the HX870E for the first time, it is recommended that you fully charge the battery. See section “5.1.4 Using the SBH-12 Charger Cradle” for details. TURNING ON AND OFF THE TRANSCEIVER 1. Press and hold the key on the left side of the radio to turn the radio on. -
Page 24: Transmit Power
7.3.1 Transmit Power The TX output power of the HX870E is set to high level (6W) in factory default, and the “[HI]” indicator is displayed on the top part of the screen. To switch the TX output power: 1. Press ◄/► key repeatedly until the [HI],... -
Page 25: Simplex/Duplex Channel Use
SELECT INTL 6. Press the [ENTER] soft key to store the selected setting. P-SET BACK ENTER DISTRESS 7. Press the CLR key to return to radio opera- 33 ° 37.120 tion. 118 ° 09.582 TIME LOC 09.56 HX870E Page 25... -
Page 26: Multi Watch (To Priority Channel)
2. If a signal is received on the channel selected in step 2, the HX870E will dual watch to priority channel. 4. To stop dual watch, press one of the soft keys, then press the [DUAL WATCH] soft key again. -
Page 27: Scanning
The priority channel may be changed from CH16 (default) to another channel. Refer to section “13.6 PRIORITY CHANNEL”. SCANNING The HX870E will automatically scan channels programmed into the preset channel memory and also the scan channel memory, and the last selected weather channel. -
Page 28: Programming Scan Memory
(described in the next 118 ° 09.582 TIME LOC 09.56 section) and will stop on a channel when a transmission is received. The channel number will blink during reception. 4. To stop scanning, press the 16/S or CLR key. Page 28 HX870E... -
Page 29: Priority Scanning (P-Scan)
118 ° 09.582 TIME LOC 09.56 3. Press the [ADD] soft key to program the P-SET QUIT USCG channel into the preset channel memory. 33 ° 37.120 “[P-SET]” icon will appear. 118 ° 09.582 TIME LOC 09.56 HX870E Page 29... -
Page 30: Operation
118 ° 09.582 TIME LOC 09.56 5. Repeat steps 2 through 4 to delete the desired channels QUIT DELETE from preset channels. 6. To exit from deleting the preset channels, press the [QUIT] soft key. Page 30 HX870E... -
Page 31: Mob Operation
Insert the plug of the VOX headset into the MIC/SP jack of the HX870E, then speak to the microphone of the headset to start VOX operation. The VC-24 is optimized for the use with the HX870E, so that you may use it without detailed settings. -
Page 32: Operation Menu
7.12 OPERATION MENU The HX870E provides advanced features below, via the “MENU” screen displayed by pressing the MENU key on the front panel. DSC CALL The following seven types of DSC (Digital Selective Calling) are available: Individual, Group, All Ships, Position Request, Position Report, Polling, and Auto Position Polling. -
Page 33: Gps Operation
8 GPS OPERATION The HX870E has an internal GPS antenna to receive and display the position information. Your position information as well as recieved positions can be memorized and utilized later for navigation. NOTE The GPS unit may be turned off, or set to power save mode to increase the battery life, via the SETUP menu. -
Page 34: Checking Gps Status
123 ° 56.890 TIME LOC 09:56 GPS LOGGER OPERATION The HX870E includes a logger for position information that allows you to record your location at regular intervals. 1. Press the [LOGGER] soft key to turn the function on or off. BUSY... -
Page 35: Digital Selective Calling (Dsc)
9 DIGITAL SELECTIVE CALLING (DSC) GENERAL WARNING This HX870E is designed to generate a digital maritime distress and safety call to facilitate search and rescue. To be effective as a safety device, this equipment must be used only within communication range of a shore-based VHF marine channel 70 distress and safety watch system. -
Page 36: Programming The Mmsi
9. Press the [OK] soft key to return to radio operation. NOTE To view your MMSI after programming to ensure it is correct, perform steps 1 to 2. Look that the MMSI number shown on the display is correct. Page 36 HX870E... -
Page 37: Dsc Distress Call
DSC DISTRESS CALL The HX870E is capable of transmitting and receiving DSC distress messages to all DSC radios. Distress calls from the HX870E include the latitude and longitude of the vessel when the internal GPS unit is activated. 9.3.1 Transmitting a DSC Distress Call... - Page 38 6. Press and hold the DISTRESS key until a distress alert is transmitted. Transmitting a DSC Distress Alert by Manually Inputting Location and Time In case the HX870E fails to get a GPS position fix, you may input your latitude and longitude, and time to transmit the distress alert.
-
Page 39: Receiving A Dsc Distress Call
Canceling a DSC Distress Call If a DSC distress call was sent by error the HX870E allows you to send a message to other vessels to cancel the distress call that was made. Press the [CANCEL] soft key, then press the [YES] soft key. - Page 40 ” icon will appear on the display. You may review the unread distress alert from the DSC log, refer to the section “9.12.2 Reviewing a Logged DSC Distress Call”. • Not all DSC radios can receive a DSC distress relay call. Page 40 HX870E...
-
Page 41: All Ships Call
“PAN QUIT PAN, PAN PAN, PAN PAN” or “Securite, Securite, Securite” depending on the priority of the call. 9. Press the [QUIT] soft key to exit the all ships call menu. HX870E Page 41... -
Page 42: Receiving An All Ships Call
When there is an unread all ships call, “ ” icon will appear on the display. You may review the unread all ships call from the DSC log, refer to the section “9.12.3 Reviewing Other Logged Calls”. Page 42 HX870E... -
Page 43: Individual Call
Up to 100 individual contacts may be programmed. 9.5.1 Setting up the Individual / Position Call Directory The HX870E has a DSC directory that allows you to store a vessel or person’s name and the associated MMSI number you wish to contact via individual calls, auto polling, position request, position report, and polling transmissions. -
Page 44: Setting Up The Individual Call Reply
6. Press the CH▼/CH▲ key to select “AUTO” BACK SELECT MANUAL or “MANUAL”. 7. Press the [ENTER] soft key to store the BACK ENTER selected setting. 8. Press the CLR key to return to radio opera- tion. Page 44 HX870E... -
Page 45: Enabling The Individual Call Acknowledgment
2. Press the [SELECT] soft key, then press the INDIVIDUAL GROUP CH▼/CH▲ key to select “INDIVIDUAL”. (To ALL SHIPS cancel, press the [BACK] soft key.) POS REQUEST POS REPORT 3. Press the [SELECT] soft key. DIST ALERT MSG BACK SELECT HX870E Page 45... - Page 46 5. Press the CH▼/CH▲ key to select the first 98765432 BACK SELECT number of the MMSI which you want to 5 6 7 8 9 0 contact, then press the [SELECT] soft key Delete BACK FINISH SELECT to step to the next number. Page 46 HX870E...
-
Page 47: Receiving An Individual Call
3. Monitor the requested channel until the message is RX INDIVIDUAL 366901235 completed. Yaesu ROUTINE CATEG: Press the PTT button and talk into the microphone to the 00:15 SINCE: called vessel. Connected 4. Press the [QUIT] soft key to return to radio operation. RESEND QUIT HX870E Page 47... - Page 48 7. Press the [QUIT] soft key to return to the channel display. NOTE When there is an unread individual call, “ ” icon will appear on the display. You may review the unread individual call from the DSC log, refer to the section “9.12.3 Reviewing Other Logged Calls”. Page 48 HX870E...
-
Page 49: Setting Up The Individual Call Ringer
8. Press the CLR key to return to radio opera- tion. The HX870E has the capability to turn off the individual call ringer. 1. Press the MENU key to display “MENU”. 2. Press the CH▼/CH▲/◄/► key to select “SETUP”, then press the [SELECT] soft key. -
Page 50: Group Call
MMSI numbers. The first digit of a group MMSI is always set to “0” by International rules. All Standard Horizon radios are preset so when programming a group MMSI the first digit is set to “0”. - Page 51 12. After the nineth letter has been entered, press the [FINISH] soft key to confirm. 13. To store the data, select “SAVE”, then press the [SELECT] soft key. 14. To enter another group address, repeat steps 6 through 13. 15. Press the CLR key to return to radio operation. HX870E Page 51...
-
Page 52: Transmitting A Group Call
QUIT nated channel. 9. Listen to the channel to make sure it is not busy, then press the PTT button and call the other vessel you desire to communicate with. Page 52 HX870E... - Page 53 10. After the group call is transmitted, all the radios in the group will switch to the designated channel. 11. Listen to the channel to make sure it is not busy, then press the PTT button and talk into the microphone to the group of vessels. HX870E Page 53...
-
Page 54: Receiving A Group Call
9.6.3 Receiving a Group Call 1. When a group call is received, the HX870E will produce a RX GROUP 036690123 ringing alarm sound. Yaesu ROUTINE CATEG: 2. The display shows the group MMSI number. 00:15 SINCE: 3. Press any key to stop the alarm. -
Page 55: Setting Up The Group Call Ringer
9.6.4 Setting up the Group Call Ringer The HX870E has the capability to turn off the group call ringer. 1. Press the MENU key to display “MENU”. 2. Press the CH▼/CH▲/◄/► key to select “SETUP”, then press the [SELECT] soft key. -
Page 56: Position Request
Advancements in DSC have made it possible to poll the location of another vessel and show the position of that vessel on the display of the HX870E. This is a great feature for anyone wanting to know the position of another vessel. - Page 57 7. When finished entering the MMSI number, press the [FINISH] soft key. 8. Press the [YES] soft key to transmit the position request DSC call. 9. When the HX870E receives the position from the polled vessel it is shown on the radio display.
-
Page 58: Receiving A Position Request
NOTE When there is an unread position request call, “ ” icon will appear on the display. You may review the unread individual call from the DSC log, refer to the section “9.12.3 Reviewing Other Logged Calls”. Page 58 HX870E... -
Page 59: Manual Input Of Position Information
9.7.3 Manual Input of Position Information If the HX870E is located in an area where GPS reception is limited when you are going to reply to the received position request, you may manually input your location (latitude and longitude) and time to be sent. -
Page 60: Setting Up A Position Request Ringer
BACK ENTER 9.7.5 Setting up a Position Request Ringer The HX870E has the capability to turn off the position request ringer. 1. Press the MENU key to display “MENU”. 2. Press the CH▼/CH▲/◄/► key to select “SETUP”, then press the [SELECT] soft key. -
Page 61: Position Report
7. Press the [YES] soft key to send your posi- 987654321 Do you want to Horizon-1 transmit a Call? SAFETY tion to the selected vessel. CATEG: 24 ° 25.975 POS: 118 ° 59.456 8. Press the [QUIT] soft key to return to radio operation. Transmitted QUIT HX870E Page 61... - Page 62 10. Press the [QUIT] soft key to return to radio operation. DSC Position Report Call by Manually Input Location and Time If the HX870E is located in an area where GPS reception is limited when you are going to transmit a position report call, you may manually input your location (latitude and longitude) and time to be sent.
-
Page 63: Receiving A Dsc Position Report Call
9.8.3 Navigating to the Reported Position The HX870E has a feature that allows you to navigate to a received position report call by using the compass display. Navigating to the position of a position report call may be enabled by the procedure below. -
Page 64: Saving The Reported Position As A Waypoint
9.8.4 Saving the Reported Position as a Waypoint The HX870E can save a position report call in the radio’s memory as a waypoint. 1. After the position report call has been RX POS REPORT 987654321 received, press the [SAVE] soft key. -
Page 65: Polling Call
POLLING CALL The HX870E has the capability to track another vessel. 9.9.1 Transmitting a Polling Call to a Vessel Polling Call using the Individual/Position Call Directory 1. Press the MENU key to display “MENU”, select “DSC CALL” with the CH▼/CH▲/◄/►... -
Page 66: Receiving A Polling Call
9. Press the [QUIT] soft key to return to radio operation. 9.9.2 Receiving a Polling Call When another vessel transmits a polling call to the HX870E the following will happen: 1. When a polling call is received, the radio will automatically... -
Page 67: Auto Pos Polling
9.10 AUTO POS POLLING The HX870E has the capability to automatically track seven vessels programmed into the individual directory, or to automatically send your position information to the programmed stations. 9.10.1 Setting up the Polling Operation 1. Press the MENU key to display “MENU”. -
Page 68: Selecting Vessels To Be Automatically Polled
6. For more entries, press the CH▼/CH▲ key BACK DELETE SELECT to select a blank row, press the [SELECT] soft key, then perform step 5. 7. When finished, press the CLR key to exit to the radio mode. Page 68 HX870E... -
Page 69: Enabling/Disabling Auto Pos Polling
6. Press the CLR key to return to radio opera- tion. 7. Auto POS Polling starts and “A” icon will light BUSY up on the screen. P-SET USCG 33 ° 37.120 118 ° 09.582 TIME LOC 09.56 HX870E Page 69... -
Page 70: Dsc Test
USCG SAFETY CATEG: BACK SELECT 6. Press the [QUIT] soft key to return to radio DSC TEST CALL operation. 987654321 Do you want to Horizon-1 transmit a Call? SAFETY CATEG: 00:05 SINCE: Waiting for ACK RESEND QUIT Page 70 HX870E... -
Page 71: Receiving A Dsc Test Call
9.11.3 Receiving a DSC Test Call When another vessel transmits a DSC Test call to the HX870E the following will happen: 1. When a DSC Test call is received, the radio will automati-... -
Page 72: Dsc Log Operation
“ ” icon will appear on the radios display. The HX870E can store up to 24 transmitted calls, up to the latest 27 distress calls, and up to the latest 64 other calls (individual, group, all ships, position report, position request ack, test call ack, and polling calls). -
Page 73: Reviewing A Logged Dsc Distress Call
9.12.2 Reviewing a Logged DSC Distress Call The HX870E allows logged DSC distress call to be reviewed. 1. Press the MENU key to display “MENU”, then select “DSC CALL” with the CH▼/CH▲/◄/► key. DSC CALL 2. Press the [SELECT] soft key, then press the... -
Page 74: Deleting Logged Calls From The Dsc Log Directory
The procedure above will delete all logged calls of the selected category at one time. To delete logged calls one by one, review the details of the call you want to delete, then press the [DELETE] soft key. Page 74 HX870E... -
Page 75: Dsc Loop Back Operation
9.13 DSC LOOP BACK OPERATION The HX870E has a self-test feature for DSC call. 1. Press the MENU key to display “MENU”, then select “DSC CALL” with the CH▼/CH▲/◄/► key. DSC CALL 2. Press the [SELECT] soft key, then press the... -
Page 76: Navigation
10 NAVIGATION The HX870E is capable of storing up to 200 waypoints for navigation using the compass page. You can also navigation to DSC distress calls with position or a position received from another DSC radio using DSC polling. 10.1 WAYPOINT OPERATION 10.1.1 Starting and Stopping Navigation... - Page 77 The navigation screen will appear. The screen includes the distance and direction to the destination, and the waypoint is indicated by a dot () inside the compass. 11. Press ◄/► key, then press the [STOP] soft key to stop the navigation. HX870E Page 77...
-
Page 78: Setting Up Waypoint Directory
When finished modifying the position, press the [FINISH] soft key. 8. Select “SAVE” with the CH▼/CH▲ key, then press the [SELECT] soft key to save the mark position into memory. 9. Press the CLR key to return to radio operation. Page 78 HX870E... - Page 79 When finished entering the position, press the [FINISH] soft key. 9. Select “SAVE” with the CH▼/CH▲ key, then press the [SELECT] soft key to save the waypoint into memory. 10. Press the CLR key to return to radio operation. HX870E Page 79...
- Page 80 When finished editing, press the [FINISH] soft key. 10. Select “SAVE” with the CH▼/CH▲ key, then press the [SELECT] soft key to store the edited waypoint into memory. 11. Press the CLR key to return to radio operation. Page 80 HX870E...
-
Page 81: Deleting A Waypoint
8. Press the CLR key to return to radio operation. Saving a DSC Position Call as a Waypoint When a position is received from another DSC radio the HX870E allows the position to be saved as a waypoint. Refer to section “9.8.4 Saving the Reported Position as a Waypoint” for details. -
Page 82: Selecting The Display Range
7. Press the CLR key to return to radio operation. 10.1.4 Selecting the Arrival Range This menu item allows setting of the range within which the HX870E determines to be around the destination. 1. Press the MENU key to display “MENU”. -
Page 83: Routing Operation
10.2 ROUTING OPERATION The HX870E allows you to set 1 to 15 waypoints along the route. Via14 Via15 Via3 Via2 Via1 Current position outinG to a ayPoint 10.2.1 Setting Up Routing Directory NOTE All the destinations and via-points must be programmed as waypoints in the HX870E memory. - Page 84 USCG 8. Select “SAVE” with the CH▼/CH▲ key, then ROUTE BACK SELECT SAVE press the [SELECT] soft key to store the edited route into memory. BACK SELECT 9. Press the CLR key to return to radio operation. Page 84 HX870E...
-
Page 85: Starting And Stopping Route Navigation
To start navigation to the next target, press 35.2 N-UP 20nm 36.0 the [YES] soft key. KAREN 7. To stop the navigation, press ◄/►key, then press the [STOP] soft key. 8. Press the CLR key to return to radio operation. HX870E Page 85... -
Page 86: Changing The Destination
5. Select “AUTO” or “MANUAL” with the CH▼/ ROUTING OPERATION ROUTING OPERATION AUTO CH▲ key, then press the [ENTER] soft key. BACK SELECT MANUAL 6. Press the CLR key to return to radio opera- tion. BACK ENTER Page 86 HX870E... -
Page 87: Gm Operation
DSC Group call and Auto Position Polling, to display the group members' locations. 11.1 SETTING UP GM OPERATION The HX870E is capable of storing up to 10 groups with 1 to 9 members each. 11.1.1 Setting Up Group Directory NOTE ●... -
Page 88: Setting Up The Polling Time Interval
5. Press the CH▼/CH▲ key to select the GM SETUP desired interval time, then press the INTERVAL 1min [ENTER] soft key. BACK SELECT 3min 5min 6. Press the CLR key to return to radio opera- 10min tion. 15min BACK ENTER Page 88 HX870E... -
Page 89: Enabling/Disabling Transmission During Gm Operation
Horizon-1 BUSY Standard Horizon-2 The GM operation starts and the GM target USCG DW-16 BACK SELECT display appears. ° 4. Press the CLR key to return to radio opera- 35.2 N-UP 20nm 36.0 tion. KAREN HX870E Page 89... -
Page 90: Transmitting A Dsc Call To A Group Member
4. Press the [TO WPT] soft key to start navi- POS: 118 ° 59.456 POS TM: AM LOC gation to the selected member. (Press the DST: ° BRG: [BACK] soft key twice to cancel and return BACK CALL TO WPT to the GM target display.) Page 90 HX870E... -
Page 91: Configuration Setup
(except the PTT switch). CONTINUOUS: Illuminates the display/keypad continuously. 6. Press the [ENTER] soft key to store the selected setting. 7. Press the CLR key to return to radio operation. HX870E Page 91... -
Page 92: Display Contrast
STROBE LED KEY BEEP SOFT KEY “LEVEL 1” to “LEVEL 5”, or “OFF”. BACK SELECT 6. Press the [ENTER] soft key to store the selected level. BACK ENTER 7. Press the CLR key to return to radio operation. Page 92 HX870E... -
Page 93: Battery Saver
BACK SELECT “CONTINIOUS”, “SOS”, “BLINK 1”, “BLINK 2”, BLINK1 or “BLINK 3”. BLINK2 BLINK3 7. Press the [ENTER] soft key to store the BACK SELECT selected setting. 8. Press the CLR key to return to radio operation. HX870E Page 93... -
Page 94: Water Hazard Led
ON/PWR ON: The LED lights up and the transceiver turns on even if the transceiver is off. 7. Press the [ENTER] soft key to store the selected setting. 8. Press the CLR key to return to radio operation. Page 94 HX870E... -
Page 95: Soft Keys
Add or remove channels from memory channel scan. PRESET Programs or deletes the preset memory channel. NAME Edit channel names. STROBE Turns on or off the strobe light LED. LOGGER Starts and stops logging position data. Enables the noise canceling settings display. HX870E Page 95... -
Page 96: Key Timer
WAYPOINT & GPS “CONFIGURATION”, or “FACTORY” (all settings CONFIGURATION except the MMSI will be initialized). FACTORY BACK ENTER 7. Press the [ENTER] soft key to store the selected setting. 8. Press the CLR key to return to radio operation. Page 96 HX870E... -
Page 97: Summary Of The Configuration Setup
Sets the operation of the WATER HAZARD LED. S O F T K E Y K E Y Sets the assignment and display time of 10 sec TIMER the soft keys. RESET Initializes the memories and settings. − HX870E Page 97... -
Page 98: Channel Function Setup
Refer to section “7.8.2 Programming Scan Memory” for details. 13.3 SCAN TYPE This selection is used to select the scan mode between “Memory Scan” and “Priority Scan”. The default setting is “Priority Scan”. Refer to section “7.8.1 Selecting the Scan Type” for details. Page 98 HX870E... -
Page 99: Scan Resume
13.4 SCAN RESUME This selection is used to select the time the HX870E waits after a transmission ends before the radio starts to scan channels again. The default setting is 2 seconds. 1. Press the MENU key to display “MENU”. -
Page 100: Sub Channel
VOX LEVEL SUB CH VOX DELAY 6. Press the [ENTER] soft key to store the new BACK SELECT setting. 7. Press the CLR key to return to radio opera- BACK ENTER tion. Page 100 HX870E... -
Page 101: Channel Name
11. Press the CLR key to return to radio operation. NOTE When “CHANNEL NAME” is assigned to the soft key, you can show the channel name input display directly by pressing the [NAME] soft key during radio operation. HX870E Page 101... -
Page 102: Noise Cancellation
5. Press the CH▼/CH▲ key to select “ON” or NOISE CANCEL CH SETUP “OFF”, then press the [ENTER] soft key to VOX LEVEL VOX DELAY store the new setting. BACK SELECT 6. Press the CLR key to return to radio opera- tion. BACK ENTER Page 102 HX870E... -
Page 103: Setting The Vox Level
VOX DELAY VOX DELAY 0.5sec “1.5sec”, “2.0sec” or “3.0sec”. BACK SELECT 1.0sec 1.5sec 6. Press the [ENTER] soft key to store the new 2.0sec setting. 3.0sec BACK ENTER 7. Press the CLR key to return to radio operation. HX870E Page 103... -
Page 104: Audio Filter Operation
AF PITCH NORMAL 6. Press the [ENTER] soft key to store the new BACK SELECT HIGH-LOW CUT HIGH-LOW BOOST setting. LOW BOOST 7. Press the CLR key to return to radio opera- HIGH BOOST BACK ENTER tion. Page 104 HX870E... -
Page 105: Summary Of The Cannel Function Setup
Turns on or off of noise cancelling function (independently available for transmission and reception) Turn on or off the VOX function VOX LEVEL Selects the VOX gain VOX DELAY Selects the VOX delay time 1.5 sec AF PITCH Selects the audio filter operation Normal HX870E Page 105... -
Page 106: Dsc Setup
14 DSC SETUP 14.1 INDIVIDUAL DIRECTORY The HX870E has a DSC directory that allows you to store a vessel or person’s name and the associated MMSI you wish to contact via individual calls, position requests and position report transmissions. To transmit an individual call you must program this directory with information of the vessel you wish to contact, similar to a cellular phones telephone directory. -
Page 107: Auto Pos Polling
14.6 AUTO POS POLLING The HX870E has the capability to automatically track seven vessels programmed into the individual directory. Refer to section “9.10 AUTO POS POLLING” for details. 14.7 AUTO POS INTERVAL The HX870E has the capability to automatically track seven vessels programmed into the individual directory. -
Page 108: No Act (Action) Timer
14.9 NO ACT (ACTION) TIMER If no key is pressed during the “MENU” or “DSC CALL” screen, the HX870E will automatically return to radio operation. The default selection is 15 minutes. 1. Press the MENU key to display “MENU”. 2. Select “SETUP” with the CH▼/CH▲/◄/►... -
Page 109: Dsc Beep
POS Report call, or acknowledgement to POS request call DSC BEEP Turns on or off the audible alarm when Indivi.: receiving a DSC call All Ship: Group: POS RQ.: Off POS RP.: On Geog.: Polling: Test Call: Off HX870E Page 109... -
Page 110: Gps Setup
15 GPS SETUP The “GPS Setup” mode allows the parameters for the HX870E internal GPS unit to be customized for your operating requirements. 15.1 GPS ON/OFF This selection allows the internal GPS unit to be turned on or off to conserve battery power. -
Page 111: Display Direction
7. Press the CLR key to return to radio operation. 15.3 DISPLAY DIRECTION This menu item selects the compass direction to be shown on the HX870E display. The default setting is “course up”. 1. Press the MENU key to display “MENU”. -
Page 112: Location Format
15.4 LOCATION FORMAT This menu item selects the coordinate system to be shown on the HX870E display. The default setting is “ddd mm.mmm”. 1. Press the MENU key to display “MENU”. 2. Select “SETUP” with the CH▼/CH▲/◄/► key, then press the [SELECT] soft key. -
Page 113: Units Of Measure
10Ft. BACK ENTER OFF: When the vessel is underway or stopped, the HX870E continuously updates its position. This improves accuracy of the position fix. 6. Press the [ENTER] soft key to save the new setting. -
Page 114: Sbas (Satellite Based Augmentation System)
ENTER tion. 15.11 OUTPUT SENTENCES This selection is used to setup the NMEA output sentences of the HX870E. By default, all the NMEA sentences are turned “OFF”. 1. Press the MENU key to display “MENU”. 2. Select “SETUP” with the CH▼/CH▲/◄/►... -
Page 115: Logger Interval
5. Press the CH▼/CH▲ key to select “CANCEL” D-GPS OUTPUT SENTENCES GPS SETUP or “OK”, then press the [ENTER] soft key. LOGGER INTERVAL LOG ERASE LOG ERASE CANCEL 6. Press the CLR key to return to radio opera- BACK SELECT tion. BACK ENTER HX870E Page 115... -
Page 116: Summary Of The Gps Setup
Turns on or off of use of SBAS OUTPUT Selects a sentence to be output to the SENTENCES USB terminal LOGGER INTERVAL Selects the interval time of logging 1 min LOG ERASE Erases the log data − Page 116 HX870E... -
Page 117: Atis Setup
16 ATIS SETUP The HX870E supports the ATIS (Automatic Transmitter Identification System) used in Inland waterways in Europe. When enabled ATIS mode transmits a unique ATIS code each time the PTT switch is released at the end of a trans- mission. -
Page 118: Atis Ch Group
16.2 ATIS CH GROUP The HX870E has the capability to turn on and off the ATIS feature for each channel group. 1. Press the MENU key to display “MENU”. 2. Select “SETUP” with the CH▼/CH▲/◄/► key, then press the [SELECT] soft key. -
Page 119: Maintenance
Never key the microphone unless an antenna or suitable dummy load is connected to the transceiver. • Use only STANDARD HORIZON approved accessories and replacement parts. In the unlikely event of serious problems, please contact your Dealer or our repair facility. -
Page 120: Troubleshooting Chart
Poor location for GPS Move to a less obstructed position. satellite reception. Charge indicator does not Defective battery SBR- Contact Standard Horizon dealer. appear on the display 13LI. when charging a battery. The transceiver is not set Set the transceiver onto the SBH-12 onto the SBH-12 Charger Charger Cradle properly. -
Page 121: Channel Assignments
PORT OPR 156.775 156.775 SIMPLEX PORT OPR 156.825 156.825 SIMPLEX PORT OPR 156.875 156.875 SIMPLEX – PORT OPR 156.925 161.525 DUPLEX – INTL 156.975 161.575 DUPLEX – INTL 157.025 161.625 DUPLEX – INTL 157.075 161.675 DUPLEX – INTL HX870E Page 121... - Page 122 157.425 SIMPLEX – PORT OPR 157.850 157.850 SIMPLEX – – 161.425 161.425 SIMPLEX – – NOTE 1: Channel M1 and M2 are assigned to only U.K. version. 2: Channel assignment is different depending on the transceiver version. Page 122 HX870E...
-
Page 123: Warranty
Product or part(s) therein which, upon examination by STANDARD HORIZON, appear to be defective or not up to factory specifications. STANDARD HORIZON may, at its option, repair or replace parts or subassemblies with new or reconditioned parts and subassemblies. - Page 124 Products, or for the operation of the Product with any ancillary equipment and all such equipment is expressly excluded from this warranty. STANDARD HORIZON disclaims liability for range, coverage, or operation of the Product and ancillary equipment as a whole under this warranty.
-
Page 125: Connecting A Usb Data Terminal To The Pc
20 CONNECTING A USB DATA TERMINAL TO THE The HX870E outputs the following NMEA 0183 sentences 9600: GLL, GGA, GSA, GSV, RMC, DSC and DSE. If you have further inquires, please feel free to contact Product Support at: Phone: (800) 767-2450 Email: marinetech@yaesu.com... -
Page 126: Specifications
21.2 TRANSMITTER RF Power Output ....6 W (HI) / 2 W (MEDIUM) / 1 W (LOW) (@7.4 V) Modulation Type ..............Variable Reactance Maximum Deviation ................±5 kHz Spurious Emission ..............−75 dBc typical Microphone Impedance ................2 kΩ Page 126 HX870E... -
Page 127: Receiver (For Voice And Dsc)
5 sec typical (@Hot Start) Geodetic Datum................... WGS84 21.5 NMEA OUTPUT NMEA 0183 Output Sentence (9600 baud) ....DSC, DSE, GGA, GLL, RMC, GSA & GSV SYMBOL PLACED ON THE EQUIPMENT Direct current "ON" power "OFF" power HX870E Page 127... - Page 128 Note Page 128 HX870E...
- Page 129 Note HX870E Page 129...
- Page 130 List of national codes are not generally permitted. As for the actual usage, the user has to possess an amateur radio licence. Usage is allowed only in the frequency bands – – – – which are allocated for amateur radios. Page 130 HX870E...
-
Page 131: Declaration Of Conformity
We, Yaesu UK Ltd. certify and declare under our sole responsibility that the following equipment complies with the essential requirements of the Directive 1999/5/EC and 2011/65/EU. Type of Equipment VHF Waterproof Marine Handheld Transceiver Brand Name Standard Horizon Model Number HX870E Manufacturer YAESU MUSEN CO. LTD. - Page 132 Copyright 2015 YAESU MUSEN CO., LTD. All rights reserved. No portion of this manual may be reproduced YAESU MUSEN CO., LTD. without the permission of Tennozu Parkside Building YAESU MUSEN CO., LTD. 2-5-8 Higashi-Shinagawa, Shinagawa-ku, Tokyo 140-0002 Japan YAESU USA Printed in China 6125 Phyllis Drive, Cypress, CA 90630, U.S.A.
Need help?
Do you have a question about the HX870E and is the answer not in the manual?
Questions and answers