Cisco Catalyst 3110G Getting Started Manual
For ibm bladecenter
Hide thumbs
Also See for Catalyst 3110G:
- Supplementary manual (20 pages) ,
- Hardware installation manual (48 pages)
Table of Contents
Advertisement
G
S
ETTING
TARTED
Cisco Catalyst Switch Module 3110G, 3110X, and 3012
for IBM BladeCenter Getting Started Guide
1
About This Guide
2
Taking Out What You Need
3
Installing the Switch Module
4
Configuring the Switch Module
5
Managing the Switch Module
6
Creating Switch Stacks
7
Connecting Devices
8
In Case of Difficulty
9
Obtaining Documentation, Obtaining Support, and Security Guidelines
G
UIDE
Advertisement
Table of Contents

Related Manuals for Cisco Catalyst 3110G


Summary of Contents for Cisco Catalyst 3110G
- Page 1 ETTING TARTED UIDE Cisco Catalyst Switch Module 3110G, 3110X, and 3012 for IBM BladeCenter Getting Started Guide About This Guide Taking Out What You Need Installing the Switch Module Configuring the Switch Module Managing the Switch Module Creating Switch Stacks...
-
Page 2: About This Guide
Cisco.com. When you use the online publications, refer to the documents that match the Cisco IOS software version that is running on the switch module. -
Page 3: Shipping Box Contents
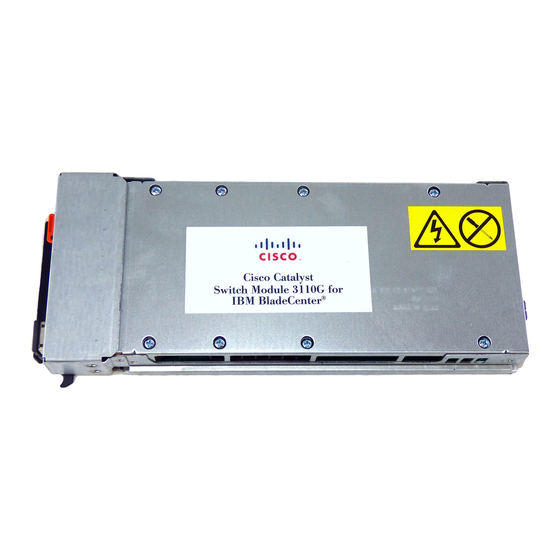
Shipping Box Contents Figure 1 shows the Catalyst Switch Module 3110G as an example. Your switch module might look different from the one shown. Figure 1 Switch Module Box Contents LN K AC T LN K AC T LN K AC T LN K AC T... - Page 4 1 S TA C K 2 Catalyst Switch Module 3110G 10/100/1000 Ethernet ports Catalyst Switch Module 3110X Switch module LEDs 10-Gigabit Ethernet module slot Mode button StackWise Plus ports Console port Release latch 1. For use with Cisco X2 transceiver modules.
-
Page 5: Catalyst Switch Module 3012
External 10/100/1000BASE-T copper Gigabit Ethernet uplink ports that (Switch module 3110G) support auto-MDIX and autonegotiation. Port 1 (X2) External 10-Gigabit Ethernet module slot for use with Cisco X2 (Switch module 3110X) transceiver modules. Internal 100BASE-T The Ethernet management port (Fa0) is used only for switch module Ethernet port management traffic, not for data traffic. - Page 6 For more information about the features of the switch module, see the hardware installation guide and the software configuration guide on Cisco.com. Figure 3 Catalyst Switch Module 3012 L N K A C T L N K A C T...
-
Page 7: Installing The Switch Module
See the IBM blade enclosure documentation for more information about the specific enclosure model, the interconnect bay options, and the port mapping between the blade enclosure and the switch modules. Also see the blade enclosure compatibility table in the switch module release notes on Cisco.com. - Page 8 21 for more information. • Review and become familiar with the safety guidelines in the Regulatory Compliance and Safety Information for the Cisco Catalyst Switch Module 3110G, 3110X, and 3012 for IBM BladeCenter on the documentation CD. • Review and become familiar with the safety guidelines, and the temperature, power, and grounding requirements specified in the IBM blade enclosure installation and user’s guide.
- Page 9 Follow these steps: Remove the acoustic attenuation module, if one is installed, from the rear of the blade Step 1 enclosure. Select the blade enclosure bay in which to install the switch module (Figure 4). Step 2 Figure 4 IBM BladeCenterH Rear-Panel View I/O module bay 1 I/O module bay 3 I/O module bay 2...
- Page 10 The system power LED blinks green while POST is running, and then turns solid green when POST is finished. Confirm that the system power LED is green. For a complete description of the switch module Step 9 LEDs, see the hardware installation guide on Cisco.com. Step 10 Replace the acoustic-attenuation module, if applicable.
-
Page 11: Configuring The Switch Module
When you first set up the switch module, you should use the blade enclosure advanced Management Module (aMM) to enter the initial IP information and the Cisco device manager Express Setup screen to configure the switch module password and Telnet access. You can then access the switch module through the IP address for further configuration. - Page 12 From the I/O Module Tasks menu, click Admin/Power/Restart. Step 2 In the I/O Module Advanced Setup section, use the Select a module pull-down menu to select Step 3 the I/O module (switch module) to configure (Figure 6). Use the External ports pull-down menu and select Enabled to enable the switch module external ports.
- Page 13 From the I/O Module Tasks menu, click Configuration. Step 5 In the I/O Module Configuration section, click the bay number that corresponds to the Step 6 location of the I/O module (switch module) that you are configuring. The applicable bay number appears in the window, followed by other related I/O-module information, including the IP address.
-
Page 14: Running Express Setup
Click Advanced Configuration, and enable these switch module features: Step 8 a. External management over all ports b. Preserve new IP configuration on all resets The default setting is Disabled for these features. If you have connected the StackWise Plus cables, the Advanced Configuration settings Note are not available. - Page 15 The switch module device manager page appears (Figure 8). If it does not appear, see the “In Step 2 Case of Difficulty” section on page 26. Figure 8 Switch Module Device Manager Page...
- Page 16 Select Configure > Express Setup from the menu. The Express Setup Basic Settings screen Step 3 appears (Figure 9). Figure 9 Express Setup Basic Settings Screen Enter this information in the Network Settings fields. Step 4 In the Switch Password field, enter your password. The password can be from 1 to 25 –...
- Page 17 Select the Advanced Settings tab on the Express Setup screen. The Advanced Settings screen Step 9 appears (Figure 10). Figure 10 Express Setup Advanced Settings Screen Step 10 In the Telnet Access field, click Enable if you are going to use Telnet to manage the switch module by using the CLI.
-
Page 18: Designating The Switch Stack Master
Step 15 (Optional) You can enable IPv6 in the IPv6 Settings section. Click Enable IPv6 to enable it. In the Interface column, choose the interface for which you want to set an IPv6 address, and complete the other fields in this table. Step 16 Click Submit to save your settings, or click Cancel to clear your settings. -
Page 19: Blade Enclosure Advanced Management Module
Command-Line Interface You can enter Cisco IOS commands and parameters through the CLI. You can access the CLI by connecting your management station directly to the switch module console port or by using Telnet from a remote management station. -
Page 20: Switch Module Device Manager
Cisco Network Assistant Cisco Network Assistant is a software program that you download from Cisco.com and run on your PC. It offers advanced options for configuring and monitoring multiple devices, including switch modules, switch clusters, routers, and access points. - Page 21 Modules 3110G and 3110X; other blade switches are not supported. • For conditions that might cause a stack master re-election and for general concepts and procedures to manage switch stacks, see the “Managing Switch Stacks” chapter in the switch module software configuration guide on Cisco.com.
-
Page 22: Connecting A Switch Stack
• Before connecting, verify the StackWise Plus cable length. Depending on your configuration, you might need different sized cables. If you do not specify the length of the StackWise Plus cable when you order your product, the 1-meter cable is supplied. If you need the 0.5-meter cable or the 3-meter cable, you can order these StackWise Plus cables from your supplier: CAB-STK-E-0.5M= (0.5-meter cable) –... -
Page 23: Switch Stack Cabling Example
Step 4 the other end of the cable into the connector of the other switch module. Always use a Cisco-approved StackWise Plus cable to connect the switch modules. Caution The new stack-member switch module restarts when you connect the StackWise Plus cables. - Page 24 For more stacking configuration examples, see the switch module hardware installation guide and the software configuration guide on Cisco.com. Figure 12 Switch Stack Cabling Example...
-
Page 25: Install And Connect To Devices In The 10-Gigabit Ethernet Slot
The X2 transceiver module has SC connectors to connect to multimode fiber (MMF) and single-mode fiber (SMF) cables. Use only Cisco X2 transceiver modules with the switch module. Each Cisco module has an internal serial EEPROM that is encoded with security information. This encoding provides a way for Cisco to... -
Page 26: Verify Port Connectivity
See the “In Case of Difficulty” section on page 26 for more information. In Case of Difficulty If you experience difficulty, help is available in this section and also on Cisco.com. You can access the Cisco Technical Support and Documentation website for a list of known hardware problems and extensive troubleshooting documentation at: http://www.cisco.com/en/US/support/index.html... -
Page 27: Resetting The Switch Module
• Change or update firmware For a switch stack, you can use the CLI to perform the same functions. For more information, see the switch module software configuration guide and command reference on Cisco.com. Using the Mode Button to Reset the Switch Module You can use the Mode button to reset a standalone switch module. -
Page 28: Obtaining Documentation, Obtaining Support, And Security Guidelines
3110X, and 3012 for IBM BladeCenter. This guide contains agency approvals, compliance information, and translated warning statements. • Release Notes for the Cisco Catalyst Switch Module 3110G, 3110X, and 3012 for IBM BladeCenter. The release notes include the system requirements, important notes, limitation, open and resolved caveats, and documentation updates. - Page 30 Cisco Website at www.cisco.com/go/offices. CCDE, CCVP, Cisco Eos, Cisco StadiumVision, the Cisco logo, DCE, and Welcome to the Human Network are trademarks; Changing the Way We Work, Live, Play, and Learn is a service mark; and Access Registrar, Aironet, AsyncOS, Bringing the Meeting To You, Catalyst, CCDA, CCDP,...