Table of Contents
Advertisement
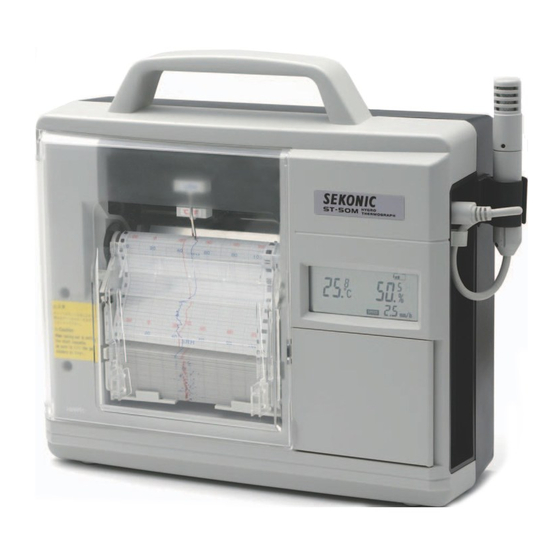
Microprocessor-Based
Hygro-Thermograph
ST-50A / ST-50M
Operation Manual
CE Approved
Thank you for purchasing this Microprocessor-Based Hygro-Thermograph.
The essential information for the correct oper ation of the Hygro-Thermograph is described
in this manual. Please be sure to read this manual carefully before using the Hygro-
Thermograph.
Advertisement
Table of Contents

Related Manuals for Sekonic ST-50A


Summary of Contents for Sekonic ST-50A
- Page 1 Microprocessor-Based Hygro-Thermograph ST-50A / ST-50M Operation Manual CE Approved Thank you for purchasing this Microprocessor-Based Hygro-Thermograph. The essential information for the correct oper ation of the Hygro-Thermograph is described in this manual. Please be sure to read this manual carefully before using the Hygro-...
-
Page 2: Safety Information
Safety Information This is a Class B product based on the standard of the Voluntary Control Council for Interfer- ence from Information Technology Equipment (VCCI). If this is used near a radio or television receiver in a domestic environment, it may cause radio interference. Install and use the equip- ment according to the instruction manual. - Page 3 Use SD cards with a size from 128 MB to 2 GB and compliant with the SD standards. However, operation is not guaranteed with all SD cards that satisfy this condition. For a list of the cards where operation has been confirmed, please refer to the Sekonic Product Guide web page ("http://www.sekonic.co.jp/English/index.html).
-
Page 4: Table Of Contents
Check Before Use This instrument has passed our severe inspection, however, the following points should be confirmed before use: ① Check the appearance of the instrument carefully to make sure that the instrument is free from any damage. ② Check if all accessories are provided as specified. The detail of the accessories is as follows: If you find anything damaged or missing, please contact us or the distributor from whom you purchased the... - Page 5 Chapter 7. Setting Alarm 7-1. Function overview ..........21 7-2. Setting temperature alarm ......... 7-3. Setting humidity alarm ........7-4. To initialize the alarm ......... Chapter 8. Display indicators (ST-50M only) ..23 8-1. SD card recording cycle indicator ...... 8-2.
-
Page 6: Chapter 1. Machine Call-Outs
Chapter 1. Machine Call-outs [Side view] Temperature recording pen [Front view] Sensor terminal Humidity recording pen SD card Sensor Alarm output terminal LCD Screen AC adapter terminal Control panel door Front door Control panel Chart cassette 〔LCD 〕 ② ③ ④... - Page 7 (ST-50M only), writing range, and pen adjustment settings and to initialize the SD card (ST-50M only) * 【 FUNCTION 】Key = 【SPEED/RANGE 】Key in ST-50A. ④ 【ALARM 】 Key Sets or checks the alarm, or changes the sensor calibra- tion setting.
-
Page 8: Chapter 2. Installation
Chapter 2. Installation Be sure to check the following points when installing the instrument. • The inclination of the body should fall within +/- 10 de grees both against the horizontal and the vertical (when hanged on the wall.) • The instrument should always stand as shown in the fig ure. -
Page 9: Setting (Replacing) Chart Paper
Chapter 3. Preparation for Measurement Setting (Replacing) chart paper ① While pressing the stoppers on both sides of the chart cassette, pull forward and remove it from the body. CAUTION • When replacing the chart paper, make sure that the Stopper recording pens are raised. -
Page 10: Inserting (Replacing) Dry Batteries
⑤ Make sure that the chart paper is not raised from the drum and close both the rear chart holder (silver matal) and the front chart holder (transparent plastic). Drum ⑥ Turn the chart feed dial 2 or 3 times to make sure that Chart paper the chart paper is fed properly. -
Page 11: Time To Replace
Time to replace The life of the batteries loaded in the instrument is indicat- ed in the upper right corner of the LCD screen. The indica- tor will change as follows: CAUTION • When the batteries run short, the bat- The battery voltage tery life indicator will start blinking. -
Page 12: Pen Replacement Mode
Pen replacement mode ① Turn ON the power switch, then press the 【▼】 and 【EN- TER 】 keys together. ② The 『MODE 』 indication appears and 『PEn 』 blinks in the LCD. ③ The 『PEn 』 will stop blinking when the temperature recording pen and the humidity recording pen get posi- tioned on the chart paper, 25 mm from the left side and 25 mm from the right side, respectively. -
Page 13: Inserting The Sd Card(St-50M Only)
Inserting the SD card (ST-50M only) ① Set the [SD Card Record] switch to OFF. ② Insert the SD card until it clicks into place in the SD card slot. ③ 【MEMORY 】 blinks for a short time on the LCD. This indi- [Side view] cates that the information in the SD card is being loaded. -
Page 14: Chapter 4. Basic Operation
Chapter 4. Basic Operation 4-1. To start and stop recording Turn ON the power switch. Wait 4.5 minutes or less till the two pens get their positions to start recording. To stop re- cording, turn OFF ( 【 】 ) the power switch. CAUTION When using with batteries, if the remaining battery level be- comes low, the battery level indicator may show an extremely... -
Page 15: Chapter 5. Sd Card Writing Function (St-50M Only)
® graph data viewer application (for Windows XP and Vista) is available for download from the Sekonic Product Guide web page (http://www.sekonic.co.jp/English/index.html) for enabling the viewing and printing of graphs and data for customers who do not have spreadsheet software. -
Page 16: Starting And Stopping Data Writing To Sd Card
5-2. Starting and Stopping Data Writing to SD Card Insert the SD card and set the 【SD Card Write 】 switch to ON. The MEMORY indicator turns on, and writing to the SD card is started. To stop data writing, set the [SD Card Write] switch to OFF. -
Page 17: Changing The Date
5-4. Changing the Date ① Pressing the 【FUNCTION 】 key three times in the normal measurement screen shows 【MODE 】 , 【DATE 】 , and the year, month, and day. The year is blinking. ② Use the 【▲】 and 【▼】 keys to change the year, and then press the 【ENTER 】... -
Page 18: Initializing The Sd Card
5-6. Initializing the SD Card The initialization process deletes all the data files on the SD card. ① If the 【SD Card Write 】 switch is set to ON, set it to OFF. ② Pressing the 【FUNCTION 】 key five times in the normal measurement screen shows 【MODE 】... -
Page 19: Chapter 6. Setting Recordeing Range
Chapter 6. Setting Recordeing Range 6-1. Setting temperature recording range The temperature recording range can be set by changing over the DIP Sett ing Temperature switches. Record ing Range w ith DIP Sw itch -20 ∼80 CAUTION -20-80 °C or 0-170 °F B e f o r e c h a n g i n g o v e r t h e D I P (humidity range 0-100%) 【... -
Page 20: Setting Humidity Recording Range
6-2. Setting humidity recording range ① FUNC- Before setting, make sure that the DIP switches No. 3 and No. 4 are turned ON. Press the 【FUNCTION 】 key six times (Seven times ② when the SD card is inserted and the [SD Card Re- cord] switch is set to OFF) while the normal mea- surement screen is displayed. -
Page 21: Setting Temperature Alarm
7-2. Setting temperature alarm 【ALARM】 ① Press the 【ALARM 】 key once while the normal mea- 『MODE』 surement screen is displayed. 『MODE 』 and 『ALARM 』 will appear. When the alarm is already set, H and / or L will also be displayed. ②... -
Page 22: Chapter 8. Display Indicators (St-50M Only)
Chapter 8. Display indicators (ST-50M only) In the ST-50M, the 【▲】 and 【▼】 keys can be pressed from the normal measurement screen to change the various dis- play indicators. Press【▼】 key Normal measurement (chart speed screen) Press【▲】 key Press【▼】 key SD card writing cycle indicator Press【▲】... -
Page 23: Sd Card Recording Cycle Indicator
8-1. SD card recording cycle indicator This displays the SD card recording cycle that is cur- rently set. SD card recording cycle 8-2. Date indicator Month This displays the current date. Reference ・The year data is displayed as the last two digits. This setting is valid for the year 2000 to 2099. -
Page 24: Chapter 9. Useful Function
Chapter 9. Useful Function 9-1. Pen trace o set compensation (POC) Function overview When recording the temperature and humidity on the chart paper, those two traces inevitably have the di erent time axes due to the positional di erence of the recording pens. Use this function to compensate the distance and align the Temperature recording pen (Red) time axes. -
Page 25: Chapter 10. Sensor Calibtarion
Chapter 10. Sensor Calibration 10-1. Setting humidity alarm • The one-point calibration is provided as an optional setting in order to calibrate the sensor at the reference value shown on both basic thermometer and basic hy- grometer. • The 2-point calibration is also provided to calibrate the sensor at each reference value of low humidity and high humidity using a saturated salt type humidity calibrator... -
Page 26: Calibrating Humidity Sensor
④ Press the 【ALARM 】 key to return to the “Sensor calibra- tion status” screen. CAUTION To cancel this setting, press the 【ALARM 】 key and pro- ceed to the next setting item. 10-3. Calibrating humidity sensor Press the 【ALARM 】 key twice while the “Sensor ①... -
Page 27: To Initialize The Calibrated Value
④ When the humidity is stabilized, press the 【ENTER 】 key. The 『75.0 』 indication will start blinking. ⑤ Use the 【▲】 or 【▼】 key to enter the humidity value that corresponds to the present temperature shown on the humidity calibrator or the value indicated on the humidity bath, then press the 【ENTER 】... -
Page 28: Adjusting Temperature Recording Pen Position
The operation menu for pen position adjustment is as follows: Turn ON the power while pressing the【 】 and 【ENTER 】 keys. Pen position adjustment status (P 0) Press 【FUNCTION 】 key Temperature pen position adjustment Press 【FUNCTION 】 key Humidity pen position adjustment Press 【FUNCTION 】... -
Page 29: Chapter 12. Maintenance
Chapter 12. Maintenance 12-1. Periodic inspection This instrument is a microprocessor-based hygrothermo- graph. To maintain the optimal performance, do the following inspections occasionally, and replace the parts, if necessary. ① Check if screen display and re cording are performed normal- ly. -
Page 30: File Names
Two types of data files are created, one for each day and one for each month. If a file with the same name already exists, data is added to that file. 13-1 File Names File names are assigned as shown below. (YYYY=Year, MM=Month, DD=Day) All characters are single-byte characters. -
Page 31: Chapter 14. Troubleshooting
Chapter 14. Troubleshooting 14-1. Troubleshooting tips If the instrument does not operate normally, please check the following points before sending it for repair. If it does not recover from a malfunction after the check points are cleared, turn o the power switch immediately, then contact us or your distributor to get it repaired. -
Page 32: Chapter 15. Specifications
±3mm/0.12 in. (at 12m/39.37 ft. Long Recording) Battery Service Life Battery Service Life Recording Recording Period (Standard Mode) (Energy Saving Mode) Chart Speed Recording Cycle (Reference only) (ST-50A) (ST-50M) (ST-50A) (ST-50M) 2.5mm (abt. 0.10 in.)/H 6minutes 6months 3months 3months 6months 4months 5.0mm (abt. - Page 33 (6) 本保証書に製品名、機体番号の記載がなく、ご住所、ご氏名、購入先、購入年月日の記載がない場合。 4. この保証規定書は日本国内においてのみ有効です。 * 修理依頼品および修理完了品の送料はそれぞれ送付元負担とさせていただきます。 * この保証規定は提示した期間、条件のもとにおいて無料修理をお約束するものです。従ってこの保証規定によってお客 様の法律上の権利を制限するものではありませんので、保証期間経過後の修理などについてはお買い上げの販売店、ま たは当社サービス窓口へお問い合わせください。 5. 個人情報について (1) お客様より頂きました個人情報は、個人情報保護法のもと、以下の利用目的等に限定し、第三者への提供はいたし ません。 a. 電話・FAX・E Mail・手紙などによる各種情報配信サービスとそのご案内 b. 弊社、社内使用に限定したマーケティング資料の作成 (2) お客様ご本人が確認・開示または訂正・削除を希望される場合には、下記にご連絡ください。 〒 178-8686 東京都練馬区大泉学園町 7-24-14 株式会社 セコニック 機器事業部 営業部 温湿度記録計担当 TEL 03 −3978 −2333 FAX 03 −3922 −2144 E-mail : recorder@sekonic.co.jp...
- Page 34 本 社 〒 178-8686 東京都練馬区大泉学園町 7 - 24 - 14 TEL 03 - 3978 - 2333 FAX 03 - 3922 - 2144 Head office 7-24-14, Oizumi-Gakuen-cho, Nerima-ku, Tokyo 178-8686 Tel +81-3-3978-2335 Fax +81-3-3978-5229 http://www.sekonic.co.jp/ 2008 年 11月初版発行 HE5097510 08.11.S First issue: Nov, 2008 HE5097510 08.11.S...
Need help?
Do you have a question about the ST-50A and is the answer not in the manual?
Questions and answers