
Subscribe to Our Youtube Channel
Related Manuals for Intelligent Home Alecto


Summary of Contents for Intelligent Home Alecto
- Page 1 Alecto Video Door System 2-wire Series Installation and User Manual Digital Touch Screen 7 inch Monitor www.intelligenthomeonline.com...
- Page 2 PRECAUTIONS ● Read this manual through before using the product ● Slots or openings in the back of the monitor, are provided for ventilation and to ensure reliable operation of the video monitor or equipment and to protect if from overheating. These openings must not be blocked or covered.
-
Page 3: Table Of Contents
CONTENT 1.Monitor Parts and Functions .................... 4 2.Monitor Mounting ......................6 3.Main Menu ........................7 4.System Configuration ..................... 8 4.1 Entering Installer Setup ....................8 4.1.1 Entering Help page ..................... 8 4.1.2 Entering Address setting page ................9 5.Monitor Setup Instructions ....................11 5.1 Date &... -
Page 4: Monitor Parts And Functions
1. Monitor Parts and Functions SD card Item Description Digital LCD touch screen Display visitors' image • Press to communicate hands free with visitor Talk/Mon button • Press to view outside the property in standby Menu button Press to open Main Menu Unlock button Press to Unlock door or gate Microphone... - Page 5 1.1. Monitor Terminals L1, L2: Bus line terminal SW+,SW-: External Call button connection port Ring,GND: External ringer connection port NC: Not in use DIP switches • DIP1~DIP5: User Code setting • DIP6: End of line setting. Set ON if the monitor is at the end of the line or if connected with DBC4 DIP Switches 1 2 3 4 5 6...
-
Page 7: Main Menu
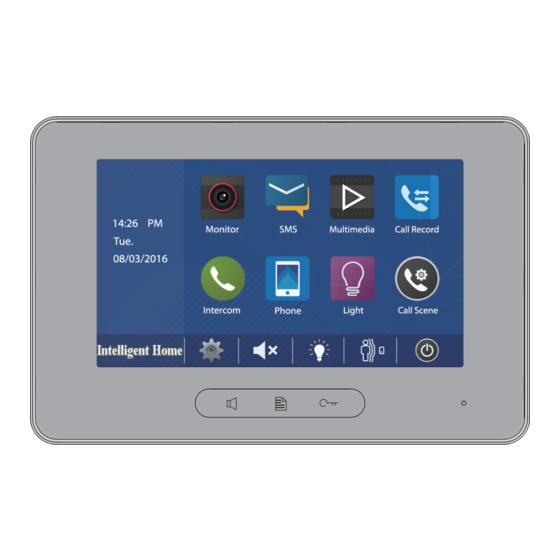
PARTS AND FUNCTIONS Screen Main Menu The Main menu is your starting point for using all the applications of the monitor Touch screen anywhere and ‘Main menu’ will appear as following: MONITOR Touch to write message or Touch to view outdoor review sent/received messages Current date and time... -
Page 8: System Configuration
SYSTEM CONFIGURATION Entering Installer Setup • On the Main menu page touch [Logo] icon to enter About page • Press and hold for 2 sec UNLOCK button • Digital keypad will be shown 00:10 DS-1 INSTALLER SETUP About ? + OK: Help Menu @ + OK: Address Setting Menu Local Address 00.00... -
Page 9: Entering Address Setting Page
SYSTEM CONFIGURATION Entering Address setting page Type in ‘@ and OK’ to open Address Setting menu INSTALLER SETUP ? + OK: Help Menu @ + OK: Address Setting Menu Multiple Monitor System Configuration There are two way of connecting multiple monitors: 1. - Page 10 User Codes Table On ‘ Address Setting’ page, select DIP Switch Set Address setting, then touch icon to see 32 User Codes configuration. Same table can be found in the Door Station Manual Note: In Apartment systems, program Apartment 32 with User Code ‘0’ Manual Input of User Code In the ‘Address Setting’...
-
Page 11: Monitor Setup Instructions
SETUP INSTRUCTIONS Date and Time Settings Here you can set date and time. On the Main Menu page touch settings icon and choose ‘Date &Time’. Change values using up and down arrows and click icon to save new settings Date&Time 2016 Sync From System Clock RTC Server Enable... -
Page 12: Ring Volume Settings
SETUP INSTRUCTIONS Ring Volume Settings Here you can set Day/Night ring volume. The setting range is 0~9 On the Main menu page touch settings icon ->’ Sounds’ Select Volume setting,touch icon to adjust levels. Settings will perform immediately Note: The day time is from 06:00am to 18:00pm. The night time is from 18:00pm~06:00am. Touch icon to exit and return to the Main menu page Enabling/Disabling the Operational Sound... -
Page 13: Monitoring Time Settings
SETUP INSTRUCTIONS * Up to 12 characters can be entered for a name Current name is displayed here Current renamed door station Keypad type abc- Alphabet keypad DOOR1 RENAME 123-Number keypad DS1_ Edit box Delete the last character Save the setting Switch the keypad between alphabet and numbers... -
Page 14: Changing Language
SETUP INSTRUCTIONS Changing Language On the Main menu page touch settings icon ->’ Language’ to set the operating language Language English Turkish Greek Hebrew Spanish French Restoring to Factory Default Settings To recover factory settings ‘About ’ On the main menu page touch settings icon ->... -
Page 15: Enable/Disable Intercom Function
SETUP INSTRUCTIONS Enable/Disable Intercom Function Here you can enable or disable Intercom between monitors function On the Main menu page touch settings icon ->’ More’ Click / Unclick Intercom Disable icon Enabling/Disabling Motion Detection Function Here you can Enable/Disable Motion Detection function which is available only when Door Station Model 607 and additional Motion Detection Interface are installed On the main menu page touch settings icon ->... - Page 16 SETUP INSTRUCTIONS Door Station Model 607 and Motion Detection Interface must be connected and system must be powered up to make settings 00:10 DS-1 • Detection Off: deactivate Motion Detection function • Detection On: activate Motion Detection function Example of Door Station Detection Settings On the Main menu page touch icon Touch DS1=>...
-
Page 17: Electric Lock Release Settings
SETUP INSTRUCTIONS Electric Lock Release Settings You can open the lock by touching Button or touching icon on the screen. UNLOCK There are two icons Lock1 and Lock2 which means you can have up to 2 electric locks connected and opened independently. -
Page 18: Basic Operations
BASIC OPERATIONS Answering a Door Call • When Door Station is rung, the monitor comes On with video TALK/MON Talk icon on the screen • To start conversation touch icon on the button or To end conversation touch icon on the button once again or touch icon TALK/MON •... -
Page 19: Pan-Tilt & Zoom
BASIC OPERATIONS Pan-Tilt & Zoom Pan-Tilt & Zoom function only available with Fish-Eye Door Station installed When the video from Door Station is displayed, move to the desired position by touching using the 5 Direction Pad on the screen to view the image in Zoom mode Example: •... -
Page 20: Intercom Between Monitors Function
BASIC OPERATIONS Intercom Between Monitors Function Touch ‘ Intercom’ icon on the Home page. It will open new page with available Intercom options 00:10 DS-1 1. ’ Inner Broadcast’ : use ‘Inner Broadcast’ to talk to all monitors at the same time. Your speech will be heard from all monitors right away with no need to do anything else even if monitors are not active 2.’... -
Page 21: Manual Monitoring
BASIC OPERATIONS Manual Monitoring You can manually monitor the entrance at any time even if nobody rings the bell 1.Touch screen of the monitor in standby 2.Touch ‘ MONITOR’ icon on the Main Menu page to enter Monitor Select page *Note: Press TALK/MON icon on the button to see view from Door Station 1 Monitoring Door Stations/ CCTV cameras:... -
Page 22: Pictures And Video Recording
BASIC OPERATIONS Pictures and Video Recording When door station is rung, the monitor will record a picture of the visitor automatically. The monitor has built-in memory for 118 pictures. An additional Micro SD card up to 32GB can be installed to increase memory storage. The SD card will enable video clips recording. Clips are 10sec each. -
Page 23: Copying Recordings Onto Sd Card
BASIC OPERATIONS Copying Recordings onto SD Card You can copy recordings (images) stored in the built-in memory onto a SD card • On the Main Menu page touch ‘ Media’ ->’ Copy to SD’ icon to copy. Touch icon to cancel •... -
Page 24: Voicemail
BASIC OPERATIONS BASIC OPERATIONS Voicemail Voicemail function is useful when you are away from home. Micro SD card has to be installed to support this function. Lenghts of Voicemail is limited to 10 sec. When you have new Voicemail, the icon will appears in the status bar on the Home page 00:10 DS-1... -
Page 25: Viewing Call Records
BASIC OPERATIONS BASIC OPERATIONS Viewing Call Records All calls from Door Station/s or other monitors will be recorded and can be reviewed afterwards. On the Main Menu page touch ‘ Call Record ’ icon Current page Pages N Call Record 01/05 Called in 06-23... -
Page 26: Sms Function
BASIC OPERATIONS SMS function You can exchange messages between monitors in multiple monitors system Writing a message • On the Main Menu page touch ‘ SMS’ ->’ Write a SMS’ icon, and then select the monitor address (User Code of a monitor) •... -
Page 27: Call Divert Function
BASIC OPERATIONS Call Divert Function Forwarding a call from the Door Station to a mobile phone requires and additional TPS Telephone Interface or GSM Interface. Up to 3 mobile or landline numbers can be programmed 00:10 DS-1 Call Scenario Normal Do Not Disturb Voicemail Simultaneously Voicemail if No Answer... -
Page 28: Do Not Disturb
BASIC OPERATIONS Do Not Disturb Do Not Disturb function will set the monitor to not react to door station or other monitors calls 00:10 DS-1 Call Scenario Normal Do Not Disturb Voicemail Simultaneously Voicemail if No Answer Divert, Simultaneously Divert, If No Answer Notes : * This function will perform immediately if selected, and the status bar on the Main Menu page will show icon... -
Page 29: Changing Colour Of Led On The Button
Changing Colour of LED on the Button Default: Standby: Green; Call Waiting: Red flashing Available colours to choose and codes for setting: Standby Call Waiting 8051 Red 8045 Red flashing 8052 Green 8046 Green flashing 8053 Blue 8047 Blue flashing 8054 Yellow 8048 Yellow flashing 8049 Purple flashing... -
Page 30: Warranty Card
4. Attempting to force the device to perform functions for which it is not intended 5. Attaching the device to power supplies other than thoserecommended by the manufacturer Distributor for Warranty purposes: Intelligent Home Online Ltd 62 Hartley Old Road Purley Surrey... - Page 31 Alecto 2-wire series Right to interpret and copyright of this manual are preserved. www.intelligenthomeonline.com -18-...
Need help?
Do you have a question about the Alecto and is the answer not in the manual?
Questions and answers