
Related Manuals for Kenwood DDX4017DAB


Summary of Contents for Kenwood DDX4017DAB
- Page 1 DDX4017DAB DDX4017BTR DDX4017BT DDX317BT MONITOR WITH DVD RECEIVER INSTRUCTION MANUAL © 2016 JVC KENWOOD Corporation B5A-1596-10 (EN/QN)
-
Page 2: Table Of Contents
• [ ] indicates the buttons on the touch panel. • Indication language: English indications are used for the purpose of explanation. You can select the indication language from the <Setup> menu. (Page 58) • Updated information (the latest Instruction Manual, system updates, new functions, etc.) is available from <http://www.kenwood.com/cs/ce/>. -
Page 3: How To Reset Your Unit
BEFORE USE BEFORE USE V Cautions on the monitor: For safety... • Do not raise the volume level too much, as this • The monitor built into this unit has been will make driving dangerous by blocking outside produced with high precision, but it may have sounds, and may cause hearing loss. -
Page 4: Initial Settings
INITIAL SETTINGS INITIAL SETTINGS <Rear Camera> Configure the settings to Display the <System> setting screen. Initial setup (Page 34) display the picture from When you power on the unit for the first time or the connected rear view reset the unit, the initial setting screen appears. camera. -
Page 5: Clock Settings
• You can also display the <Clock> setting screen by touching the clock area on the Home screen. Only for DDX4017DAB/DDX4017BT: Appears only when a navigation The security function is activated. unit is connected. The security indicator on the monitor panel Only for DDX4017BT/DDX4017BTR/DDX317BT. -
Page 6: Basics
Component names and functions • Displays the current source screen. (Press) • Resets the unit. (Page 3) – For DDX4017DAB/DDX4017BT: When the • Lights up while the unit is turned on. V Caution on the volume setting: navigation box is connected, the screen is •... -
Page 7: Common Operations
BASICS BASICS ❏ Adjusting the volume To attenuate the sound (only for DDX4017DAB/ Common operations DDX4017BT/DDX4017BTR) To adjust the volume (00 to 35) ❏ Turning on the power DDX4017DAB/ DDX4017BT/ DDX4017BTR (Hold) Turn to the right to increase, and turn to the left to The ATT indicator lights up. -
Page 8: Common Screen Operations
Source control screen Performs source playback operations. • The operation buttons and information displayed On the monitor panel: vary depending on the selected source. DDX4017DAB/ DDX4017BT/ DDX4017BTR (Hold) DDX317BT (Hold) To turn on the screen: Press and hold the same button, or touch the display. - Page 9 BASICS BASICS ❏ Touch screen operations Home screen <Setup> screen Displays the source control screen and settings Changes the detailed settings. (Page 55) screen. • To display the Home screen, press HOME on the monitor panel. • You can arrange the items to display on the Home screen.
-
Page 10: Selecting The Playback Source
[USB] Plays files on a USB device. (Page 17) [BT Audio] Plays a Bluetooth audio player. Only for DDX4017DAB/DDX4017BT: Not selectable when no (Page 44) navigation is connected. [AV-IN]* Switches to an external Selectable only when connection method other than [USB + component connected to the AV-IN] is selected for <iPod Setup>. -
Page 11: Using Short-Cut Buttons
While displaying the source control screen, you can Home screen indicated below. jump to another screen from the pop-up short-cut menu. Display the pop-up short-cut menu. [TEL] Displays the phone control DDX4017DAB/DDX4017BT/ screen. (Page 42) DDX4017BTR [Screen Displays the picture adjustment Adjustment] screen. (Page 50) [Display OFF] Turns off the screen. -
Page 12: Discs
Insert a disc with the label side facing up. • If the ejected disc is not removed within ❏ Indications and buttons on the source DDX4017DAB/ 15 seconds, the disc is automatically inserted control screen DDX4017BT/ again into the loading slot to protect it from dust. - Page 13 DISCS DISCS Operation buttons For audio playback Operation buttons • Available buttons on the screen and operations • Available buttons on the screen and operations differ depending on the type of disc/file being differ depending on the type of disc/file being played back.
- Page 14 DISCS DISCS ❏ Selecting a folder/track on the list ❏ Video menu operations Displays the disc menu (DVD). MENU] You can display the video control menu during [T MENU] Displays the disc menu (DVD). video playback. [Highlight] Switches to the direct disc menu •...
- Page 15 DISCS DISCS For VCD To select a track directly on a VCD To select Random playback mode • When playing a VCD with PBC activated, stop playback to deactivate the PBC function, then use the direct selection buttons to select a track number.
- Page 16 DISCS DISCS ❏ Setting items <Down Mix> When playing back a multi-channel Settings for disc playback—<DISC disc, this setting affects the signals <Menu Select the initial disc menu language. Mode> reproduced through the front and/or Language> (Initial: English) (Page 71) rear speakers. <Subtitle Select the initial subtitle language •...
-
Page 17: Usb
[Audio]/ Selects the playback file type.* ❏ Indications and buttons on the source Connecting a USB device [Video]/ • Audio: Plays back audio files. control screen [Photo] • Video: Plays back video files. You can connect a USB mass storage class device •... - Page 18 ❏ Settings for USB playback—<USB ❏ Selecting a folder/track on the list <Screen Select the monitor type to watch a Mode> Ratio> wide screen picture on the external Display the folder/track list during monitor. playback. 16:9 (Initial) 4:3 LB 4:3 PS Select the folder (1), then the item in the <Drive Switches between internal memory...
-
Page 19: Android
<www.kenwood.com/cs/ce/> • This unit supports the Android™ application KENWOOD Music Play. ❏ Starting playback • When you use KENWOOD Music Play, you can Playback information search for audio files by Genre, Artist, Album, Start KENWOOD Music Play on your 1 Artwork (Shown if the song contains artwork) Playlist, and Song. - Page 20 * To cancel random mode, press the button repeatedly until the device. indicator disappears. <Android • BROWSE MODE: Controls from the Setup> unit (using the KENWOOD Music Play application). • HAND MODE: Controls other media player applications from the Android device (without using the KENWOOD Music Play application).
-
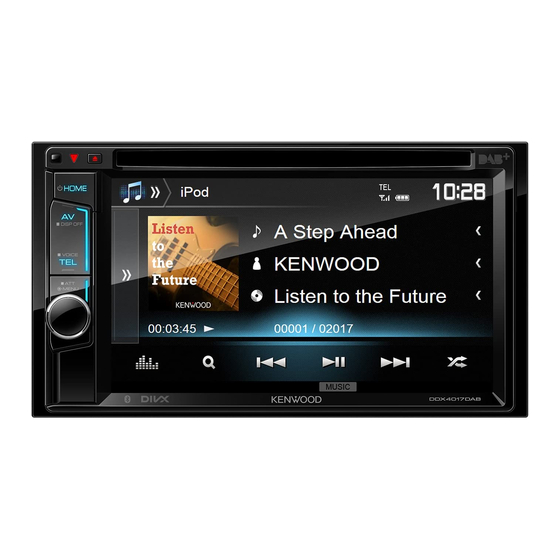
Page 21: Ipod/Iphone
iPod/iPhone iPod/iPhone ❏ Selecting iPod/iPhone device to play [USB 1 Wire] Select this when the iPod/ Preparation iPhone is connected using and the connection method ❏ Connecting iPod/iPhone KCA-iP102 or KCA-iP103 Display the <System> setting screen. (optional accessory). • For details about connecting iPod/iPhone, see On the Home screen: [USB + AV-IN] Select this when the iPod/ page 65. - Page 22 iPod/iPhone iPod/iPhone ❏ Displaying/hiding artwork of iPod/ Operation buttons Playback operations Displays the other operation button iPhone window. When the operation buttons are • To hide the window, press [ not displayed on the screen, touch Displays the <Equalizer> screen. the area shown on the illustration.
- Page 23 iPod/iPhone iPod/iPhone ❏ Selecting an audio/video file from the Audio menu: menu Video menu: Select the menu ( : audio or : video) (1), a category (2), then a desired item (3). • To list the items in alphabetical order, press A-Z], then select the first character on the keypad.
-
Page 24: Apps
• For Apps you can use on this unit, visit When the operation buttons are not displayed on <http://www.kenwood.com/cs/ce/>. the screen, touch the screen to show them. • To change settings for video playback, see Preparation page 50. -
Page 25: Spotify
Spotify Spotify (Only for DDX4017DAB/DDX4017BT/DDX317BT) (Only for DDX4017DAB/DDX4017BT/DDX317BT) Displays the <Equalizer> screen. With Spotify, your music is everywhere. Working out, Playback operations (Page 47) partying or relaxing, the right music is always at your Displays the Spotify menu screen. fingertips. There are millions of songs on Spotify—... - Page 26 Spotify Spotify ❏ Creating your station (Start Radio) ❏ Selecting a track Requirements for Spotify Display the Spotify menu screen. iPhone or iPod touch • Install the latest version of the Spotify application on your iPhone or iPod touch. (Search for “Spotify” in the Apple iTunes App Store to find and install the most recent version.) Select the list type (<Your...
-
Page 27: Radio
RADIO RADIO [MODE]* Changes the settings for radio Operation buttons Listening to the radio reception on the <Radio Mode> Displays the other operation button screen. (See below and page 29) ❏ Indications and buttons on the source window. • To hide the window, press [ control screen * Appears only when FM is selected as the source. - Page 28 RADIO RADIO ❏ Selecting a preset station Presetting stations FM Radio Data System features Select the band (1), then display the ❏ Storing stations in the memory ❏ Searching for FM Radio Data System preset station window (2). programs—PTY Search You can preset 5 stations for each band.
- Page 29 Traffic Information, the volume is set with stronger signals. to the previous level. • When shipped from the factory, Network-Tracking • For DDX4017DAB: The TI Standby Reception can Reception is activated. also be activated or deactivated from “DAB” source control screen. (Page 32)
-
Page 30: Digital Radio (Dab)
DIGITAL RADIO (DAB) DIGITAL RADIO (DAB) (Only for DDX4017DAB) (Only for DDX4017DAB) Operation buttons About DAB (Digital Audio Listening to Digital Radio Displays the other operation button Broadcasting) ❏ Indications and buttons on the source window. • To hide the window, press [... - Page 31 DIGITAL RADIO (DAB) DIGITAL RADIO (DAB) ❏ Selecting a service from the list ❏ Selecting a preset service Presetting services Display the <Service List> screen. Display the preset services window. ❏ Storing services in the memory You can preset 5 services for each band. Select a service you want to preset.
- Page 32 DIGITAL RADIO (DAB) DIGITAL RADIO (DAB) ❏ Activating/deactivating TI Standby Select a PTY code. Radio Data System features Reception ❏ Searching for Radio Data System programs—PTY Search You can search for your favorite programs being broadcast by selecting the PTY code. (Hold) •...
- Page 33 DIGITAL RADIO (DAB) DIGITAL RADIO (DAB) <PTY Watch> If the service of the set program <Seamless • ON (Initial): Prevents audio Settings for Digital Audio Radio type begins with the ensemble Blend> break when switching from You can set the Digital Radio related items. being received, the unit switches Digital Radio to Analog Radio.
-
Page 34: Other External Components
OTHER EXTERNAL COMPONENTS OTHER EXTERNAL COMPONENTS ❏ Displaying the rear view camera screen Using the rear view camera To display the picture from the rear view camera • To connect a rear view camera, see page 66. The rear view screen is displayed when you shift the •... - Page 35 OTHER EXTERNAL COMPONENTS OTHER EXTERNAL COMPONENTS ❏ Using the parking guidelines on the To exit the camera screen On the camera screen: rear view screen Touch the area shown below. You can display parking guidelines to enable easier parking when you shift the gear to the reverse (R) position.
-
Page 36: Using External Audio/Video Players-Av-In
OTHER EXTERNAL COMPONENTS OTHER EXTERNAL COMPONENTS Make sure that A and B are horizontally ❏ Changing the AV-IN name Adjusting the parking guidelines parallel, and that C and D are the same length. Adjust the parking guidelines according to the size You can change the AV-IN name displayed on the of the car, parking space and so on. -
Page 37: Using The External Navigation Unit
Display the <Navigation> screen. Using the external navigation unit The screen is switched automatically. To return to (Only for DDX4017DAB/DDX4017BT) the navigation screen, press [ You can connect a navigation unit (KNA-610 or KNA-G620T: optional accessory) to the NAV input terminal so that you can view the navigation screen. -
Page 38: Bluetooth
BLUETOOTH BLUETOOTH Auto pairing About mobile phones compatible with Phone Information for using Bluetooth® When <Auto Pairing> is set to [ON], iOS devices Book Access Profile (PBAP) devices (such as iPhone) are automatically paired when If your mobile phone supports PBAP, you can connected via USB. - Page 39 BLUETOOTH BLUETOOTH Pairing a Bluetooth device using a PIN code (for Change the PIN code. Select the unit (“DDX****”) on your Bluetooth 2.0) • If you wish to skip changing the PIN code, go Bluetooth device. to step 3. Display the <Bluetooth Setup> screen. •...
- Page 40 BLUETOOTH BLUETOOTH ❏ Connecting/disconnecting a registered • When a Bluetooth mobile phone is connected, Select [ON] (to connect) or [OFF] (to the signal strength and battery level are displayed Bluetooth device disconnect) for the target (1), then display when the information is acquired from the device. the <Paired Device List>...
- Page 41 The unit answers incoming calls automatically. volume. (Page 7) When receiving a call during navigation guidance (only for DDX4017DAB/DDX4017BT) • To adjust the noise reduction volume (between The screen is switched automatically. To return to −5 to 5, initial: 0) : Adjust <NR LEVEL>.
- Page 42 BLUETOOTH BLUETOOTH ❏ Sending text during a call ❏ Making a call • You can display the <Bluetooth Setup> screen by pressing [ You can send text during a call using the DTMF (Dual Display the phone control screen. Tone Multi Frequency) function. * When the mobile phone is not compatible with Phone Book On the Home screen: Access Profile (PBAP), the call history and the phone book are not...
- Page 43 BLUETOOTH BLUETOOTH • To use the A to Z search in the phone book: • To display other phone numbers: Voice dialing When the phone book list is displayed, you can • Available only when the connected mobile phone switch between phone numbers if several phone has a voice recognition system.
-
Page 44: Using The Bluetooth Audio Player
BLUETOOTH BLUETOOTH ❏ Presetting phone numbers Operation buttons Using the Bluetooth audio player Displays the other operation button You can preset up to 5 phone numbers. window. Display the phone control screen. • To register a new device, see page 38. •... - Page 45 BLUETOOTH BLUETOOTH ❏ Selecting an audio file from the menu <Device Shows the device address of the unit. Address> <Auto • ON (Initial): A connection is Connect> automatically established with the last connected Bluetooth device when the unit is turned on. Select a category (1), then a desired item •...
-
Page 46: Settings
SETTINGS SETTINGS For iPod/iPhone: Select the device type (1), then press Settings for using applications of [USB 1 Select this when the iPod/iPhone [Change] (2). iPod touch/iPhone/Android Wire] is connected using KCA-iP102 (optional accessory) or KCA-iP103 Before using applications of iPod touch /iPhone/ (optional accessory). -
Page 47: Sound Adjustment
SETTINGS SETTINGS • You can also display the <Equalizer> screen by • To apply the adjusted equalizer to all playback Sound adjustment pressing [ ] on the source control screen. sources, press [ALL SRC], then press [OK] to ❏ Using the sound equalization confirm. - Page 48 SETTINGS SETTINGS ❏ Setting the speakers—car type, Select the speaker type (1), select the size <TW Gain (L)>/ Adjusts the output volume of <TW Gain (R)> the tweeter (left/right).* speaker size and crossover frequency of the selected speaker (2), then display <TW FREQ>...
- Page 49 SETTINGS SETTINGS ❏ Adjusting the Digital Time Alignment Select an item to make an adjustment. Determining the value for <Position DTA> (DTA) adjustment If you specify the distance from the center of the Make fine adjustments to the delay time of currently set listening position to every speaker, the speaker output to create a more suitable the delay time will be automatically computed...
-
Page 50: Adjustment For Video Playback
SETTINGS SETTINGS Select the aspect ratio. <Bright> Adjusts the brightness. (−15 Adjustment for video playback to +15) ❏ Adjusting the picture <Contrast> Adjusts the contrast. (−10 to +10) You can adjust the picture quality. <Black> Adjusts the blackness. (−10 to Display the picture adjustment screen. -
Page 51: Changing The Display Design
To select a panel color* • Selecting [Scan] changes the illumination color gradually. Change the magnification (1), then move The panel color is selectable only for DDX4017DAB/DDX4017BT/ DDX4017BTR. the zooming frame (2). Store your own scene beforehand. (Page 52) Select an item to change (background Store your own color adjustment beforehand. - Page 52 SETTINGS ❏ Making your own color adjustment ❏ Storing your own scene for the Adjust the image. (Only for DDX4017DAB/DDX4017BT/ background image DDX4017BTR) While playing a video or picture, you can capture an image and use the captured image as a background.
-
Page 53: Customizing The Home Screen
SETTINGS SETTINGS Customizing the Home screen Customizing the system settings You can arrange the items to display on the Home ❏ Memorizing/recalling the settings screen. • You can memorize the settings changed in the Display the <Home Customize> screen. <Setup> menu and recall the memorized settings On the Home screen: any time. - Page 54 • Even if you have turned off the power during the update, you can restart the update after the power is turned on. The update will be performed from the beginning. * Only for DDX4017DAB.
-
Page 55: Setting Menu Items
– When the unit is in standby (Page 8) – When the Bluetooth phone is used (making or receiving a call, during a call, or while voice dialing) – During navigation guidance* * Only for DDX4017DAB/DDX4017BT. ENGLISH... - Page 56 • SW LEVEL: Adjusts the subwoofer level. – –50 to +10 (Initial: 0) You cannot change the setting when “Radio” or “DAB” (only <Sound Effect> for DDX4017DAB) is selected as the source. Adjust the sound effect. This function works only when “DISC”/“USB”/“iPod”/ • Loudness: Adjusts loudness.
- Page 57 Change the navigation settings. (Page 37) • OFF (Initial): Cancels. panel to make the panel easier to see. <Demonstration> • Under 0° (Initial)/5°/10°/15°/20° * Only for DDX4017DAB/DDX4017BT. • ON (Initial): Activates the demonstration on the screen. Only for DDX4017 DAB/DDX4017BT. • OFF: Cancels.
- Page 58 Select the text language used for on-screen (Page 45) Activate or deactivate the security function. information. <Beep> (Page 5) • English (Initial for DDX4017DAB/DDX4017BT/ • ON (Initial): Activates the key-touch tone. <Serial Number>* DDX317BT)/Español/Français/Deutsch/Italiano/ • OFF: Cancels. Displays the serial number. Nederlands/Ελληνικά/Português/Türkçe/ <SETUP Memory>...
-
Page 59: Remote Controller
Answers incoming calls. You can also operate this unit from Smartphone FNC/PBC/ Switches the control screen. using KENWOOD Remote APP. For details, visit MENU <http://www.kenwood.com/cs/ce/>. Changes the aspect ratio. AUD mode: Switch to this mode when controlling a MODE/ •... - Page 60 1 – 5 Specifies preset number. Starts/pauses playback. Stops and memorizes the point where Specifies the number to search for in * Only for DDX4017DAB. the disc stops. 0 – 9 direct search. ❏ iPod/Android (AUD mode) • Specifies the number to search for Enters direct search mode.
- Page 61 Using the steering remote functions at the same time. To do this, press each Setting> screen. controller (Only for DDX4017DAB/ button in turn and after pressing all of them, • You can change the page to display more DDX4017BT/DDX4017BTR) press [Done] on the <Steering Remote Control items by pressing [ Setting>...
-
Page 62: Connection/Installation
CONNECTION/INSTALLATION CONNECTION/INSTALLATION • If your car’s ignition does not have an ACC Before installing the unit V CAUTION position, connect the ignition wires to a power • Install this unit in the console of your vehicle. V WARNING source that can be turned on and off with the Do not touch the metal parts of this unit during •... - Page 63 CONNECTION/INSTALLATION CONNECTION/INSTALLATION ❏ Installation procedure ❏ Installing the trim plate Installing the unit Attach the trim plate (2). To prevent a short circuit, remove the key ❏ Installing the unit from the ignition and disconnect the · battery. Make the proper input and output wire connections for each unit.
-
Page 64: Connecting Wires To Terminals
To the aerial control terminal in the vehicle. To the terminal that is grounded when either the telephone rings or during Brown (Mute control wire) conversation. (To connect the Kenwood navigation system, consult your navigation manual.)* Color and functions of Connector A and B... - Page 65 CONNECTION/INSTALLATION CONNECTION/INSTALLATION ❏ Connecting a USB device ❏ Connecting an Android device ❏ Connecting iPod/iPhone USB device* Android device (commercially iPod/iPhone (Lightning iPod/iPhone (30-pin (commercially available) available) connector models) connector models) (commercially available) (commercially available) KCA-iP103 (optional 1.0 m accessory) USB 2.0 cable 0.8 m (commercially available)
- Page 66 2 Steering wheel remote controller input* the chassis of the car; otherwise the unit may be damaged. • Connect to the vehicle’s steering remote For DDX4017DAB. To use the digital radio, connect CX-DAB1 Speaker harness. Contact your Kenwood dealer for (optional accessory).
- Page 67 CONNECTION/INSTALLATION CONNECTION/INSTALLATION ❏ Connecting microphone for Bluetooth ❏ Removing the unit Removing the unit Connect the microphone (5) to the MIC terminal. Remove the trim plate. (See the left ❏ Removing the trim plate • To install the microphone, peel off the adhesive column.) tape, fix on the installation position, then adjust Engage the catch pins on the extraction...
-
Page 68: References
REFERENCES REFERENCES ❏ To keep discs clean Maintenance More information Dirty discs may not play correctly. ❏ Caution on cleaning the unit ❏ File playback If a disc does become dirty, wipe it with a soft cloth Do not use any solvent (for example, thinner, in a straight line from the center to the edge. - Page 69 • This unit can display jacket pictures that meet the DVD Region code: • This unit can play back files with the extension conditions below: For DDX4017DAB/DDX4017BT/DDX317BT: 2 code: – Picture size: 32 x 32 to 1 232 x 672 resolution For DDX4017BTR: 5 –...
- Page 70 REFERENCES REFERENCES ❏ Notes on playing iPod/iPhone Playing Recordable/Rewritable discs Notes on using a USB device: • This unit can recognize a total of 5 000 files and • This unit may not play back files in a USB device •...
- Page 71 ❏ Language codes (for DVD language selection) • When operating an iPod/iPhone, some operations may not be performed correctly or as intended. In Afar Galician Maori Somali this case, visit the following KENWOOD web site: Abkhazian Guarani Macedonian Albanian <www.kenwood.com/cs/ce/ipod> Afrikaans...
-
Page 72: Error Message List
REFERENCES REFERENCES “Connection Error”: Error message list Troubleshooting • The device is registered but the connection has failed. Connect the registered device. (Page 40) If an error occurs while using the unit, a message What appears to be trouble is not always serious. appears. - Page 73 [BROWSE MODE]. No operations are available when playing back a • Make sure KENWOOD Music Play APP is installed play. track containing artwork. • Playback order may differ from the one played on the Android device.
-
Page 74: Specifications
❏ Digital Radio (DAB) (only for The sound is interrupted or skipped while using a • You may have tried to copy the same entries (as DDX4017DAB) stored) to the unit. Bluetooth audio player. • Reduce the distance between the unit and the Cannot receive an ensemble. - Page 75 REFERENCES REFERENCES ❏ DVD player section ❏ USB interface section ❏ DSP section D/A Converter 24 bit USB Standard USB 2.0 Full Speed/High Speed Equalizer BAND 13 Band Audio Decoder Linear PCM/Dolby Digital/MP3/ Compatible Devices WMA/WAV/AAC (.m4a) Mass Storage Class Frequency (Hz) (BAND1-13) Video Decoder DivX/MPEG1/MPEG2/JPEG...
- Page 76 Usable Sensitivity 28.5 μV 100/120/150/180/220/250 Signal to Noise Ratio Slope –6/–12 dB/Oct. ❏ Digital tuner (DAB) section 68 dB (MONO) Mid Range (LPF): (DDX4017DAB) Frequency (Hz) 1k/1.6k/2.5k/4k/5k/6.3k/8k/10k/ Selectivity (±400 kHz) 12.5k/Through ≥ 80 dB Frequency Range Slope –6/–12 dB/Oct. L-BAND: 1 452.960 MHz to 1 490.624 MHz...
- Page 77 Design and specifications are subject to change to connect specifically to iPod, or iPhone, * Only for DDX4017DAB/DDX4017BT. without notice. respectively, and has been certified by the developer to meet Apple performance standards.
- Page 78 – Neither the name of the Xiph.org Foundation ARISING IN ANY WAY OUT OF THE USE OF THIS Inc. and any use of such marks by JVC KENWOOD nor the names of its contributors may be used SOFTWARE, EVEN IF ADVISED OF THE POSSIBILITY Corporation is under license.
- Page 79 Spoločnosť JVCKENWOOD týmto vyhlasuje, Par la présente, JVCKENWOOD déclare Por la presente, JVCKENWOOD declara „DDX4017DAB/DDX4017BT/DDX4017BTR/ že rádiové zariadenie „DDX4017DAB/ que l’équipement radio « DDX4017DAB/ que el equipo de radio “DDX4017DAB/ DDX317BT“ rádióberendezés megfelel a DDX4017BT/DDX4017BTR/DDX317BT“ DDX4017BT/DDX4017BTR/DDX317BT » est DDX4017BT/DDX4017BTR/DDX317BT” 2014/53/EU irányelvnek.
- Page 80 Eesti ROMÂNĂ Українська Käesolevaga JVCKENWOOD kinnitab, et Prin prezenta, JVCKENWOOD declară Таким чином, компанія JVCKENWOOD „DDX4017DAB/DDX4017BT/DDX4017BTR/ că echipamentul radio “DDX4017DAB/ заявляє, що радіообладнання DDX317BT“ raadiovarustus on vastavuses DDX4017BT/DDX4017BTR/DDX317BT” este «DDX4017DAB/DDX4017BT/DDX4017BTR/ direktiiviga 2014/53/EL. în conformitate cu Directiva 2014/53/UE. DDX317BT» відповідає Директиві...