Advertisement
Quick Links
Advertisement

Subscribe to Our Youtube Channel
Related Manuals for Lanzar SNV695B


Summary of Contents for Lanzar SNV695B
- Page 1 ® anzar Model: • • Touchscreen DouЫe DIN Stereo Receiver Headunit...
- Page 2 This unit is a standard “Double Din” sized radio. Check to see that your vehicle accepts a double din sized radio. This Compatibility unit conforms to the standard size and dimensions of a double din radio. Your vehicle may require a vehicle specific or 3 party double din installation kit.
- Page 3 Before starting: To prevent short circuits, be sure to disconnect the battery terminal before starting. System Installation: Installation Guide - Double Din Fitting: 1) This screen opens up. Install the unit within 30 degrees of the horizontal plane. Check that the screen has enough Caution: room to fully open.
- Page 4 Technical support can assist you in interfacing into vehicles with existing steering wheel controls. For additional help, contact Lanzar Technical Support and be sure to supply Year Make Model and options of vehicle so that proper instructions can be supplied.
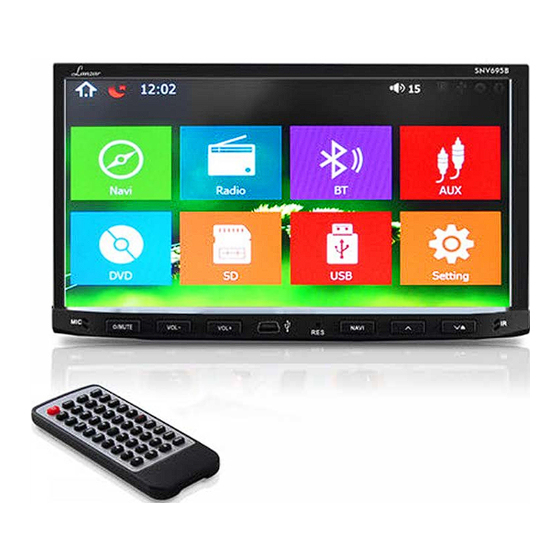
- Page 5 Front Panel and Buttons Microphone port Button & Feature Layout Power/Mute Hold to power up / shut down unit. Short press while unit is on to mute the volume output Volume down Volume up VOL- Mini USB port type B VOL+ Use a pin to insert into reset port to trigger unit reset.
- Page 6 Sound GPS - Navigation and CD/DVD options and applications may only be found in select headunit receiver stereo systems, which include these, and other, additional/special features -- not all Lanzar stereo *Please Note: models come equipped with GPS Navigation and/or CD/DVD players.
- Page 7 1) Scrolling Settings Use the red bar to scroll through the list of all available options. 2) Turn on/ off Many settings can be toggled on or off in this screen *Note: Factory setup is not adjustable by user. Do not attempt to enter this setup menu. 1) Time Options Set Time Turn GPS auto update and 12 hour clock settings on and off here.
- Page 8 Displays the day, month and year. Calendar Use forward and back arrows the view past or future months. Selected dates are highlighted in blue Note: Calendar does not allow entry of appointments. Date must be set within system settings A handy little app for simple calculations Calculator EQ - Equalizer Presets...
- Page 9 1) Scanning: Press, hold, and drag the slider to quickly tune the radio. Radio 2) Current Station: The currently selected station will be displayed in the center. Press the forward and back arrows to change the current station. 3) Favorite Stations: Press and hold one of the six preset slots to set and save a selection for later. SD - Flash Memory File Browsing Warning: Do not attempt to browse files while operating the vehicle 1) Browsing Files...
- Page 10 Plug in flash drives to access music video and photos. USB - Flash Memory File Browsing 1) Brightness, Contrast, Hue Video Press, hold and drag to adjust the brightness, contrast and hue of the display. 2) Presets Select to automatically adjust the display settings. Note: Wallpapers can be imported from a flash drive or SD card.
- Page 11 Wiring - Back Panel:...
- Page 12 Wiring - Color Wiring: Radio Antenna Radio antenna receptacle Wiring Subwoofer Output Pre amp subwoofer output (5V) Audio / Video Input Auxiliary input for external hardware Audio / Video Output 1 Connect to headrest display (Optional) Audio / Video Output 2 Connect to headrest display (Optional) SW KEY Steering wheel control Key 1 interface wire...
- Page 13 DVD app will only open if a compatible DVD disc is detected. 1) Scrubbing Press and drag along the time line to quickly skip through DVD times line. (Note: DVD formatting does not allow scrubbing through previews and warnings) 2) Menu options & controls:...
- Page 14 Bluetooth Bluetooth app allows Bluetooth pairing with compatible devices for making calls and music playback. To pair your phone, ensure Bluetooth is enabled in your phone’s system settings and that you are disconnected from all other devices. In the Bluetooth app of your radio, press the “Gear” icon in the left column to access Bluetooth settings. Next, press the “Magnifying glass”...
Need help?
Do you have a question about the SNV695B and is the answer not in the manual?
Questions and answers