
Related Manuals for SHOWTEC shooter 360


Summary of Contents for SHOWTEC shooter 360
- Page 1 MANUAL ENGLISH Shooter 360 Ordercode: 46001 Highlite International B.V. – Vestastraat 2 – 6468 EX – Kerkrade – the Netherlands...
-
Page 2: Table Of Contents
Shooter 360 Table of contents Warning ....................................2 Safety Instructions ................................. 2 Operating Determinations ............................4 Rigging .................................... 4 Connection with the mains............................5 Return Procedure ................................6 Claims ....................................6 Description of the device ..............................7 Frontside..................................7 Backside ..................................8 Installation ................................... -
Page 3: Warning
Save the carton and all packing materials. In the event that a fixture must be returned to the factory, it is important that the fixture be returned in the original factory box and packing. Your shipment includes: Showtec Shooter 360 IEC power cable (1,5 m) ... - Page 4 • If your Showtec device fails to work properly, discontinue the use immediately. Pack the unit securely (preferably in the original packing material), and return it to your Showtec dealer for service.
-
Page 5: Operating Determinations
Shooter 360 • The user is responsible for correct positioning and operating of the Shooter. The manufacturer will not accept liability for damages caused by the misuse or incorrect installation of this device. • This device falls under protection class I. Therefore it is essential to connect the yellow/green conductor to earth. -
Page 6: Connection With The Mains
Shooter 360 The Shooter can be placed on a flat stage floor or mounted to any kind of truss with a clamp. Improper installation can cause serious injuries and/or damage of property! Connection with the mains Connect the device to the mains with the power-plug. -
Page 7: Return Procedure
Shooter 360 Return Procedure Returned merchandise must be sent prepaid and in the original packing, call tags will not be issued. Package must be clearly labeled with a Return Authorization Number (RMA number). Products returned without an RMA number will be refused. Highlite will not accept the returned goods or any responsibility. -
Page 8: Description Of The Device
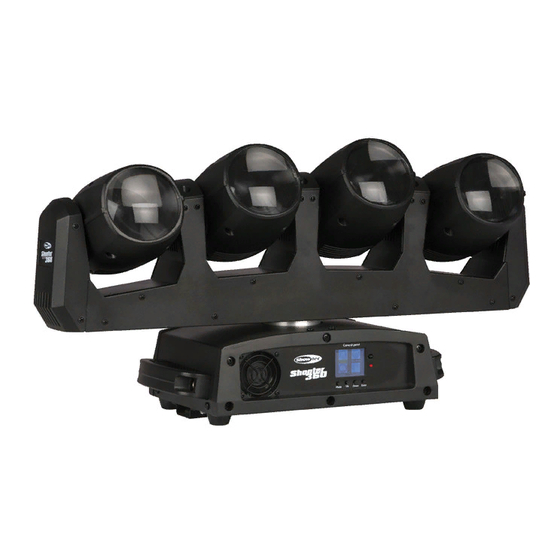
Shooter 360 Description of the device Features The Shooter 360 is a light effect with high output and great effects. • Input voltage: 100-240V AC, 60/50Hz • Power consumption: 177W • Light source: 4 x 12W RGBW LEDs • Color range: 16,7 million additive colors •... -
Page 9: Backside
09) Fuse F5AL/250V 10) Ground/earth connection Installation Remove all packing materials from the Shooter 360. Check if all foam and plastic padding is removed. Connect all cables. Do not supply power before the whole system is set up and connected properly. -
Page 10: Control Modes
Shooter 360 Control Modes There are 4 modes: • Stand-alone (Auto) • Sound-controlled • Master/Slave • DMX-512 (17CH, 33CH) One Shooter (Auto) 01) Fasten the effect light to a firm trussing. Leave at least 0,5 meter on all sides for air circulation. -
Page 11: Multiple Shooters (Dmx Control)
Shooter 360 Multiple Shooters (DMX Control) 01) Fasten the effect light to a firm trussing. Leave at least 0,5 meter on all sides for air circulation. 02) Always use a safety cable (ordercode 70140 / 70141). 03) Use a 3-pin XLR cable to connect the Shooters and other devices. -
Page 12: Fixture Linking
Shooter 360 Fixture Linking You will need a serial data link to run light shows of one or more fixtures using a DMX-512 controller or to run synchronized shows of two or more fixtures set to a master/slave operating mode. The combined number of channels required by all the fixtures on a serial data link determines the number of fixtures the data link can support. -
Page 13: Control Panel
Shooter 360 The Shooter 360 can be operated with a controller in control mode or without the controller in stand-alone mode. Control Panel A) LCD display MODE button C) UP button D) DOWN button ENTER button Fig. 05 Control Mode The fixtures are individually addressed on a data-link and connected to the controller. -
Page 14: Menu Overview
Shooter 360 Menu Overview Ordercode: 46001... -
Page 15: Main Menu Options
Dimmer curve + speed System Info 1. DMX Addressing With this menu, you can set the DMX address of your Shooter 360. 01) Press the MODE button, until the display shows 02) Press the ENTER button to open the menu. -
Page 16: Dmx-512 Mode
Shooter 360 2.1. DMX-512 Mode 01) Press the UP/DOWN buttons until the display shows: 02) Press the ENTER button to open the menu. 03) Press the UP/DOWN buttons to choose one of the 2 channel modes: 17-channel mode or 33-channel mode. -
Page 17: Master/Slave Mode
05) The device will now run as a slave device, which means that it will react the same as the master device. 3. Setup With this menu, you can adjust the settings of your Shooter 360. 01) Press the MODE button, until the display shows 02) Press the ENTER button to open the menu. -
Page 18: Pan/Tilt Reverse
Shooter 360 3.2. Pan/Tilt Reverse 01) Press the UP/DOWN buttons to choose Pan Reverse or Tilt Reverse. 02) Press the ENTER button to open the menu. 03) Press the UP/DOWN buttons to choose ON or OFF and press the ENTER button to confirm your choice. -
Page 19: System Information
01) Press the MODE button, until the display shows 02) Press the ENTER button to open the menu. The display will show: 03) Now, it is possible to view the following pieces of information about the Shooter 360: Current software version ... - Page 20 Shooter 360 Channel 8 – Head 4 - Vertical movement (Tilt) Move the slider up, in order to move head vertically (TILT). Gradual head adjustment from one end of the slider to the other (0-255, 128-center). The head can be turned by 270° and stopped at any position you wish.
- Page 21 Shooter 360 208-229 Counterclockwise color switch, from fast to slow 230-234 Not functional 235-249 Color flow, from fast to slow 250-255 Sound-controlled mode Channel 12 – Heads Dimmer must be open Head # 1 Head # 2 Head # 3...
- Page 22 Shooter 360 111-115 Program 20 116-120 Program 21 121-125 Program 22 126-130 Program 23 131-135 Program 24 136-140 Program 25 141-145 Program 26 146-150 Program 27 151-155 Program 28 156-160 Program 29 161-165 Program 30 166-170 Program 31 171-175 Program 32...
- Page 23 Shooter 360 230-244 Strobe ON, from fast to slow 245-255 Shutter open Channel 17 – Functions Dimmer must be open. It takes 10 seconds for the settings to be visible. Not functional 10-14 Tilt blackout 15-19 Cancel tilt blackout 20-24...
-
Page 24: Channels
Shooter 360 33 Channels Channel 1 – Horizontal movement (Pan) Move the slider up, in order to move head horizontally (PAN). Gradual head adjustment from one end of the slider to the other (0-255, 128-center). The head can be turned by 540° and stopped at any position you wish. - Page 25 Shooter 360 200-207 Program 20 208-215 Program 21 216-223 Program 22 224-231 Program 23 232-239 Program 24 240-247 Program 25 – all programs 248-255 Sound-controlled mode Channel 10 – Tilt built-in program speed 0-255 Gradual speed adjustment, from fast to slow Channel 11 –...
- Page 26 Shooter 360 Channel 27 – Colors Dimmer must be open All colors 100% 8-15 Color 1 16-23 Color 2 24-31 Color 3 32-39 Color 4 40-47 Color 5 48-55 Color 6 56-63 Color 7 64-71 Color 8 72-79 Color 9...
- Page 27 Shooter 360 Channel 29 – Built-in programs Dimmer must be open 0-15 Not functional 16-20 Program 1 21-25 Program 2 26-30 Program 3 31-35 Program 4 36-40 Program 5 41-45 Program 6 46-50 Program 7 51-55 Program 8 56-60 Program 9...
- Page 28 Shooter 360 Channel 31 – Dimmer intensity 0-255 From dark to brightest Channel 32 – Shutter Dimmer must be open 0-19 Shutter closed 20-24 Shutter open 25-64 Shutter closed/open, from fast to slow 65-69 Shutter open 70-84 Shutter fade out, from fast to slow...
-
Page 29: Maintenance
04) The electric power supply cables must not show any damages or material fatigue. The Shooter 360 requires almost no maintenance. However, you should keep the unit clean. Otherwise, the fixture’s light output will be significantly reduced. Disconnect the mains power supply, and then wipe the cover with a damp cloth. -
Page 30: No Response To Dmx
Shooter 360 No Response to DMX Suspect the DMX cable or connectors, a controller malfunction, a light effect DMX card malfunction. 01) Check the DMX setting. Make sure that DMX addresses are correct. 02) Check the DMX cable: Unplug the unit; change the DMX cable; then reconnect to electrical power. -
Page 31: Product Specifications
Shooter 360 Product Specifications Model: Showtec Shooter 360 Input voltage: 100-240 VAC, 60/50Hz Power consumption: 177W (full output) DMX linking: 30pcs Fuse: F5AL/250V Dimensions: 550 x 180 x 300 mm (LxWxH) Weight: 9,3 kg Operating and Programming: Signal pin OUT:... -
Page 32: Dimensions
Shooter 360 Dimensions Ordercode: 46001... - Page 33 Shooter 360 Ordercode: 46001...
- Page 34 Shooter 360 Ordercode: 46001...
- Page 35 Shooter 360 Ordercode: 46001...
- Page 36 ©2016 Showtec...
Need help?
Do you have a question about the shooter 360 and is the answer not in the manual?
Questions and answers