Advertisement
Quick Links
The purpose of this guide is to:
1. Describe assembly of Roll Stand (pages 2 – 3).
2. Describe attachment of Fixed Tilt Mounts (page 4).
3. Describe mounting MP5 on Roll Stand (page 5).
4. Describe mounting MP2 on Roll Stand (page 6).
5. Describe cable management – MP2 only (page 7).
WARNING: USE OF THIS ROLL STAND FOR INSTRUMENTS OTHER THAN THOSE DESCRIBED IN
THIS DOCUMENT MAY RESULT IN INJURY DUE TO TIPPING OF THE ROLL STAND. THE CUSTOMER
SHOULD VERIFY THE STABILITY OF ANY DEVIATION FROM THE CONFIGURATIONS SHOWN.
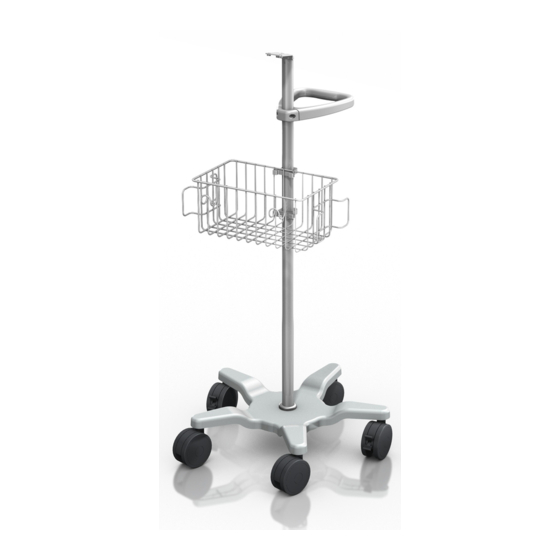
Parts Reference
The following parts and hardware are included with this installation kit (hardware not shown):
Item #
Description
1
Post, 40''
2
Base, 21''
3
5/16-18 x 1'' Hex Head Cap Screw (HHCS)
4
5/16 Flat Washer
5
5/16 Split Lock Washer
6
Utility Basket
7
Basket Clip
8
#8-32 x 7/8'' Pan Head Machine Screw (PHMS)
9
#8-32 Hex Nut
10
Handle
11
#10-32 x 9/16'' PHMS
12
Fixed Tilt Mount, MP5
13
Fixed Tilt Mount, MP2
14
M4 x 14mm PHMS
15
#10-32 x 3/4'' Flat Head Machine Screw (FHMS)
16
Power Supply Mount
17
M4 x 12mm PHMS
18
M6 x 10mm FHMS
19
M6 x 8mm PHMS
20
Cable Clip (not shown – see page 7)
21
Screw Cover, Adhesive-backed Lexan
Tools Required: Phillips screwdriver (not provided), 1/2'' [13mm] wrench (not provided).
Installation Guide
Philips MP2/MP5 Roll Stand
Qty
1
1
1
1
1
1
2
2
2
1
4
1
2
3
1
2
3
2
2
1
DU-PH-0062-60 Rev A 7/16/07 GCX Corp Page 1 of 7
1
12
13
10
16
6
2
Advertisement

Related Manuals for Philips MP2


Summary of Contents for Philips MP2
- Page 1 2. Describe attachment of Fixed Tilt Mounts (page 4). 3. Describe mounting MP5 on Roll Stand (page 5). 4. Describe mounting MP2 on Roll Stand (page 6). 5. Describe cable management – MP2 only (page 7). WARNING: USE OF THIS ROLL STAND FOR INSTRUMENTS OTHER THAN THOSE DESCRIBED IN THIS DOCUMENT MAY RESULT IN INJURY DUE TO TIPPING OF THE ROLL STAND.
- Page 2 Assembling the Roll Stand 1. Insert bottom end of Post in center of Base and lay assembly on its side for access to bottom of base (not shown). 2. Using a 1/2'' [13mm] wrench, fasten Post to Base with one (1) 5/16-18 x 1'' HHCS, with 5/16 split lock washer, and 5/16'' flat washer as shown below.
- Page 3 Attaching Utility Basket and Handle to Roll Stand Post 1. Attach two (2) Basket Clips to Utility Basket as shown below left. Insert two (2) #8-32 x 7/8'' PHMS and #8-32 hex nuts in Basket Clips but do not tighten. 2.
- Page 4 Roll Stand Front 2. Remove backing from Lexan Screw Cover and place on top of screw heads as shown below. Procedure is same for MP2 Mount (shown) or MP5 Mount. Screw Cover 3. Not shown. Align Basket and Handle with the Fixed Tilt Mount orientation and tighten mounting screws as required to secure Basket and Handle on the Post.
- Page 5 Mounting MP5 on Philips Table Top Mount (Requires Philips-supplied Table Top Mount) 1. Fasten the Philips-supplied table top mount to the Mounting Adapter with three (3) M6 x 10mm FHMS as shown below left. Mount the monitor in accordance with Philips mounting instructions.
- Page 6 Mounting MP2 Attaching Docking Station to Fixed Tilt Mount 1. Fasten docking station to MP2 Fixed Tilt Mount with two (2) M4 x 14 mm PHMS as shown below. Mount monitor on docking station according to manufacturer's instructions. M4 x 14 mm PHMS (2) Mounting the Power Supply 1.
- Page 7 Cable Management (MP2 Only) Two (2) Cable Clips are provided for managing cables along Roll Stand Post. Place loose cables inside Clip and slide Clip onto Post as shown. Cable Clip Slide onto Post Cable Clips (2) Cable Clip Routine Maintenance Periodically check all mounting hardware.