Advertisement
3950 NW 120th Ave, Coral Springs, FL 33465 TEL 561-955-9770 FAX 561-955-9760
www.nav-tv.com
info@nav-tv.com
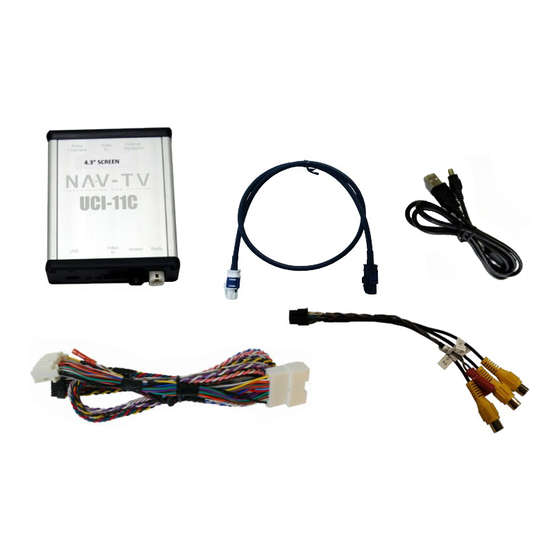
UCI-11C R-CAM (4.3)
NTV-KIT331
Plug & Play T-Harness
NTV-HAR182
LVDS Cable
USB Cable
UCI-11c R-CAM
NTV-CAB055
NTV-CAB009
Camera Harness
NTV-ASY180
NTV-HAR183
UCI Installation (Journey)
1. Use the plastic pry tool to pry up the plastic trim on
the passenger side. Pry up just enough to gain
access to the T-20 TORX.
2. With the plastic pry tool, remove the plastic trim on the
driver's side.
3. Remove the 2) TORX screws from the radio/HVAC control panel.
1 |
P a g e
Advertisement
Table of Contents

Related Manuals for Nav TV UCI-11C NTV-KIT331


Summary of Contents for Nav TV UCI-11C NTV-KIT331
- Page 1 3950 NW 120th Ave, Coral Springs, FL 33465 TEL 561-955-9770 FAX 561-955-9760 www.nav-tv.com info@nav-tv.com UCI-11C R-CAM (4.3) NTV-KIT331 Plug & Play T-Harness NTV-HAR182 LVDS Cable USB Cable UCI-11c R-CAM NTV-CAB055 NTV-CAB009 Camera Harness NTV-ASY180 NTV-HAR183 UCI Installation (Journey) 1. Use the plastic pry tool to pry up the plastic trim on the passenger side.
- Page 2 4. Using the plastic pry tool, gently pry the control panel from the dash. 5. Disconnect the cable assembly and set the panel to the side. 6. Remove the 4) TORX screws holding the radio in place. 7. Remove the radio and disconnect all the wires. Set the unit aside for easy access to behind the dash.
- Page 3 12. Insert the 18 pin connector into the UCI-11C port labeled Radio T-Harness. 13. The white, round 4 pin LVDS connector that was disconnected from the screen, gets inserted into the white connector on the UCI-11C module labeled “RADIO”. 14. Plug the black end of the supplied LVDS cable into the black connector labeled “SCREEN”...
- Page 4 Programming UCI for 4.3" Monitor Adjusting the rearview camera settings PRIOR TO ADJUSTING ANY SETTING AFTER THE INITIAL INSTALLATION, TURN THE VEHICLE OFF, CLOSE ALL DOORS, THE HOOD AND TRUNK AND LOCK THE VEHICLE WITH THE FACTORY KEY FOB OR LOCK IT WITH THE KEY. WAIT ONE MINUTE AND THEN UNLOCK THE VEHICLE AND PROCEED WITH THE FOLLOWING STEPS.
Need help?
Do you have a question about the UCI-11C NTV-KIT331 and is the answer not in the manual?
Questions and answers