Table of Contents
Advertisement
Advertisement
Table of Contents

Related Manuals for Honeywell CN51


Summary of Contents for Honeywell CN51
- Page 1 PrintPAD Series ™ CN70/70e & CN51...
- Page 2 Disclaimer Honeywell International Inc. (“HII”) reserves the right to make changes in specifications and other information contained in this document without prior notice, and the reader should in all cases consult HII to determine whether any such changes have been made. The information in this publication does not represent a commitment on the part of HII.
- Page 3 PrintPAD Series CN70/70e & CN51 User Guide...
- Page 4 PrintPAD Series CN70/70e & CN51 User Guide...
-
Page 5: Table Of Contents
Setup Bluetooth Parameters ......... 20 PrintPAD Series CN70/70e & CN51 User Guide... - Page 6 PrintPAD Series ............26 PrintPAD Series CN70/70e & CN51 User Guide...
-
Page 7: Customer Support
Repair. Contact your service center to obtain a Return Material Authorization number (RMA #) before you return the product. To obtain warranty or non - warranty service, return your product to Honeywell (postage paid) with a copy of the dated purchase record. -
Page 8: Limited Warranty
Resources > Warranty. Send Feedback Your feedback is crucial to the continual improvement of our documentation. To provide feedback about this manual, please contact the Technical Communications department directly at ACSHSMTechnicalCommunications@honeywell.com. viii PrintPAD Series CN70/70e & CN51 User Guide... -
Page 9: Agency Approvals
EMC: EN 50024 (2010) Complies with EU directives: • EMC: 2004/108/EC • LVD: 2006/95/EC • ROH52: 2011/65/EU UL60950 - 1; 2nd Edition CSA C22.2 No. 60950 ? 1 ? 07, 2nd Edition, 2007 - 03 PrintPAD Series CN70/70e & CN51 User Guide... - Page 10 PrintPAD Series CN70/70e & CN51 User Guide...
-
Page 11: Safety Information
Safety Information Please read the following safety information prior to setting up or operating your printer. -
Page 12: Important Safety Requirements
Do not place the power cord where it can be stepped on and, if the power cord becomes damaged, immediately replace it. • If service is required, use only qualified trained technicians to repair your printer. PrintPAD Series CN70/70e & CN51 User Guide... -
Page 13: Printer Basics
Printer Basics Learn to use the printer basic features, including how to load the media; install, replace and charge the batteries; and perform a test to ensure the printer is operating properly. Also in this chapter, refer to the printer status LEDs and indicators for proper usage and functionality. -
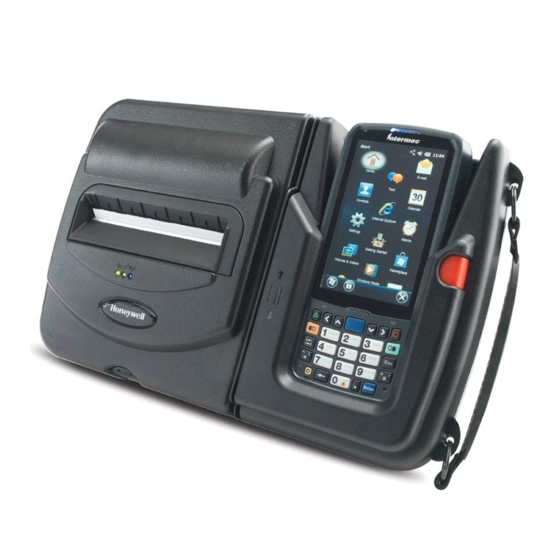
Page 14: Printer Component Identification
Mobile computer cavity LEDs Battery Status Card Reader slot Paper opening Latch DC power port DEX/UCS port Closed View: Use this illustration to familiarize yourself with the printer components in the closed position. PrintPAD Series CN70/70e & CN51 User Guide... -
Page 15: Status Leds And Indicators
RF power is on (when blue, RF power button is pressed None. and power was turned off). 2 short RF power is off (when blue, RF power button is pressed None. and power was turned on). PrintPAD Series CN70/70e & CN51 User Guide... - Page 16 Description Printer is asleep. Red flash Out of paper. Green Printer is awake. CardReader Audio Indicators Magnetic – Beeps Description Action 1 long Bad read. Swipe card again. 2 short Good read. None. PrintPAD Series CN70/70e & CN51 User Guide...
-
Page 17: How To Use The Batteries
3 Lift up the outside end of the battery to remove it. 4 Insert the new batteries. Verify the battery contacts are facing down and are facing the outside edge of the printer. Contacts 5 Close the battery cover by snapping it into place. PrintPAD Series CN70/70e & CN51 User Guide... -
Page 18: Charge The Batteries And Mobile Computer
Do not plug DC power into the internal and external power ports at the same time. Do not plug the DC power supply into the printer if the printer is being charged by means of external charge contacts. PrintPAD Series CN70/70e & CN51 User Guide... -
Page 19: Determine Battery Condition
Dispose of the used batteries according to the instructions. The maximum operating temperature of the portable printer is 122 °F (50 °C). However, the operating temperature when used with a Datamax-O’Neil by Honeywell power supply for charging, the portable printer is limited to 104 °F (40 °C). -
Page 20: Load The Media
4 Feed the end of the paper and center it under the roller until the paper exits from the top of the printhead. The printer has an auto - advance feature that will aid moving the paper through the printer. Verify the paper exits straight. PrintPAD Series CN70/70e & CN51 User Guide... -
Page 21: Print A Self-Test
1 Open the printer's cover. 2 Press and hold the red self - test button for 4 to 5 seconds until the printer starts to print. 3 After printing starts, release the red self - test button. PrintPAD Series CN70/70e & CN51 User Guide... - Page 22 Chapter 2 — Printer Basics PrintPAD Series CN70/70e & CN51 User Guide...
-
Page 23: Printer Configuration
Printer Configuration Use this chapter to configure your printer. -
Page 24: Printer Data Cables
2 Insert the plug into the printer’s data port. Note: Do not close the lid or damage will occur to the cable. The data cable is intended for reflashing the printer. Please note that printer data cables are not included. PrintPAD Series CN70/70e & CN51 User Guide... -
Page 25: Update Firmware And Drivers
Supports & Download. 2 Select Downloads and Drivers. 3 Select PrintPAD Series. 4 Download the USB-CDC driver that matches the device operating system (OS). Install the driver (.cab file) onto the handheld computer. PrintPAD Series CN70/70e & CN51 User Guide... -
Page 26: Establish A Printer Connection
Windows Update.” Follow the instructions to complete the installation. Once completed, you should see the PrintPAD as an available printer from your host PC. 3 The default setting will setup as a “CDC Composite” printer type. PrintPAD Series CN70/70e & CN51 User Guide... -
Page 27: Setup Bluetooth Connection
Power on the printer and confirm that the wireless radio is on. Follow your host PC for adding a new Bluetooth device. Once connected and connection is established, proceed to “Setup Bluetooth Parameters” on page 20. PrintPAD Series CN70/70e & CN51 User Guide... -
Page 28: Verify Printer Connection
3 Locate and select a file from the “Select File to Print” dropdown menu. 4 Select “Settings” to set the communication parameters for the communication type selected. 5 Select “Print Demo” to send the file to the printer. PrintPAD Series CN70/70e & CN51 User Guide... -
Page 29: Update Printer Settings
Supports & Download > Downloads and Drivers > PrintPAD Series > Utility > MFlash Configuration. 2 Launch the MFlash Configuration utility. 3 Verify the communication port and query the printer. PrintPAD Series CN70/70e & CN51 User Guide... -
Page 30: Setup Bluetooth Parameters
Authentication (This must be set to “Yes” for Android devices, and Windows 7 and above host PCs) • Bondable • Discoverable • Connectable • Encryption Contact your network administrator to verify the proper radio settings for your environment. PrintPAD Series CN70/70e & CN51 User Guide... -
Page 31: Printer Options
Printer Options Learn to use the optional printer capabilities, including the DEX/UCS port for data transfer, the Magnetic Stripe Card Reader option and the External Charge Contacts option. -
Page 32: Dex/Ucs Port
DEX/UCS Port: Use this illustration to locate the DEX/UCS port on the printer. The direct exchange (DEX)/UCS port can only be used with the Datamax - O’Neil by Honeywell - approved DEX cable (P/N: 210237 - xxx). When the DEX cable is plugged into the data port, the printer automatically turns off to allow data transfer between the mobile computer and the DEX port. -
Page 33: Magnetic Stripe Card Reader
For information on Card Reader LED indicators and audio indicators, see the following table. Card Reader Indicators – Audio Indicators Beeps Description Action 1 long Bad read. Swipe card again. 2 short Good read. None. PrintPAD Series CN70/70e & CN51 User Guide... -
Page 34: External Charge Contacts
Refer to the status LEDs for proper charging. For more information, see the instruction sheets included with the accessories. Use of any product not approved by Honeywell for use with their printers could cause damage to the batteries or printer and will void the warranty. -
Page 35: Printer Specifications
Printer Specifications... -
Page 36: Printpad Series
Dimensions (H x W x L) 190.5 x 299.7 x 60.9 mm (7.5 x 11.8 x 2.4 in) Weight With CN51 handheld: 1.7 kg (60.0 oz) With CN70/70e handheld: 1.9 kg (70.3 oz) Drop specification 1.8 m (6 ft) tested with handheld... - Page 37 DEX/UCS standard Software/Firmware Protocol Line Printer Mode, Easy Print® Drivers Windows CE and Desktop Compatible label design NiceLabel, BarTender®, DP Designer software Software development kit C++, Visual Basic, Java, Microsoft Dynamics Configuration Tool PrintPAD Series CN70/70e & CN51 User Guide...
- Page 38 Appendix A — Printer Specifications PrintPAD Series CN70/70e & CN51 User Guide...
- Page 40 Honeywell www.honeywellaidc.com PrintPAD Series CN70/70e &CN51 User Guide P/N 110287–001...