Table of Contents
Advertisement
Quick Links
GPSmile 6561
Portable Automobile Navigation System
User Manual
Registered info
HOLUX and GPSmile are trademarks of HOLUX Technology, Inc.
All other trademarks belong to registered companies.
Note
• The contents of this manual will be modified without further notice.
• The operation temperature for the product is between -10℃~45℃.
Operating or recharging in an environment with a temperature over 45℃
might cause the system to malfunction. However, this should be considered
a normal phenomenon. Please do not operate under extreme temperatures.
Advertisement
Table of Contents

Subscribe to Our Youtube Channel
Related Manuals for Holux GPSMILE 6561


Summary of Contents for Holux GPSMILE 6561
- Page 1 GPSmile 6561 Portable Automobile Navigation System User Manual Registered info HOLUX and GPSmile are trademarks of HOLUX Technology, Inc. All other trademarks belong to registered companies. Note • The contents of this manual will be modified without further notice. • The operation temperature for the product is between -10℃~45℃.
-
Page 3: Safety Precautions
Safety Precautions Select the install location must be cautiously. HOLUX will not bear any • responsibility if the user does not follow the correct device installing procedure. Use the power adapter included with the package. Using other power • adapters than the one provided will result to malfunction and could prove to be dangerous. -
Page 4: Warranty Statement
Holux Technology, or repairs done by anyone other than Holux Technology and authorized retail/service providers. -
Page 5: Technical Support
Technical Support If there are any questions regarding the use of this product, please • log on to the website www.holux.com and see the FAQ. Maintenance Service HOLUX Technology, Inc. +886-3-6687-000 Web Site: www.holux.com E-mail: info@holux.com Contact your nearest dealer, for further support. -
Page 6: Table Of Contents
Table of Contents Safety Precautions..................i Warranty Statement ..................ii Technical Support ..................iii Maintenance Service ................... iii Preface......................2 Precautions and Notices................2 Copyright ....................3 Important Notice ..................3 First time use ....................4 Package Contents ..................4 Basic Operation ..................5 Introduction ..................5 Using the In-Vehicle Bracket ..............7 Connecting the Car Charger ..............9 Inserting a SD/MMC Card ..............10 Getting Started....................11... - Page 7 Apps ....................22 PERSONAL ....................23 Location services ................23 Security ....................24 Language & input ................25 Backup & reset...................26 Accounts & sync ..................27 System....................28 Date & Time ..................28 Developer options ................29 About device ..................30 MUSIC ......................31 Play music ..................31 GPS ......................33 Troubleshooting ..................34 Resetting System ...................36 Maintaining Device .................37 Regulatory Information ................38...
-
Page 8: Preface
Preface We appreciate your purchase of the HOLUX car navigation. Please read all instructions thoroughly for a full understanding of the products’ features. Precautions and Notices For your own safety, do not operate the controls of the product while •... -
Page 9: Copyright
Copyright Without the written consent of HOLUX Technology, Inc, this manual, including the product and the software, may not be duplicated, transmitted, recorded or saved on storage devices. Furthermore, it shall not be translated under any circumstances into any other languages. -
Page 10: First Time Use
First time use Package Contents Your product should include the following accessories: Device In-vehicle Bracket fixing Car Adapter Home Charger USB Cable Quick Guide... -
Page 11: Basic Operation
Basic Operation Introduction Front View TFT LCD with touch screen Rear View Reset Speaker... - Page 12 Top View ON/OFF Power button Left Side Headphone connector Micro SD Slot Mini-USB connector...
-
Page 13: Using The In-Vehicle Bracket
Using the In-Vehicle Bracket The included in-vehicle bracket set can be securely suctioned on the front windshield, or secured on top of the glove compartment using the adhesive plate. This device will effectively secure the GPS unit in the vehicle. Follow the procedures below to secure the bracket: 1. - Page 14 3. Install GPS unit Slide the GPS into the in-vehicle bracket fitting holes to secure. Gently push down until the unit is tightly fixed with the bracket.
-
Page 15: Connecting The Car Charger
Connecting the Car Charger The car charger supplies power to your device when you are using the device in a car. CAUTION: To protect your device against sudden surges in current, connect the car charger only after the car engine has been started. Connect one end of the car charger to the power connector of your device. -
Page 16: Inserting A Sd/Mmc Card
Inserting a SD/MMC Card Your device has a SD/MMC slot where you can insert an optional Secure Digital or Multi Media Card storage card. To use a SD/MMC card, insert it into the slot, with the connector pointing to the slot and its label facing the front of the device. To remove a card, first make sure that no application is accessing the card, and then slightly push the top edge of the card to release it and pull it out of the slot. -
Page 17: Getting Started
Getting Started Unlocking device Press the ON/OFF button for several seconds. After turn on the device, you will see the lock screen. To unlock the screen, touch and drag the lock icon out of the circle to the open locked icon. -
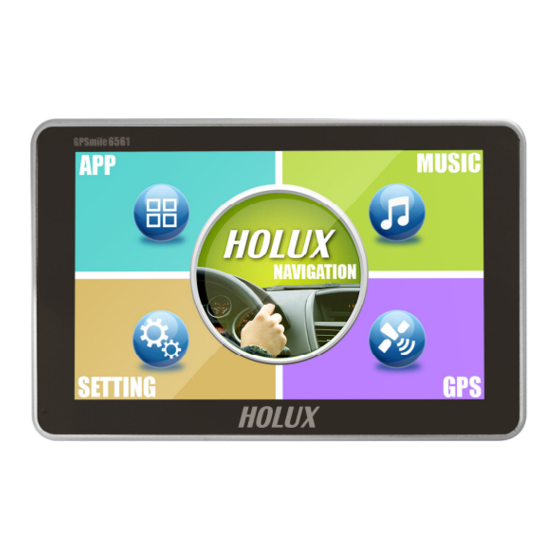
Page 18: Main Menu
Main menu After unlocking, the main menu appears. You can touch and drag the main menu to switch the page. The main menu consists of five functions: Navigation, Applications, Settings, Music and GPS. Directly select an icon on the screen to use the function. - Page 19 The following table provides a list of other icons: Icon Function Description Return icon Returns to the previous page. Home icon Opens your main menu recent apps Opens a list of your most recent apps. Volume icon Decrease/ Increase the volume Function icon “Wallpaper”, “Manage apps”...
-
Page 20: Switching Wallpaper
Switching Wallpaper There are three ways to change the wallpaper. 1. Long-press in an empty area on the home screen to pop-up the choose wallpaper function. Touch the Wallpapers tab and touch a source (Live Wallpapers, Super-HD Player or Wallpapers) from which to select the wallpaper. Touch the image of the wallpaper you want to use. -
Page 21: App
Touch APP icon on main menu or touch icon on other page to enter APPS/ WIDGETS page. Using APPs An application is a software program that enables you to perform a specific task. The main apps screen is where you can see all your apps. From the main apps screen you can touch the app icon to launch the app. -
Page 22: Using Widgets
Using Widgets A widget is a small application that you can place on a Home screen to provide quick and easy access to information, an application, or a function. Touch the Widgets tab to select the desired item that you want to add. Drag the item to the Home screen where you want to add it. -
Page 23: Setting
SETTING Settings screen allows you to configure the settings of your device, including Wireless & networks, Device, Personal and System settings. There are three ways to go to the Settings screen. 1. On main menu, touch the button to switch screens and do the configurations. -
Page 24: Wireless & Networks
Wireless & Networks Configure and manage connections to networks and devices through Wi-Fi, and mobile networks. Connecting to Wi-Fi networks To enable Wi-Fi and connect to a Wi-Fi network: Slide the Wi-Fi switch to ON. When enabled, your device scans for available Wi-Fi networks. -
Page 25: Device
Device The item contains: Sound, Display, Storage, Battery and Apps. Directly select an icon on the screen to set the function. Sound Configure the volume level and type; configure ringtones and alarms. -
Page 26: Display
Display Configure brightness and other screen settings. Brightness: Adjust the brightness of the screen. Wallpaper: changing the wallpaper file. Auto-rotate screen: Enable or disable the screen auto-rotation function. When enabled, the screen switches the orientation to landscape or portrait views as you rotate the device. Sleep: adjust the time setting of sleep mode. -
Page 27: Storage
Storage Use the Storage settings to monitor the used and available space on your device internal storage. Battery View which applications are using the battery power since you last charged your device. -
Page 28: Apps
Apps View details about the applications installed on your device, manage application data, close applications, and set whether you want to permit the installation of applications that you obtain from Web sites and e-mail. -
Page 29: Personal
PERSONAL Location services Configure how you want the device to determine your location and how you want to share your location with Google and others. Access to my location: Enable to use Wi-Fi and mobile networks to determine your approximate location. GPS satellites: Enable to use your device’s global positioning system (GPS) satellite receiver to accurately determine your location to several meters. -
Page 30: Security
Security Screen lock: To unlock the screen, the default value is “slide”: Press the power button again and drag the unlock icon across the screen in any direction. If you have set up a screen unlock password or a Personal Identification Number (PIN), or an unlock pattern, you have to type the correct password or PIN, or draw the correct pattern to unlock your screen. -
Page 31: Language & Input
Language & input Select the language that you want to work with on your device and configure the input method. Select language: Select the language to use for the text on your device. -
Page 32: Backup & Reset
Backup & reset Back up data or reset your device. Back up my data: Enable to back up some of your personal data to Google servers using your Google Account. Backup account: View the Google Account that your settings and other data are backed up with. -
Page 33: Accounts & Sync
Accounts & sync Use the Accounts & Sync settings to add, remove, and manage your Google Accounts and other accounts. You also use these settings to control how and whether applications send, receive, and synchronize data on their own schedules, and whether applications can synchronize user data automatically. -
Page 34: System
System Date & Time Use Date & time settings to set your preferences for how dates are displayed. You also can use these settings to set your own time and time zone, rather than obtaining the current time from the network. Automatic date &... -
Page 35: Developer Options
Developer options Stay awake: When enabled, the screen will not go to sleep (lock) while the battery is charging, or while the device is connected to a computer through a USB cable. HDCP checking: Set if you want to use high-bandwidth digital copy protection (HDCP) to check for digital rights management (DRM) content. -
Page 36: About Device
About device View information about your device. System updates: Open a screen that reports the latest available Android software updates for your device. Status: View information about your battery status, mobile network connection, and other details. Legal information: Legal information Obtain legal information about the software included with your device. -
Page 37: Music
MUSIC Touch the MUSIC icon on main menu to enter music page. Play music Play music stored on your device or music stored on an optionally installed flash media card. While viewing a list of artists, albums, playlists, or songs, touch the song to play it. - Page 38 Control button lists: Control Button Description Play Play the playback. Pause Pause the current music playing. Previous/ Next Play the previous or next file. Playlist Display Playlists. Random play Enable/ disable random play Replay Turn off replay/ Continuous play all songs/ Continuous play current song...
-
Page 39: Gps
Touch the GPS icon on main menu to enter GPS page. This page is for information only. You can view the number of satellite signals t he unit is receiving and also the strength of these signals. -
Page 40: Troubleshooting
Troubleshooting Power Problems Power does not turn on The remaining battery power may be too low when using battery to run your device. Connect the AC adapter to power your device and to AC power. Then, turn on your device. Screen Problems Screen is off If the screen does not respond even after... - Page 41 Reset your device before connecting the • cable. Always disconnect your device before you restart your computer. GPS Problems When there are no valid Make sure that the GPS antenna has a • signals available, clear view of the sky. consider the following: Note that the GPS reception can be •...
-
Page 42: Resetting System
Resetting System Occasionally, you may need to reset your device. For example, you should reset your system when it stops responding; or appears to be "frozen" or "locked up. Insert a small rod, such as a straightened paperclip, into the reset button on the bottom of your device. -
Page 43: Maintaining Device
Maintaining Device Taking good care of your device will ensure trouble-free operation and reduce the risk of damage to your device. Keep your device away from excessive moisture and extreme • temperatures. Avoid exposing your device to direct sunlight or strong ultraviolet light •... -
Page 44: Regulatory Information
Regulatory Information NOTE: Marking labels located on the exterior of your device indicate the regulations that your model complies with. Please check the marking labels on your device and refer to the corresponding statements in this chapter. Some notices apply to specific models only. Regulations Statements Class B Regulations USA Federal Communications Commission Radio Frequency Interference... - Page 45 Canada Canadian Department of Communications Radio Interference Regulations Class B Compliance Notice This Class B digital apparatus meets all requirements of the Canada Interference-Causing equipment regulations. Cet appareil numrique de Classe B respecte toutes lesexigences duReglement Canadien sur le materiel brouileur. European Notice Products with the CE marking comply with Radio &...
-
Page 46: Ncc Warning Statement
NCC Warning Statement Article 12 Without permission, any company, firm or user shall not alter the frequency, increase the power, or change the characteristics and functions of the original design of the certified lower power frequency electric machinery. Article 14 The application of low power frequency electric machineries shall not affect the navigation safety nor interfere a legal communication, if an interference is found, the service will be suspended until improvement is made and the...
Need help?
Do you have a question about the GPSMILE 6561 and is the answer not in the manual?
Questions and answers