
Related Manuals for Superscope PSD450mk II


Summary of Contents for Superscope PSD450mk II
-
Page 1: User Manual
PSD450mk Digital Audio Recording System User Manual © Copyright 2013, Superscope Technologies, Inc. - Page 2 Do not let liquids get into the unit. SD Logo is a trademark. microSD Logo is a trademark. Do not spray insecticides onto or into the unit. Do not attempt to repair this unit by yourself. Superscope PSD450mkII User Manual - ii -...
- Page 3 For EU Countries Superscope PSD450mkII User Manual - iii -...
- Page 4 For EU Countries Superscope PSD450mkII User Manual - iv -...
-
Page 5: Table Of Contents
REPEAT............... 21 Internal Speaker ..........15 f PAUSE ............. 21 g DRIVE SELECT ............ 21 Internal Mic R & Internal Mic L ....15 h MUTE ..............21 LCD Color Display ..........15 Superscope PSD450mkII User Manual - v -... - Page 6 Pan Setting – R/2 ........... 32 Edit Track Information ..........72 Recording a Solo Performance ........ 33 Title/Artist/Album ........... 73 Internal Built-in Microphones........34 Genre ..............73 Connecting Musical Instruments ......35 24>16bit Convert ........... 74 Superscope PSD450mkII User Manual - vi -...
- Page 7 Record with a Track/File ......... 103 Play a Track/File ............104 Import CD .............. 104 Duplicate CD ............105 Modify and Save File ..........105 Copy File to USB ............. 105 Create/REC Playlist ..........105 Superscope PSD450mkII User Manual - vii -...
-
Page 8: Supplied Accessories
Superscope PSD450mkII User Manual ■Supplied Accessories USB Cable RCA Patch Cables Infrared (IR) Remote AC Adapter AC Power Cord AAA Batteries The following items (not pictured) are also in the box: • Instruction Manual on CD-ROM (PDF format) • Quick Start Guide (printed) -
Page 9: Introduction
Superscope PSD450mkII User Manual ■Introduction Thank you for purchasing a Superscope PSD400 Series Recording System. Were you looking for a high-quality, portable recorder? A music practice and transcription tool? If either factor is important to you, we’re confident you’ll find your recorder to be an immensely powerful and versatile audio system. -
Page 10: Preparations Before Use
3. Re-attach the battery cover to the rear side of the recorder. Burning CDs with battery power is not ※ recommended. Please connect AC power before burning a CD. Superscope PSD450mkII User Manual - 10 -... -
Page 11: Remote Controller Battery Installation
Please match the polarity of the battery (+/ -) with the polarity indication on the remote controller. Batteries may have the same shape, but different voltages. Do not mix different battery types. Superscope PSD450mkII User Manual - 11 -... -
Page 12: About Discs
• In direct sunlight or near a source of heat like a heater. • In a place which is damp or dirty. • In a place which could be exposed to rain, such as near a window. Superscope PSD450mkII User Manual - 12 -... -
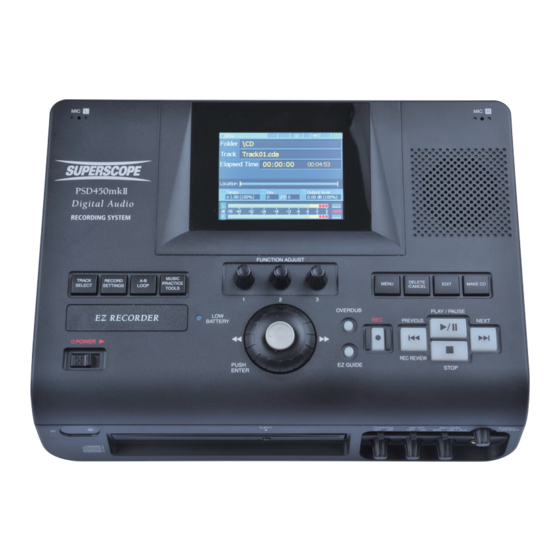
Page 13: Top Panel
Input Source, Recording Folder, Record Format (WAV/ MP3), Stereo/Mono setting, Bit Number/Bit Rate. Press this button a second time to return to the main screen. Ⓐ TRACK SELECT Ⓒ A-B LOOP Ⓑ RECORD SETTINGS Ⓓ MUSIC PRACTICE TOOLS Superscope PSD450mkII User Manual - 13 -... -
Page 14: A-B Loop
Ⓐ FUNCTION ADJUST #1 knob complete, press this button to return to the main screen. Ⓑ FUNCTION ADJUST #2 knob Ⓒ FUNCTION ADJUST #3 knob EZ GUIDE Press for assistance operating the most popular features. Superscope PSD450mkII User Manual - 14 -... -
Page 15: Control Buttons (Transport)
LCD Color Display Press to stop playback or recording. High-resolution full-color liquid crystal display monitor. Please refer to LCD Display for an explanation of display E. NEXT icons. Press to advance to the next track. Superscope PSD450mkII User Manual - 15 -... -
Page 16: Front Panel
A limiter circuit Connect stereo headphones here. This input accepts ¼” protects against signal overload. headphone plugs. PHONES / SPEAKER LEVEL Turn this knob to adjust the level for the built-in speaker and headphones. Superscope PSD450mkII User Manual - 16 -... -
Page 17: Right Side Panel
Connect an electric guitar, bass, or keyboard here. recording device. VU Meter Overload If your keyboard or guitar/bass signals routinely cause the VU meters to display “OVER,” change INST Input Gain setting to Low. Superscope PSD450mkII User Manual - 17 -... -
Page 18: Left Side Panel
Connect the DA450PSD AC to DC adapter here. Connect an optional foot pedal here to provide Play/ Do not use any adapter other than the DA450PSD. Pause, or Record/Pause control. The Superscope FT200 foot pedal is available at our online store. USB Connector B... -
Page 19: Back Panel
Controls ■Back Panel Battery Compartment Insert a Ni-MH rechargeable battery or eight alkaline size AA batteries here. Please refer to Using Batteries. Superscope PSD450mkII User Manual - 19 -... -
Page 20: Remote Control
Fine Tune control is adjustable +/-50 cents (100 cents = 1 semitone). o TEMPO RESET Press to reset Tempo control to normal speed. a PLAY Press to play the currently selected track. Superscope PSD450mkII User Manual - 20 -... -
Page 21: Stop
External MIC, INST, etc. previous track. will not be heard. FINE TUNE RESET Press to reset Fine Tune control to normal pitch. KEY RESET Press to reset Key control to normal pitch. Superscope PSD450mkII User Manual - 21 -... -
Page 22: Lcd Display
Play back current track once, then stop at start of current track (Single, 1) Play back and repeat current track (Repeat 1) Play back all tracks once, then stop at start of the first track (Single, All) Superscope PSD450mkII User Manual - 22 -... -
Page 23: File Information
Indicates the battery level is almost empty (needs to be charged or replaced) Indicates the AC Adapter is connected Ⓑ File Information PLAY / STOP Mode Folder Displays the current folder Track Displays the active track Superscope PSD450mkII User Manual - 23 -... -
Page 24: Playback Data
Level meter indication Displays the sound level of the left channel in decibels (dB). Displays the sound level of the right channel in decibels (dB). When sound level is beyond 0dB, “OVER” turns on. Superscope PSD450mkII User Manual - 24 -... -
Page 25: Powering On
Slide the POWER switch to power on. When inserting batteries always be mindful of polarity (+/-). During battery operation, an icon is displayed ※ in the top right corner of the display showing battery power. See AC/Battery Icons. Superscope PSD450mkII User Manual - 25 -... -
Page 26: Battery Life
• Do not mix new and old batteries or battery types (Alkaline or Ni-MH). • When the unit is not in use for a long period of time, please remove batteries to prevent battery leakage. Superscope PSD450mkII User Manual - 26 -... -
Page 27: Setting Date And Time
The following screen should appear: 4. Move the joystick right, left, up, or down to select Year, Month, Day, Hour, Minute, or Second. 5. Change Time and Date values by turning the jog wheel. Superscope PSD450mkII User Manual - 27 -... -
Page 28: The Internal Memory
Internal Memory will directly affect the amount of time it takes to create a file database. Superscope recommends that you limit the number of files and folders on the Internal Memory. Do not remove the USB Memory during ※... -
Page 29: Setting Up Speakers
INPUT to the LINE OUT terminal on the right side panel. The left channel is the white terminal and the right channel is the red terminal. Use the volume control on the powered speakers to adjust level. Superscope PSD450mkII User Manual - 29 -... -
Page 30: Other Sound Sources
#1 to select External Mic and then press the Record Settings button to exit the screen. Input Select Screen Unbalanced Connections Unbalanced signals only use two connections and are therefore more susceptible to noise than balanced connections. Unbalanced ¼” Plug Superscope PSD450mkII User Manual - 30 -... -
Page 31: Setting Levels
AUX LEVEL controller on the right side panel. When using the INST input, If your mics have higher than normal output, try control input level with the Instrument level controller. switching the MIC ATT switch to ON. Superscope PSD450mkII User Manual - 31 -... -
Page 32: Stereo/Pan Mode
Turn FUNCTION ADJUST #3 (4C) to adjust the Pan Setting for input R/2 (the right microphone). Adjustments are made in 1% increments between Left 100% - Center - Right 100%. The initial setting is Center. Input Select Screen Superscope PSD450mkII User Manual - 32 -... -
Page 33: Recording A Solo Performance
Record Settings Screen. Turn the jog wheel or toggle the joystick to select Input Source and Push Enter. Record Settings Screen Turn the jog wheel or toggle joystick to select Input Source and Push ENTER. Superscope PSD450mkII User Manual - 33 -... -
Page 34: Internal Built-In Microphones
The recorder has two built-in microphones for stereo recording. When using the built-in microphones, please refer to the following procedures. 1. Push the RECORD SETTINGS button to display the Input Source options. Record Settings Screen Superscope PSD450mkII User Manual - 34 -... -
Page 35: Connecting Musical Instruments
To prevent the built-in microphones from Input Select Screen picking up the sound of buttons on the top panel, operate the recorder with the RC450PSD remote control. Superscope PSD450mkII User Manual - 35 -... -
Page 36: The Same Time
Setting Levels. 2. Push the RECOR SETTINGS button to open the Record Settings Screen. Turn the jog wheel or toggle the joystick to select Input Source and Push ENTER. Record Settings Screen Superscope PSD450mkII User Manual - 36 -... - Page 37 INST knob to obtain a proper level and balance between the microphone and the instrument. Please refer to Setting Levels. After the recording is completed, the MIC/ ※ INST balance cannot be changed. Superscope PSD450mkII User Manual - 37 -...
-
Page 38: Line Level Sources
MIC/LINE Jacks on the right side panel. 2. Push the RECCOR SETTINGS button to open the Record Settings Screen. Turn the jog wheel or toggle the joystick to select Input Source and Push ENTER. Record Settings Screen Superscope PSD450mkII User Manual - 38 -... - Page 39 Fig.3. And operate the following Fig.6 and Fig7. 5. Move the joystick right or left to select Stereo Mode or Pan Mode (Stereo mode is the default setting). For adjustment of Pan Setting see STEREO/PAN Mode. Input Select Screen Superscope PSD450mkII User Manual - 39 -...
- Page 40 Input Source and Push ENTER. Record Settings Screen For adjustment of Pan Setting see STEREO/ ※ PAN Mode. 6. Adjust the AUX LEVEL control to obtain a suitable recording level. See Setting Levels. Superscope PSD450mkII User Manual - 40 -...
-
Page 41: Digital Connection
DIGITAL IN on the left side panel. 2. Push the RECOR SETTINGS button to open the Record Settings Screen. Turn the jog wheel or toggle the joystick to select Input Source and Push ENTER. Record Settings Screen Superscope PSD450mkII User Manual - 41 -... -
Page 42: Computer Connection
Level should be set to the default value of 0 dB. Turn FUNCTION ADJUST #1 (4A) to adjust Record Level. Press FUNCTION ADJUST #1 (4A) to return Record Level to 0 dB. Rec Pause Screen Superscope PSD450mkII User Manual - 42 -... - Page 43 “track.db” and a folder named “PSD450mkII” will appear in your recorder’s file directory. If this file or folder is edited or deleted, you may lose access to your audio files and settings. Superscope PSD450mkII User Manual - 43 -...
-
Page 44: Working With Files And Folders
When a track is highlighted in the Track ※ Select Screen, push ENTER to view or edit track information. Press the PLAY/PAUSE button (8C) to begin playback. The contents of the storage device will now be displayed. Superscope PSD450mkII User Manual - 44 -... -
Page 45: Using The [Search] Feature
Use FUNCTION ADJUST # 1 (4A) to move the cursor to a 3. Use the Text Input Method below to type the file new character. name or part of the file name you are searching for. Superscope PSD450mkII User Manual - 45 -... - Page 46 ENTER. When the search is complete, the search results will be displayed. Move the joystick up or down or turn the jog wheel to select a track from the Search Result [Folder] screen. Search Result [Folder] Screen Superscope PSD450mkII User Manual - 46 -...
-
Page 47: Create A Folder
4. Turn the jog wheel or move the joystick up or down to highlight Rename. Press ENTER. Edit Screen 5. Enter the name of the new folder by using the Text Input Method. Superscope PSD450mkII User Manual - 47 -... -
Page 48: Create A Playlist
Press ENTER to add the selected track to the playlist. 3. When you use the provisional playlist name, press ENTER. Select Track [Folder] Screen Use the Text Input Method to rename the playlist name. Text Input Screen Superscope PSD450mkII User Manual - 48 -... -
Page 49: Create A Cd Playlist
2. Press FUNCTION ADJUST #2 (4B) key to create a playlist. The Playlist screen is opened and a provisional playlist name is displayed. 3. Press ENTER to use the provisional playlist name. Use the Text Input Method to rename the playlist. Superscope PSD450mkII User Manual - 49 -... - Page 50 When you play a CD Playlist, you will find it in the CD Playlist folder in the Internal Memory. Press the PLAY key to play. The CD Playlist is erased when the CD is ※ ejected or the unit is turned off. Superscope PSD450mkII User Manual - 50 -...
-
Page 51: Cd Ripping
3. If you have exited the Track Select [Folder]\CD screen, see How to Select [CD] to display the CD contents again. Turn the jog wheel or move the joystick up or down to highlight a track. Superscope PSD450mkII User Manual - 51 -... -
Page 52: Ripping Selected Tracks From An Audio Cd
If you only intend to rip a small number of tracks from the CD, turn the jog wheel or move the joystick up or down to highlight [Clear All]. CD Ripping Screen Press ENTER. All tracks will appear in grey. CD Ripping Screen Superscope PSD450mkII User Manual - 52 -... - Page 53 Track Select Screen Track Select [Folder] Screen 4. Turn the jog wheel or move the joystick up or down to highlight [CD]. Press ENTER to open the the CD track folder. Track Select Screen Superscope PSD450mkII User Manual - 53 -...
-
Page 54: Music Practice
-75% and +50% (1% intervals) [-7/+7] Perfect fifth (P5) without affecting playback pitch. [-8/+8] Minor sixth (m6) [-9/+9] Major sixth (M6) [-10/+10] Minor seventh (m7) [-11/+11] Major seventh (M7) [-12/+12] Perfect octave (P8) Superscope PSD450mkII User Manual - 54 -... -
Page 55: Fine Tune
Music Practice Tools Screen Using the Chromatic Tuner 1. Push the MUSIC PRACTICE TOOLS button. Select Tuner by using the jog wheel or the joystick and press ENTER. Music Practice Tools Screen Superscope PSD450mkII User Manual - 55 -... -
Page 56: Using The Tuning Tone
Offset Value showing how flat or sharp the note is (+/- 50 cents). Tune your instrument until the tuning gauge is centered and the Offset Value displays “In Tune”. Superscope PSD450mkII User Manual - 56 -... -
Page 57: Using The Metronome
5. All notes are displayed in concert pitch. Tune your instrument to match Tone Name displayed on the Tuning Tone screen. Press the corresponding function adjust knob (1, 2 or 3) to return to default settings for each function. Tuning Tone Screen Superscope PSD450mkII User Manual - 57 -... -
Page 58: Adjusting Accent Beat And Accent Beat Volume
2. Turn FUNCTION ADJUST #3 (4C) to set the volume of the accent beat. Press FUNCTION ADJUST #3 (4C) to return the Accent Beat Volume to the default setting (0.0 dB). Metronome Screen Superscope PSD450mkII User Manual - 58 -... -
Page 59: Play
PREVIOUS button within the first one second of playback to return to the start of the ③ PREVIOUS previous track. Press during Stop Mode to return to the start of the previous track. Superscope PSD450mkII User Manual - 59 -... -
Page 60: Playback Modes
Settings and then press ENTER. Single track. Menu Screen 4. Select a Repeat Mode by turning the jog wheel. Press ENTER to confirm the selection. Repeat Mode Screen To cancel the setting, press the DELETE/CANCEL button. Superscope PSD450mkII User Manual - 60 -... -
Page 61: Equalizer Settings
When Parameter Type is set for Gain, turn the FUNCTION ADJUST controller (1, 2 or 3) to determine the gain for each Band. Gain can be adjusted +/- 12dB. Pressing the FUNCTION ADJUST knobs will return all settings to default values. Superscope PSD450mkII User Manual - 61 -... -
Page 62: Bandwidth
A-B Loop Screen 2. Press the A-B Loop button [2-C] to set the end point of the loop. ‘ ’ will appear and playback will begin looping between the start and end markers automatically. Superscope PSD450mkII User Manual - 62 -... -
Page 63: Delete A Loop Point
B point to the end of the track. 3. Push and hold FUNCTION ADJUST #3 (4C) to reset both the A and the B point. During Loop playback, press the PREVIOUS button to return to the beginning of the loop. Superscope PSD450mkII User Manual - 63 -... -
Page 64: Editing
[Cancel]. See Adjusting Tempo, Key and Fine Tune. 2. Turn the jog wheel or move the joystick up or down to highlight the track you wish to export. Track Select [Folder] Screen Superscope PSD450mkII User Manual - 64 -... -
Page 65: Changing File Format
40, 48, 56, 64, 80, 96, 112, 128 or 160 kbps. A progress bar is displayed during the Export ※ procedure. Do not power off until the procedure is complete. If power is interrupted during Export, the exported file will be lost. Superscope PSD450mkII User Manual - 65 -... -
Page 66: Move A Track
1 through 5. After selecting Yes on the Move screen, the Int Memory folder will be shown. Turn the jog wheel or move the joystick up or down to highlight [Return]. Push ENTER. Superscope PSD450mkII User Manual - 66 -... -
Page 67: Copy A Track
Track Select [Folder] Screen 3. Push the EDIT button to open the Edit menu screen. Edit Screen 4. Turn the jog wheel or move the joystick up or down to highlight Copy. Press ENTER. Edit Screen Superscope PSD450mkII User Manual - 67 -... - Page 68 [USBHDD] . Push ENTER. 11. The USBHDD folder will be shown. Turn the jog wheel or move the joystick up or down to highlight [Current Folder]. Press ENTER. Superscope PSD450mkII User Manual - 68 -...
-
Page 69: Divide A Track
Track Select [Folder] Screen 6. When you hear the point at which you want to divide the track, press FUNCTION ADJUST #1 (4A). Playback will loop the 4 seconds before the Divide point. Track Edit Screen Superscope PSD450mkII User Manual - 69 -... -
Page 70: Combine A Track
Combine a Track Follow these steps to combine two audio files into one file. 4. Turn the jog wheel or move the joystick up or down to highlight Combine. Press ENTER. Edit Screen Superscope PSD450mkII User Manual - 70 -... - Page 71 Do not power off until the procedure is ※ complete. If power is interrupted during the Combine operation, the new file may be lost. 3. Push the EDIT button to open the Edit menu screen. Edit Screen Superscope PSD450mkII User Manual - 71 -...
-
Page 72: Edit Track Information
Press FUNCTION ADJUST #2 (4B) to switch playback to the second trim point. Audio from this point to the end of the track will be removed. Playback will loop the 4 seconds before the Trim point. Track Edit Screen Superscope PSD450mkII User Manual - 72 -... -
Page 73: Title/Artist/Album
Text Input Method. Genre 1. From the Track Information Edit screen, turn the jog wheel or move the joystick up or down to highlight Genre. Track Information Edit Screen Superscope PSD450mkII User Manual - 73 -... -
Page 74: Bit Convert
Repeat steps 1-3. The new genre will now appear as an option. Text Input Screen 24>16bit Convert This option only appears for 24-bit WAV files. Select this option to make 24-bit files playable on this recorder. See Auto Convert. Superscope PSD450mkII User Manual - 74 -... -
Page 75: Delete/Cancel
ENTER to highlight a file that you want to delete. Track Select Delete 3. Press DELETE/CANCEL button to open the Delete menu screen. Delete Screen Repeat step 6 to select the files to be deleted. Superscope PSD450mkII User Manual - 75 -... -
Page 76: Cancel
9. Press ENTER to open the Delete menu screen. 10. Move the joystick to select “OK” and press ENTER to delete the files. Cancel Press to cancel settings and delete characters when editing titles and file information. Superscope PSD450mkII User Manual - 76 -... -
Page 77: Recording
Rec. Pause Screen 3. Press the Record button again to start recording. The Record button will stay lit during recording. Record Screen Superscope PSD450mkII User Manual - 77 -... -
Page 78: Recording To A Usb Memory
To record to the Int Memory and the USBHDD ※ at the same time, turn on Int Memory + USBHDD Recording in the Record Settings menu. Select [USBHDD] as the recording folder in order for this feature to work. Superscope PSD450mkII User Manual - 78 -... -
Page 79: Track Increment
- Sets the Threshold level of the silent part. (-60 dB to -20 dB) The initial settings are as follows: Silent Skip Recording: Off Silent time detector: 3 seconds Threshold level: -40 dB Superscope PSD450mkII User Manual - 79 -... -
Page 80: Pre-Roll Time/ Post-Roll Time
Pre-Roll Time and Post-Roll Time can be adjusted between 0 seconds and 10 seconds in 1 second intervals. The default setting for Pre-Roll Time and Post-Roll Time is [0] seconds. Turn the FUNCTION ADJUST #1 to set Silent time detector. Superscope PSD450mkII User Manual - 80 -... -
Page 81: Fade In / Out
Fade In / Out Auto Convert When a Fade-IN Time is selected, the Record Level will Your Superscope PSD400 series recorder is designed to gradually increase from a mute condition to full Record be a “music practice recording system.” Your recorder is... -
Page 82: Input Effects
ENTER. Menu Screen Available Input Sources Please refer to the chart on the following page. 4. Select Reverb/Delay by using the jog wheel or the joystick and press ENTER. Menu Screen Superscope PSD450mkII User Manual - 82 -... -
Page 83: ① Delay Time
Press FUNCTION ADJUST # 2 (4B) to return to the default setting. 3. Press the joystick down one time to open the Input Input Select [Effect] Screen Select [EQ] screen. Input Equalizer Screen Superscope PSD450mkII User Manual - 83 -... -
Page 84: Frequency
ADJUST controller to determine the gain for each Band. Menu (Mix Mode Settings) Screen Gain can be adjusted +/- 12 dB. Pressing the FUNCTION ADJUST knobs will return all settings to default values. Superscope PSD450mkII User Manual - 84 -... - Page 85 MUTE -90 dB (0%) and +6.0 ㏈ (200%) in 0.25 dB increments. The default setting is 0.0 ㏈ (100%). Mix Mode Settings Screen Monitor Source About Monitor Source, refer to page 90. Superscope PSD450mkII User Manual - 85 -...
-
Page 86: Overdub
To adjust the level of the accompaniment file, ※ Mix Mode & Monitor Source. (MUNU -> MixMode & Monitor Source -> Mix Balance Mode & Monitor) Superscope PSD450mkII User Manual - 86 -... - Page 87 Select Cancel and the file will not be saved. When Cancel is selected, the recorder will re-enter REC Pause Mode (Overdub) (step 7) allowing the user to redo the Overdub recording. Superscope PSD450mkII User Manual - 87 -...
-
Page 88: Overdubbing For Practice (Recording Over A Loop)
Loop / A&B Setting Screen Adjust the REC Level knobs so that the Record Level (left and right channels) does not exceed 0 dB as indicated on the Level meters. (see Setting Levels). Superscope PSD450mkII User Manual - 88 -... -
Page 89: Monitor Source
FUNCTION ADJUST #2 (4B) when the main Overdub screen is 3. Move the joystick up or down or turn the jog wheel visible. to select Monitor Source. Press ENTER. Menu Screen Superscope PSD450mkII User Manual - 89 -... - Page 90 Recording 4. Turn the jog wheel to select Recording Signal or Playback Signal. Press ENTER. Press the CANCEL button to cancel changes. Superscope PSD450mkII User Manual - 90 -...
-
Page 91: Overdub Screen
OFF. L ch Mix Mix mode is set L ch Mix R ch Mix Mix mode is set R ch Mix Monaural Mix Mix mode is set Monaural Mix Superscope PSD450mkII User Manual - 91 -... -
Page 92: Overdub Screen And Audio Signal
INPUT R cH Pan 2 R cH R cH Monitor Source L cH Tempo/Key Monitor Accompaniment file Output Playback EQ R cH Playback level Playback Signal Output Level Superscope PSD450mkII User Manual - 92 -... - Page 93 L cH Recording Signal Effects Input INPUT Pan 2 R cH R cH Monitor Source L cH L cH Tempo/Key Monitor Accompaniment file Output Playback EQ R cH R cH Playback level Playback Signal Superscope PSD450mkII User Manual - 93 -...
- Page 94 Pan 1 L cH Effects Input Recording Signal INPUT R cH Pan 2 R cH R cH L cH Tempo/Key Monitor Accompaniment file Output Playback EQ R cH Playback level Output Playback Signal Level Superscope PSD450mkII User Manual - 94 -...
-
Page 95: Cd Burning
If you wish to create a finalized disc that is playable to highlight Audio Disc. Press ENTER. in other CD players, select [Burn Tracks + Finalize]. Press ENTER. Make CD Screen Select write mode Screen Superscope PSD450mkII User Manual - 95 -... -
Page 96: Finalizing A Cd
5. Move the joystick left to select OK. Press ENTER. 6. When you select OK, the following screen will appear: FINALIZE Progress Screen 2. Press the Make CD button. When finalization is complete, status will return to the Main Screen. Superscope PSD450mkII User Manual - 96 -... -
Page 97: Creating A Data Cd
Make CD List [Data Disc] Screen 2. Press the MAKE CD button. The following screen will appear: 3. Turn the jog wheel or move the joystick up or down to highlight Data Disc. Press ENTER. Make CD Screen Superscope PSD450mkII User Manual - 97 -... -
Page 98: Cd Duplication
CD to the Internal Memory and then to a blank CD-R/RW: 1. Insert the CD to be duplicated into the CD-R/RW drive. 5. Move the joystick left to select OK. Press ENTER. Superscope PSD450mkII User Manual - 98 -... -
Page 99: Erasing A Cd-Rw
9. When burning is finished, the CD will be ejected 2. Press the MAKE CD button. automatically. The following screen will appear: 10. To make another copy, insert a blank CD and burning will begin automatically. To end duplication, select Cancel. Superscope PSD450mkII User Manual - 99 -... -
Page 100: Erase Last
1. Insert a CD-RW with audio tracks into the CD-R/RW drive. 5. The following screen will appear: 2. Press the MAKE CD button. 6. Move the joystick left to select OK. Press ENTER. Superscope PSD450mkII User Manual - 100 -... -
Page 101: Finalized Cd-Rw Menu
4. Turn the jog wheel or move the joystick up or down to highlight Erase Last. Press ENTER. Make CD [Erase] Screen 2. Press the Make CD button. 5. The following screen will appear: Superscope PSD450mkII User Manual - 101 -... -
Page 102: Finalized Cd-Rw Menu
Unfinalized CD-RW Menu Make CD Screen 4. Turn the jog wheel or move the joystick up or down to highlight Erase All. Press ENTER. Make CD [Erase] Screen 5. The following screen will appear: Superscope PSD450mkII User Manual - 102 -... -
Page 103: Ez Guide
EZ Guide feature. 3. Adjust the input source and recording folder. 4. Adjust the recording level and push the REC button (8A) to start recording. Superscope PSD450mkII User Manual - 103 -... -
Page 104: Play A Track/File
Select [Execute] and press the joystick down. The selected tracks will be imported to the destination folder previously selected, Note: You cannot change the order of the tracks of a CD Import. Superscope PSD450mkII User Manual - 104 -... -
Page 105: Duplicate Cd
Record or Record + Finalize. 5. Select the location to save the modified file. CD-R cannot be selected. 4. Select Record Playlist to Other Media to record the playlist to a USB Flash Drive or Internal Memory. Superscope PSD450mkII User Manual - 105 -... -
Page 106: System Settings
LCD backlight after a period of inactivity. This includes the use of all top panel buttons and knobs, and the remote control. Settings include OFF, 2 seconds, 5 seconds, 10 seconds, and 20 seconds. The default setting is OFF. Superscope PSD450mkII User Manual - 106 -... - Page 107 During playback, press the Play <-> Rewind foot pedal to toggle between play and Rewind. The default setting is "Play/REC <-> Pause”. Superscope PSD450mkII User Manual - 107 -...
-
Page 108: Appendix
One Touch Recording OFF, 1 ~ 16 beat Count In Increment: 1 beat Auto Convert 0 Seconds 1 Second 2 Seconds CD-PreGap Settings 0 Seconds 3 Seconds 4 Seconds 5 Seconds USBHDD+Int Memory REC Superscope PSD450mkII User Manual - 108 -... - Page 109 Plate Reverb Delay Stereo Mix Split Mix Balance Mode & Monitor L ch Mix Stereo Mix Mix Mode & Monitor Source R ch Mix Monaural Mix Recording Signal Monitor Source Recording Signal Playback Signal Superscope PSD450mkII User Manual - 109 -...
-
Page 110: Main Menu (2 Of 2)
(PSD450 only) and SD capacity. Maintenance Format Internal All the data currently on the SD ※ — — Memory card will be deleted. Returns all menu settings to factory Restore Defaults — — default values. Superscope PSD450mkII User Manual - 110 -... -
Page 111: Recording Settings Menu
40 bps 48 bps 56 bps 64 bps 80 bps 96 bps Bit Rate Recording File Bit Rate 192 bps 112 bps 128 bps 160 bps 192 bps 224 bps 256 bps 320 bps Superscope PSD450mkII User Manual - 111 -... -
Page 112: Edit Menu Options
Track Information Track Information Copy Copy Copy Copy Copy Move Move Move Move Move Rename Rename Rename Rename Rename Delete Delete Delete Delete Delete Edit Playlist Trim In/Out 24 > 16bit Convert Export Divide Combine Export Superscope PSD450mkII User Manual - 112 -... -
Page 113: Music Practice Tools Menu
Accent Beat Number [0 (OFF) ~ 9] Increment: 1 Normal Beat Volume [MUTE, -20.0 ~ 0.0] dB Increment: 0.5 dB -12.0 dB Accent Beat Volume [MUTE, -20.0 ~ 10.0] dB Increment: 0.5 dB 0.0 dB Superscope PSD450mkII User Manual - 113 -... -
Page 114: Continuous Recording Time With Battery Operation
69 hr 26 min 40 Kbps 55 hr 33 min 64 Kbps 34 hr 43 min Mono 80 Kbps 27 hr 46 min 128 Kbps 17 hr 21 min 160 Kbps 13 hr 53 min Superscope PSD450mkII User Manual - 114 -... -
Page 115: Pop-Up Messages
“This disc has max tracks.” tracks. “CD burning…” During CD writing. AddTrack “Convert file…” During converting WAV 24bit to WAV 16bit. “Disc Information” When Disc write error occurs. “Disc write error.” “Finalize CD…” During Finalize CD. Superscope PSD450mkII User Manual - 115 -... -
Page 116: Pop-Up Messages (Continued)
During erasing data. “Finalize this CD-R?” When [Finalize] is selected. Finalize “Finalize this CD-RW?” When [Finalize] is selected. “Finalize CD…” During finalizing CD. “Unfinalize?” When [Unfinalize] is selected. Unfinalize “Unfinalizing CD…” During unfinalizing CD. Superscope PSD450mkII User Manual - 116 -... -
Page 117: Specifications
Speaker Output Level ....2 W, 8 W, 10% THD THD ..............0.01% Digital Output Level .....0.5 Vp-p, 75 W Load S/N............92 dB A-WTD Max. Input Level ......... There is no limit. Appearance standards and specifications are subject to change without notice. Superscope PSD450mkII User Manual - 117 -... -
Page 118: Trademarks, Copyrights And Disclaimers
■Trademarks, Copyrights and Disclaimers MPEG Layer-3 Licensing MPEG Layer-3 audio coding technology licensed from Fraunhofer IIS and Thompson. “Supply of this product does not convey a license nor imply any right to distribute MPEG Layer-3 compliant content created with this product in revenue-generating broadcast systems (terrestrial, satellite, cable and/or other distribution channels), streaming applications (via Internet, intranets and/or other networks). -
Page 119: One Year Limited Warranty
All labor and material expenses for items covered by the warranty. To Obtain Service: 1. If your unit needs service contact Superscope at (630)232-8900. A service representative will advise you of how to obtain service. Please do not return the unit directly to Superscope Technologies, unless specified by our service representative.
Need help?
Do you have a question about the PSD450mk II and is the answer not in the manual?
Questions and answers