Table of Contents
Advertisement
Available languages
Available languages
Advertisement
Table of Contents

Subscribe to Our Youtube Channel
Related Manuals for ECOVACS WINBOT W850


Summary of Contents for ECOVACS WINBOT W850
- Page 1 Instruction Manual...
-
Page 2: Instruction Manual
Instruction Manual, please contact our Customer Service Center where a technician can address your specific problem or question. For more information, please visit the ECOVACS official website: www.ecovacs.com The company reserves the right to make technological and/or design changes to this product for continuous improvement. -
Page 3: Table Of Contents
Contents 1. Important Safety Instructions...............2 2. Package Contents and Technical Specifications........4 2.1 Package Contents..................4 2.2 Specifications....................4 2.3 Product Diagram..................5 3. Operating WINBOT 8..................6 3.1 Notes before Cleaning................6 3.2 Attach Cleaning Pad.................8 3.3 Assemble Power Adapter................8 3.4 Install Safety Tether...................8 3.5 Place Safety Pod..................10 3.6 Spray Cleaning Solution................10 3.7 Start......................11 3.8 Pause......................12... -
Page 4: Important Safety Instructions
1. Important Safety Instructions When using an electrical appliance, basic precautions should always be followed, including the following: READ ALL INSTRUCTIONS BEFORE USING THIS APPLIANCE. SAVE THESE INSTRUCTIONS 1. This Appliance is not intended to be used by children under 8 or anyone lacking knowledge on proper use. - Page 5 1. Important Safety Instructions 24. Please dispose of used batteries according to local laws and regulations. 25. Do not incinerate the Appliance even if it is severely damaged. The battery can explode in a fire. 26. The Appliance must be used in accordance with the directions in this Instruction Manual. The company cannot be held liable or responsible for any damages or injuries caused by improper use.
-
Page 6: Package Contents And Technical Specifications
2. Package Contents and Technical Specifications 2.1 Package Contents Safety Pod and Remote Control WINBOT 8 Power Adapter Instruction Manual with Batteries Tether (3) Cleaning Pads WINBOT (1) WINBOT Finishing Cloth Cleaning Solution Extension Cord (1.5m/4’11”) 2.2 Specifications WINBOT model W850 Working Voltage 24V DC... -
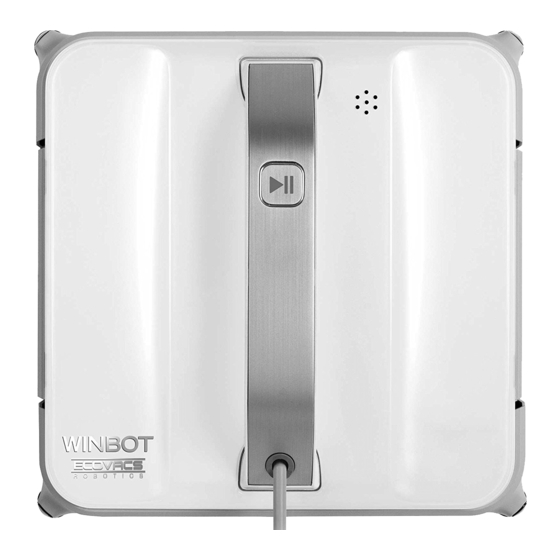
Page 7: Product Diagram
2. Package Contents and Technical Specifications 2.3 Product Diagram WINBOT 8 1. Bumper Rail 9. Squeegees 2. Speaker 10. Bottom Power Switch 3. Status Indicator Light and START/PAUSE Button 11. Driving Treads 4. Handle 12. Fan 5. Upgrade Port (for after-sale service) 13. -
Page 8: Operating Winbot 8
3. Operating WINBOT 8 3.1 Notes Before Cleaning Do not use WINBOT 8 on a framed window WINBOT 8 can clean framed or frameless with a frame smaller than 5mm (0.2”). glass, larger than 50 x 50cm (19.7’’ x 19.7’’). If WINBOT 8’s Status Indicator Light flashes If the window is covered with dirt, clean a GREEN after powering ON, the Back-Up... -
Page 9: Attach The Cleaning Pad
Please refer to the manufacturer's care and cleaning instructions before using WINBOT 8 on glass with an uneven surface, such as frosted, textured, patterned, or coated glass. ECOVACS Robotics cannot be responsible for damage due to improper use on these surfaces. -
Page 10: Assemble Power Adapter
3. Operating WINBOT 8 3.3 Assemble the Power Adapter 3.4 Install the Safety Tether End A: WINBOT 8 Power Cord End B: Power Adapter Power Cord End C: Safety Pod End D: Safety Tether... - Page 11 3. Operating WINBOT 8 Loop one end of the Safety Tether to End A on the WINBOT 8 Power Cord and tighten. Connect End A and End B and tighten. Loop the other end of the Safety Tether around the Safety Pod’s channel and pull it tight.
-
Page 12: Place Safety Pod
3. Operating WINBOT 8 3.5 Place the Safety Pod Wipe the surface of the Safety Pod’s suction cup clean with the provided Finishing Cloth. If WINBOT 8 is being used to clean an inside window: Press the Safety Pod FIRMLY on the top corner of the inside window. -
Page 13: Start
3. Operating WINBOT 8 3.7 Start Plug in WINBOT 8 * Do not unplug WINBOT 8 while it is cleaning. Power ON Move the Power Switch to the “ ” position. WINBOT 8 is powered ON when the Status Indicator Light flashes BLUE. * Keep objects away from WINBOT 8’s Fan to avoid blockage. -
Page 14: Pause
3. Operating WINBOT 8 Start Start WINBOT 8 using one of the methods below. Press the START/PAUSE button on WINBOT 8 or on the Remote Control to begin cleaning. WINBOT 8 automatically chooses an “N” or “Z” cleaning path. Choose your own cleaning path by pressing the “N” or “Z” Cleaning Mode Button on the Remote Control to begin cleaning. -
Page 15: Stop
3. Operating WINBOT 8 3.9 Stop When WINBOT 8 completes its cleaning cycle, it returns to the place it started and beeps. Remove WINBOT 8 Power OFF Grasp WINBOT 8’s Handle. Press and Move the Power Switch to the “ ”... -
Page 16: Maintenance
4. Maintenance Before performing cleaning and maintenance on WINBOT 8, Power OFF and unplug WINBOT 8 from the receptacle. 4.1 Cleaning Pad Turn WINBOT 8 over and remove the Cleaning Pad. Soak the Cleaning Pad in cool, clean water for 2 minutes. Hand wash with mild detergent and lay flat to dry. -
Page 17: Driving Treads
4. Maintenance Edge Detection Sensors Squeegees Turn WINBOT 8 over and wipe the four Edge Turn WINBOT 8 over and wipe the two Detection Sensors clean with the provided Squeegees with the provided Finishing Cloth to Finishing Cloth to maintain their effectiveness. maintain their effectiveness. -
Page 18: Status Indicator Light And Sounds
5. Status Indicator Light and Sounds Indicator Description Status Indicator Light Back-Up Battery is low and is charging. WINBOT will not clean until flashes GREEN the Back-Up Battery is properly charged. Status Indicator Light WINBOT 8 is powered ON and ready to be placed on the glass. flashes BLUE Status Indicator Light WINBOT 8 has successfully adhered itself to the glass and is ready... -
Page 19: Troubleshooting
6. Troubleshooting Malfunction Possible Causes Solutions Pause WINBOT 8 by pressing the WINBOT 8 is cleaning. When START/PAUSE button on the robot WINBOT 8 is cleaning, only the or Remote Control. Other buttons START/PAUSE Button works on on the Remote Control will function the Remote Control. - Page 20 6. Troubleshooting Malfunction Possible Causes Solutions A. Connect WINBOT 8 to the Power Adapter and plug into the wall receptacle. Press Start/Pause Button on WINBOT 8 or on the Remote Control. WINBOT 8 will resume cleaning. Interruption of electricity while B.
- Page 21 6. Troubleshooting Malfunction Possible Causes Solutions A. Press the RESET Button on the Remote Control. B. If WINBOT 8 does not Reset, it must be placed in Manual Override Mode. Hold the RESET Button on the Remote Control until the Status Indicator Light glows a continuous WINBOT 8 is stuck RED.
- Page 22 !ECOVACS ROBOTICS מביתWINBOT ברכותינו על שרכשתם את שואב האבק הרובוטי אנו מקווים שתהיו מרוצים ממנו במשך שנים רבות. אנחנו מאמינים כי הרכישה של הרובוט החדש שלכם תסייע לכם לשמור על הבית נקי ותקנה לכם זמן פנוי כדי לחיות חכם וליהנות...
- Page 23 תוכן העניינים 22..................1. הוראות בטיחוות חשובות 24................2. תוכן האריזה ומפרטים טכניים 24....................1.2 תוכן האריזה 24......................2.2 מפרטים 25....................3.2 תרשים המוצר 26...................WINBOT 8 3. הפעלת 26...................:1.3 הערות לפני ניקוי 27..................2.3 חיבור רפידת ניקוי 28..................3.3 חיבור מתאם החשמל 28..................4.3 חיבור כבל הבטיחות 30..................5.3 הצבת התקן הבטיחות 30..................6.3 ריסוס...
- Page 24 1. הוראות בטיחוות חשובות...
- Page 25 1. הוראות בטיחוות חשובות...
- Page 26 2. תוכן האריזה ומפרטים טכניים 1.2 תוכן האריזה התקן בטיחות וכבל מדריך למשתמש מתאם חשמל WINBOT 8 שלט רחוק עם סוללות מטלית כבל מאריך פתרון ניקוי )3( רפידות ניקוי 1.5) WINBOT WINBOT ('מטר/4 רגל 11 אינץ 2.2 מפרטים WINBOT דגם W850 הספק...
- Page 27 2. תוכן האריזה ומפרטים טכניים 3.2 תרשים המוצר WINBOT 8 9. מגבים 1. פגוש 01. מתג הפעלה תחתון 2. רמקול 3. נורית חיווי לסטטוס ולחצן התחלה/השהיה 11. גלגלי נסיעה 21. מאוורר 4. ידית 31. נורית חיווי תחתונה לסטטוס (5. חיבור שדרוג )לשירות לאחר המכירה 41.
- Page 28 WINBOT 8 3. הפעלת :1.3 הערות לפני ניקוי בחלונות בעלי מסגרתWINBOT 8-אל תשתמש ב מסוגל לנקות שמשה בעלת מסגרתWINBOT 8 .('קטנה מ-5 מ"מ )2.0 אינץ x 19.7) 05 ס"מx 50-או ללא מסגרת, הגדולה מ .('7.91 אינץ מהבהבתWINBOT 8 אם נורית החיווי לסטטוס של אם...
- Page 29 . ועלול להזיק לוWINBOT את הביצועים של לניקוי משטחי זכוכית שאינם חלקים, כגוןWINBOT 8-עיין בהוראות הטיפול והניקוי של היצרן לפני שימוש ב אינה אחראית לנזקECOVACS ROBOTICS. משטחים מכוסים בציפוי, בעלי מרקם, בעלי תבניות או מצופים .שנגרם כתוצאה משימוש בלתי הולם על משטחים כאלה...
- Page 30 WINBOT 8 3. הפעלת 3.3 חיבור מתאם החשמל 4.3 חיבור כבל הבטיחות : כבל החשמל של מתאם החשמלB קצה WINBOT 8 : כבל החשמל שלA קצה : כבל בטיחותD קצה : התקן בטיחותC קצה...
- Page 31 WINBOT 8 3. הפעלת A כרוך קצה אחד של כבל הבטיחות על קצה . והדק אותוWINBOT 8 של הכבל של . והדק אותםB וקצהA חבר את קצה כרוך את הקצה האחר של כבל הבטיחות סביב התעלה בהתקן הבטיחות ומשוך כדי .להדקו...
- Page 32 WINBOT 8 3. הפעלת 5.3 הצבת התקן הבטיחות נגב את משטח גביע היניקה של התקן הבטיחות .במטלית המצורפת : לניקוי חלון פנימיWINBOT 8-אם נעשה שימוש ב לחץ את התקן הבטיחות בחוזקה על הפינה העליונה של החלון הפנימי. ודא שהתקן הבטיחות .מחובר...
- Page 33 WINBOT 8 3. הפעלת 7.3 התחלה WINBOT 8 חבר את . כשהוא מנקהWINBOT 8 * אל תנתק את הדלקה ."-" הסט את מתג ההפעלה בתחתית למצב דולק כשנורית החיווי לסטטוס מהבהבתWINBOT 8 .בכחול כדיWINBOT 8 * הרחק עצמים מהמאוורר של .למנוע...
- Page 34 WINBOT 8 3. הפעלת :התחלה . באחת מהשיטות האלהWINBOT 8 הפעל את WINBOT-לחץ על לחצן ההתחלה/השהיה ב WINBOT .8 או בשלט-רחוק להתחלת הניקוי ."Z" " אוN" 8 בוחר אוטומטית נתיב ניקוי ." בשלט-רחוק להתחלת הניקויZ" " אוN" בחר את נתיב הניקוי הרצוי על ידי לחיצה על לחצן מצב ניקוי ."...
- Page 35 WINBOT 8 3. הפעלת 9.3 הפסקה . משלים מחזור ניקוי, הוא חוזר למקום שבו התחיל ומשמיע צפצוףWINBOT 8-כש כיבוי WINBOT 8 הסרת ."O" הסט את מתג ההפעלה למצב . לחץ לחיצה ממושכת עלWINBOT 8 אחוז בידית של במשך 5 שניות. המאוורר יפסיק לפעול. הסר את ..
- Page 36 4. תחזוקה ., כבה אותו ונתק אותו מהשקעWINBOT 8-לפני ביצוע ניקוי ותחזוקה ב 1.4 רפידת ניקוי . והסר את רפידת הניקויWINBOT 8 הפוך את טבול את רפידת הניקוי במים קרים ונקיים במשך שתי דקות. כבס ביד עם חומר ניקוי עדין ופרוש לייבוש.
- Page 37 4. תחזוקה מגבים חיישנים לזיהוי שוליים ונגב את שני המגביםWINBOT 8 הפוך את ונגב את ארבעת החיישניםWINBOT 8 הפוך את .במטלית המצורפת כדי לשמור על יעילותם לזיהוי קצוות במטלית המצורפת כדי לשמור על .יעילותם 3.4 גלגלי נסיעה -בדוק את גלגלי הנסיעה באמצעות הלחצנים ו ...
- Page 38 5. נורית חיווי לסטטוס וצלילים מצב חיוו לא ינקה עדWINBOT .סוללת הגיבוי כמעט ריקה והיא נטענת נורית החיווי לסטטוס .שסוללת הגיבוי טעונה כהלכה מהבהבת בירוק נורית החיווי לסטטוס מהבהבת . נדלק ומוכן להנחה על משטח הזכוכיתWINBOT 8 בכחול נורית החיווי לסטטוס דולקת ....
- Page 39 6. פתרון בעיות פתרונות סיבות אפשריות תקלה 'מס על ידי לחיצה על לחצןWINBOT 8 השהה את WINBOT- מנקה. כשWINBOT 8 ההפעלה/השהיה ברובוט או בשלט-רחוק. ניתן 8 מנקה, ניתן להשתמש רק בלחצן יהיה להשתמש בלחצנים האחרים בשלט-רחוק .הפעלה/השהיה בשלט-רחוק . מושההWINBOT 8 רק כשפעולת השלט-רחוק...
- Page 40 6. פתרון בעיות פתרונות סיבות אפשריות תקלה 'מס למתאם החשמלWINBOT 8 א. חבר את ולשקע בקיר. חץ על לחצן ההתחלה/השהיה WINBOT 8 . או בשלט-רחוקWINBOT 8-ב .ימשיך בניקוי הפסקת חשמל, ניתוק של התקע או ב. במקרה של הפסקת חשמל ואם הפתרון חיבור...
- Page 41 6. פתרון בעיות פתרונות סיבות אפשריות תקלה 'מס . בשלט-רחוקRESET א. לחץ על לחצן לא מתאפס, יש להעבירוWINBOT 8 ב. אם WINBOT 8 למצב מעקף ידני. לחץ לחיצה ממושכת על לחצן תקוע בפינת בשלט-רחוק עד שנורית החיוויRESET החלון ולא ,לסטטוס...
- Page 42 W850-012-IM2014R00...
Need help?
Do you have a question about the WINBOT W850 and is the answer not in the manual?
Questions and answers