Table of Contents
Advertisement
Advertisement
Table of Contents

Related Manuals for TP-Link AD7200


Summary of Contents for TP-Link AD7200
-
Page 1: User Guide
AD7200 User Guide AD7200 Multi-Band Wi-Fi Router REV1.0.0 1910011594... -
Page 2: Table Of Contents
Contents About This Guide ....................1 Chapter 1. Get to Know About Your Router ......2 1. 1. Product Overview . - Page 3 6. 3. 1. Access the USB Disk ..........41 6.
- Page 4 Chapter 13. Manage the Router ........89 13.
-
Page 5: About This Guide
In addition to this guide, a Quick Installation Guide is also released with each TP-LINK router, you are suggested to configure your router for quick Internet setup by following the published Quick Installation Guide before you get started with a further configuration. -
Page 6: Chapter 1. Get To Know About Your Router
Chapter Get to Know About Your Router This chapter introduces what the router can do and shows its main features and appearance. This chapter contains the following sections: • Product Overview • Main Features • Panel Layout • Position Your router... -
Page 7: Product Overview
TP-LINK’s AD7200 comes with the latest generation Wi-Fi standard – 802.11ad, backward compatible with 802.11n and 802.11ac. With the fastest combined Wi-Fi speed of up to 7200Mbps, the AD7200 lets you simultaneously game online and stream video in 4K ultra HD across multiple devices without lag. -
Page 8: Main Features
With URL blocking, you can easily set up a black or white list to limit the level of web access. Tether APP TP-LINK Tether provides the easiest way to access and manage your router with your devices. 1. 2. -
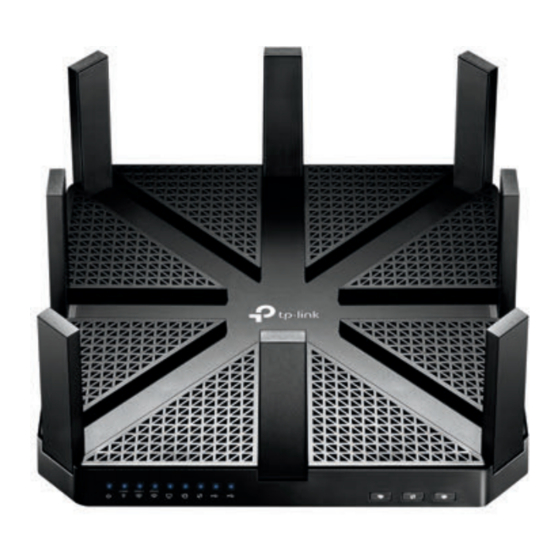
Page 9: Panel Layout
Chapter 1 • Supports Dynamic DNS, UPnP and Static Routing • Provides Automatic-connection and Scheduled Connection on certain time to the Internet • Supports system log and Traffic Statistics • Supports IPv6 1. 3. Panel Layout 1. 3. 1. Top View The router’s LEDs (view from left to right) are located on the front. -
Page 10: Led Explanation
Chapter 1 LED Explanation Name Status Indication The 5GHz wireless band is working properly. ( 5GHz Wireless) The 5GHz wireless band is disabled. The 60GHz wireless band is working properly. ( 60GHz Wireless) The 60GHz wireless band is disabled. At least one Ethernet port is connected. (Ethernet) No Ethernet port is connected. -
Page 11: The Back Panel
Chapter 1 1. 3. 2. The Back Panel The following parts (view from left to right) are located on the rear panel. Item Description When you need to reset the router, press and hold the Reset button for Reset Button about 10 seconds until all LEDs go on, then release the button. - Page 12 Chapter 1 Note: The diameter of the screw, 3.5mm<D<6mm, and the distance of two screws is 149.6mm. The screw that project from the wall need around 4mm based, and the length of the screw need to be at least 30mm to withstand the weight of the product.
-
Page 13: Chapter 2. Connect The Hardware
Chapter Connect the Hardware This chapter contains the following sections: • Position Your Router • Connect Your Router... -
Page 14: Position Your Router
Chapter 2 2. 1. Position Your Router • The Product should not be located where it will be exposed to moisture or excessive heat. • Place the router in a location where it can be connected to the various devices as well as to a power source. - Page 15 Chapter 2 2 ) Turn off the modem, and remove the backup battery if it has one. 3 ) Connect the modem to the Internet port on your router with an Ethernet cable. 4 ) Turn on the modem, and then wait about 2 minutes for it to restart. 5 ) Turn on the router.
- Page 16 Chapter 2 Close...
-
Page 17: Chapter 3. Log Into Your Router
Chapter Log into Your Router... - Page 18 Chapter 3 With a Web-based utility, it is easy to configure and manage the rouer. The Web-based utility can be used on any Windows, Macintosh or UNIX OS with a Web browser, such as Microsoft Internet Explorer, Mozilla Firefox or Apple Safari. Follow the steps below to log into your router.
-
Page 19: Chapter 4. Set Up Internet Connection
Chapter Set Up Internet Connection This chapter intr oduces how to connect your router to the Internet. The router is equipped with a w eb-based Quick Setup wizard. It has many ISP information built in, automates many of the steps and verifies that those steps have been successfully completed. -
Page 20: Quick Setup
Chapter 4 4. 1. Quick Setup The Quick Setup Wizard will guide you through the process to set up your router to access the Internet. Tips: If you need the IPv6 Internet connection, please refer to the section of “4. 3. Setting Up an IPv6 Internet Connection”. - Page 21 Chapter 4 6. Follow the instructions on the page to decide whether to clone MAC Address. Click Next. 7. Configure your wireless settings and click Next.
- Page 22 Chapter 4 Note: 1. You may customize your 2.4GHz/5GHz/60GHz SSID and password. Once done, the wireless connection will disconnect automatically, and you must then use the new SSID/password to regain access to the Internet. 2. Tick Hide SSID if you want to hide this wireless network name. 8.
-
Page 23: Manually Configure Your Internet Connection Settings
Chapter 4 Tips: You can connect your computer to the router’s Etherent port using an Ethernet cable to join the local area network. You can also find and select the wireless network name on your Wi-Fi device to join the Wi-Fi network. 4. - Page 24 Chapter 4 2 ) If you choose Static IP, enter the information provided by your ISP in the corresponding fields. 3 ) If you choose PPPoE, enter the username password provided by your ISP. PPPoE users usually have DSL cable. 4 ) If you choose L2TP, enter the username password...
- Page 25 Chapter 4 5 ) If you choose PPTP, enter the username, password and choose the Secondary Connection provided by your ISP. Different parameters are needed according to the Secondary Connection. 5. Click Save to make the settings take effect. To check your Internet connection, click Network Map on the left of the page.
-
Page 26: Setting Up An Ipv6 Internet Connection
Chapter 4 Tips: 1. If you use Dynamic IP PPPoE and you are provided any other parameters that are not required on the page, please go to Advanced > Network > Internet to complete the configuration. 2. If you still cannot connect to the Internet, refer to for further instructions. - Page 27 Chapter 4 3. Select the Internet connection type provided by ISP. Tips: If you do not know what your Internet connection type is, contact your ISP or judge according to already known information provided by your ISP. 4. Fill in information as required by different connection type. (Red blanks must be filled.) Static IP: Fill in blanks and click Save.
- Page 28 Chapter 4 PPPoE: Fill in the Username and Password. Click Advanced to have more configuration if ISP requires. Click Save to save the settings and then click Connect to finish the configuration. 6to4 Tunnel: An IPv4 Internet connection type is a prerequisite for this connection type.
- Page 29 Chapter 4 Pass-Through (Bridge): Click Save and skip to step 6. 5. Configure LAN ports. Windows users are recommended to choose from the first two types. Fill in Address Prefix provided by ISP, and click Save to save the settings. Tips: Find Help...
- Page 30 Chapter 4 Tips: Visit if there is no Internet connection.
-
Page 31: Chapter 5. Guest Network
Chapter Guest Network This function allows you to provide Wi-Fi access for guests without disclosing your main network. When you have guests in your house, apartment, or workplace, you can create a guest network for them. In addition, you can limit the network authorities for guests to ensure network security and privacy. -
Page 32: Create Guest Network
Chapter 5 5. 1. Create Guest Network 1. Visit http://tplinkwifi.net, and log in with the username and password you set for the router. 2. Go to Advanced > Guest Network. 3. Create a 2.4GHz or 5GHz guest network according to your needs. 1 ) Enable Wireless Network 2.4GHz Wireless Network... - Page 33 Chapter 5 • Allow guests to see each other Tick this checkbox to allow the clients in your guest network to access each other. • Allow guests to access my local network Tick this checkbox to allow the clients in your guest network to access your local network, not just Internet access.
-
Page 34: Chapter 6. Usb Application
Chapter USB Application This chapter describes how to share and access USB devices connected to the router among different clients. The router only supports USB external flash drives, hard drives, USB printers and USB 3G/4G modems. This chapter contains the following sections: •... -
Page 35: Local Storage Sharing
Customize Your Settings. ¾ Method 1: Go to Computer > Network, then click the Network Server Name (AD7200-Share by default) in the Computer section. Note: Operations in different systems are similar. Here we take Windows 7 as an example. Windows... - Page 36 Chapter 6 ¾ Method 2: Open the Windows Explorer (or go to Computer) and type the server address \\tplinkwifi.net ftp://tplinkwifi.net in the address bar, then press [Enter]. Windows computer 1 ) Select > Connect to Server 2 ) Type the server address smb://tplinkwifi.net 3 ) Click Connect.
-
Page 37: Customize Your Settings
Chapter 6 6. 1. 2. Customize Your Settings ¾ To Only Share Specific Content By default, Share All is enabled so all content on the USB disk is shared. If you want to only share specific folders, follow the steps below: 1. - Page 38 Chapter 6 • Enable Media Sharing: If you tick this check box, you can view photos, play music and watch movies in the folder directly from DLNA-supported devices. Refer to Media Sharing to learn more. 6. Click OK. Tips: The router can share 32 volumes at most. You can click on the page to detach the corresponding volume you do not need to share.
- Page 39 Chapter 6 • Share All is disabled, enable Authentication for specific folders. Note: Due to Windows credential mechanism, you might be unable to access the USB disk after changing Authentication settings. Please log out from Windows and try to access again. For more details, please refer to FAQ. ¾...
-
Page 40: Remote Access Via Ftp Server
Chapter 6 3. Now you can access the USB disk by visiting \\My-Share (for Windows) or smb:// My-Share (for Mac). 6. 2. Remote Access via FTP Server You can access your USB disk outside the local area network. For example: •... - Page 41 Chapter 6 2. Enable Authentication for Data Security It is strongly recommended that you set and apply a sharing account for data security. 1 ) Visit http://tplinkwifi.net, then log in with the username and password you’ve set for the router. 2 ) Go to Advanced >...
- Page 42 Chapter 6 3. Enable the FTP (via Internet) Select the check box to enable FTP (via Internet), then click Save. 4. Access Your USB Disk via Internet Now different clients with Internet connection can access the USB disk:...
-
Page 43: Customize Your Settings
Chapter 6 1 ) Open the Windows Explorer (or go to Computer, only for Windows users) or open a web browser. 2 ) Type the server address in the address bar: Type in ftp://<WAN IP address of the router>:<port number> (such as ftp://59.40.2.243:21). -
Page 44: Media Sharing
Chapter 6 5. Click OK. Tips: The router can share 32 volumes at most. You can click on the page to detach the corresponding volume you do not need to share. 6. 3. Media Sharing The feature of Media Sharing allows you to view photos, play music and watch movies stored on the USB disk directly from DLNA-supported devices, such as your computer, pad and PS2/3/4. -
Page 45: Access The Usb Disk
Now the DLNA-supported devices (such as your computer and pad) connected to the router can detect and play the media files on the USB disks. Go to Computer > Network, then click the Media Server Name (AD7200-Share by default) in the Media Devices section. Note: Here we take Windows 7 as an example. -
Page 46: Customize Your Settings
Chapter 6 6. 3. 2. Customize Your Settings ¾ To Only Share Specific Content By default, Share All is enabled so all content on the USB disk is shared. If you want to only share specific folders, follow the steps below: 1. -
Page 47: Printer Sharing
USB LED becomes solid on. 3. Install the TP-LINK USB Printer Controller Utility TP-LINK USB Printer Controller Utility helps you access the shared printer. Download and install the utility on each computer that needs printer service. 1 ) Visit http://www.tp-link.com/app/usb/. - Page 48 Chapter 6 Windows 3 ) Click the Auto-Connect for printing tab to pull down a list, then select Set Auto- Connect Printer. Windows...
- Page 49 Chapter 6 4 ) Select the printer you share, then click Apply. Windows...
-
Page 50: Offline Download
Windows Tips: The Print Server also allows different clients to share the scan feature of MFPs (Multi-Function Printers). To scan with TP-LINK USB Printer Controller, right-click the printer and select Network Scanner. Then, a scanning window will pop up. Finish the scanning process by following the on-screen instructions. - Page 51 Chapter 6 3. Go to Advanced > USB Settings > Offline Download and toggle On to enable the Offline Download feature. 4. Select a directory path to store or cache your downloads. Note: Don’t change the directory path or unmount the USB storage device when uploading or downloading files; otherwise some fatal errors may occur.
- Page 52 Chapter 6 7. If the source is a URL for aMule, specify the aMule server IP address and port number under Advanced > aMule Server.
-
Page 53: Chapter 7. Parental Controls
Chapter Parental Controls This function allows you to block inappropriate, explicit and malicious websites, and controls access to specified websites at specified time. - Page 54 Internet. For example, I want to allow my children’s devices (e.g. a computer or a tablet) to access only www.tp-link.com Wikipedia.org from 18:00 (6PM) to 22:00 (10PM) at the weekend and not other times. How can I 1.
- Page 55 Chapter 7 5. Enter a Description for the entry. Keep the Enable This Entry checkbox selected. Click OK. 6. Select Whitelist as the restriction policy. Tips: 1. In Blacklist mode, the controlled devices cannot access any websites containing the specified keywords during the Internet Access Time period. 2.
- Page 56 Chapter 7 Done! Now you can control your children’s Internet access according to your needs.
-
Page 57: Chapter 8. Qos
Chapter This chapter introduces how to create a QoS (Quality of Service) rule to specify prioritization of traffic and minimize the impact caused when the connection is under heavy load. This chapter contains the following sections: • Prioritize Internet Traffic with QoS •... -
Page 58: Prioritize Internet Traffic With Qos
Chapter 8 8. 1. Prioritize Internet Traffic with QoS QoS (Quality of Service) is designed to ensure the efficient operation of the network when come across network overload or congestion. I want to: Specify priority levels for some devices or applications. For example, I have several devices that are connected to my wireless network. - Page 59 Chapter 8 1 ) Set a High Priority rule for the ftp server. a . Click in the High Priority section. Tips: In the QoS rule field, displays three rule type include Device, By Application By Physical Port. b . Select By Application and then select in the list.
- Page 60 Chapter 8 • Name: Enter a name for your applicaiton. • Protocol: Select the protocol for your application, if your are not sure, select ALL. • Port: Enter the destination port for your application, usually each application has a fixed port, please ensure you enter the correct the port. In this case, the destination port for ftp is 21.
-
Page 61: Update The Database
Chapter 8 3 ) Set a Low Priority rule for the WIFI-GUEST. a . Select By Physical Port and then select WIFI-HOST. Click 4 ) The QoS rules list will display in the table. Tips: If you want to delete a QoS rule, click to remove the responding rule from the list. - Page 62 New database versions are posted at www.tp-link.com can be downloaded for free. 1. Download the latest QoS database from our website (www.tp-link.com). 2. Visit http://tplinkwifi.net, and log in with the username and password you set for the router.
-
Page 63: Chapter 9. Network Security
Chapter Network Security This chapter guides you on how to protect your home network from cyber attacks and unauthorized users by implementing these three network security functions. You can protect your home network against DoS (Denial of Service) attacks from flooding your network with server requests using DoS Protection, block or allow specific client devices to access your network using Access Control, or you can prevent ARP spoofing and ARP attacks using IP &... -
Page 64: Protect The Network From Cyber Attacks
Chapter 9 9. 1. Protect the Network from Cyber Attacks The SPI (Stateful Packet Inspection) Firewall and DoS (Denial of Service) Protection protect the router from cyber attacks. The SPI Firewall can prevent cyber attacks and validate the traffic that is passing through the router based on the protocol. -
Page 65: Access Control
Chapter 9 5. If you want to ignore the ping packets from WAN/LAN port, select Ignore Ping Packet From WAN/LAN Port 6. Click Save to make the settings effective. 9. 2. Access Control Access Control is used to block or allow specific client devices to access your network (via wired or wireless) based on a list of blocked devices (Blacklist) or a list of allowed devices (Whitelist). - Page 66 Chapter 9 3 ) Click Block above the Devices Online table. The selected devices will be added to Devices in Blacklist automatically. To allow specific device(s) 1 ) Select Whitelist and click Save. 2 ) Click in the Devices in Whitelist section.
-
Page 67: Ip & Mac Binding
Chapter 9 9. 3. IP & MAC Binding IP & MAC Binding, namely, ARP (Address Resolution Protocol) Binding, is used to bind network device’s IP address to its MAC address. This will prevent ARP Spoofing and other ARP attacks by denying network access to an device with matching IP address in the Binding list, but unrecognized MAC address. -
Page 68: Chapter 10. Nat Forwarding
Internet to initiatively communicate with the devices in the local network, thus to realize some special functions. TP-LINK router includes four forwarding rules. If two or more rules are set, the priority of implementation from high to low is Virtual Servers, Port Triggering, UPnP and DMZ. -
Page 69: Share Local Resources On The Internet By Virtual Servers
Chapter 10 10. 1. Share Local Resources on the Internet by Virtual Servers When you build up a server in the local network and want to share it on the Internet, Virtual Servers can realize the service and provide it to the Internet users. At the same time Virtual Servers can keep the local network safe as other services are still invisible from the Internet. -
Page 70: Open Ports Dynamically By Port Triggering
Chapter 10 Tips: 1. It is recommended to keep the default settings of Internal Port Protocol if you are not clear about which port and protocol to use. 2. If the service you want to use is not in the Service Type, you can enter the corresponding parameters manually. -
Page 71: Make Applications Free From Port Restriction By Dmz
Chapter 10 1. Visit http://tplinkwifi.net, and log in with the username and password you set for the router. 2. Go to Advanced > NAT Forwarding > Port Triggering and click Add. 3. Click View Existing Applications, and select the desired application. The External Port, Internal Port Protocol... -
Page 72: Make Xbox Online Games Run Smoothly By Upnp
Chapter 10 Note: When DMZ is enabled, the DMZ host is totally exposed to the Internet, which may bring some potential safety hazard. If DMZ is not in use, please disable it in time. I want to: Make the home PC join the Internet online game without port restriction. - Page 73 Chapter 10 Tips: 1. UPnP is enabled by default in this router. 2. Only the application supporting UPnP protocol can use this feature. 3. UPnP feature needs the support of operating system (e.g. Windows Vista/ Windows 7/ Windows 8, etc. Some of operating system need to install the UPnP components).
-
Page 74: Chapter 11. Vpn Server
Chapter VPN Server The VPN (Virtual Private Networking) Server allows you to access your home network in a secured way through Internet when you are out of home. The router offers two ways to setup VPN connection: OpenVPN and PPTP (Point to Point Tunneling Protocol) VPN. OpenVPN is somewhat complex but with greater security and more stable. -
Page 75: Use Openvpn To Access Your Home Network
Chapter 11 11. 1. Use OpenVPN to Access Your Home Network In the OpenVPN connection, the home network can act as a server, and the remote client can access the server through the router which acts as an OpenVPN Server gateway. -
Page 76: Use Pptp Vpn To Access Your Home Network
Chapter 11 7. Click Save. 8. Click Generate to generate a new certificate. Note: If you have already generated one, please skip this step, or click Generate to update the certificate. 9. Click Export to save the OpenVPN configuration file. Remote client will use this configuration file to access your router. - Page 77 Chapter 11 Note: Before you enable VPN Server, we recommend you configure Dynamic DNS Service (recommended) or assign a static IP address for router’s WAN port and synchronize your System Time with Internet. 3. In the Client IP Address filed, enter the range of IP addresses (up to 10 clients) that can be leased to the client by the PPTP VPN server.
- Page 78 Chapter 11 2 ) Enter the Username Password to authenticate clients to the PPTP VPN Server. 3 ) Click OK. Step 2. Configure PPTP VPN Connection on Your Remote Client Remote client can use Windows built-in PPTP software or third-party PPTP software to connect to PPTP Server.
- Page 79 Chapter 11 3. Select Connect to a workplace and click Next. 4. Select Use my Internet connection (VPN).
- Page 80 Chapter 11 5. Enter the WAN IP address of the router (for example: 218.18.1.73) in the Internet address field. Click Next. 6. Enter the User name and Password, it’s the username and password you have set on your router, and click Connect.
- Page 81 Chapter 11 7. The PPTP VPN connection is created and ready to use.
-
Page 82: Chapter 12. Customize Your Network Settings
Chapter Customize Your Network Settings This chapter guides you on how to configure advanced networking features that are available for this router. This chapter contains the following sections: • Change the LAN Settings • Configure to Support IPTV Service Specify DHCP Server Settings •... -
Page 83: Change The Lan Settings
Chapter 12 12. 1. Change the LAN Settings The router is preset with a default LAN IP 192.168.0.1, which you can use to log in to its web-based management page. The LAN IP address together with the Subnet Mask also defines the subnet that the connected devices are on. - Page 84 Chapter 12 2 ) Click Save. 3 ) After configuring IGMP proxy, IPTV can work behind your router now. You can connect your set-top box to any of the router’s Ethernet port. If IGMP is not the technology your ISP applies to provide IPTV service: 1 ) Tick the Enable IPTV...
-
Page 85: Specify Dhcp Server Settings
Chapter 12 12. 3. Specify DHCP Server Settings By default, the DHCP (Dynamic Host Configuration Protocol) Server is enabled and the router acts as a DHCP server; it dynamically assigns TCP/IP parameters to client devices from the IP Address Pool. You can change the settings of the DHCP Server if necessary, and you can reserve LAN IP addresses for specified client devices. -
Page 86: Set Up A Dynamic Dns Service Account
Chapter 12 2. Click View Exsiting Devices or enter the MAC address of the client device. 3. Enter the IP address to set to the client device. 4. Enter the Description for the rule. 5. Tick the Enable This Entry checkbox and click OK. -
Page 87: Create Static Routes
Chapter 12 4. Enter the username, password and domain name of the account (such as lisadns. ddns.net). 5. Click Login and Save. Tips: If you want to use a new DDNS account, please Logout first, then login with the new account. 12. - Page 88 Chapter 12 How can 1. Change the router’s LAN IP addresses to two different IP addresses on the same subnet. Disable Router 2’s DHCP I do that? function. 2. Visit http://tplinkwifi.net, and log in with the username and password you‘ve set for the router. 3.
-
Page 89: Specify Wireless Settings
Chapter 12 Interface: Determined by the port (WAN/LAN) that sends out the data packets. In the example, the data is sent to the gateway through the LAN port, so LAN should be selected. Description: Enter a description for this static routing entry. 5. - Page 90 Chapter 12 Note: If you use a wireless device to change the wireless settings, you will be disconnected when the settings are effective. Please write down the new SSID and password for future use. ¾ To hide SSID : 1. Go to Basic >...
-
Page 91: Use Wps For Wireless Connection
Chapter 12 • Channel - Select an operating channel for the wireless network. It is recommended to leave the channel to Auto, if you are not experiencing the intermittent wireless connection issue. • Transmit Power - Select either High, Middle to specify the data transmit power 2.4GHz 5GHz... - Page 92 Chapter 12 Success will appear on the above screen and the WPS LED on the router will keep on for five minutes if the client has been successfully added to the network.
-
Page 93: Chapter 13. Manage The Router
Chapter Manage the Router This chapter will show you the configuration for managing and maintaining your router. This chapter includes the following sections: • Set Up System Time • Test the Network Connectivity • Upgrade the Firmware • Backup and Restore Configuration Settings •... -
Page 94: Set Up System Time
Chapter 13 13. 1. Set Up System Time System time is the time displayed while the router is running. The system time you configure here will be used for other time-based functions like Parental Controls. You can choose the way you prefer to obtain the system time. Visit http://tplinkwifi.net, and log in with the username and password you set for the router. -
Page 95: Test The Network Connectivity
Chapter 13 2. Set the current Date MM/DD/YYYY format). 3. Set the current Time HH/MM/SS format). 4. Click Save to make the settings effective. ¾ To set up Daylight Saving Time: 1. Select Enable Daylight Saving Time. 2. Select the correct Start date and time when daylight saving time starts at your local time zone. - Page 96 Chapter 13 3. Enter the information with the help of page tips: 1 ) Choose Ping Traceroute as the diagnostic tool to test the connectivity; • Ping is used to test the connectivity between the router and the tested host, and measure the round-trip time.
-
Page 97: Upgrade The Firmware
TP-LINK aims at providing better network experience for users. We will inform you throught the web management page if there’s any update firmware available for your router. Also, the latest firmware will be released at TP-LINK official website, you can download it from the... -
Page 98: Backup And Restore Configuration Settings
Chapter 13 2. Visit http://tplinkwifi.net, and log in with the username and password you’ve set for the router. 3. Go to Advanced > System Tools > Firmware Upgrade. 4. Focus on the Device Information section. Make sure the downloaded firmware file is matched with the Hardware Version. -
Page 99: Change The Administrator Account
Chapter 13 2. Wait a few moments for the restoring and rebooting. Note: During the restoring process, do not turn off or reset the router. ¾ To reset the router to factory default settings: 1. Click Factory Restore to reset the router. 2. -
Page 100: Password Recovery
Chapter 13 3. Enter the old username and old password. Enter the new username and enter the new password twice (both case-sensitive). Click Save. 4. Use the new username and password for the following logins. 13. 6. Password Recovery This feature allows you to recover your default login username and password in case you forget them. -
Page 101: Local Management
Chapter 13 13. 7. Local Management This feature allows you to limit the number of client devices on your LAN from accessing the router by using the MAC address-based authentication. 1. Visit http://tplinkwifi.net, and log in with the username and password you’ve set for the router. -
Page 102: Remote Management
Chapter 13 6 ) Click to make the settings effective. 13. 8. Remote Management This feature allows you to control remote devices’ authority to manage the router. 1. Visit http://tplinkwifi.net, and log in with the username and password you set for the router. -
Page 103: System Log
Chapter 13 Tips: The router’s WAN IP is usually a dynamic IP. Please refer to Set Up a Dynamic DNS Service Account if you want to log in to the router through a domain name. 13. 9. System Log When the router does not work properly, you can save the system log and send it to the technical support for troubleshooting. - Page 104 Chapter 13 1. Visit http://tplinkwifi.net, and log in with the username and password you’ve set for the router. 2. Go to Advanced > System Tools > System Log. 3. Click Mail Settings. 4. Enter the information with the help of page tips: From: Enter the email address used for sending the system log.
-
Page 105: Monitor The Internet Traffic Statistics
Chapter 13 13. 10. Monitor the Internet Traffic Statistics The Traffic Statistics page displays the network traffic of the LAN, WAN and WLAN sent and received packets, allows you to monitor the volume of Internet traffic statistics. 1. Visit http://tplinkwifi.net, and log in with the username and password you set for the router. -
Page 106: Control Leds
Chapter 13 13. 11. Control LEDs The router LEDs indicate router activities and behavior. You can turn on or turn off the router from the management web-page. ¾ To turn on or off the LEDs: • Press the LED button on the router about 2 seconds to turn on or off the LEDs. -
Page 107: Faq
Q1. What can I do if I forgot my wireless password? If it is your first time to connect the wireless network, use the password labeled at the bottom of the router. If the password has been altered, please connect the router to the computer using a cable and follow the steps below: 1. - Page 108 • Make sure the IP address of your computer is configured as Obtain an IP address automatically Obtain DNS server address automatically. • Make sure you enter the correct IP address to login: http://tplinkwifi.net. • Check your computer’s settings: 1 ) Go to Start >...
- Page 109 5 ) Go to Advanced > Restore advanced settings, click to save the settings. • Use another web browser or computer to login again. • Reset the router to factory default settings and try again. If login still fails, please contact the technical support.
- Page 110 Q4. How to use the WDS Bridging function to extend my wireless network? example, my house covers a large area. The wireless network coverage of the router I’m using (the root router) is limited. I want to use an extended router to extend the wireless network of the root router.
- Page 111 4. Disable DHCP: 1 ) Go to Network > DHCP Server. 2 ) Deselect Enable DHCP Server and click Save. Now you can go to Advanced > Status > Wireless to check the WDS status. When the WDS status is Run, it means WDS bridging is successfully built. Q5.
- Page 112 • Power cycle the modem and the TP-LINK router. 1 ) Power off your modem and TP-LINK router, leave them off for 1 minute. 2 ) Power on your modem first, wait about 2 minutes until it gets a solid cable or Internet light.
- Page 113 • Modify the LAN IP address of the router. Note: Most TP-LINK routers use 192.168.0.1/192.168.1.1 as their default LAN IP address, it may conflict with the IP range of your existent ADSL modem/router. If so, the router is not able to communicate with your modem and cause you can’t access the Internet.
- Page 114 • Power cycle the modem and the TP-LINK router. 1 ) Power off your modem and TP-LINK router, leave them off for 1 minute. 2 ) Power on your modem first, wait about 2 minutes until it get a solid cable or Internet light.
- Page 115 1 ) If you see the message Windows cannot configure this wireless connection, this is usually because windows configuration utility is disabled or you are running another wireless configuration tool to connect the wireless. 2 ) Exit the wireless configuration tool (the TP-LINK Utility, for example).
- Page 116 3 ) Select and right click on My Computer on desktop, select Manage to open Computer Management window. 4 ) Expand Services and Applications > Services, find and locate Wireless Zero Configuration in the Services list on the right side. 5 ) Right click Wireless Zero Configuration, and then select Properties.
-
Page 117: Authentication Settings
2 ) If you cannot find the PIN or PIN failed, you may choose Connecting using a security key instead, and then type in the Wireless Password/Network Security Key. 3 ) If it continues to show note of Network Security Key Mismatch, it is suggested to confirm the wireless password of your wireless router. - Page 118 Q8. What can I do if I am still required to enter the password for USB access even though I have selected Remember my credentials in my Windows computer? Because of Windows special credential mechanism, if the USB access username you set is the same as the Windows account name, Windows will be unable to remember the password you set for the USB.
-
Page 119: Specifications
Specifications Hardware Four 10/100/1000Mbps LAN Ports Ethernet Ports One 10/100/1000Mbps WAN Port Two USB 3.0 Port USB Port Button WPS Button, Reset Button, Wi-Fi On/Off Button, LED On/Off Button, Power On/Off Button External Power Supply 12V/4.2A Dimensions (W x D x H) 230mm×230mm×43mm Antenna Four 2.4GHz antennas, four 5GHz antennas and one 60GHz antenna... - Page 120 Specifications are subject to change without notice. is a registered trademark of TP-LINK TECHNOLOGIES CO., LTD. Other brands and product names are trademarks or registered trademarks of their respective holders. No part of the specifications may be reproduced in any form or by any means or used to make any derivative such as translation, transformation, or adaptation without permission from TP-LINK TECHNOLOGIES CO., LTD.
- Page 121 FCC STATEMENT This equipment has been tested and found to comply with the limits for a Class B digital device, pursuant to part 15 of the FCC Rules. These limits are designed to provide reasonable protection against harmful interference in a residential installation. This equipment generates, uses and can radiate radio frequency energy and, if not installed and used in accordance with the instructions, may cause harmful interference to radio communications.
-
Page 122: Rf Exposure Information
CE Mark Warning This is a class B product. In a domestic environment, this product may cause radio interference, in which case the user may be required to take adequate measures. RF Exposure Information This device meets the EU requirements (1999/5/EC Article 3.1a) on the limitation of exposure of the general public to electromagnetic fields by way of health protection. - Page 123 2. Le gain maximal d’antenne permis pour les dispositifs avec antenne(s) amovible(s) utilisant la bande 5725-5850 MHz doit se conformer à la limitation P.I.R.E spécifiée pour l’exploitation point à point et non point à point, selon le cas. En outre, les utilisateurs devraient aussi être avisés que les utilisateurs de radars de haute puissance sont désignés utilisateurs principaux (c.-à-d., qu’ils ont la priorité) pour les bandes 5250-5350 MHz et 5650-5850 MHz et que ces radars pourraient causer du brouillage et/ou des dommages aux dispositifs LAN-EL.
-
Page 124: Safety Information
• 插槽與開口供通風使用,以確保本產品的操作可靠並防止過熱,請勿堵塞 或覆蓋開口。 • 請勿將本產品置放於靠近熱源的地方。除非有正常的通風,否則不可放在 密閉位置中。 • 請不要私自打開機殼,不要嘗試自行維修本產品,請由授權的專業人士進 行此項工作。 Продукт сертифіковано згідно с правилами системи УкрСЕПРО на відповідність вимогам нормативних документів та вимогам, що передбачені чинними законодавчими актами України. Safety Information • When product has power button, the power button is one of the way to shut off the product;... - Page 125 Explanations of the symbols on the product label Symbol Explanation DC voltage RECYCLING This product bears the selective sorting symbol for Waste electrical and electronic equipment (WEEE). This means that this product must be handled pursuant to European directive 2012/19/ EU in order to be recycled or dismantled to minimize its impact on the environment.
- Page 126 TP-LINK TECHNOLOGIES CO., LTD DECLARATION OF CONFORMITY For the following equipment: Product Description: AD7200 Multi-Band Wi-Fi Router Model No.: AD7200 Trademark: TP-LINK We declare under our own responsibility that the above products satisfy all the technical regulations applicable to the product within the scope of Council Directives:...