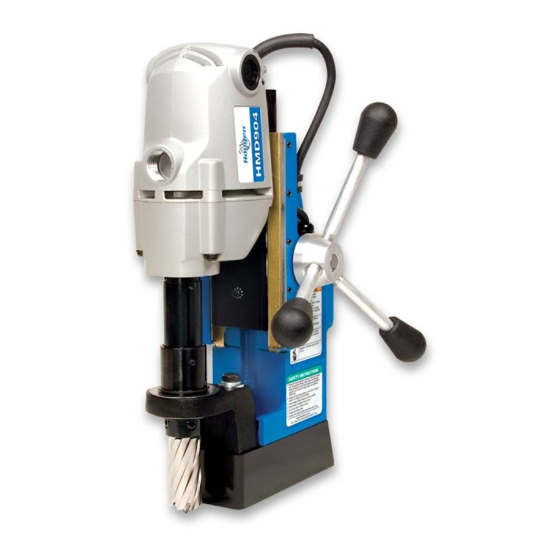
Hougen HMD904 Series Operator's Manual
Portable magnetic drill
Hide thumbs
Also See for HMD904 Series:
- Operator's manual (23 pages) ,
- Operator's manual (14 pages) ,
- Operator's manual (19 pages)
Table of Contents

Subscribe to Our Youtube Channel
Related Manuals for Hougen HMD904 Series


Summary of Contents for Hougen HMD904 Series
- Page 1 HMD904 SERIES PORTABLE MAGNETIC DRILL OPERATOR’S MANUAL COVERS DRILL PART NUMBER 0904101, 0904102 , 0904103, 0904201, 0904202 & 0904203 FOR USE WITH “12,000-SERIES” HOUGEN FOR USE WITH “12,000-SERIES” HOUGEN CUTTERS CUTTERS ® ® ®...
-
Page 2: 10506 Set Screw For Cutter Installation
No other expressed warranty is given or authorized. Hougen Manufacturing, Inc. disclaims any implied warranty of MERCHANTABILITY or FITNESS for any period beyond the expressed warranty and shall not be liable for incidental or consequential damages. -
Page 3: Table Of Contents
Complete and mail the Product Registration Card now. 8. Your Magnetic Drill was factory adjusted prior to It is important that Hougen Manufacturing, Inc. have a shipping. Check to make sure that all gib record of product ownership. -
Page 4: Safety Instructions
12. Non-Conforming Cutting Tools Keep Work Area Clean Your Mag Drill is designed to use Hougen Cutters. Cluttered areas and benches invite injuries. The use of drilling tools having different shank styles Keep dirt and chips from under the Cutter area. -
Page 5: Safety Switch Indicator Light
Keep tools sharp and clean for better and safer Changing of the circuit breaker to a higher amp rated breaker, or performance. Do not use dull or broken Hougen Cutters. bypassing the circuit breaker is not recommended and will void Follow instructions for lubricating and changing product warranty. -
Page 6: Operating Instructions
6. Make certain that cutter is clear of workpiece and turn motor ON by pressing the motor START switch. 7. Feed Hougen Cutter slowly into workpiece. Only after cutting path is established to a depth of about 1/16” can full force be applied to feed handles. -
Page 7: Installing Hougen Cutters
3. Turn Feed Handles until cutter mounting set screws are exposed and completely remove the set screws. 4. Insert proper pilot in shank end of Hougen Cutter. 5. Insert Hougen Cutter until fl at on cutter shank is aligned with set screw holes and is exactly perpendicular to axis of set screw holes. -
Page 8: Drill Maintenance
5. Remove arbor and pack the bearing in the front support bracket with grease. Use Shell Cyprina-RA or equivalent. HINTS FOR SMOOTHER OPERATION 1. Keep insides of Hougen Cutter clear of chips. Chips will interfere with cutting to maximum depth, may impede the free oil fl ow and can cause cutter breakage. -
Page 9: Swivel Base Adjustment
SWIVEL BASE ADJUSTMENTS ATTENTION The threads on the Clamp Handle Assembly are a Left Handed thread meaning, Turning Clockwise would loosen the assembly Turning Counter Clockwise would tighten the assembly. Also, the Clamp Handle Assembly is spring loaded so you will need to lift & turn the entire Clamp Handle Assembly when repositioning as if to be a ratchet device. -
Page 10: Coolant Bottle Assembly
Coolant Bottle Assembly Coolant Bottle Assembly ������ ������� ������ ������� ���� �� � ��� ����� ����� ���� ���� ��� ����� ���� �������� 05060 Coolant Bottle Assembly 05064 Round Bottle 05059 Coolant Botttle Bracket 05065 Ball Valve 05067 Brass Barb Fitting (bottem of the bottle) 40304 Vinyl Tube Brass Fitting (vinyl tube to coolant inducer) not in-... -
Page 11: 0904101 & 0904201 Assembly
Main Assembly Breakdown Standard Base Main Assembly Breakdown Standard Base 0904101 120v Mag Base Drill 0904201 230v Mag Base Drill Item Part # Description � Magnet & Switch Assembly 05378 Standard Base 120v Magnet & Switch Assembly 05392 Standard Base 230v Arbor/Front Support Assembly 05470 Housing Assembly 120v... -
Page 12: 0904102 & 0904202 Assembly
Main Assembly Breakdown Standard Base with Coolant Main Assembly Breakdown Standard Base with Coolant 0904102 120v with Coolant � 0904202 230v with Coolant Item Part # Description � Magnet & Switch Assembly 05378 Standard Base 120v Magnet & Switch Assembly 05392 Standard Base 230v Arbor/Front Support Assembly... -
Page 13: 0904103 & 0904203 Assembly
Main Assembly Breakdown Swivel Base Main Assembly Breakdown Swivel Base 0904103 120v Swivel Base 0904203 230v Swivel Base Item Part # Description Magnet & Switch Assembly 05648 � Swivel Base 120v Magnet & Switch Assembly 05894 Swivel Base 230v Arbor/Front Support Assembly 05733 Housing Assembly 04540... -
Page 14: Magnet Assembly Breakdowns
Magnet Assembly Breakdowns Magnet Assembly Breakdowns 05378 Magnet Assembly 120v 05392 Magnet Assembly 230v Item Part # Description 05377 Magnet Assembly 120v 05391 Magnet Assembly 230v 04885 Safety Switch Assembly 04910 Plunger Assembly 04909 Safety Switch Bracket 10983 Micro Switch Shield 10971 Screw SHC 1/4-20 X 1/2 10972... -
Page 15: Arbor/Front Support Breakdown
Arbor/Front Support Assembly Breakdowns Arbor/Front Support Assembly Breakdowns 05470 Arbor & Front Support Bracket Assy. non-swivel 05733 Arbor & Front Support Bracket Assy. swivel Item Part # Description 05469 Arbor & Collar Assembly (swivel & non-swivel base) 05458 Arbor Body 01441 Ejection Collar 01439... -
Page 16: Housing Assembly Breakdown
Housing Assembly Breakdown Housing Assembly Breakdown 07122 Housing Assembly (CSA) 04540 Housing Assembly Item Part # Description 07121 Housing Assembly for 07122 assy. (includes a-f) 04541 Housing Assembly for 04540 assy. (includes a-f) 07027 CSA Warning Label for 07122 assy. 04530 Warning Label for 04540 assy. -
Page 17: 120V Control Panel Breakdown
Control Panel Breakdown 120v Control Panel Breakdown 120v 05188 120v Panel Assembly Item Part # Description Qty. 01226 Switch Guard � 02547 #4-40 x 5/16 Screw 04614 Magnet Switch 04643 Red Switch Cover � 04644 Green Switch Cover 04877 Wire Harness �... -
Page 18: 230V Control Panel Breakdown
Control Panel Breakdown 230v Control Panel Breakdown 230v 05290 230v Panel Assembly Item Part # Description Qty. 05929 Faceplate 04877 Wire Harness 04664 Magnet Switch 05871 Motor ON Switch 04881 Bulb L.E.D 05424 Power Cord (230v) 05827 Circuit Board (230v) �... -
Page 19: Motor Slide Assembly Breakdowns
Motor Slide Assembly Breakdown Motor Slide Assembly Breakdown 05482 Motor & Slide Assembly 120v 07179 Motor & Slide Assembly 230v Item Part # Description 05477 Motor Assembly 120v 07181 Motor Assembly 230v � � 04527 Motor Label � 04528 Specs Label 120v 04042 Specs Label 230v �... - Page 20 Motor Slide Assembly Breakdown Motor Slide Assembly Breakdown 05667 Motor & Slide Assembly 120v Swivel Item Part # Description 05477 Motor Assembly 120v 04527 Motor Label 04528 Specs Label 02413 Motor Cord � � 11053 Screw BHS #8-32 X 3/16 �...
-
Page 21: Motor Breakdowns
MOTOR PARTS DIAGRAM 120v... - Page 22 MOTOR PARTS DIAGRAM 230v...
Need help?
Do you have a question about the HMD904 Series and is the answer not in the manual?
Questions and answers