Table of Contents
Advertisement
Table of contents
Thank you for your purchase of this Citizen watch.
Before using the watch, read this instruction manual carefully to ensure correct use.
Parts identification . . . . . . . . . . . . . . .
Notes on modes of this watch . . . . . . .
of the hands . . . . . . . . . . . . . . . . . .
Adjusting the watch . . . . . . . . . . . . . . .
Adjusting the date . . . . . . . . . . . . . . .
Adjusting the year/month . . . . . . . . .
Using the chronograph . . . . . . . . . . .
(Minutes repeater) . . . . . . . . . . . .
2
4
Using the tachymeter . . . . . . . . . . . .
Notes on charging your watch . . . . .
6
Troubleshooting . . . . . . . . . . . . . . . . .
8
Precautions . . . . . . . . . . . . . . . . . . . . .
13
Maintenance . . . . . . . . . . . . . . . . . . . .
14
Information . . . . . . . . . . . . . . . . . . . . .
16
Specifications . . . . . . . . . . . . . . . . . . .
18
20
22
24
27
30
38
39
40
1
Advertisement
Table of Contents

Subscribe to Our Youtube Channel
Related Manuals for Citizen G910


Summary of Contents for Citizen G910
-
Page 1: Table Of Contents
Table of contents Thank you for your purchase of this Citizen watch. Before using the watch, read this instruction manual carefully to ensure correct use. Parts identification .... -
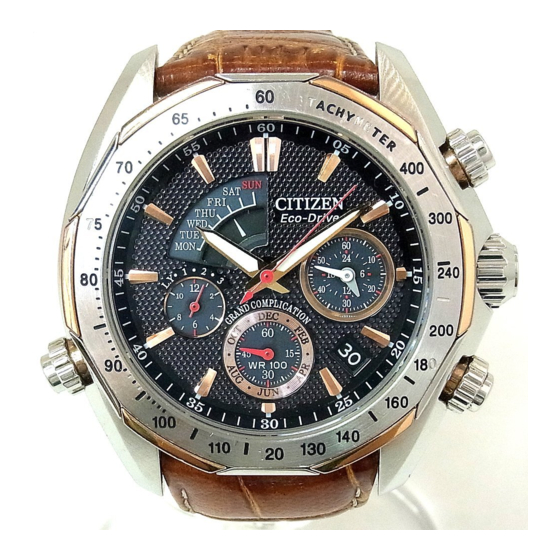
Page 2: Parts Identification
Parts identification Chronograph second Day indicator hand Minute hand Day indication Upper right button ( B ) Hour hand 24-hour hand Passed year indication Crown Year hand/ Second hand Chronograph hour hand Lower right button ( A ) Lower left button ( C ) Date indication Month hand/Chronograph Tachymeter... - Page 3 How to use the screw down crown and screw down push button Some models feature a screw down crown and screw down push button. Locking the crown and button prevents accidental operation. Unlock them when you want to operate the watch. Unlock Lock After pushing the...
-
Page 4: Notes On Modes Of This Watch
Notes on modes of this watch There are two modes for hand indications in this watch; one is for checking the calendar and the other is for using the chronograph. For checking the calendar—Normal indication mode Day indicator and indication (common) Minute hand (common) Hour hand (common) - Page 5 For using the chronograph—Chronograph indication mode Chronograph second Day indicator and indication hand (common) Minute hand (common) Hour hand (common) 24-hour hand (common) Chronograph hour hand Second hand (common) Lower left button ( C ) Pressing and holding this Date indication button for two or more (common) seconds will return the...
-
Page 6: Checking The Reference Position
Checking the reference position of the hands If the reference position is incorrect, the time and calendar are not indicated properly. See the next page to confirm the correct reference position. Ensure that the crown is in position 0 when 0 1 2 the watch is in the normal indication mode. - Page 7 Notes on the correct reference position The correct reference position for all the items is shown below. If items are not in the correct reference position, refer to page 20 for the adjustment. Chronograph second position (indicating 12:00) Year hand (indicating 12:00) Date indication (indicating 1)
-
Page 8: Adjusting The Watch
Adjusting the watch This watch consists of two built-in clocks—the main-watch and the sub-watch. Each controls the functions of the hands in a different manner. For details on the assignment of the Hands and indications Main-watch Sub-watch functions to the main-watch and the sub-watch, refer to the table to Year/Minute/Second hands √... - Page 9 For the most accurate setting, first adjust the sub-watch and then synchronize the main-watch with the time on the sub-watch. Pull the crown out to position 2 when the 0 1 2 second hand indicates 12:00. Both the main-watch and the sub-watch stop, and the current time of the sub-watch is shown.
- Page 10 Adjust the hour and minute hands by 0 1 2 pressing the lower or upper right button ( A or B ). • Each time you press the lower or upper right button ( A or B ), the minute hand moves counterclockwise or Crown position clockwise.
- Page 11 Adjust the time and the day of the main- 0 1 2 watch by rotating the crown. Day indicator Crown position Crown Minute hand Hour hand 24-hour hand Second hand • The movement of the hour hand/24-hour hand/day indicator is linked with the minute hand. •...
- Page 12 Push the crown in to position 0 to start the 0 1 2 watch. Both the main-watch and the sub-watch start simultaneously, and the second hand starts to move. Crown position • The second of the sub-watch starts from 0-seconds when the crown is pushed in to position 0.
-
Page 13: Adjusting The Date
Adjusting the date Pull the crown out to position 1. 0 1 2 The watch does not stop. Adjust the date by pressing the lower or upper right button ( A or B ). • Each time you press the lower or upper right button ( A Crown position or B ), the date goes backward or forward day by day. -
Page 14: Adjusting The Year/Month
Adjusting the year/month Pull the crown out to position 1. 0 1 2 The watch does not stop. Adjust the year and month by pressing the lower left button ( C ). • If you press and hold the button, the year and month Crown position change continuously. - Page 15 About the year hand About the month hand The year hand indicates the year as the Dec. Nov. number of years passed since leap year. Oct. Jan. Sep. Feb. 45 4 Aug. Mar. Indication Passed year Year Leap year 2012, 2016 Jul.
-
Page 16: Using The Chronograph
Using the chronograph You can record up to 12 hours in increments of 0.25 seconds. Ensure that the crown is in position 0. 0 1 2 Press and hold the lower left button ( C ) for two or more seconds to change to the chronograph indication mode. - Page 17 To record lap times The lap time is shown by pressing the lower right button ( A ) while timing. The timing goes on though the hands are paused. The indication for the current timing is shown by pressing the button again. To record the best time and the second best time The best time is shown by pressing the lower right button ( A ) while timing.
-
Page 18: Checking The Time By Sounds (Minutes Repeater)
Checking the time by sounds (Minutes repeater) The chime tells the current time by the tones and the number of times. • Minutes repeater operates from the sub-watch time. It does not distinguish from morning (a.m.) or afternoon (p.m.) time. •... -
Page 19: Minutes Repeater
About the sounds of the minutes repeater The minutes repeater, for example, tells 8:36 in the following way: Combinations of high tone High tone Low tone and low tone ♩ ♩ ♩ ♩ ♩ ♩ 1 2 3 4 5 1 2 3 4 5 6 15 minutes x 2 6 minutes... -
Page 20: Adjusting The Reference Position
Adjusting the reference position • See page 11 to check the correct position for each item. Pull the crown out to position 2. 0 1 2 All the hands and indications stop. Press and hold the lower left button ( C ) for five or more seconds. - Page 21 Adjust the current reference position of the selected item by pressing the upper or lower right button ( A or B ). • See page to check the correct position for each item. • Each time you press the lower or upper right button ( A or B ), the minute hand moves counterclockwise or clockwise.
-
Page 22: Using The Tachymeter
Using the tachymeter The tachymeter easily enables you to Upper right button ( B ) calculate the average speed by recording the time to travel one kilometer. • You can measure the approximate average speed from 60 km/h up to 400 km/h. - Page 23 To measure an average speed Read the value on the tachymeter after recording a lap time. Ensure that the crown is in position 0. Press and hold the lower left button ( C ) for two or more seconds to change to the 0 1 2 chronograph indication mode.
-
Page 24: Notes On Charging Your Watch
Notes on charging your watch This watch has a rechargeable cell which is charged by exposing the dial to light such as direct sunlight or fluorescent lamps. For optimal performance: • Expose the watch with the dial towards direct sunlight for several hours at least once a month. - Page 25 When the watch reaches a low charge state—insufficient charge warning function When the power reserve becomes low, the second hand moves once every two seconds—This is the insufficient charge warning function. Charge the watch by exposing the dial to light. •...
- Page 26 Charging time by environment Below are the approximate times needed for charging when exposing the watch dial to light continuously. Please use this table as a reference only. Charging time to start Charging time to work for Environment Illuminance (Lx) working normally when the one day rechargeable cell is empty...
-
Page 27: Troubleshooting
Troubleshooting If you have a problem with your watch, check the table below. Symptoms Remedies Page The hands do not work properly. The second hand moves Charge the watch. once every two seconds. Push the crown in to position 0. −... - Page 28 Charge the watch by exposing it to direct sunlight The watch does not for five or six hours. move even if the watch is Though the trouble is not solved after charging, contact your nearest Authorized Citizen Service charged. Center.
- Page 29 Resetting the watch The watch may not work properly if it is affected by static electricity or shock. In this case, you must reset the watch. Fully charge the watch before resetting. Pull the crown out to position 2. 0 1 2 All the hands and indications stop.
-
Page 30: Precautions
Precautions Warnings Handling the rechargeable cell • Do not remove the rechargeable cell. If it is removed, keep the rechargeable cell out of the reach of children to prevent ingestion. • If the rechargeable cell is swallowed, consult a doctor and seek medical treatment. - Page 31 Cautions About charging • Excessively high temperature when charging the watch may cause discoloration and deformation of the components, and result in malfunction of the movement. • Do not charge the watch at a high temperature (about 50˚C/122˚F or higher). Example: - charging the watch too close to light such as an incandescent lamp or halogen lamp (Halogen lights are...
- Page 32 To avoid injury • DO NOT wear the watch where the temperature becomes extremely high—such as in a sauna. The watch may become hot and burn the skin. To avoid malfunction • DO NOT use the watch where the temperature is lower or higher than the operating temperature specified in this manual.
- Page 33 • Avoid using the watch where it may be exposed to chemicals or corrosive gases. If solvents, such as thinners or benzine, or substances containing such solvents come in contact with the watch, discoloration, melting, cracking, etc. may occur. The case, band, or other parts may become discolored if the watch comes into contact with some household chemicals mercury that may be found in thermometers.
- Page 34 Warnings on water-resistance performance • Water-resistance for daily use: This type of watch is resistant to minor exposure to water such as accidental splashing. For example, you may wear the watch while washing your face; however, it is not designed to be used underwater. •...
- Page 35 Examples of use Minor exposure Moderate Marine sports to water exposure to (skin diving) (washing face, water (washing, rain, etc.) kitchen work, swimming, etc.) Indication Names Specifications (Case or back) WATER ✓ – – WATER Water resistant for RESIST(ANT) or RESIST(ANT) daily use no indication...
- Page 36 • If water has penetrated the watch, or if the inside of the glass is fogged up and does not become clear in a day, take the watch to your dealer or Citizen Service Center for repair. Leaving the watch in such a state will rust the internal parts and cause malfunction.
- Page 37 Keep your watch clean • Keep your watch clean to prevent rust or dirt building up as this may stain your clothes, damage the watch or appear as black residue on your wrist. Depending on use, occasional cleaning of the exterior of your watch may be necessary.
-
Page 38: Maintenance
Your watch needs an inspection once every two or three years for safety and longer usage. To keep your watch water-resistant, the gaskets and other components need to be replaced regularly. Other parts need to be inspected and replaced if necessary. Always ask for genuine Citizen parts upon replacement. -
Page 39: Information
Information Luminous dials and hands The paint on the dial and hands helps you with reading the time in a dark place. The luminous paint stores light (daylight or artificial light) and glows in a dark place. It is free from any radioactive substance or any other material harmful to a human body or environment. -
Page 40: Specifications
Specifications G910 Analog solar-powered watch Model Type Within ±15 seconds per month on average (when worn at normal temperatures Timekeeping between +5˚C/41˚F and +35˚C/95˚F without the time signal reception) accuracy −10˚C/14˚F to +60˚C/140˚F Operating temperature range Time: Hours, minutes, seconds, 24 hours... - Page 41 • Solar power function Additional • Overcharging prevention function functions • Insufficient charge warning function (two-second interval movement) • Chronograph (up to 12 hours by 0.25 seconds) • Minutes repeater (hour and minute) • Perpetual calendar (until February 28th, 2100) •...
Need help?
Do you have a question about the G910 and is the answer not in the manual?
Questions and answers