Table of Contents
Advertisement
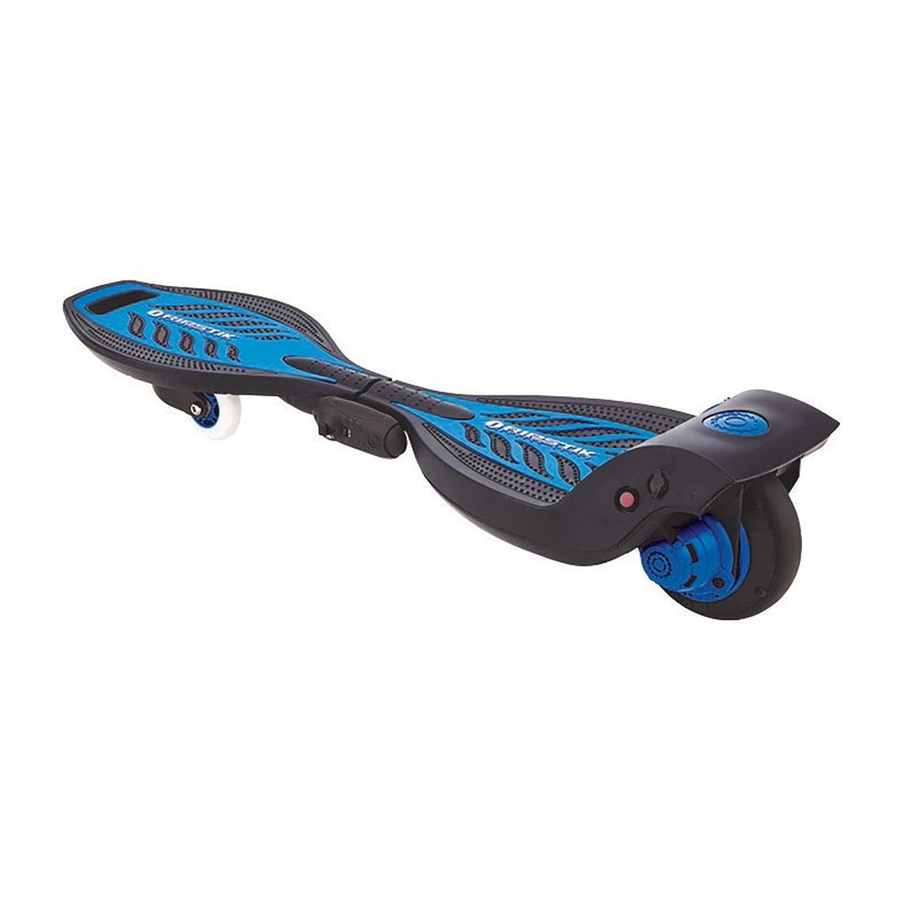
RIPSTIK
ELECTRIC
®
NOTE:
The product must be moving at least 3 mph (5 km/h) before motor will engage.
Kick start product, with lever on remote in the "Go" position to engage motor.
OWNER'S MANUAL
Read and understand this entire manual before allowing
child to use this product! For assistance contact Razor.
DO NOT RETURN TO STORE.
NOTE: Manual illustrations are for demonstration purposes only.
Illustrations may not reflect exact appearance of actual product.
Specifications subject to change without notice.
Please have your product along with the 19 character product I.D. code with you
before contacting Razor for warranty assistance and/or replacement parts.
Product I.D. Code: _____________ - ____________ - ____________
Advertisement
Table of Contents

Related Manuals for Razor RipStik Electric


Summary of Contents for Razor RipStik Electric
- Page 1 Kick start product, with lever on remote in the “Go” position to engage motor. OWNER’S MANUAL Read and understand this entire manual before allowing child to use this product! For assistance contact Razor. DO NOT RETURN TO STORE. NOTE: Manual illustrations are for demonstration purposes only.
-
Page 2: Table Of Contents
THE NEED FOR EXERCISE OF PARENTAL RESPONSIBILITY IN Do not activate the remote unless you are on the RipStik Electric and in a SELECTING RIDING PRODUCTS APPROPRIATE TO THE AGE OF A CHILD, OR safe, outdoor environment suitable for riding. -
Page 3: Safety Warnings
SAFETY WARNINGS PROPER RIDING ATTIRE Always wear proper protective equipment, such as an approved safety helmet (with chin strap securely buckled), elbow pads, kneepads and wrist guards. A helmet may be legally required by local law or regulation in your area. A long- sleeved shirt, long pants, and gloves are recommended. -
Page 4: Before You Begin
Need Help? Visit our web site for replacement parts, product support, a list of authorized service centers in the US and customer service contact information at www.razor.com. Please have the product I.D. code (located on the white label of your product) available for better assistance. Additional Customer Service... -
Page 5: Assembly And Set-Up
Remote Pairing Confirmation Note: Your remote should have been paired with your RipStik Electric at the factory. Turn the power switch on the Press power button on the If power button on product remote to the ON position. - Page 6 Need Help? Visit our web site for replacement parts, product support, a list of authorized service centers in the US and customer service contact information at www.razor.com. Please have the product I.D. code (located on the white label of your product) available for better assistance. Additional Customer Service...
-
Page 7: Charging The Battery
CHARGING THE BATTERY Your RipStik Electric may not have a fully charged battery; therefore you must charge the battery prior to use. Be sure to WARNING: Use ONLY charge the battery in a clean, dry location away from direct sunlight, flames or sparks. -
Page 8: Usage
Turn power button to the “ON” position for both the RipStik Electric and the remote. Place one foot on the front deck plate and with the other foot, push (kick start) RipStik Electric while holding the lever on the remote in the “GO” position. Place other foot on rear deck plate once motor has engaged. -
Page 9: Repair And Maintenance
REPAIR AND MAINTENANCE Before beginning repair or maintenance: • Read the instructions • Turn the power button OFF • Contact Razor Customer Service if unsure about any repair or • Disconnect charger • Exercise caution around maintenance exposed parts Caster Wheel Replacement... -
Page 10: Rear Wheel/Hub Motor Replacement
Need Help? Visit our web site for replacement parts, product support, a list of authorized service centers in the US and customer service contact information at www.razor.com. Please have the product I.D. code (located on the white label of your product) available for better assistance. Additional Customer Service... - Page 11 REPAIR AND MAINTENANCE Remote Battery Replacement Tool Required: Phillips Screwdriver Note: AAA batteries are not covered under the limited warranty. Loosen Phillips screw on Install two (2) AAA Re-attach battery cover battery cover and remove cover. replacement batteries. and securely tighten in place Remove old batteries and with screw.
- Page 12 Need Help? Visit our web site for replacement parts, product support, a list of authorized service centers in the US and customer service contact information at www.razor.com. Please have the product I.D. code (located on the white label of your product) available for better assistance. Additional Customer Service...
-
Page 13: Troubleshooting Guide
For more troubleshooting tips, a list of available replacement parts or to locate an authorized Service Center in your area, visit our web site at www.razor.com or call toll free +1 866-467-2967 to speak to a live Customer Service Representative. -
Page 14: Ripstik Electric Parts
RIPSTIK ELECTRIC PARTS Keep your RipStik Electric running for years with genuine Razor parts. Visit our web site or e-mail us for more information on spare part availability. (Specifications subject to change without notice.) 1. Traction Grips (Left/Right) 9. On/Off Button 2. - Page 15 NOTICE: INSURANCE YOUR INSURANCE POLICIES MAY NOT PROVIDE COVERAGE FOR ACCIDENTS INVOLVING THE USE OF THIS SCOOTER/ELECTRIC RIDE-ON PRODUCT. TO DETERMINE IF COVERAGE IS PROVIDED, YOU SHOULD CONTACT YOUR INSURANCE COMPANY OR AGENT.
-
Page 16: Warranty And Contact Information
- Connect the equipment into an outlet on a circuit different from that to which the receiver is connected. - Consult the dealer or an experienced radio/TV technician for help. WARNING: Changes or modifications to this product not expressly approved by Razor USA LLC, could void the user’s authority to operate the equipment. WARRANTY...
Need help?
Do you have a question about the RipStik Electric and is the answer not in the manual?
Questions and answers