Honeywell RTH8500 Operating Manual
Hide thumbs
Also See for RTH8500:
- User manual (148 pages) ,
- Installation manual (65 pages) ,
- Quick installation manual (60 pages)
Table of Contents
Advertisement
Available languages
Available languages
Advertisement
Chapters
Table of Contents

Related Manuals for Honeywell RTH8500


Summary of Contents for Honeywell RTH8500
- Page 1 Operating Manual RTH8500 Touchscreen Programmable Thermostat 69-1901ES-1...
- Page 2 For assistance with this product please visit http://yourhome.honeywell.com or call Honeywell Customer Care toll-free at 1-800-468-1502 Read and save these instructions. ® U.S. Registered Trademark. US Patent No. 6595430, D520,386 and other patents pending. Copyright © 2007 Honeywell International Inc. All rights reserved.
-
Page 3: Table Of Contents
RTH8500 Table of contents About your new thermostat Appendices Thermostat features ......2 Battery replacement ......18 Programming at a glance ..... 3 In case of difficulty ......19 Quick reference to controls ....4 Limited warranty ........21 Quick reference to status display ..5 Programming &... -
Page 4: About Your New Thermostat
Operating Manual About your new thermostat Congratulations! You’ve just purchased the world’s most advanced, easy-to-use ther- mostat. It has been designed to give you many years of reliable service and touch- screen climate control. Features • 7-day program schedules maximize comfort and economy. •... - Page 5 RTH8500 About your new thermostat This thermostat is ready to go! Your new thermostat is pre-programmed and ready to go. All you have to do is set the time and day. Then check the settings below and change if needed: 1.
-
Page 6: Quick Reference To Controls
Operating Manual Quick reference to controls Press day(s) to set program schedule (see page 11) Press to select fan Press to adjust operation (see page 7) temperature settings OK TO PICK MULTIPLE DAYS (see pages 11-14) Press to select system Inside Set To AUTO... -
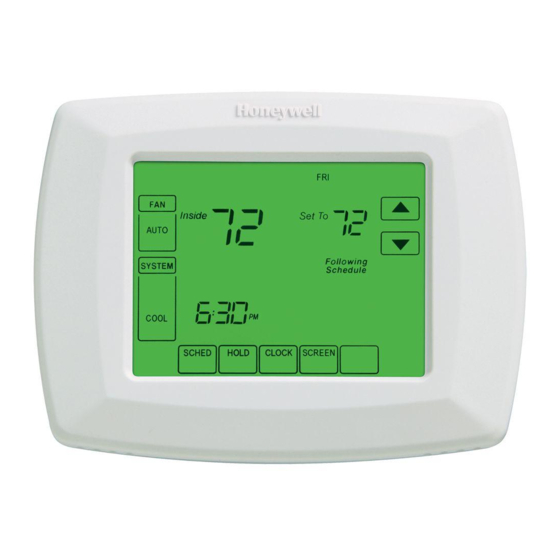
Page 7: Quick Reference To Status Display
RTH8500 Quick reference to status display Current inside temperature Current day of week Temperature setting Inside Set To Fan setting AUTO Program schedule on Following SYSTEM Schedule (does not display Recovery HEAT System setting when off) 6:01 SCHED HOLD CLOCK SCREEN... -
Page 8: Clock Setting
Operating Manual Clock setting Inside Set To AUTO To set the current time display, press CLOCK, Press CLOCK then press to adjust the time. Press and hold to advance the time more 6:01 quickly. Press DONE to save & exit (or press CANCEL to SCHED HOLD CLOCK... -
Page 9: Fan Setting
RTH8500 Fan setting Press FAN to select fan operation, then press DONE. Inside Set To • On: Fan is always on. AUTO • Auto: Fan runs only when the heating or Following SYSTEM cooling system is on. Schedule HEAT 6:01... -
Page 10: System Setting
Operating Manual System setting Press the SYSTEM button to select, then press DONE. Inside Set To • Heat: Thermostat controls only the AUTO heating system. Following SYSTEM Schedule • Cool: Thermostat controls only the HEAT cooling system. 6:01 • Auto: Thermostat automatically selects SCHED HOLD CLOCK SCREEN... -
Page 11: Save Money By Setting Program Schedules
RTH8500 Save money by setting program schedules It’s easy to program your system for maximum energy savings. You can program four time periods each day, with different settings for weekdays and weekends. WAKE Set to the time you awaken and the temperature you want 6:00 am during the morning, until you leave for the day. - Page 12 Operating Manual EnergyStar settings for maximum cost savings ® This thermostat is pre-set to use EnergyStar program settings. We recommend these ® settings, since they can reduce your heating/cooling expenses by as much as 33%. (See next page to adjust times and temperatures of each time period.) Heat (Mon-Fri) Cool...
- Page 13 Inside Set To RTH8500 AUTO To adjust program schedules Following Schedule 6:00 Inside Set To 1. Press SCHED, then EDIT. Press SCHED AUTO 2. Press day buttons (MON-SUN) to select Following SCHED HOLD CLOCK SCREEN MORE Schedule day(s). 3. Press...
-
Page 14: Program Schedule Overrides
Operating Manual Program schedule override (temporary) Adjust temperature Press to immediately adjust the tem- perature. This will temporarily override the temperature setting for the current time period. The new temperature will be maintained only Inside Set To until the time you set. When the timer expires, AUTO Heat On the program schedule will resume and set the... - Page 15 RTH8500 Program schedule override (permanent) Press HOLD to permanently adjust the Press HOLD Adjust temperature temperature. This will turn off the program schedule. Whatever temperature you set will be Inside Set To maintained 24 hours a day until you manually...
-
Page 16: Vacation Hold
Operating Manual Vacation hold This feature can suspend the program sched- 1. Set temperature ule for extended periods of time. Inside Set To Press to set the temperature you want, AUTO then press to set the time of day you SYSTEM want the schedule to resume when you return. -
Page 17: Special Features
RTH8500 Special features Smart Response Technology: This feature allows the thermostat to “learn” how ® long the furnace and air conditioner take to reach programmed temperature settings, so the temperature is reached at the time you set. For example: Set the Wake time to 6 am, and the temperature to 70°. - Page 18 Operating Manual About your new thermostat Screen cleaning SCREEN LOCKED Inside Set To AUTO Press SCREEN to lock the screen for cleaning. Press SCREEN Following Schedule The screen will remain locked for 30 seconds 6:00 so you can clean the screen without changing any settings.
-
Page 19: Furnace Filter Reminder
RTH8500 Furnace filter reminder If activated during installation, the furnace filter Press RESET after changing filter. reminder alerts you when it is time to replace CHANGE FILTER Inside your filter. Set To AUTO Press RESET after changing the filter, to restart SYSTEM the timer. -
Page 20: Battery Replacement
Operating Manual About your new thermostat Battery replacement Batteries are optional (to provide backup Grasp thermostat and pull to remove fom wallplate power) if your thermostat was wired to run on AC power when installed. Install fresh batteries immediately when the LO BATT warning begins flashing. -
Page 21: In Case Of Difficulty
RTH8500 In case of difficulty If you have difficulty with your thermostat, please try the following suggestions. Most problems can be corrected quickly and easily. Display is blank • Check circuit breaker and reset if necessary. • Make sure power switch at heating & cooling system is on. - Page 22 Operating Manual In case of difficulty Heating or • Press SYSTEM to set system to Heat. Make sure the temperature is set cooling system higher than the Inside temperature. does not respond • Press SYSTEM to set system to Cool. Make sure the temperature is set lower than the Inside temperature.
-
Page 23: Limited Warranty
This warranty does not cover removal or reinstallation costs. This warranty shall not apply if it is shown by Honeywell that the defect or malfunction was caused by damage which occurred while the product was in the possession of a consumer. - Page 24 Golden Valley, MN 55422 Toronto, Ontario M1V 4Z9 http://yourhome.honeywell.com Printed in U.S.A. on recycled paper containing at least 10% post-consumer paper fibers. ® U.S. Registered Trademark. © 2007 Honeywell International Inc. US Patent No. 6595430, D520,386; other patents pending 69-1901ES—1 Rev. M.S. 03-07...
- Page 25 Manual de Uso RTH8500 Termostato programable con pantalla activada por tacto 69-1901ES-1...
- Page 26 Visite www.dtsc.ca.gov/hazardouswaste/perchlorate. ¿Necesita ayuda? Para recibir asistencia con este producto visite http://yourhome.honeywell.com o llame gratis al Servicio de Atención al Cliente Honeywell al 1-800-468-1502 Lea y conserve estas instrucciones ® Marca registrada en EE.UU. Patente en EE.UU: Nº 6595430, D520,386 y otras patentes pendientes.
- Page 27 RTH8500 Índice de contenidos Acerca de su nuevo termostato Apéndices Funciones del termostato ......2 Instalación de las baterías ...... 18 Programación a simple vista ..... 3 En caso de dificultades ......19 Referencia rápida de los controles ... 4 Garantía limitada ........
-
Page 28: Acerca De Su Nuevo Termostato
Manual de Uso Acerca de su nuevo termostato ¡Felicitaciones! Usted acaba de comprar el termostato más avanzado y más fácil de usar en todo el mundo. Ha sido diseñado para brindarle muchos años de servicio confiable y control del clima con sólo tocar la pantalla. Funciones •... - Page 29 RTH8500 Este termostato está listo para usar! El nuevo termostato viene preprogramado y listo para usar. Todo lo que tiene que hacer es ajustar la hora y el día. Luego verifique los siguientes ajustes y cámbielos si es necesario: 1. Ajuste la hora .....................Ver página 6 2.
-
Page 30: Referencia Rápida De Los Controles
Manual de Uso Referencia rápida de los controles Oprima el día o los días para ajustar el horario de programa (ver página 11) Oprima para Oprima para ajustar la configuración de seleccionar el OK TO PICK MULTIPLE DAYS temperatura (ver páginas funcionamiento del Inside Set To... -
Page 31: Referencia Rápida De La Pantalla
RTH8500 Referencia rápida de la pantalla Temperatura interior actual Día de la semana actual Ajuste de temperatura Horario de programa activado (no aparece Inside Set To Ajustes del ventilador AUTO cuando está desactivado) Following SYSTEM Schedule Recovery Ajustes del sistema Smart Response ®... -
Page 32: Ajuste Del Reloj
Manual de Uso Ajuste del reloj Inside Set To AUTO Para ajustar la hora actual en pantalla, oprima Oprima CLOCK CLOCK, luego oprima para ajustar la hora. Mantenga oprimido para avanzar 6:01 la hora con más rapidez. Oprima DONE para guardar y salir (u oprima SCHED HOLD CLOCK... -
Page 33: Ajuste Del Ventilador
RTH8500 Ajustes del ventilador Presione FAN (ventilador) para seleccionar la función de ventilador; luego, presione DONE (listo): • On: El ventilador está siempre encendido. Inside Set To AUTO • Auto: El ventilador funciona sólo cuando el Following sistema de calefacción o de refrigeración está... -
Page 34: Ajuste Del Sistema
Manual de Uso Ajustes del sistema Presione el botón SYSTEM (sistema) para realizar la selección; luego, presione DONE (listo): • Heat: El termostato controla sólo el Inside Set To AUTO sistema de calefacción. Following • Cool: El termostato controla sólo el SYSTEM Schedule sistema de refrigeración. - Page 35 RTH8500 Ahorre dinero con el ajuste de los horarios de programas Es sencillo programar su sistema para lograr un máximo ahorro de energía. Usted puede programar cuatro períodos por día, con distintos ajustes para días de semana y fines de semana.
- Page 36 Manual de Uso Ajustes EnergyStar para un ahorro máximo de costos ® El termostato viene preajustado para usar los ajustes de programa EnergyStar ® Recomendamos estos ajustes, dado que pueden reducir sus gastos de calefacción/ refrigeración hasta un 33%. (Ver la página siguiente para ajustar las horas y temperaturas para cada período).
- Page 37 Inside Set To RTH8500 AUTO Para ajustar los horarios de programas Following Schedule Inside 6:00 Set To 1. Oprima SCHED, luego EDIT. Oprima SCHED AUTO 2. Oprima los botones de los días (MON-SUN) Following SCHED HOLD CLOCK SCREEN MORE Schedule para seleccionar los días.
- Page 38 Manual de Uso Anulación (temporaria) de horario de programas Ajuste la temperatura Oprima para ajustar inmediatamente la temperatura. Esto anulará temporariamente el ajuste de temperatura para el período actual. La nueva temperatura se mantendrá hasta Inside Set To la hora que haya fijado. Cuando se cumpla AUTO Heat On el plazo, el horario de programa reanudará...
- Page 39 RTH8500 Anulación (permanente) de horario de programas Oprima HOLD para ajustar permanentemente Oprima HOLD Ajuste la temperatura la temperatura. Esto apagará el horario de programas. Cualquier temperatura que fije se mantendrá 24 Inside Set To horas al día, hasta que la cambie manualmente,...
-
Page 40: Suspensión Por Vacaciones
Manual de Uso Suspensión por vacaciones Esta función puede suspender el horario de 1. Fije la temperatura programas por largos períodos. Inside Set To Oprima para fijar la temperatura que AUTO desea, luego oprima para fijar la hora SYSTEM del día en que desea que se reanude el horario Hold Temperature cuando usted regrese. -
Page 41: Funciones Especiales
RTH8500 Funciones especiales Cambio automático: Cuando el sistema se fija en Auto, el termostato selecciona automáticamente calefacción o refrigeración de acuerdo a la temperatura del interior. Smart Response® Technology: Permite que el termostato “aprenda” cuánto tiempo les lleva a la estufa y al acondicionador de aire alcanzar la temperatura programada, de modo que se alcance la temperatura a la hora fijada. -
Page 42: Limpieza De Pantalla
Manual de Uso Limpieza de pantalla SCREEN LOCKED Inside Set To AUTO Oprima SCREEN para bloquear la pantalla para Oprima SCREEN Following Schedule limpiarla. La pantalla permanecerá bloqueada 6:00 durante 30 segundos para que pueda limpiarla sin cambiar los ajustes. SCHED HOLD CLOCK... -
Page 43: Recordatorio De Cambio De Filtro De La Estufa
RTH8500 Recordatorio de cambio de filtro de la estufa Si está activado durante la instalación, el Oprima RESET después de cambiar el filtro. recordatorio del filtro de la estufa le alerta CHANGE FILTER Inside cuando es hora de substituir su filtro. - Page 44 Manual de Uso Reemplazo de baterías Las baterías son opcionales (para brindar Sujete el termostato y hale para separarlo de la placa de montaje alimentación de respaldo) si el cableado de su termostato se instaló para funcionar con CA. Instale baterías nuevas inmediatamente cuando comience a titilar el aviso LO BATT.
-
Page 45: En Caso De Dificultades
RTH8500 En caso de dificultades Si usted tiene dificultades con su termostato, pruebe las sugerencias que figuran a continuación. La mayoría de los problemas se pueden solucionar rápida y fácilmente. Pantalla en • Verifique el disyuntor y reinicie si es necesario. - Page 46 Mode d’emploi En cas de difficultés No responde • Oprima SYSTEM para fijar en sistema en Calefacción. Asegúrese de que el sistema de la temperatura de ajuste sea mayor que la temperatura interior. calefacción o de • Oprima SYSTEM para fijar en sistema en Refrigeración. Asegúrese de que refrigeración la temperatura de ajuste sea menor que la temperatura interior.
-
Page 47: Garantía Limitada
(i) devuélvalo, acompañado de la factura u otra prueba de compra con fecha,al lugar donde lo adquirió; o (ii) llame al numéro de atención al cliente de Honeywell al 1-800-468-1502. Atención al cliente determinará si el producto se debe devolver a la siguiente dirección: Honeywell Return Goods, Dock 4 MN10-3860, 1885 Douglas, Dr. N. Golden Valley, MN 55422 o bien, si se le puede enviar un producto de reemplazo. - Page 48 Impreso en EE.UU: en papel reciclado con un contenido mínimo de 10% de fibras de papel posconsumo. ® Marca registrada en EE.UU. Copyright © 2007 Honeywell International Inc. Patente en EE.UU: Nº 6595430, D520,386 y otras patentes pendientes. 69-1901ES—1 Rev. M.S. 03-07...