
Subscribe to Our Youtube Channel
Related Manuals for Jensen JMC-180A


Summary of Contents for Jensen JMC-180A
- Page 1 MODEL JMC-180A WALL MOUNTABLE CD SYSTEM WITH DIGITAL AM/FM STEREO RECEIVER PLEASE READ THIS USER MANUAL COMPLETELY BEFORE OPERATING THIS UNIT AND RETAIN THIS BOOKLET FOR FUTURE REFERENCE.
-
Page 2: Important Safety Instructions
WARNING TO PREVENT FIRE OR SHOCK HAZARD, DO NOT USE THIS PLUG WITH AN EXTENSION CORD, RECEPTACLE OR OTHER OUTLET UNLESS THE BLADES CAN BE FULLY INSERTED TO PREVENT BLADE EXPOSURE. TO PREVENT FIRE OR SHOCK HAZARD, DO NOT EXPOSE THIS APPLIANCE TO RAIN OR MOISTURE. The Caution Marking is located at the back enclosure of the apparatus. - Page 3 Refer all servicing to qualified service personnel. Servicing is required when the apparatus has been damaged in any way, such as power-supply cord or plug is damaged, liquid has been spilled or objects have fallen into the apparatus, the apparatus has been exposed to rain or moisture, does not operate normally, or has been dropped.
-
Page 4: Compliance With Fcc Regulations
CAUTION Follow the advice below for safe operations. ON PROTECTION AGAINST LASER ENERGY EXPOSURE As the laser beam used in this compact disc player is harmful to the eyes, do not attempt to disassemble the casing. Stop operation immediately if any liquid or solid object should fall into the cabinet. Do not touch the lens or poke at it. -
Page 5: Protect Your Furniture
The serial number of this product is found on its bottom. You should note the serial number of this unit in the space provided as a permanent record of your purchase to aid in identification in the event of theft of loss. Model Number: JMC-180A Serial Number: ____________________ PROTECT YOUR FURNITURE!! This system is equipped with non-skid rubber ‘feet’... -
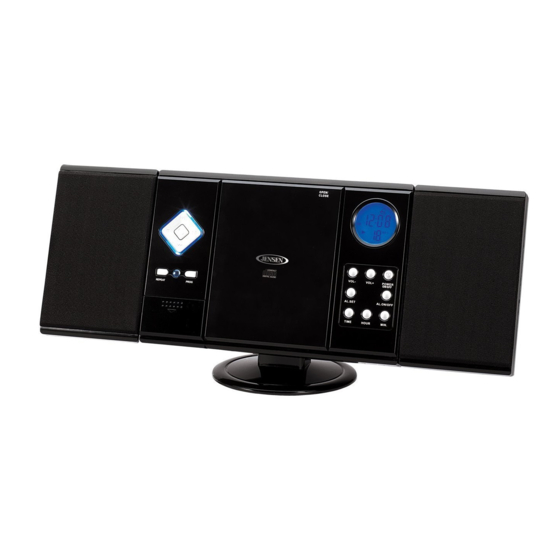
Page 6: Location Of Controls
LOCATION OF CONTROLS CD DOOR (OPEN/CLOSE) AUX IN JACK PROG. / PRESET + BUTTON LCD DISPLAY HEADPHONE JACK SPEAKERS TUNING - BUTTON DOOR HANGER HOLES TUINING + BUTTON PLAY/PAUSE / SCAN FOLD OUT SPEAKER BUTTON STANDS STANDBY BUTTON SKIP/SEARCH FORWARD FM ANTENNA BUTTON TIME ADJ BUTTON... - Page 7 REMOTE CONTROL STANDBY BUTTON MODE BUTTON PLAY/PAUSE / SCAN BUTTON MUTE BUTTON STOP / MEM. BUTTON SKIP/SEARCH FORWARD / TUNING + BUTTON VOL - BUTTON SKIP/SEARCH BACKWARD / TUNING - BUTTON REPEAT / RANDOM / PRESET - VOL + BUTTON BUTTON NUMERIC BUTTONS PROG / PRESET + BUTTON...
-
Page 8: Important Notes
IMPORTANT NOTES Avoid installing the unit in locations described below: Places exposed to direct sunlight or close to heat radiating appliances such as electric heaters. Dusty places. Places subject to constant vibration. Humid or moist places. POWER SOURCES This Music System operates on 120V~ 60Hz. Do not attempt to operate the radio on any other power source. You could cause damage to the unit and void your warranty. -
Page 9: Using The Remote Control Correctly
I MPORTANT : Be sure that the batteries are installed correctly. Wrong polarity may damage the unit and void the warranty. For best performance and longer operating time, we recommend the use of good quality alkaline type batteries. BATTERY CARE Do not mix old and new batteries. -
Page 10: Radio Operation
RADIO OPERATION The following procedures can also be accomplished by using the remote control. Check the remote control diagram for the corresponding buttons. Press the STANDBY button (#5) located at the front of the main unit to turn on the system. Press the MODE button (#17) repeatedly to select RADIO mode. -
Page 11: Cd Player Operation
CD PLAYER OPERATION NOTE: This unit not only plays commercial compact discs but also self-compiled CD-RW discs. Because of non-standardized format definition/production of CD-R/RW, playback quality & performance is not guaranteed. Manufacturer is not responsible for the playability of CD-R/RW due to recording conditions such as PC performance, writing software, media properties etc. -
Page 12: Mute Setting
Press the SKIP FORWARD or SKIP BACKWARD BUTTON to select the track to be programmed. Press the PROG button (#21) again to store the selection. The Program No. will advance to “P02” to prompt for the next input. You may repeat steps #2 to #3 to program up to 20 tracks. As soon as you have entered the 20 track , the LCD DISPLAY will show “FUL”, indicating that program is full. -
Page 13: Alarm Operation
ALARM OPERATION SETTING THE WAKE UP TIME In Standby mode, press and hold the AL. SET button (#10) until the Hour & Minute digits in the LCD display flash. Press the HOUR button (#9) and MINUTE button (#8) repeatedly to set the correct wake up time. Press the AL. -
Page 14: Sleep Function
NOTE There is a PM INDICATOR located on the left-hand side of the clock display. Be sure to observe the PM indicator when setting the alarm to make sure the alarm time is set correctly for AM or PM. If the PM indicator appears in LCD DISPLAY, the alarm will be "PM". -
Page 15: Troubleshooting Guide
TROUBLESHOOTING GUIDE If you experience difficulties in the use of this music system please check the following or call 1-800-777-5331 for Customer Service and Support. Symptom Possible Cause Solution Noise or sound - Station not tuned properly for AM or FM. - Retune the AM or FM broadcast station. - Page 16 90 DAY LIMITED WARRANTY AND SERVICE VALID IN THE U.S.A. ONLY SPECTRA MERCHANDISING INTERNATIONAL, INC. warrants this unit to be free from defective materials or factory workmanship for a period of 90 days from the date of original customer purchase and provided the product is utilized within the U.S.A.
Need help?
Do you have a question about the JMC-180A and is the answer not in the manual?
Questions and answers