Table of Contents
Advertisement
Owner's Manual & Safety Instructions
Save This Manual
operating, inspection, maintenance and cleaning procedures. Write the product's serial number in the
back of the manual near the assembly diagram (or month and year of purchase if product has no number).
Keep this manual and the receipt in a safe and dry place for future reference.
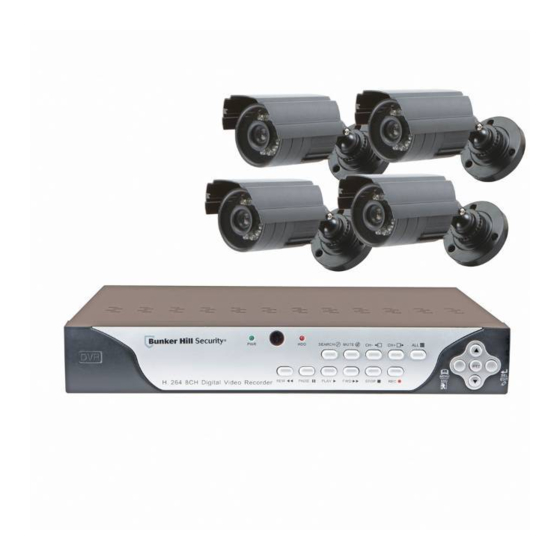
8-Channel
Surveillance DVR
When unpacking, make sure that the product is intact
and undamaged. If any parts are missing or broken,
please call 1-800-444-3353 as soon as possible.
©
Copyright
2013 by Harbor Freight Tools
No portion of this manual or any artwork contained herein may be reproduced in
any shape or form without the express written consent of Harbor Freight Tools.
Diagrams within this manual may not be drawn proportionally. Due to continuing
improvements, actual product may differ slightly from the product described herein.
Tools required for assembly and service may not be included.
Keep this manual for the safety warnings and precautions, assembly,
Visit our website at: http://www.harborfreight.com
Email our technical support at: tech@harborfreight.com
®
. All rights reserved.
Read this material before using this product.
Failure to do so can result in serious injury.
SaVE thiS manual.
ITEM 61229
Advertisement
Table of Contents

Related Manuals for Bunker Hill Security 61229


Summary of Contents for Bunker Hill Security 61229
- Page 1 Keep this manual and the receipt in a safe and dry place for future reference. 8-Channel Surveillance DVR Visit our website at: http://www.harborfreight.com ITEM 61229 Email our technical support at: tech@harborfreight.com When unpacking, make sure that the product is intact and undamaged. If any parts are missing or broken, please call 1-800-444-3353 as soon as possible.
-
Page 2: Table Of Contents
Read all safety warnings and instructions. Failure to follow the warnings and instructions may result in electric shock, fire and/or serious injury. Save all warnings and instructions for future reference. Page 2 For technical questions, please call 1-800-444-3353. Item 61229... -
Page 3: Safety
3. Do not expose the Power adapter to rain 5. Handle Camera with care. Camera could be or wet conditions. Water entering the Power damaged by improper handling or storage. Adapter will increase the risk of electric shock. Item 61229 For technical questions, please call 1-800-444-3353. Page 3... - Page 4 Figure a: Outlets for 2-Prong Plug Extension Cords note: Do not use an extension cord with the Power Adapters. Symbology Double Insulated Volts Canadian Standards Association Alternating Current Underwriters Laboratories, Inc. Amperes Page 4 For technical questions, please call 1-800-444-3353. Item 61229...
-
Page 5: Specifications
30 ft. (indoors) Ingress Protection Rating IP65 - Protected from low pressure water jets Video Connector Camera Input Rating 12VDC / 500 mA Cable Length 60 ft. Operating Temperature 14° - 122°F Item 61229 For technical questions, please call 1-800-444-3353. Page 5... -
Page 6: Set Up - Before Use
DVR Back Panel Figure C BNC Video Input RCA Audio Output RCA Audio Input VGA Port RJ45 LAN Ethernet Port USB 2.0 Port 12VDC Power Input RS485 PTZ Connector BNC Video Output Page 6 For technical questions, please call 1-800-444-3353. Item 61229... - Page 7 (to Cables) Camera Cable - 60 ft. hood lens Video (to Cable) Power (from Cable) Power Video (from Splitter) (from Camera) Power Video (to Camera) (to DVR) Figure E Item 61229 For technical questions, please call 1-800-444-3353. Page 7...
-
Page 8: Quick Start Guide Flow Charts
Physical Connections See Page 12 Connect Connect Connect Connect Mount Cameras Monitor Mouse Power Cameras Video Output BNC/RCA Video Input USB Port Power Input Note: Monitor and Surge Protector sold separately. Page 8 For technical questions, please call 1-800-444-3353. Item 61229... -
Page 9: Set Date And Time
Mode above In DVR Select Select Main Menu Motion Channel Select Alarm Select which Set Sensitivity Select Area Channels Level will record Set Buzzer for Click Apply audible alarm then OK Item 61229 For technical questions, please call 1-800-444-3353. Page 9... - Page 10 You may need to adjust the settings in Log in to DVR Internet Explorer® by adding the http with User Name and Password. address to Trusted Sites and modifying ActiveX controls to allow installation. Page 10 For technical questions, please call 1-800-444-3353. Item 61229...
- Page 11 Set Mobile Port Click Apply SMARTPHONE Select Network and Password to 3002 then OK ACCESS then Mobile Insert supplied CD into computer and look in Mobile Software folder for instructions. Item 61229 For technical questions, please call 1-800-444-3353. Page 11...
-
Page 12: Dvr Equipment Connections
INITIAL SETUP Physical Connections Connect Connect Connect Connect Mount Cameras Monitor Mouse Power Cameras Video Output BNC/RCA Video Input USB Port Power Input Note: Monitor and Surge Protector sold separately. Page 12 For technical questions, please call 1-800-444-3353. Item 61229... - Page 13 2. After initialization is complete, system will beep, then display Main Interface 4. Make sure that all cameras are operating. with live images from cameras. Item 61229 For technical questions, please call 1-800-444-3353. Page 13...
- Page 14 Adjustment Wheel. 2. Loosen Adjustment Screw, tilt Camera as needed, then tighten Adjustment Screw. note: Only loosen Adjustment Screw slightly, do not remove it. adjustment Screw Figure G Page 14 For technical questions, please call 1-800-444-3353. Item 61229...
-
Page 15: Dvr Settings
Two Pictures In Picture Record Search Go To Record Search Volume Sound Level main menu To access Main Menu, bring up Pop-up menu then click on Main Menu icon. Figure i Item 61229 For technical questions, please call 1-800-444-3353. Page 15... -
Page 16: Main Menu Map
29 Alarm Motion p. 19 p. 27 Device p. 27 General p. 17 System Users p. 20 Version p. 21 Maintain p. 24 Advanced Events p. 24 Figure J Page 16 For technical questions, please call 1-800-444-3353. Item 61229... -
Page 17: Main Settings
Ok! • Date: Set date and time for change to occur. Click Exit to return to System and discard unsaved changes. Item 61229 For technical questions, please call 1-800-444-3353. Page 17... -
Page 18: Recording Schedule
Click Exit to return to System and corresponding hours. discard unsaved changes. • top row: When selected, boxes will turn green to indicate normal continuous recording. This is the Default setting. Page 18 For technical questions, please call 1-800-444-3353. Item 61229... -
Page 19: Motion Detection
Changes will not be saved unless you click apply then Ok! 6. Buzzer: Check box to hear audible alarm when Motion Detection is triggered. Click Exit to return to System and discard unsaved changes. Item 61229 For technical questions, please call 1-800-444-3353. Page 19... -
Page 20: Users
Ok! you click apply then Ok! Click Exit to return to System and Click Exit to return to System and discard unsaved changes. discard unsaved changes. Page 20 For technical questions, please call 1-800-444-3353. Item 61229... -
Page 21: System Information
Ok! e. Close: No name will appear. Click Exit to return to System and 4. Color: Click Setup to adjust Hue, discard unsaved changes. Brightness, Contrast, and Saturation. Item 61229 For technical questions, please call 1-800-444-3353. Page 21... -
Page 22: Display Output
Ok! 2. Privacy Zone: Toggles Privacy Zones. Click Exit to return to System and 3. area Setup: Select up to 4 areas to block. discard unsaved changes. Page 22 For technical questions, please call 1-800-444-3353. Item 61229... -
Page 23: Recording Parameters
HDI - 704x240 Better 1 - 15 80 - 448 Click Exit to return to System and D1 - 704x480 Best 1- 7 80 - 448 discard unsaved changes. Figure Z Item 61229 For technical questions, please call 1-800-444-3353. Page 23... -
Page 24: Maintain Hard Drive
Ok! Figure aB Click Exit to return to System and 1. Event type: Select Event type. discard unsaved changes. 2. Enable: Check box to Enable or uncheck to Disable. Page 24 For technical questions, please call 1-800-444-3353. Item 61229... -
Page 25: Search Recordings
Play. to exit recording, click X on Playback Control 3. The Playback Control Bar will pop- Bar, then click Exit to return to Record Search. up on bottom of screen. Item 61229 For technical questions, please call 1-800-444-3353. Page 25... -
Page 26: Backup Recordings
To mark recordings for backup, click on Bak box for each selection. 1. Search Date: Set date to search. c. Click Backup and click Ok to 2. Ch: Select Channel. backup selected recordings. Page 26 For technical questions, please call 1-800-444-3353. Item 61229... -
Page 27: Format Drives
Hard Disk Drive before overwriting. discard unsaved changes. PtZ Camera Device > PtZSetings for PtZ (Pan, tilt, Zoom) camera (sold separately). Input information according to PTZ camera manufacturer instructions. Figure am Item 61229 For technical questions, please call 1-800-444-3353. Page 27... -
Page 28: Local Area Network Setup
= first 3 sets of current Default 8. The DVR can now be controlled by a Gateway (Router’s IP Address) and computer in your home network. y = new set created in 3.a. or b. Page 28 For technical questions, please call 1-800-444-3353. Item 61229... -
Page 29: Set Up Remote Video Stream
3. mobile Port: Set Port to 3002. Changes will not be saved unless you click apply then Ok! Click Exit to return to System and discard unsaved changes. Figure aR Item 61229 For technical questions, please call 1-800-444-3353. Page 29... -
Page 30: Wide Area Network Setup
Settings can be accessed DVR using User Name and Password. on the network > DDnS tab. 8. The DVR can now be controlled by a remote computer or smartphone. Page 30 For technical questions, please call 1-800-444-3353. Item 61229... -
Page 31: Software
28. note: For more instructions, refer to DvrClient • Remote computer - use DVR’s Public user manual included on the supplied CD. iP address from page 28. Item 61229 For technical questions, please call 1-800-444-3353. Page 31... -
Page 32: Video Player
Android version, installed software and settings, additional software may be required to allow installation of viewing software. 2. Go to network > mobile to view the Mobile Port settings you will need. Page 32 For technical questions, please call 1-800-444-3353. Item 61229... -
Page 33: Maintenance Instructions
• damaged cord/electrical wiring, making sure obstacles don’t interfere with visibility, such as overgrown bushes. • cracked or broken parts, and • any other condition that may affect its safe operation. Item 61229 For technical questions, please call 1-800-444-3353. Page 33... -
Page 34: Troubleshooting
Operating System. on page 32 to make sure your Operating System is supported. DvrClient software Password not Incorrect password. Contact Customer service (1-800-444-3353) working for instructions on resetting password. Page 34 For technical questions, please call 1-800-444-3353. Item 61229... -
Page 35: Parts List
If product has no serial number, record note: Some parts are listed and shown for month and year of purchase instead. illustration purposes only, and are not available individually as replacement parts. Item 61229 For technical questions, please call 1-800-444-3353. Page 35... -
Page 36: Warranty
limited 90 Day Warranty Harbor Freight Tools Co. makes every effort to assure that its products meet high quality and durability standards, and warrants to the original purchaser that this product is free from defects in materials and workmanship for the period of 90 days from the date of purchase. This warranty does not apply to damage due directly or indirectly, to misuse, abuse, negligence or accidents, repairs or alterations outside our facilities, criminal activity, improper installation, normal wear and tear, or to lack of maintenance.
Need help?
Do you have a question about the 61229 and is the answer not in the manual?
Questions and answers
Reset admin password I forgot
To reset the admin password for Bunker Hill Security model 61229:
1. Select "admin" and click "Edit".
2. Set a new User Name (up to 8 characters) if needed.
3. Enable or disable the password by selecting "Password Enable".
Note: When the password is enabled, a key icon will appear on the pop-up menu. Click it to enter the password.
This answer is automatically generated
Factory reset
To factory reset the Bunker Hill Security model 61229, follow these steps:
1. Go to the system settings.
2. Locate the "Load Default" option.
3. Click "Load Default" to restore all system default settings.
4. Click "Apply", then "OK" to save changes.
5. If needed, manually reboot the system by selecting "Reboot".
This will restore the DVR to its factory settings.
This answer is automatically generated
How do I reset password
To reset the password for the Bunker Hill Security Model 61229:
1. Go to the system settings.
2. Select "User1" and click "Edit."
3. Enable the user if not already enabled.
4. Enter a new password (must be 6 numbers).
5. Confirm the password by entering it again.
6. Click "Apply" and then "OK" to save changes.
If the existing password is unknown and cannot be changed through the menu, a factory reset or contacting support may be necessary.
This answer is automatically generated