Advertisement
Advertisement
Table of Contents

Subscribe to Our Youtube Channel
Related Manuals for Ferve F-2507


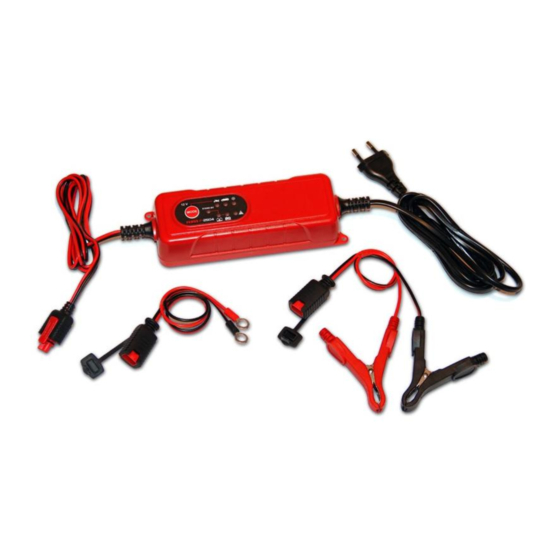
Summary of Contents for Ferve F-2507
- Page 3 BEFORE USING THE CHARGER READ THE OPERATING AND SAFETY INSTRUCTIONS FOR BATTERY CHARGERS VIA THE FOLLOWING LINK: www.ferve.com/es/publicaciones.htm...
- Page 4 CONTENTS pag.4 BATTERY CHARGING pag.9 BATTERY CHARGING pag.14 BATTERY CHARGING pag.19 BATTERY MAINTENANCE pag.22 BATTERY RECOVERY pag.26 REPLACING A BATTERY pag.29 CABLE WITH TERMINALS...
- Page 5 BATTERY CHARGING...
- Page 6 If the clamps are reversed, the LED warning light will turn on. Before continuing the charging process, switch the position of the clamps. Connect the FERVE F-2507 charger to a mains supply (D). The LED POWER turns on and the charging process begins.
- Page 7 Press the MODE button until the LED turns on. The upper four LEDs indicate the battery's charge status and they turn on progressively as the charging proceeds.
- Page 8 Charge status table. Example: If the battery charge is lower than 25%, the first LED flashes. When the 4 LEDs are on solidly, the battery is fully charged and the FERVE F-2507 can now be disconnected.
- Page 9 Unplug the charger from the mains (A), then remove the black clamp (B) and finally the red clamp (C). If you leave it plugged in, the FERVE F-2507 auto- charge will keep the battery at 100% capacity at all times.
- Page 10 BATTERY CHARGING Function for charging AGM batteries. Function for charging any kind of battery when the temperature is below 3ºC.
- Page 11 If the clamps are reversed, the LED warning light will turn on. Before continuing the charging process, switch the position of the clamps. Connect the FERVE F-2507 charger to a mains supply (D). The LED POWER turns on and the charging process begins.
- Page 12 Press the MODE button until the LED turns on. The upper four LEDs indicate the battery's charge status and they turn on progressively as the charging proceeds.
- Page 13 Charge status table. Example: If the battery charge is lower than 25%, the first LED flashes. When the 4 LEDs are on solidly, the battery is fully charged and the FERVE F-2507 can now be disconnected.
- Page 14 Unplug the charger from the mains (A), then remove the black clamp (B) and finally the red clamp (C). If you leave it plugged in, the FERVE F-2507 auto- charge will keep the battery at 100% capacity at all times.
- Page 15 BATTERY CHARGING...
- Page 16 If the clamps are reversed, the LED warning light will turn on. Before continuing the charging process, switch the position of the clamps. Connect the FERVE F-2507 charger to a mains supply (D). Press the MODE button until only the LED POWER is...
- Page 17 Press and hold the MODE button for 3 seconds until the LED turns on. The charging process starts. The upper four LEDs indicate the battery's charge status and they turn on progressively as the charging proceeds.
- Page 18 Charge status table. Example: If the battery charge is lower than 25%, the first LED flashes. When the 4 LEDs are on solidly, the battery is fully charged and the FERVE F-2507 can now be disconnected.
- Page 19 Unplug the charger from the mains (A), then remove the black clamp (B) and finally the red clamp (C). If you leave it plugged in, the FERVE F-2507 auto- charge will keep the battery at 100% capacity at all times.
- Page 20 BATTERY MAINTENANCE Function recommended for keeping the battery at 100% charge capacity at a constant voltage.
- Page 21 If the clamps are reversed, the LED warning light will turn on. Before continuing the charging process, switch the position of the clamps. Connect the FERVE F-2507 charger to a mains supply (D). The LED POWER turns on and the charging process begins.
- Page 22 Press the MODE button until the LED turns on (flashing light). If you leave it plugged in, the FERVE F-2507 auto- charge will keep the battery at a constant voltage of 13.6 V. NOTE: In the event of power failure, reselect the mode on the charger.
- Page 23 BATTERY RECOVERY Function recommended for lead-acid batteries with a very low voltage level.
- Page 24 Before continuing the charging process, switch the position of the clamps. Connect the FERVE F-2507 charger to a mains supply (D). The LED POWER turns on and the charging process begins. If the LED POWER is permanently...
- Page 25 Press the MODE button until the LED turns on (flashing light). The battery recovery process starts. The LED flashes at intervals of 1 second. If within a period of 4 hours the flashing continues at intervals of 1 second, the battery cannot be recovered and must be replaced.
- Page 26 Unplug the charger from the mains (A), then remove the black clamp (B) and finally the red clamp (C).
- Page 27 REPLACING A BATTERY Function that enables the vehicle's memories and electronic devices to be preserved when the battery is replaced.
- Page 28 (1) Connect the FERVE F-2507 charger to a mains supply without connecting the clamps. (2) The LED POWER turns on. (3 and 4) Press and hold the MODE button for 3seconds until the LEDs turn on at the same time.
- Page 29 Press the MODE button until the LED POWER turns on. The F-2507 charger stops supplying power to the battery. Unplug the charger from the mains (A), then remove the black clamp (B) and finally the red clamp (C).
- Page 30 CABLE WITH TERMINALS...
- Page 31 The FERVE F-2507 charger comes with a cable with terminals as an accessory, for a fixed connection to a battery. Connect the terminals to the battery terminals in the following order: first the red terminal to the positive terminal + (A) and then the black terminal to the negative terminal - (B).
- Page 32 sibility...
Need help?
Do you have a question about the F-2507 and is the answer not in the manual?
Questions and answers