Table of Contents
Advertisement
Advertisement
Table of Contents

Subscribe to Our Youtube Channel
Summary of Contents for Genio PRO S
- Page 2 5. Keep the power cord away from other objects. Make sure that the cord is not twisted, placed in any lane of traffic, or a trapped under the piano. 6. Place your Genio PRO S away from direct sunlight, water or moisture, or hot or cold air currents.
-
Page 3: Table Of Contents
We greatly appreciate your purchase of the Genio PRO S. The Genio PRO S allows you to enjoy your new piano any time you want without disturbing others. With the mute lever in the release position, your Genio PRO S functions as a quality upright acoustic piano with the added benefit of audio and MIDI output signals. - Page 4 23-25 A. Demo 1 B. Demo 2 (Educational Mode) Initializing of the Genio PRO S How to adjust the sensitivity of the Genio PRO S Application 28-29 A. Connecting your Genio PRO S to external Audio Equipment B. Connecting your Genio PRO S to external MIDI Equipment...
-
Page 5: Connection Diagram Of The Genio Pro S
Pedal sensor detects the pedal moving data to simulate sound effect of the real pedal working. AC Adaptor (Power supply) AC adaptor supplies required power to the Genio PRO S system. Headphones Headphones provide private sound when your performance in silent. -
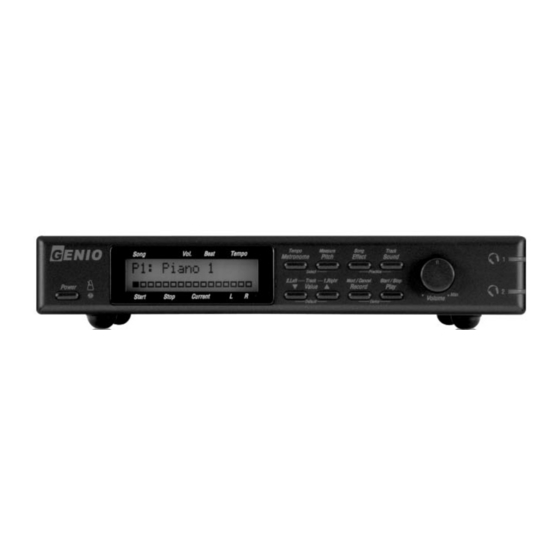
Page 6: Main Unit
Main Control Unit A. Front Panel 1. Power Press to turn the Genio PRO S on press again to turn it off 2. LED indicator Flashes according to the metronome beat with read when down beat, green when up beat. -
Page 7: Rear Panel
B. Rear Panel 1. Audio INPUT / OUTPUT : Stereo audio connections to external audio equipment. 2. MIDI INPUT / OUTPUT : MIDI connections to external MIDI equipment or computer. 3. KEYBOARD : Detected key moving data connects to the main control unit by using signal cable through this jack. -
Page 8: Operations
Mute Lever Indicator may change the color from green to red when plugs the headphones into the jack Note: After turning on the Genio PRO S, a few seconds of operation are required before the unit is ready to play. -
Page 9: How To Play The Piano With Acoustic Sounds
C. How to play the acoustic piano with the Genio PRO S In order to play the acoustic piano with the Genio PRO S together, the Genio PRO S should be connected to the amplifier system to amplify the sound of the Genio PRO S. -
Page 10: How To Try Out Various Contained Sounds On The Panel
128 sounds contained. A. Sound select When the Genio PRO S on and press the [Sound] button then the Genio PRO S would be sound mode. In this mode, user can change and choose one of the contained 32sounds the sounds by pressing either [▼] Value or [▲... - Page 11 3) While keep pressing either [▼] Value or [▲] button, then Value increase or decrease fast. P2 Piano 2 4) Press both [▼] Value or [▲ ] buttons together, then pre-set is set to the P1 : Piano 1 from any sounds.
-
Page 12: Howe To Edit User-Set
B. How to edit User-Set 1) Press either [▼] Value or [▲] button to select User-Set that will be modified parameter among 16programs. 2) Press both [Record] + [Sound] buttons together to get into edit mode. Ch1 : Current selected channel is activated for test. Brief function of each key in edit mode Button Function... -
Page 13: How To Change The Name Of User-Set
You can change the title of the User-set after modification as under instructions. C. How to change the name of User-set Piano 1 Title Char.:P 1) Press either [Effect] or [Sound] button to find title parameter 2) Character with cursor can be changed by pressing either [▼] Value or [▲] button to set new letter. 3) Press either [Metronome] or [Pitch] button to move next letter to modify. -
Page 14: Description Of The Parameter Of The User S Edit Mode
Range Description of the parameter Program Patch 000-127 The Genio PRO S contains 128GM compatible sounds which can be selected for each channel. Press either [▼] Value or [▲] button to select the sounds required to the channel. To off the channel, press [▼] Value + [▲] buttons together. - Page 15 Every notes that were pressed by keyboard will activate the sound. Reverb Type Genio PRO S has 8 types of Reverb that can be selected to each channel. Chorus Type Genio PRO S has 8 types of Chorus effect that can be selected to each channel.
-
Page 16: How To Select One Of The 128Gm Sounds
③ A. How to change the touch response of the keyboard The touch of your Genio PRO S can be changed to accommodate players with a lighter or heavier than average touch. To change form the default Medium setting, do these;... -
Page 17: Transpose
B. Transpose Transpose by the Semitone 1) Press and hold the [Sound] button 2) Strike the D#4(43) black key to transpose up as desired or C#4(41) black key to transpose down by the semitone. 3) Control range of the transpose is 24 Semitone by the semitone. Transpose by the Octave 1) Press and hold the [Sound] button Control Range... -
Page 18: Metronome
Metronome The built-in metronome has adjustable parameter for Tempo, Beat, Rhythm, and Volume. Here is how to adjust each of these. How to play along with Metronome operation In play mode, press the [Metronome] button, then display will change as show below Metronome On/Off Metr. -
Page 19: Metronome
Tempo 1) Press either [▼] Value or [▲] button to set as desired Tempo value 2) Control range of the Tempo value is from 25 to 250 by the one 3) Pressing both [▼] Value and[▲] buttons together, then tempo will set to default value 120. Beat 1) Press the [Pitch] button to change from the Tempo to Beat parameter. -
Page 20: Pitch
5) Press both [▼] Value and[▲] buttons together, the pitch value will set to default value 440Hz Effect When you play the Genio PRO S, you may want more fluent space effect like a concert hall, then you can easily change the reverb effect depth as instructed bellows. -
Page 21: Record And Play
Record and Play Your Genio PRO S has a built-in two track recorder. With it you can record your performance then later play back through the audio and MIDI output. A. Record In case, you want to record Track 1... - Page 22 B. Play 1) Press the [Play] button to get into the play mode. Play 000 X P P:Track Play Current Measure X:Track Off Left Right Track 2 (Left / Bass) Track 1 (Right / Melody) Disable Enable Enable Disable Enable Enable 2) Press either [▼] Value or [▲] button to be required play mode as shown below chart 3) Press the [Play] button to start playing your last recorded performance.
-
Page 23: Demo And Educational Accompaniment Song
Demo and Educational accompaniment song A. Demo 1 Your Genio PRO S has built-in 20Piano Sonatine demonstration songs in demo 1. 1) Press both [Record] + [Play] buttons together to get into demo mode. Display will show as below No. of Song / Beat / Temp Demo. -
Page 24: B. Demo 2 (Educational Mode
Your Genio PRO S piano has built-in 502 songs (Piano Sonatine:81 songs, Piano Adventure: 401songs) can be played to help Fun & Easy Lesson along with Piano Adventure. B. Demo 2 (Educational Mode) Beat Tempo 1L - P15 001 009 000 P+P... - Page 25 3) Press the [Play] button to start playing of the set song. Play along with set the start and stop measure Your Genio PRO S has built—in special function to play with setting start and stop measure for practice repeatedly for some phrase.
-
Page 26: Initializing Of The Genio Pro S
Use the following procedure to initialize the sensors. Before getting start 1) The keyboard cable and AC power adaptor should be plugged into the Genio PRO S control unit and the power should be OFF. 2) The mute lever should be in the Mute position. -
Page 27: How To Adjust The Sensitivity Of The Genio Pro S
1) Make sure that the Genio PRO S is off. While holding the [Record] button down, turn the Genio PRO S on. After 3 seconds, release the [Record] button. The display should be as below. -
Page 28: Application
A. Connecting your Genio PRO S to external Audio Equipment 1) Use two audio cables to connect the Left and Right Audio outputs of the Genio PRO S to inputs of your audio system. The signal is Unbalanced, line level . See the diagram below which is representative of a club or performance hall audio system. -
Page 29: B. Connecting Your Genio Pro S To External Midi Equipment
2) In order to receive MIDI data from a General MIDI keyboard, synthesizer or computer, connect a MIDI cable between the MIDI Out port of the external device and MIDI In port of the Genio PRO S. See the diagram below. -
Page 30: Trouble Shooting
Please do the initializing procedure as instructed on User s Guide (P26) Some key is louder or Please do the sensitivity of Genio PRO S even you did softer than other key. initializing procedure as instructed on User s Guide (P27) Headphones Check the headphones if there is particle inside of the ear-pad. -
Page 31: Gm Program Chart
GM Program chart... -
Page 32: Drum Chart
Drum chart... -
Page 33: Midi Implementation Chart
MIDI Implementation Chart Function Transmitted Received Remark MIDI Channels 1~16 1~16 Mode Note Number 21~108 0~127 Velocity Note On 9n,V=127 9n,V=127 Note Off 9n,V=0 8n,V=0~127 Key Aftertouch Channel Aftertouch Pitch Bend ±2 Octave Pitch Bend Sensitivity recognized Control Change 0,32 Bank Select Modulation 6,38... -
Page 35: Specification
Specifications Item Specification Model Genio PRO S Mute Mechanism Universal Mute Rail with Lever Sensing Method Continuous position reflector type Sensor photo interpreter Velocity Level 127Level Touch Response 5Types Key sensitivity Individual adjustable Pedal sensor Damper and Soft Sound 16Pre-set + 16 User-set(128GM), Sound Memory : 384Mbit...
Need help?
Do you have a question about the PRO S and is the answer not in the manual?
Questions and answers