Table of Contents
Advertisement
Advertisement
Table of Contents

Related Manuals for Spirit CIC800


Summary of Contents for Spirit CIC800
- Page 1 CIC800 INDOOR CYCLE OWNER’S MANUAL...
- Page 3 TABLE OF CONTENTS IMPORTANT SAFETY INSTRUCTIONS IMPORTANT OPERATION INSTRUCTIONS PRODUCT REGISTRATION CIC800 ASSEMBLY INSTRUCTIONS GENERAL MAINTENANCE MANUFACTURER’S LIMITED WARRANTY Thank you for purchasing our product, please save these instructions. Please do not perform or attempt any customizing, adjustments, repair or maintenance that is not described in this manual.
- Page 4 Congratulations on your new Indoor Cycle and welcome to the Spirit Fitness family! Thank you for your purchase of this quality group indoor cycle from Spirit Fitness. Your new indoor cycle was manufactured by one of the leading fitness manufacturers in the world and is backed by one of the most comprehensive warranties available.
-
Page 5: Important Safety Instructions
• Never drop or insert any object into any opening of Important Safety Instructions the bike. WARNING • Only use the bike on a stable, level floor. • Follow instructions for safe use of the equipment • Use this equipment only for its intended use as including proper seat position, handlebar position, described in this manual. -
Page 6: Important Operation Instructions
Please record the serial number of this fitness product in the space provided below. Serial Number: Register Y our Purchase The self-addressed product registration card must be completed in full and returned to Spirit Fitness. You can also go to https://www.spiritfitness.com/residentialwarrantyregistration.html under the Support tab to register online. - Page 7 CIC800 PRE ASSEMBLY UNPACKING TOOLS INCLUDED: 1. Cut the straps, then along the dotted line on the bottom of the box; lift the box over ‰ M22 Wrench the unit and unpack. ‰ Combination 6mm Allen/Screwdriver 2. Locate the hardware package. The hardware is separated into six steps. Remove the ‰...
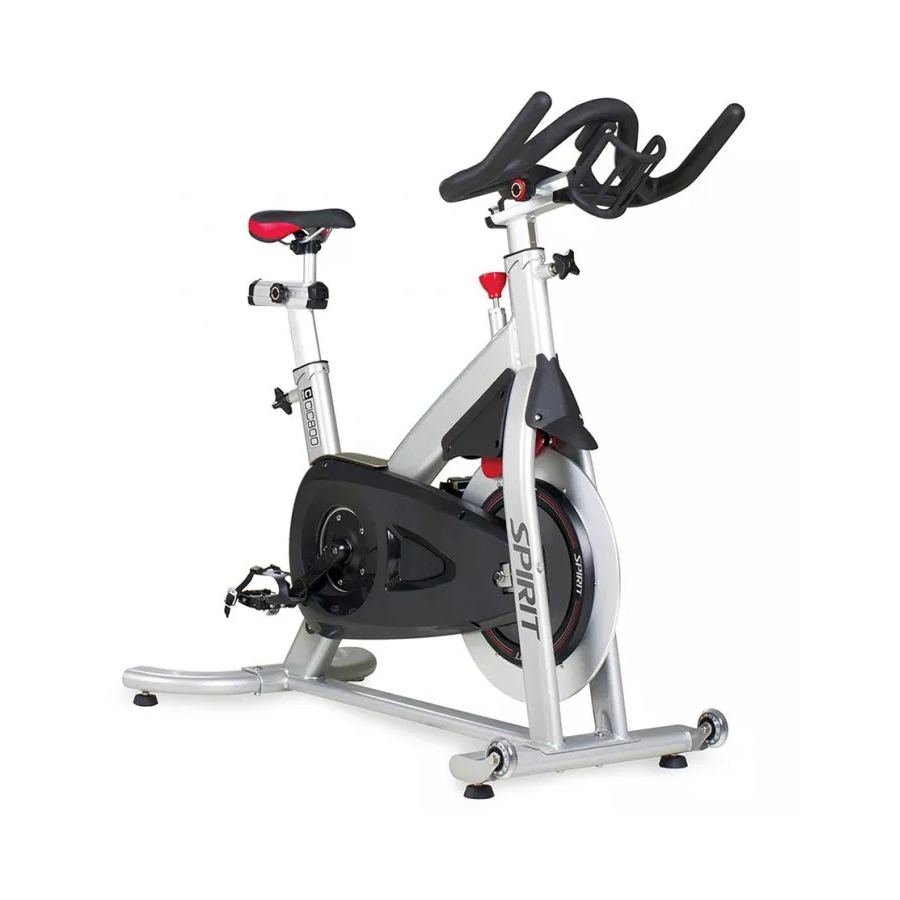
- Page 8 SEAT HANDLEBAR FORWARD/AFT ADJ. SEAT FORWARD/AFT ADJ. SEAT HEIGHT ADJ. RESISTANCE ADJUSTMENT REAR STABILIZER HANDLEBAR ADJUSTMENT PEDALS MAIN FRAME FLYWHEEL LEVELERS FRONT STABILIZER TRANSPORT WHEELS...
- Page 9 CIC800 STEP ONE HARDWARE FOR STEP 1 PART TYPE DESCRIPTION SCREW M5X1.25X55L FLAT WASHER NYLON NUT M8X1.25 1. Gather HARDWARE FOR STEP 1. 2. Position the FRONT STABILIZER (1) on the FRAME BRACKET as showed in the figure. Make sure the TRANSPORT WHEELS are facing up and toward the front of the bike.
- Page 10 CIC800 STEP TWO HARDWARE FOR STEP 2 PART TYPE DESCRIPTION HEX NUT SCREW M8X1.25X55L FLAT WASHER NYLON NUT M8X1.25 1. Gather HARDWARE FOR STEP 2. 2. Assemble the FOOT LEVELER (2-2) and HEX NUT (2-1) onto the REAR STABILIZER (2) 3.
- Page 11 CIC800 STEP THREE NO HARDWARE FOR STEP 3 1. Remove the T-POP (7) from the components box and turn clockwise to tighten firmly into the FRAME with WRENCH (A).
- Page 12 CIC800 STEP FOUR HARDWARE FOR STEP 4 PART TYPE DESCRIPTION SCREW M8X1.25X12L 1. Gather HARDWARE FOR STEP 4. 2. Assemble the UPPER HORIZONTAL ADJUST- ABLE BRACKET (9) and ADJUSTABLE HAN- DLEBAR (8) with 2 SOCKET HEX SCREWS (10) 3. Pull out the SAFETY PIN (2) and slide the HANDLEBAR onto the POST (11).
- Page 13 CIC800 STEP FIVE HARDWARE FOR STEP 5 PART TYPE DESCRIPTION SCREW M6X1.0”x15L FLAT WASHER 1. Gather HARDWARE FOR STEP 5. 2. Assemble the BOTTLE HOLDER (12) with 2 SOCKET HEX SCREWS (11) and 2 FLAT WASHER (13)
- Page 14 CIC800 STEP SIX NO HARDWARE FOR STEP 6 1. Remove pedals from the components box. 2. Look at the end of the pedal axle and notice each pedal is marked with an R and L on the spindle. It is indicated which side of bike the pedal is intend- ed to assemble.
- Page 15 The pitch of the saddle can be adjusted to accommodate all users. Loosen the horizontal bolt under the seat to adjust the pitch, then retighten. Transportation The indoor cycle is equipped with two transport wheels, which are engaged when the rear of the CIC800 indoor cycle is lifted.
-
Page 16: Seat Height Adjustment
Take some time to learn how to properly adjust the bike to your body; it will make your workouts more pleasant and a safer experience too. Riding the bike when it is incorrectly adjusted can result in discomfort and increase your risk of injury. ADJUSTMENT OF SEA T POSITION Seat Height Adjustment Standing next to the bike, adjust the seat until it is about hip height. - Page 17 HANDLE BAR ADJUSTMENT Handlebar Height Adjustment 1. The handlebar height is a matter of preference. Start with a handlebar height that is the same as the seat’s height. Adjusting the handlebar higher will give the rider a more upright position; lower will result in a more crouched position.
-
Page 18: Pedal Strap Adjustment
RESIST ANCE ADJUSTMENT Resistance can be adjusted easily at any time while riding to change the intensity of workout. Turn the knob clockwise (+) to increase resistance. Turn the knob counterclockwise (-) to decrease resistance. EMERGENCY BRAKE In case of emergency or before dismounting the indoor cycle, presses directly DOWN on the resistance knob to stop the flywheel and pedal. -
Page 19: General Maintenance
BEL T TENSION ADJUSTMENT The belt tension had been set before shipping. It should not need to be adjusted when first using. However, you may need to make the minor tension adjustment over time. NOTE: Make sure you adjust both side equally, either tighten or loosen the belt tension so that the flywheel keep in alignment with the frame Tighten the Belt tension Move the crank arms back and forth. -
Page 20: Maintenance Schedule
MAINTENANCE SCHEDULE Part Recommended Action Frequency Cleaner Pedals Ensure that pedals are tight in crank Before each Use arms, that all screws on pedals are tight, and that the pedal straps are not frayed. Frame Wipe down using a clean, soft Daily Water damp cloth... - Page 21 Indoor Cycle Warranty - Effective December 23, 2015 Spirit Fitness warrants all its Indoor Cycle parts for a period of time listed below from the date of retail sale, as determined by sale receipt, or in the absence of a sales receipt eighteen (18) months from the original factory shipping date. Spirit Fitness’ responsibilities include providing new or remanufactured parts, at Spirit Fitness’...
- Page 22 Products that have been: sold, transferred, bartered, or given to a third party. Products that do not have a warranty registration card on file at Spirit Fitness. Spirit Fitness reserves the right to request proof of purchase if no warranty record exists for the product.
- Page 24 800.258.4555 Spirit Fitness spiritservice@spiritfitness.com 3000 Nestle Road www.spiritfitness.com Jonesboro, AR 72401 CIC800 Owners Manual © 2015 All Rights Reserved Revision: 12.23..2015...
Need help?
Do you have a question about the CIC800 and is the answer not in the manual?
Questions and answers